Tetap teratur dengan koleksi
Simpan dan kategorikan konten berdasarkan preferensi Anda.
Action Anda dapat mengirimkan notifikasi kepada pengguna jika relevan, seperti mengirim pengingat saat batas waktu tugas sudah dekat.
Panduan ini menjelaskan cara menyiapkan notifikasi push untuk Action Anda.
Platform yang didukung
Notifikasi push tersedia di perangkat Android dan iOS (perangkat iOS harus menginstal aplikasi Asisten untuk menerima notifikasi push). Fitur tersebut saat ini tidak didukung di speaker, layar smart, atau platform lainnya yang diaktifkan dengan suara.
Prasyarat
Project Anda harus berisi setidaknya satu intent global yang dipanggil saat pengguna mengetuk notifikasi push yang diterima dari Asisten.
Mulai
Bagian berikut menjelaskan cara menyiapkan notifikasi push di Action Anda.
Membuat intent untuk memicu
Intent yang Anda buat di bagian ini akan memicu alur notifikasi. Untuk membuat
untuk intent ini, ikuti langkah-langkah berikut:
Klik Intent di menu kiri untuk meluaskan bagian tersebut.
Klik add_circle_outline di bagian bawah daftar dan masukkan nama untuk intent baru.
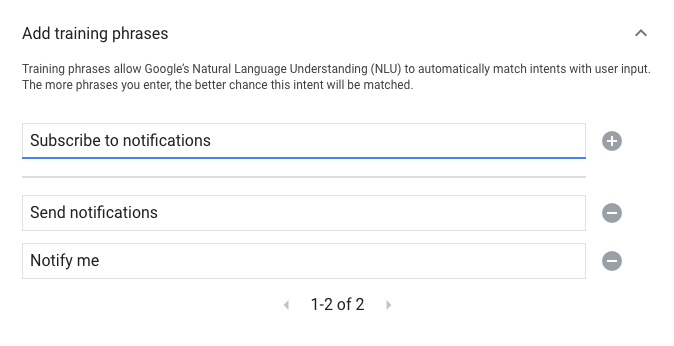
Tekan Enter/Return untuk membuat intent baru.
Tambahkan frasa pelatihan untuk memicu alur notifikasi. Contohnya antara lain:
Notify me
Send notifications
Subscribe to notifications
Klik Simpan.
Transisi ke intent sistem
Untuk menyiapkan transisi ke scene sistem Notifications, ikuti langkah-langkah berikut:
Di bagian Scenes di menu kiri, klik scene yang ingin Anda tambahi alur langganan notifikasi.
Di bagian User intent penanganan pada scene, klik + untuk menambahkan pengendali intent baru.
Di bagian Intent, pilih intent yang Anda buat di bagian sebelumnya.
Di bagian Transition, pilih scene sistem Notifications.
Klik Simpan.
Mengonfigurasi scene sistem
Untuk mengonfigurasi scene sistem Notifications, ikuti langkah-langkah berikut:
Di bagian Scenes di menu kiri, pilih scene sistem Notifications yang baru.
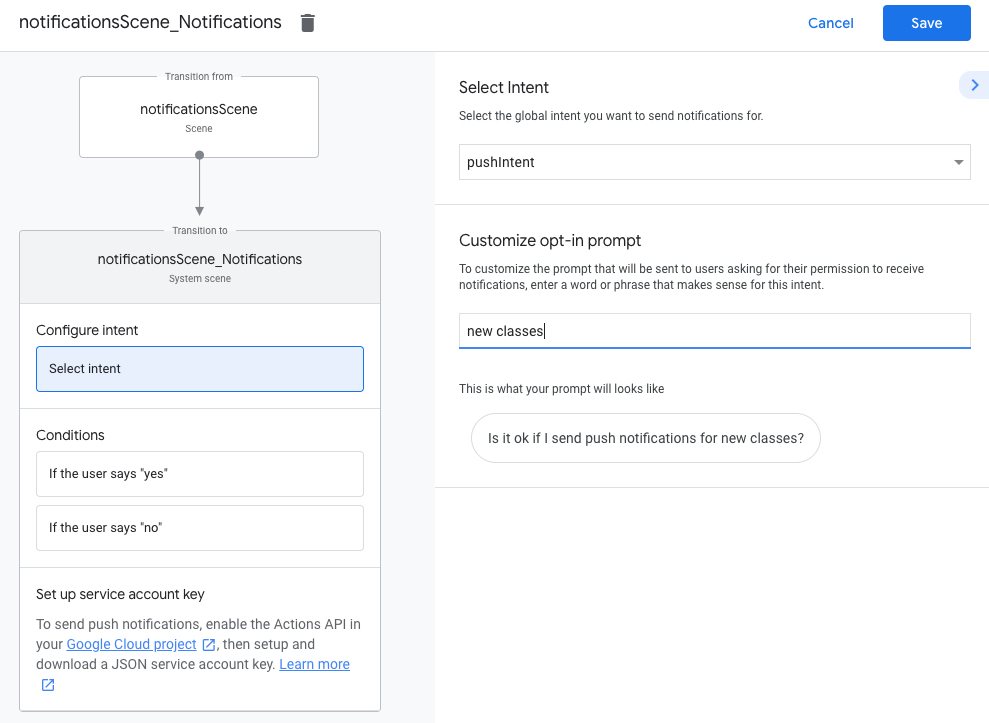
Di bagian Configure intent, klik Select intent.
Di bagian Pilih intent, pilih intent yang ingin dicocokkan saat pengguna mengetuk notifikasi push.
Untuk Sesuaikan dialog keikutsertaan, masukkan perintah yang ditampilkan kepada pengguna saat mereka diminta untuk berlangganan notifikasi push. Perintahnya berbentuk "Apakah tidak apa-apa jika saya mengirim notifikasi push untuk $prompt".
Klik Simpan.
Mengonfigurasi keikutsertaan
Untuk mengonfigurasi keikutsertaan dalam notifikasi push, ikuti langkah-langkah berikut:
Di bagian Scenes, pilih scene sistem Notifications.
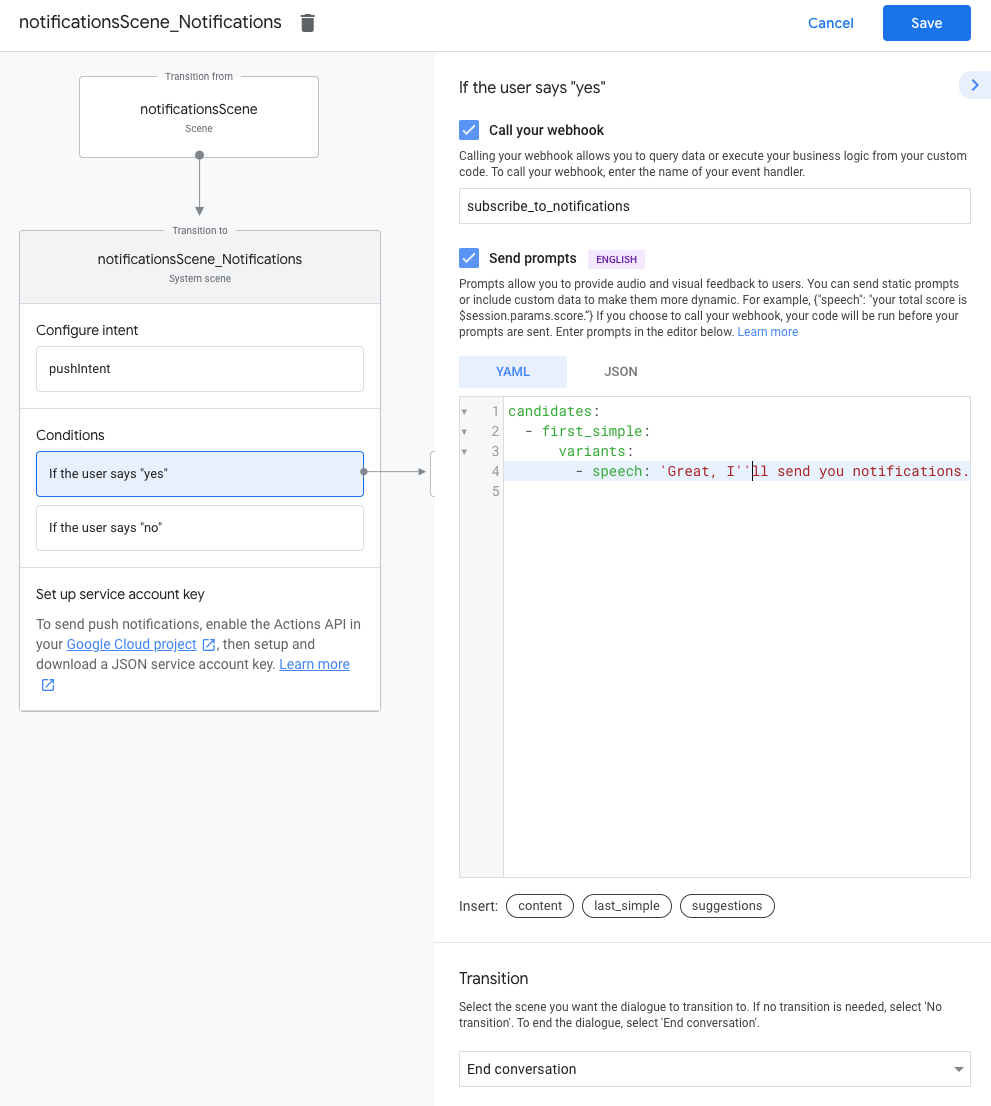
Di bagian Kondisi, pilih Jika pengguna mengatakan "ya".
Aktifkan Call your webhook dan berikan nama pengendali peristiwa, seperti subscribe_to_notifications.
Aktifkan Kirim perintah dan berikan perintah sederhana untuk memberi tahu pengguna bahwa mereka akan menerima notifikasi:
Di bagian Transisi, pilih Akhiri percakapan untuk mengakhiri percakapan setelah pengguna berlangganan notifikasi.
Mengonfigurasi ketidakikutsertaan
Untuk mengonfigurasi penonaktifan notifikasi push, ikuti langkah-langkah berikut:
Di bagian Kondisi, pilih Jika pengguna mengatakan "tidak".
Aktifkan Kirim perintah dan berikan perintah sederhana untuk memberi tahu pengguna bahwa mereka tidak akan menerima notifikasi:
candidates:-firstsimple:variants:-speech:Okay,Iwon't send you notifications.
Di bagian Transisi, pilih Akhiri percakapan untuk mengakhiri percakapan setelah pengguna memilih untuk tidak menerima notifikasi.
Konfigurasi webhook
Untuk mengonfigurasi webhook Anda, ikuti langkah-langkah berikut:
Di webhook Anda, tambahkan pengendali intent untuk menyimpan updatesUserId:
app.handle('subscribe_to_notifications',conv=>{constintentName='<name_of_intent_to_trigger>';constnotificationsSlot=conv.session.params['NotificationSlot_${intentName}'];if(notificationsSlot.permissionStatus=='PERMISSION_GRANTED'){constupdateUserId=notificationsSlot.additionalUserData.updateUserId;//StoretheuserIDandthenotification's target intent for later use.//(Useadatabase,likeFirestore,forbestpractice.)}});
Kirim notifikasi
Notifikasi push dikirim ke pengguna menggunakan Actions API. Untuk menggunakan API ini, Anda perlu mengaktifkan API di project Google Cloud Anda serta menyiapkan dan mendownload kunci akun layanan JSON.
Anda kemudian dapat menggunakan library klien Google OAuth2 untuk menukar kunci akun layanan dengan token akses, dan menggunakan token tersebut untuk mengautentikasi permintaan ke Actions API.
Dapatkan kunci akun layanan
Buka konsol Google API, lalu pilih project Anda dari menu dropdown Select a project.
Klik Enable untuk mengaktifkan Actions API untuk project Anda.
Dari dropdown Select a role, pilih Project > Pemilik.
Klik Lanjutkan.
Klik Create key untuk mendownload file JSON akun layanan.
Tukar kunci dengan token akses dan kirim notifikasi
Untuk mengirim notifikasi push melalui Actions API, Anda harus menukar kunci akun layanan dengan token akses. Sebaiknya gunakan library klien Google API untuk hal ini. Dalam seri cuplikan kode berikut, kami menggunakan library klien Node.js Google API.
Instal library dan permintaan klien Google API:
npm install googleapis request --save
Gunakan kode berikut untuk mendapatkan token akses dari kunci akun layanan dan mengirim notifikasi push:
[[["Mudah dipahami","easyToUnderstand","thumb-up"],["Memecahkan masalah saya","solvedMyProblem","thumb-up"],["Lainnya","otherUp","thumb-up"]],[["Informasi yang saya butuhkan tidak ada","missingTheInformationINeed","thumb-down"],["Terlalu rumit/langkahnya terlalu banyak","tooComplicatedTooManySteps","thumb-down"],["Sudah usang","outOfDate","thumb-down"],["Masalah terjemahan","translationIssue","thumb-down"],["Masalah kode / contoh","samplesCodeIssue","thumb-down"],["Lainnya","otherDown","thumb-down"]],["Terakhir diperbarui pada 2025-07-25 UTC."],[[["\u003cp\u003ePush notifications can be sent to Android and iOS users to provide timely reminders or updates from your Action.\u003c/p\u003e\n"],["\u003cp\u003eYou need to create a global intent that will be triggered when the user interacts with the notification.\u003c/p\u003e\n"],["\u003cp\u003eUsers must explicitly opt-in to receive push notifications through a prompt within your Action.\u003c/p\u003e\n"],["\u003cp\u003eSending notifications requires using the Actions API with a service account key for authentication.\u003c/p\u003e\n"],["\u003cp\u003eStore the \u003ccode\u003eupdatesUserId\u003c/code\u003e securely to target specific users with notifications.\u003c/p\u003e\n"]]],[],null,["# Push notifications\n\nYour Action can push notifications to users whenever relevant, such as sending a reminder when the due date for a task is near.\n\nThis guide describes how to set up push notifications for your Action.\n\nSupported surfaces\n------------------\n\nPush notifications are available on Android and iOS devices (iOS devices must have the Assistant app installed to receive push notifications). They are not currently supported on voice-activated speakers, smart displays, or other surfaces.\n\nPrerequisites\n-------------\n\nYour project must contain at least one [global intent](/assistant/conversational/intents#custom_intents), which is invoked when the user taps a push notification received from Assistant.\n\nGet started\n-----------\n\nThe following sections describe how to set up push notifications in your Action.\n\n### Create an intent for triggering\n\nThe intent you create in this section triggers the notifications flow. To create\nthis intent, follow these steps:\n\n1. Go to the [Actions console](//console.actions.google.com/) and click **Develop** in the top menu.\n2. Click **Intents** in the left menu to expand the section.\n3. Click the add_circle_outline at the bottom of the list and enter a name for the new intent.\n4. Press `Enter/Return` to create the new intent.\n5. Add training phrases for triggering the notifications flow. Some examples are:\n\n - `Notify me`\n - `Send notifications`\n - `Subscribe to notifications`\n6. Click **Save**.\n\n### Transition to system intent\n\nTo set up the transition to the `Notifications` system scene, follow these steps:\n\n1. Under **Scenes** in the left menu, click the scene you want to add the notifications subscription flow to.\n2. Under the **User intent handling** section of the scene, click **+** to add a new intent handler.\n3. Under **Intent**, select the intent you created in the previous section.\n4. Under **Transition** , select the **Notifications** system scene.\n\n5. Click **Save**.\n\n### Configure system scene\n\nTo configures the `Notifications` system scene, follow these steps:\n\n1. Under **Scenes** in the left menu, select the new **Notifications** system scene.\n2. Under the **Configure intent** section, click **Select intent**.\n3. Under the **Select intent** section, select the intent you want to be matched when a user taps a push notification.\n\n | **Note:** The intent you choose for this step needs to be a global intent.\n4. For **Customize opt-in prompt**, enter a prompt that is displayed to users when they're asked to subscribe to push notifications. The prompt is in the form of \"Is it ok if I send push notifications for $prompt\".\n\n5. Click **Save**.\n\n### Configure opt-in\n\nTo configure opting in to push notifications, follow these steps:\n\n1. Under **Scenes** , select the **Notifications** system scene.\n2. Under **Conditions** , select **If the user says \"yes\"**.\n3. Enable **Call your webhook** and provide an event handler name, such as `subscribe_to_notifications`.\n4. Enable **Send prompts** and provide a simple prompt to let the user know they'll be sent notifications:\n\n candidates:\n - first simple:\n variants:\n - speech: 'Great, I'll send you notifications.'\n\n5. Under **Transition** , select **End conversation** to end the conversation after a user subscribes to notifications.\n\n### Configure opt-out\n\nTo configure opting out of push notifications, follow these steps:\n\n1. Under **Conditions** , select **If the user says \"no\"**.\n2. Enable **Send prompts** and provide a simple prompt to let the user know they won't be sent notifications:\n\n candidates:\n - first simple:\n variants:\n - speech: Okay, I won't send you notifications.\n\n3. Under **Transition** , select **End conversation** to end the conversation after a user opts out of notifications.\n\n### Configure webhook\n\nTo configure your webhook, follow these steps:\n\n1. In your webhook, add an intent handler for storing the `updatesUserId`:\n\n app.handle('subscribe_to_notifications', conv =\u003e {\n const intentName = '\u003cname_of_intent_to_trigger\u003e';\n const notificationsSlot = conv.session.params['NotificationSlot_${intentName}'];\n if(notificationsSlot.permissionStatus == 'PERMISSION_GRANTED') {\n const updateUserId = notificationsSlot.additionalUserData.updateUserId;\n // Store the user ID and the notification's target intent for later use.\n // (Use a database, like Firestore, for best practice.)\n }\n });\n\nSend notifications\n------------------\n\nPush notifications are sent to users using the Actions API. To use this API, you need to activate the API in your Google Cloud project and set up and download a JSON service account key.\n\nYou can then use the Google OAuth2 client library to exchange the service account key for an access token and use the token to authenticate your requests to the Actions API.\n\n### Get a service account key\n\n1. Go to the [Google API console](//console.developers.google.com/apis/api/actions.googleapis.com/overview) and select your project from the **Select a project** dropdown.\n2. Click **Enable** to enable the Actions API for your project.\n3. Go to the [Google Cloud console credentials page](//console.developers.google.com/apis/credentials) and select your project from the **Select a project** dropdown.\n4. Click **Create credentials \\\u003e Service account**.\n5. Enter a service account name and click **Create**.\n6. From the **Select a role** dropdown, select **Project \\\u003e Owner**.\n7. Click **Continue**.\n8. Click **Create key** to download the service account JSON file.\n\n### Exchange the key for an access token and send a notification\n\nTo send push notifications through the Actions API, you need to exchange the service account key for an access token. We recommend using a Google API client library for this. In the series of code snippets that follow, we use the Google API Node.js client library.\n\n1. Install the Google API client library and request:\n\n `npm install googleapis request --save`\n2. Use the following code to get an access token from the service account key and send a push notification:\n\n // Use the Actions API to send a Google Assistant push notification.\n let client = auth.fromJSON(require('./service-account.json'));\n client.scopes = ['https://www.googleapis.com/auth/actions.fulfillment.conversation'];\n let notification = {\n userNotification: {\n title: 'Example notification title',\n },\n target: {\n userId: '\u003cUPDATES_USER_ID\u003e',\n intent: 'Notifications Intent',\n },\n };\n client.authorize((err, tokens) =\u003e {\n if (err) {\n throw new Error('Auth error: ${err}');\n }\n request.post('https://actions.googleapis.com/v2/conversations:send', {\n 'auth': {\n 'bearer': tokens.access_token,\n },\n 'json': true,\n 'body': {'customPushMessage': notification, 'isInSandbox': true},\n }, (err, httpResponse, body) =\u003e {\n if (err) {\n throw new Error('API request error: ${err}');\n }\n console.log('${httpResponse.statusCode}: ' + '${httpResponse.statusMessage}');\n console.log(JSON.stringify(body));\n });\n });"]]