Kể từ ngày 13 tháng 6 năm 2023, Hành động trò chuyện không còn được dùng nữa. Để biết thêm thông tin, hãy xem phần Hành động trò chuyện ngừng hoạt động.
Sử dụng bộ sưu tập để sắp xếp ngăn nắp các trang
Lưu và phân loại nội dung dựa trên lựa chọn ưu tiên của bạn.
Hành động của bạn có thể đẩy thông báo cho người dùng bất cứ khi nào thích hợp, chẳng hạn như gửi lời nhắc khi gần đến ngày đến hạn của một công việc.
Hướng dẫn này mô tả cách thiết lập thông báo đẩy cho Hành động của bạn.
Nền tảng được hỗ trợ
Thông báo đẩy có trên thiết bị Android và iOS (thiết bị iOS phải cài đặt ứng dụng Trợ lý để nhận thông báo đẩy). Các tính năng này hiện không được hỗ trợ trên loa kích hoạt bằng giọng nói, màn hình thông minh hoặc các nền tảng khác.
Điều kiện tiên quyết
Dự án của bạn phải chứa ít nhất một ý định chung và ý định này sẽ được gọi khi người dùng nhấn vào một thông báo đẩy nhận được từ Trợ lý.
Bắt đầu
Các phần sau đây mô tả cách thiết lập thông báo đẩy trong Hành động của bạn.
Tạo một ý định để kích hoạt
Ý định bạn tạo trong phần này sẽ kích hoạt quy trình thông báo. Để tạo
ý định này, hãy làm theo các bước sau:
Nhấp vào Ý định trong trình đơn bên trái để mở rộng mục này.
Nhấp vào add_circle_outline ở cuối danh sách và nhập tên cho ý định mới.
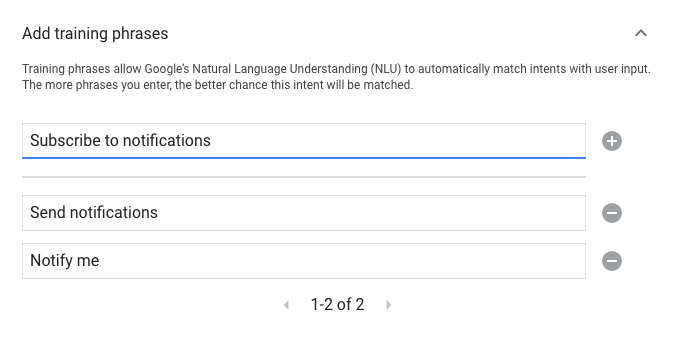
Nhấn Enter/Return để tạo ý định mới.
Thêm các cụm từ huấn luyện để kích hoạt quy trình thông báo. Dưới đây là một số ví dụ:
Notify me
Send notifications
Subscribe to notifications
Nhấp vào Lưu.
Chuyển đổi sang ý định hệ thống
Để thiết lập hiệu ứng chuyển đổi sang cảnh hệ thống Notifications, hãy làm theo các bước sau:
Trong mục Cảnh trên trình đơn bên trái, hãy nhấp vào cảnh mà bạn muốn thêm quy trình đăng ký nhận thông báo.
Trong phần Xử lý ý định của người dùng trong cảnh, hãy nhấp vào dấu + để thêm một trình xử lý ý định mới.
Trong phần Ý định, hãy chọn ý định mà bạn đã tạo ở phần trước.
Trong phần Transition (Chuyển đổi), hãy chọn cảnh hệ thống Notifications (Thông báo).
Nhấp vào Lưu.
Định cấu hình cảnh hệ thống
Để định cấu hình cảnh hệ thống Notifications, hãy làm theo các bước sau:
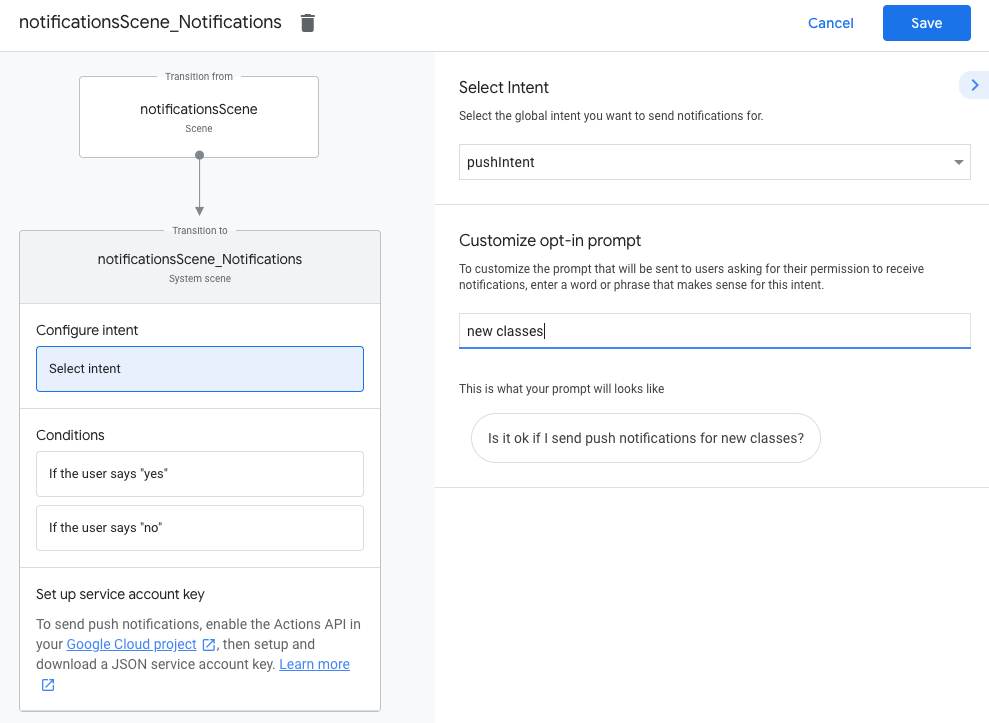
Trong phần Cảnh trên trình đơn bên trái, hãy chọn cảnh mới trong hệ thống Thông báo.
Trong phần Định cấu hình ý định, hãy nhấp vào Chọn ý định.
Trong phần Chọn ý định, hãy chọn ý định mà bạn muốn được so khớp khi người dùng nhấn vào một thông báo đẩy.
Đối với nội dung Tuỳ chỉnh lời nhắc chọn tham gia, hãy nhập lời nhắc mà người dùng nhìn thấy khi họ được yêu cầu đăng ký nhận thông báo đẩy. Lời nhắc có dạng "Tôi có thể gửi thông báo đẩy cho $prompt".
Nhấp vào Lưu.
Thiết lập lựa chọn sử dụng
Để định cấu hình việc chọn nhận thông báo đẩy, hãy làm theo các bước sau:
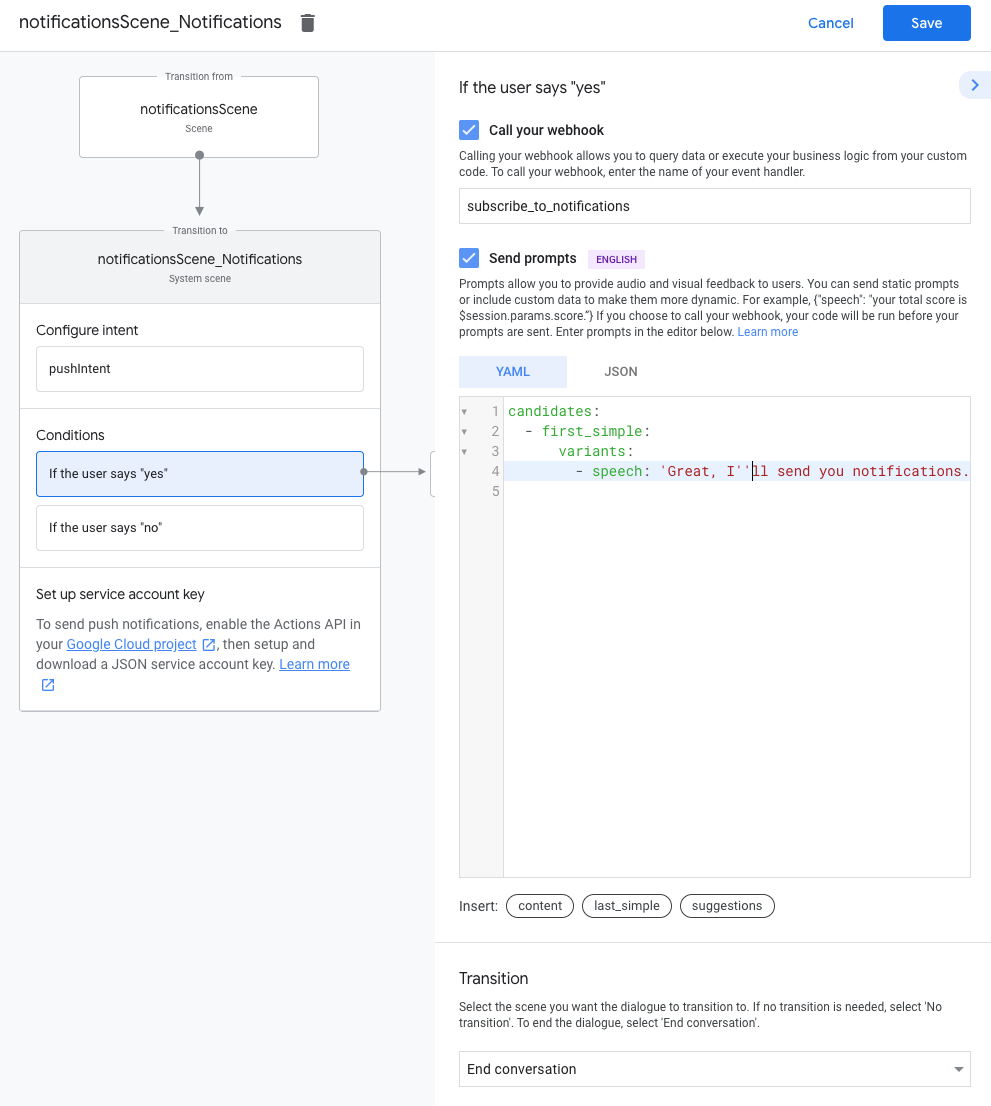
Trong phần Scenes (Cảnh), hãy chọn cảnh hệ thống Notifications (Thông báo).
Trong mục Điều kiện, hãy chọn Nếu người dùng trả lời "có".
Bật tuỳ chọn Gọi webhook của bạn và cung cấp tên trình xử lý sự kiện, chẳng hạn như subscribe_to_notifications.
Bật tính năng Gửi lời nhắc và đưa ra một lời nhắc đơn giản để người dùng biết họ sẽ nhận được thông báo:
Trong mục Chuyển đổi, hãy chọn Kết thúc cuộc trò chuyện để kết thúc cuộc trò chuyện sau khi người dùng đăng ký nhận thông báo.
Thiết lập chế độ chọn không sử dụng
Để định cấu hình chọn không nhận thông báo đẩy, hãy làm theo các bước sau:
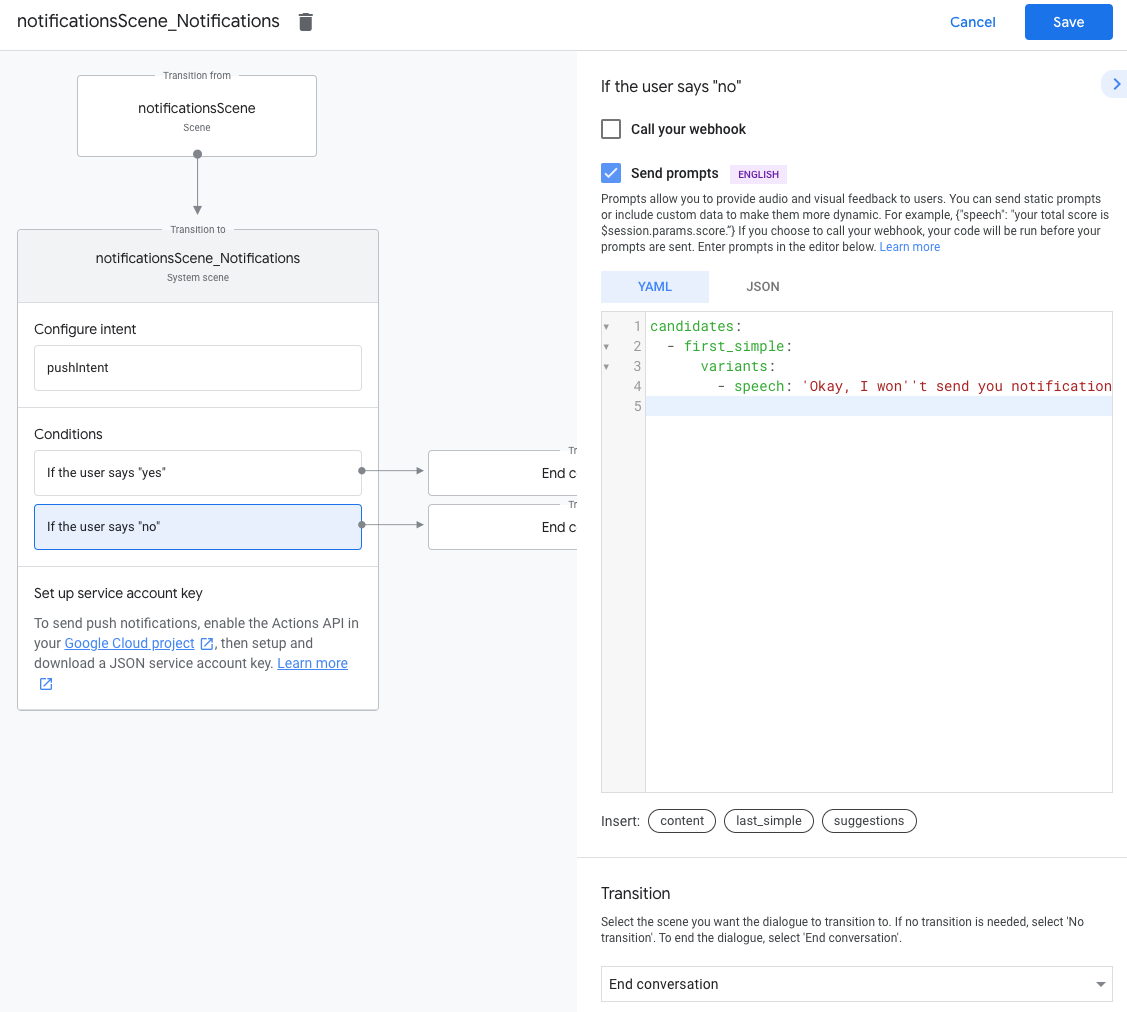
Trong mục Điều kiện, hãy chọn Nếu người dùng trả lời "không".
Bật tính năng Gửi lời nhắc và đưa ra một lời nhắc đơn giản để người dùng biết rằng họ sẽ không nhận được thông báo:
candidates:-firstsimple:variants:-speech:Okay,Iwon't send you notifications.
Trong mục Chuyển đổi, hãy chọn Kết thúc cuộc trò chuyện để kết thúc cuộc trò chuyện sau khi người dùng chọn không nhận thông báo.
Định cấu hình webhook
Để định cấu hình webhook, hãy làm theo các bước sau:
Trong webhook, hãy thêm một trình xử lý ý định để lưu trữ updatesUserId:
app.handle('subscribe_to_notifications',conv=>{constintentName='<name_of_intent_to_trigger>';constnotificationsSlot=conv.session.params['NotificationSlot_${intentName}'];if(notificationsSlot.permissionStatus=='PERMISSION_GRANTED'){constupdateUserId=notificationsSlot.additionalUserData.updateUserId;//StoretheuserIDandthenotification's target intent for later use.//(Useadatabase,likeFirestore,forbestpractice.)}});
Gửi thông báo
Thông báo đẩy được gửi cho người dùng qua API Hành động. Để sử dụng API này, bạn cần kích hoạt API trong dự án trên Google Cloud, đồng thời thiết lập và tải khoá tài khoản dịch vụ JSON xuống.
Sau đó, bạn có thể dùng thư viện ứng dụng Google OAuth2 để trao đổi khoá tài khoản dịch vụ lấy mã truy cập và dùng mã thông báo này để xác thực yêu cầu của bạn với Actions API.
Nhấp vào Tạo thông tin xác thực > Tài khoản dịch vụ.
Nhập tên tài khoản dịch vụ rồi nhấp vào Tạo.
Trong trình đơn thả xuống Select a role (Chọn vai trò), hãy chọn Project (Dự án) > Chủ sở hữu.
Nhấp vào Tiếp tục.
Nhấp vào Tạo khoá để tải tệp JSON của tài khoản dịch vụ xuống.
Đổi khoá lấy mã truy cập rồi gửi thông báo
Để gửi thông báo đẩy thông qua API Hành động, bạn cần đổi khoá tài khoản dịch vụ lấy mã truy cập. Bạn nên sử dụng thư viện ứng dụng API của Google để thực hiện việc này. Trong loạt đoạn mã tiếp theo, chúng tôi sử dụng thư viện ứng dụng Node.js của Google API.
Cài đặt thư viện ứng dụng API của Google và yêu cầu:
npm install googleapis request --save
Hãy dùng mã sau để lấy mã truy cập từ khoá tài khoản dịch vụ rồi gửi thông báo đẩy:
[[["Dễ hiểu","easyToUnderstand","thumb-up"],["Giúp tôi giải quyết được vấn đề","solvedMyProblem","thumb-up"],["Khác","otherUp","thumb-up"]],[["Thiếu thông tin tôi cần","missingTheInformationINeed","thumb-down"],["Quá phức tạp/quá nhiều bước","tooComplicatedTooManySteps","thumb-down"],["Đã lỗi thời","outOfDate","thumb-down"],["Vấn đề về bản dịch","translationIssue","thumb-down"],["Vấn đề về mẫu/mã","samplesCodeIssue","thumb-down"],["Khác","otherDown","thumb-down"]],["Cập nhật lần gần đây nhất: 2025-07-25 UTC."],[[["\u003cp\u003ePush notifications can be sent to Android and iOS users to provide timely reminders or updates from your Action.\u003c/p\u003e\n"],["\u003cp\u003eYou need to create a global intent that will be triggered when the user interacts with the notification.\u003c/p\u003e\n"],["\u003cp\u003eUsers must explicitly opt-in to receive push notifications through a prompt within your Action.\u003c/p\u003e\n"],["\u003cp\u003eSending notifications requires using the Actions API with a service account key for authentication.\u003c/p\u003e\n"],["\u003cp\u003eStore the \u003ccode\u003eupdatesUserId\u003c/code\u003e securely to target specific users with notifications.\u003c/p\u003e\n"]]],[],null,["# Push notifications\n\nYour Action can push notifications to users whenever relevant, such as sending a reminder when the due date for a task is near.\n\nThis guide describes how to set up push notifications for your Action.\n\nSupported surfaces\n------------------\n\nPush notifications are available on Android and iOS devices (iOS devices must have the Assistant app installed to receive push notifications). They are not currently supported on voice-activated speakers, smart displays, or other surfaces.\n\nPrerequisites\n-------------\n\nYour project must contain at least one [global intent](/assistant/conversational/intents#custom_intents), which is invoked when the user taps a push notification received from Assistant.\n\nGet started\n-----------\n\nThe following sections describe how to set up push notifications in your Action.\n\n### Create an intent for triggering\n\nThe intent you create in this section triggers the notifications flow. To create\nthis intent, follow these steps:\n\n1. Go to the [Actions console](//console.actions.google.com/) and click **Develop** in the top menu.\n2. Click **Intents** in the left menu to expand the section.\n3. Click the add_circle_outline at the bottom of the list and enter a name for the new intent.\n4. Press `Enter/Return` to create the new intent.\n5. Add training phrases for triggering the notifications flow. Some examples are:\n\n - `Notify me`\n - `Send notifications`\n - `Subscribe to notifications`\n6. Click **Save**.\n\n### Transition to system intent\n\nTo set up the transition to the `Notifications` system scene, follow these steps:\n\n1. Under **Scenes** in the left menu, click the scene you want to add the notifications subscription flow to.\n2. Under the **User intent handling** section of the scene, click **+** to add a new intent handler.\n3. Under **Intent**, select the intent you created in the previous section.\n4. Under **Transition** , select the **Notifications** system scene.\n\n5. Click **Save**.\n\n### Configure system scene\n\nTo configures the `Notifications` system scene, follow these steps:\n\n1. Under **Scenes** in the left menu, select the new **Notifications** system scene.\n2. Under the **Configure intent** section, click **Select intent**.\n3. Under the **Select intent** section, select the intent you want to be matched when a user taps a push notification.\n\n | **Note:** The intent you choose for this step needs to be a global intent.\n4. For **Customize opt-in prompt**, enter a prompt that is displayed to users when they're asked to subscribe to push notifications. The prompt is in the form of \"Is it ok if I send push notifications for $prompt\".\n\n5. Click **Save**.\n\n### Configure opt-in\n\nTo configure opting in to push notifications, follow these steps:\n\n1. Under **Scenes** , select the **Notifications** system scene.\n2. Under **Conditions** , select **If the user says \"yes\"**.\n3. Enable **Call your webhook** and provide an event handler name, such as `subscribe_to_notifications`.\n4. Enable **Send prompts** and provide a simple prompt to let the user know they'll be sent notifications:\n\n candidates:\n - first simple:\n variants:\n - speech: 'Great, I'll send you notifications.'\n\n5. Under **Transition** , select **End conversation** to end the conversation after a user subscribes to notifications.\n\n### Configure opt-out\n\nTo configure opting out of push notifications, follow these steps:\n\n1. Under **Conditions** , select **If the user says \"no\"**.\n2. Enable **Send prompts** and provide a simple prompt to let the user know they won't be sent notifications:\n\n candidates:\n - first simple:\n variants:\n - speech: Okay, I won't send you notifications.\n\n3. Under **Transition** , select **End conversation** to end the conversation after a user opts out of notifications.\n\n### Configure webhook\n\nTo configure your webhook, follow these steps:\n\n1. In your webhook, add an intent handler for storing the `updatesUserId`:\n\n app.handle('subscribe_to_notifications', conv =\u003e {\n const intentName = '\u003cname_of_intent_to_trigger\u003e';\n const notificationsSlot = conv.session.params['NotificationSlot_${intentName}'];\n if(notificationsSlot.permissionStatus == 'PERMISSION_GRANTED') {\n const updateUserId = notificationsSlot.additionalUserData.updateUserId;\n // Store the user ID and the notification's target intent for later use.\n // (Use a database, like Firestore, for best practice.)\n }\n });\n\nSend notifications\n------------------\n\nPush notifications are sent to users using the Actions API. To use this API, you need to activate the API in your Google Cloud project and set up and download a JSON service account key.\n\nYou can then use the Google OAuth2 client library to exchange the service account key for an access token and use the token to authenticate your requests to the Actions API.\n\n### Get a service account key\n\n1. Go to the [Google API console](//console.developers.google.com/apis/api/actions.googleapis.com/overview) and select your project from the **Select a project** dropdown.\n2. Click **Enable** to enable the Actions API for your project.\n3. Go to the [Google Cloud console credentials page](//console.developers.google.com/apis/credentials) and select your project from the **Select a project** dropdown.\n4. Click **Create credentials \\\u003e Service account**.\n5. Enter a service account name and click **Create**.\n6. From the **Select a role** dropdown, select **Project \\\u003e Owner**.\n7. Click **Continue**.\n8. Click **Create key** to download the service account JSON file.\n\n### Exchange the key for an access token and send a notification\n\nTo send push notifications through the Actions API, you need to exchange the service account key for an access token. We recommend using a Google API client library for this. In the series of code snippets that follow, we use the Google API Node.js client library.\n\n1. Install the Google API client library and request:\n\n `npm install googleapis request --save`\n2. Use the following code to get an access token from the service account key and send a push notification:\n\n // Use the Actions API to send a Google Assistant push notification.\n let client = auth.fromJSON(require('./service-account.json'));\n client.scopes = ['https://www.googleapis.com/auth/actions.fulfillment.conversation'];\n let notification = {\n userNotification: {\n title: 'Example notification title',\n },\n target: {\n userId: '\u003cUPDATES_USER_ID\u003e',\n intent: 'Notifications Intent',\n },\n };\n client.authorize((err, tokens) =\u003e {\n if (err) {\n throw new Error('Auth error: ${err}');\n }\n request.post('https://actions.googleapis.com/v2/conversations:send', {\n 'auth': {\n 'bearer': tokens.access_token,\n },\n 'json': true,\n 'body': {'customPushMessage': notification, 'isInSandbox': true},\n }, (err, httpResponse, body) =\u003e {\n if (err) {\n throw new Error('API request error: ${err}');\n }\n console.log('${httpResponse.statusCode}: ' + '${httpResponse.statusMessage}');\n console.log(JSON.stringify(body));\n });\n });"]]