
İşleminiz uygun olduğunda kullanıcılara bildirimler gönderebilir. Örneğin, bir görevin son tarihi yaklaştığında hatırlatıcı gönderebilir.
Bu kılavuzda, işleminiz için push bildirimlerini nasıl ayarlayacağınız açıklanmaktadır.
Desteklenen yüzeyler
Push bildirimlerini Android ve iOS cihazlarda kullanabilirsiniz (iOS cihazlarda push bildirimleri alabilmek için Asistan uygulamasının yüklü olması gerekir). Sesle etkinleştirilen hoparlörlerde, akıllı ekranlarda veya diğer yüzeylerde şu an için desteklenmemektedir.
Ön koşullar
Projeniz, kullanıcı Asistan'dan gelen bir push bildirimine dokunduğunda çağrılan en az bir genel amaç içermelidir.
Başlayın
Aşağıdaki bölümlerde, İşleminizde push bildirimlerini nasıl ayarlayacağınız açıklanmaktadır.
Tetikleme için amaç oluşturun
Bu bölümde oluşturduğunuz amaç bildirim akışını tetikler. Oluşturmak için aşağıdaki adımları izleyin:
- İşlemler konsoluna gidin ve üst menüden Geliştir'i tıklayın.
- Bölümü genişletmek için soldaki menüden Niyetler'i tıklayın.
- Listenin altındaki simgesini tıklayın ve yeni amaç için bir ad girin.
- Yeni niyeti oluşturmak için
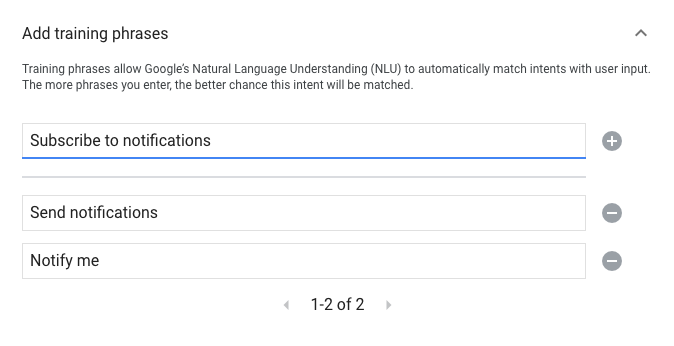
Enter/Returntuşlarına basın. Bildirim akışını tetiklemek için eğitim ifadeleri ekleyin. Bu parçalardan bazıları:
Notify meSend notificationsSubscribe to notifications
Kaydet'i tıklayın.
Sistem amacına geçiş
Notifications sistem sahnesine geçişi ayarlamak için şu adımları uygulayın:
- Soldaki menüde bulunan Sahneler bölümünde, bildirim aboneliği akışını eklemek istediğiniz sahneyi tıklayın.
- Yeni bir amaç işleyici eklemek için sahnenin Kullanıcı amacı işleme bölümünde + simgesini tıklayın.
- Niyet altında, önceki bölümde oluşturduğunuz amacı seçin.
Geçiş bölümünde Bildirimler sistem sahnesini seçin.
Kaydet'i tıklayın.
![]()
Sistem sahnesini yapılandırın
Notifications sistem sahnesini yapılandırmak için şu adımları uygulayın:
- Soldaki menüde bulunan Sahneler bölümünde, yeni Bildirimler sistem sahnesini seçin.
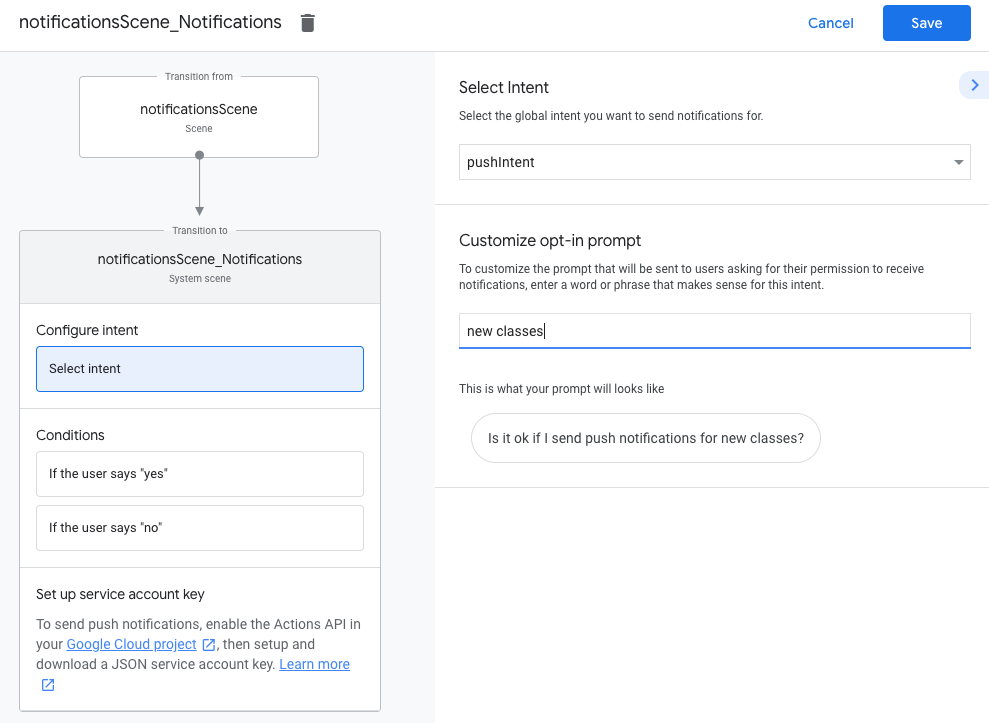
- Amacı yapılandırın bölümünde Amaç seçin'i tıklayın.
Amaç seçin bölümünde, kullanıcılar push bildirimine dokunduğunda eşleşmesini istediğiniz amacı seçin.
Etkinleştirme istemini özelleştir alanına, push bildirimlerine abone olmaları istenen kullanıcılara gösterilecek bir istem girin. İstem, "$prompt için push bildirimleri gönderirsem sorun olur mu?" biçimindedir.
Kaydet'i tıklayın.
Kaydolma seçeneğini yapılandırın
Push bildirimlerini etkinleştirme seçeneğini yapılandırmak için aşağıdaki adımları uygulayın:
- Sahneler bölümünde Bildirimler sistem sahnesini seçin.
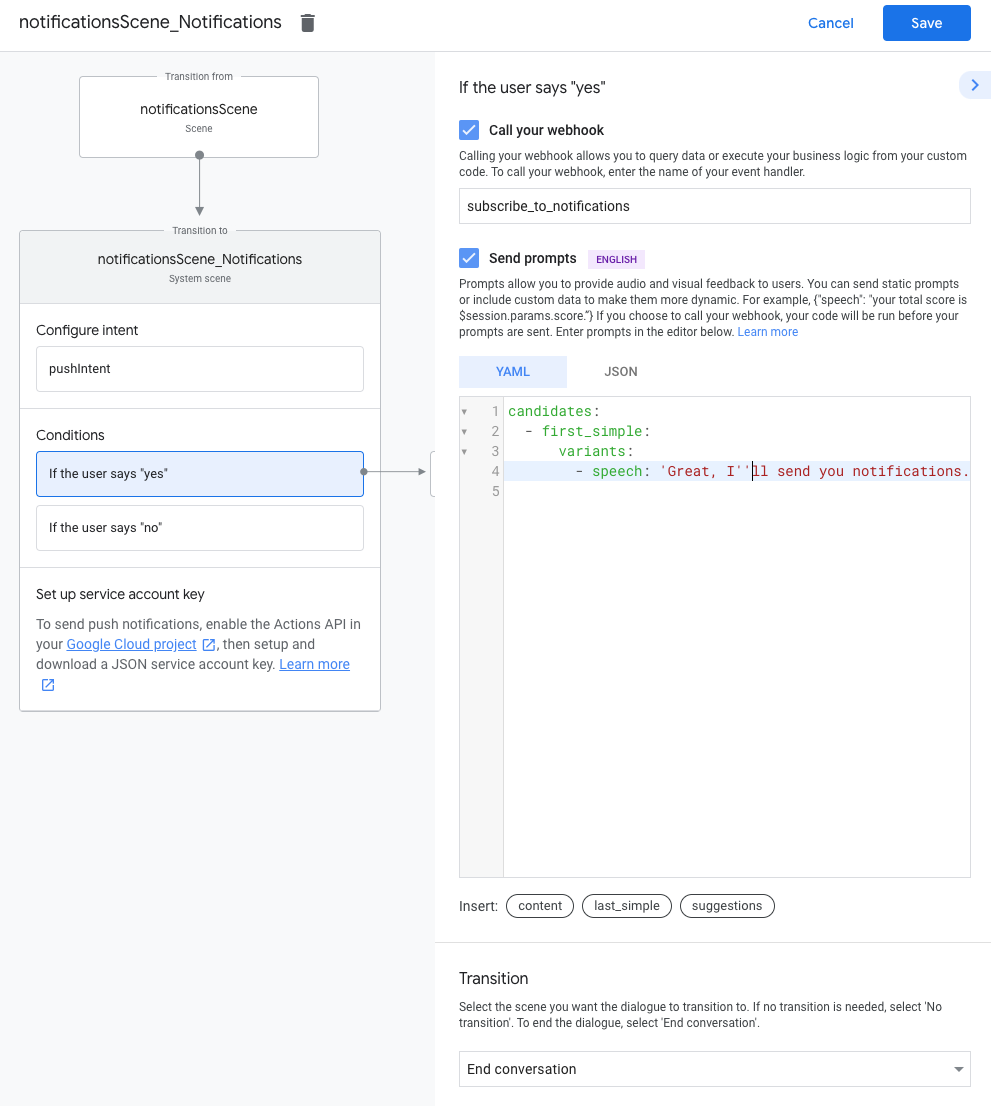
- Koşullar bölümünde Kullanıcı "evet" derse seçeneğini belirleyin.
- Webhook'unuzu arama özelliğini etkinleştirin ve
subscribe_to_notificationsgibi bir etkinlik işleyici adı sağlayın. İstemleri gönder'i etkinleştirin ve kullanıcıya bildirim gönderileceğini bildirmek için basit bir istem ekleyin:
candidates:
- first simple:
  variants:
  - speech: 'Great, I'll send you notifications.'
Bir kullanıcı bildirimlere abone olduktan sonra görüşmeyi sonlandırmak için Geçiş bölümünde Görüşmeyi sonlandır'ı seçin.
Devre dışı bırakmayı yapılandır
Push bildirimlerini devre dışı bırakmayı yapılandırmak için aşağıdaki adımları uygulayın:
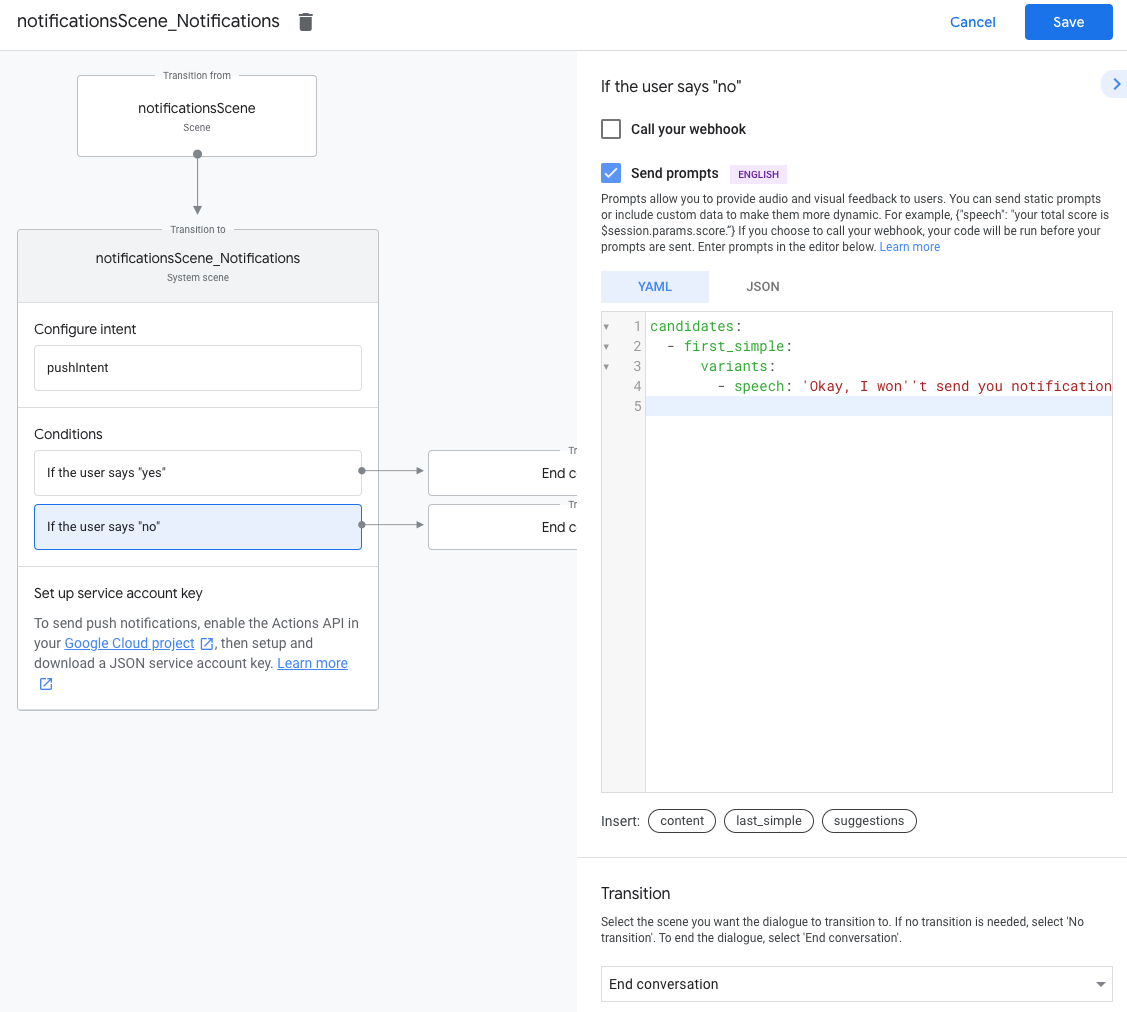
- Koşullar bölümünde, Kullanıcı "hayır" derse seçeneğini belirleyin.
İstemleri gönder'i etkinleştirin ve kullanıcıya bildirim gönderilmeyeceğini basit bir istemle belirtin:
candidates:
- first simple:
  variants:
  - speech: Okay, I won't send you notifications.
Bir kullanıcı bildirimleri devre dışı bıraktıktan sonra görüşmeyi sonlandırmak için Geçiş bölümünde Görüşmeyi sonlandır'ı seçin.
Webhook'u yapılandır
Webhook'unuzu yapılandırmak için aşağıdaki adımları uygulayın:
Webhook'unuzda,
updatesUserIdöğesini depolamak için bir intent işleyici ekleyin:app.handle('subscribe_to_notifications', conv => { const intentName = '<name_of_intent_to_trigger>'; const notificationsSlot = conv.session.params['NotificationSlot_${intentName}']; if(notificationsSlot.permissionStatus == 'PERMISSION_GRANTED') { const updateUserId = notificationsSlot.additionalUserData.updateUserId; // Store the user ID and the notification's target intent for later use. // (Use a database, like Firestore, for best practice.) } });
Bildirim gönder
Push bildirimleri, kullanıcılara Actions API kullanılarak gönderilir. Bu API'yi kullanmak için Google Cloud projenizde API'yi etkinleştirmeniz ve bir JSON hizmet hesabı anahtarı oluşturup indirmeniz gerekir.
Ardından, hizmet hesabı anahtarını bir erişim jetonuyla değiştirmek için Google OAuth2 istemci kitaplığını kullanabilir ve Actions API'ye yönelik isteklerinizin kimliğini doğrulamak için jetonu kullanabilirsiniz.
Hizmet hesabı anahtarı al
- Google API konsoluna gidin ve Proje seçin açılır menüsünden projenizi seçin.
- Projenizde Actions API'yi etkinleştirmek için Etkinleştir'i tıklayın.
- Google Cloud Console kimlik bilgileri sayfasına gidin ve Proje seçin açılır listesinden projenizi seçin.
- Kimlik bilgileri oluştur > Hizmet hesabı.
- Bir hizmet hesabı adı girin ve Create'i (Oluştur) tıklayın.
- Rol seçin açılır listesinden Proje > Sahibi.
- Devam'ı tıklayın.
- Hizmet hesabı JSON dosyasını indirmek için Anahtar oluştur'u tıklayın.
Anahtarı bir erişim jetonuyla değiştirin ve bildirim gönderin
Actions API üzerinden push bildirimleri göndermek için hizmet hesabı anahtarını erişim jetonuyla değiştirmeniz gerekir. Bunun için Google API istemci kitaplığı kullanmanızı öneririz. İzleyen kod snippet'i dizisinde, Google API Node.js istemci kitaplığını kullanacağız.
Google API istemci kitaplığını yükleyin ve şunları isteyin:
npm install googleapis request --saveHizmet hesabı anahtarından erişim jetonu almak ve push bildirimi göndermek için aşağıdaki kodu kullanın:
// Use the Actions API to send a Google Assistant push notification.
let client = auth.fromJSON(require('./service-account.json'));
client.scopes = ['https://www.googleapis.com/auth/actions.fulfillment.conversation'];
let notification = {
  userNotification: {
    title: 'Example notification title',
  },
  target: {
    userId: '<UPDATES_USER_ID>',
    intent: 'Notifications Intent',
  },
};
client.authorize((err, tokens) => {
  if (err) {
    throw new Error('Auth error: ${err}');
  }
  request.post('https://actions.googleapis.com/v2/conversations:send', {
    'auth': {
      'bearer': tokens.access_token,
    },
    'json': true,
    'body': {'customPushMessage': notification, 'isInSandbox': true},
  }, (err, httpResponse, body) => {
    if (err) {
      throw new Error('API request error: ${err}');
    }
    console.log('${httpResponse.statusCode}: ' + '${httpResponse.statusMessage}');
    console.log(JSON.stringify(body));
  });
});