Mantenha tudo organizado com as coleções
Salve e categorize o conteúdo com base nas suas preferências.
Sua Ação pode enviar notificações push aos usuários sempre que for relevante, como enviar um lembrete quando a data de conclusão de uma tarefa estiver próxima.
Neste guia, descrevemos como configurar notificações push para uma ação.
Plataformas compatíveis
As notificações push estão disponíveis em dispositivos Android e iOS (os dispositivos iOS precisam ter o app do Assistente instalado para receber as notificações push). No momento, eles não são compatíveis com alto-falantes ativados por voz, smart displays ou outras superfícies.
Pré-requisitos
Seu projeto precisa conter pelo menos uma intent global, que é invocada quando o usuário toca em uma notificação push recebida do Google Assistente.
Primeiros passos
As seções a seguir descrevem como configurar notificações push na sua ação.
Criar uma intent para acionamento
A intent criada nesta seção aciona o fluxo de notificações. Para criar
essa intent, siga estas etapas:
Clique em Intents no menu à esquerda para expandir a seção.
Clique no add_circle_outline na parte de baixo da lista e digite um nome para a nova intent.
Pressione Enter/Return para criar a nova intent.
Adicione frases de treinamento para acionar o fluxo de notificações. Por exemplo:
Notify me
Send notifications
Subscribe to notifications
Clique em Salvar.
Transição para a intent do sistema
Para configurar a transição para a cena do sistema Notifications, siga estas etapas:
Em Cenas no menu à esquerda, clique na cena em que você quer adicionar o fluxo de inscrições de notificações.
Na seção Processamento da intent do usuário da cena, clique em + para adicionar um novo gerenciador de intent.
Em Intent, selecione a intent que você criou na seção anterior.
Em Transição, selecione a cena do sistema Notificações.
Clique em Salvar.
Configurar cenário do sistema
Para configurar a cena do sistema Notifications, siga estas etapas:
Em Cenas, no menu à esquerda, selecione o novo cenário do sistema Notificações.
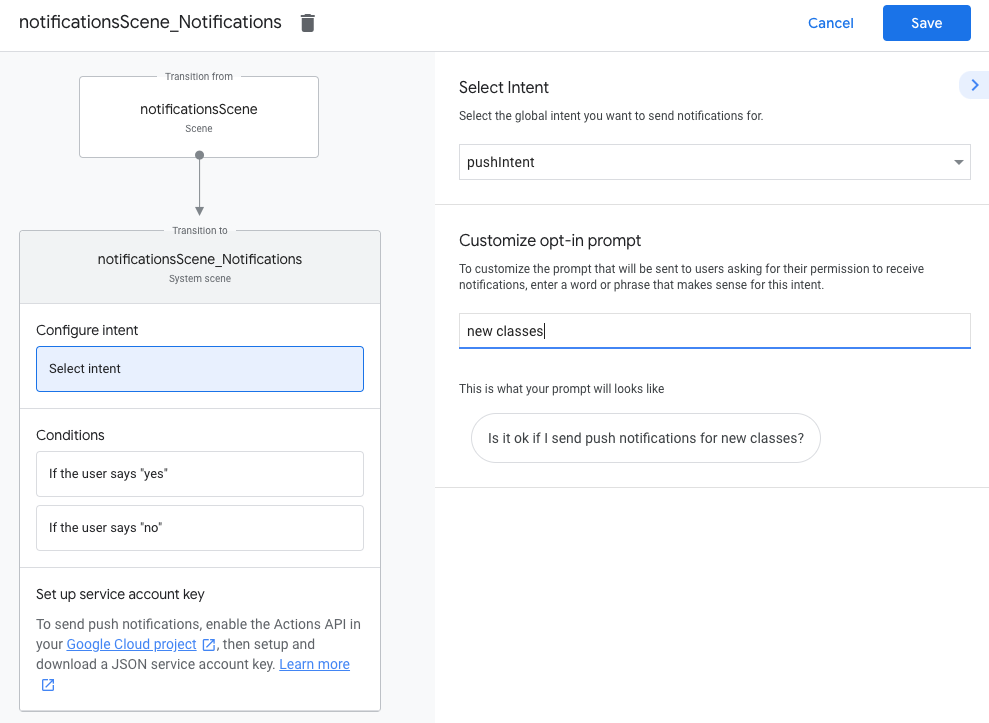
Na seção Configurar intent, clique em Selecionar intent.
Na seção Selecionar intent, escolha a intent que vai corresponder quando um usuário tocar em uma notificação push.
Em Personalizar solicitação de ativação, insira um aviso que será exibido aos usuários quando eles receberem uma solicitação para se inscreverem nas notificações push. O comando fica no seguinte formato: "Tudo bem se eu enviar notificações push para $prompt".
Clique em Salvar.
Configurar a ativação
Para configurar as notificações push, siga estas etapas:
Em Cenas, selecione a cena do sistema Notificações.
Em Condições, selecione Se o usuário disser "sim".
Ative Chamar seu webhook e forneça um nome de manipulador de eventos, como subscribe_to_notifications.
Ative Enviar solicitações e forneça um comando simples para informar ao usuário que ele vai receber notificações:
Em Transição, selecione Encerrar conversa para encerrar a conversa depois que um usuário se inscrever para receber notificações.
Configurar recusa
Para configurar a desativação de notificações push, siga estas etapas:
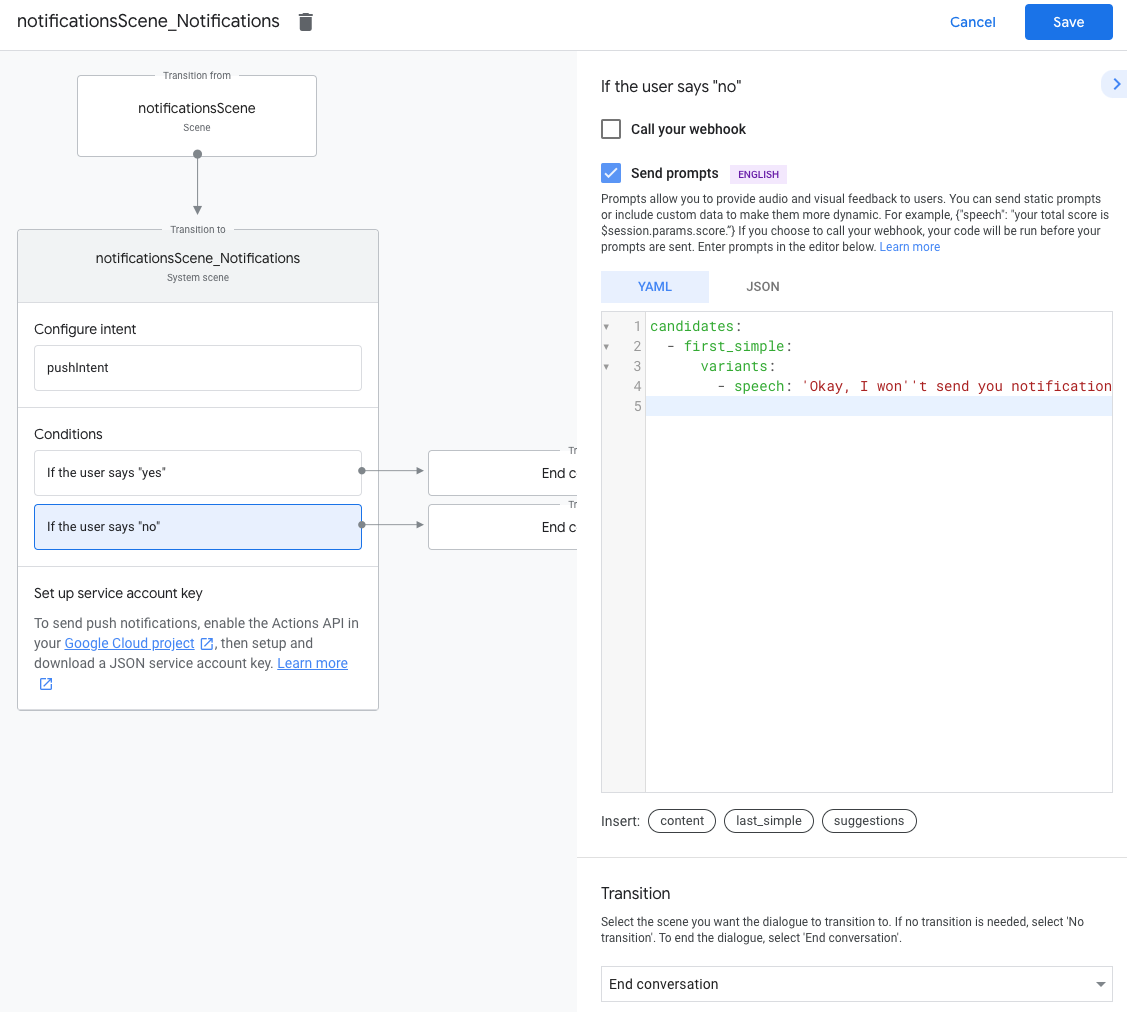
Em Condições, selecione Se o usuário disser "não".
Ative Enviar solicitações e forneça um comando simples para informar ao usuário que ele não receberá notificações:
candidates:-firstsimple:variants:-speech:Okay,Iwon't send you notifications.
Em Transição, selecione Encerrar conversa para encerrar a conversa depois que um usuário desativar as notificações.
Configurar webhook
Para configurar o webhook, siga estas etapas:
No webhook, adicione um gerenciador de intent para armazenar o updatesUserId:
app.handle('subscribe_to_notifications',conv=>{constintentName='<name_of_intent_to_trigger>';constnotificationsSlot=conv.session.params['NotificationSlot_${intentName}'];if(notificationsSlot.permissionStatus=='PERMISSION_GRANTED'){constupdateUserId=notificationsSlot.additionalUserData.updateUserId;//StoretheuserIDandthenotification's target intent for later use.//(Useadatabase,likeFirestore,forbestpractice.)}});
Envie notificações
As notificações push são enviadas aos usuários pela API Actions. Para usar essa API, você precisa ativá-la no projeto do Google Cloud, configurar e fazer o download de uma chave de conta de serviço JSON.
Depois, é possível usar a biblioteca de cliente OAuth2 do Google para trocar a chave da conta de serviço por um token de acesso e usá-lo para autenticar suas solicitações à API Actions.
Insira o nome da conta de serviço e clique em Criar.
No menu suspenso Selecionar papel, selecione Projeto > proprietário.
Clique em Continuar.
Clique em Criar chave para fazer o download do arquivo JSON da conta de serviço.
Trocar a chave por um token de acesso e enviar uma notificação
Para enviar notificações push pela API Actions, você precisa trocar a chave da conta de serviço por um token de acesso. Para isso, recomendamos o uso de uma biblioteca de cliente das APIs do Google. Na série de snippets de código a seguir, usamos a biblioteca de cliente Node.js da API do Google.
Instale a biblioteca de cliente da API do Google e solicite:
npm install googleapis request --save
Use o código a seguir para receber um token de acesso da chave da conta de serviço e enviar uma notificação push:
[[["Fácil de entender","easyToUnderstand","thumb-up"],["Meu problema foi resolvido","solvedMyProblem","thumb-up"],["Outro","otherUp","thumb-up"]],[["Não contém as informações de que eu preciso","missingTheInformationINeed","thumb-down"],["Muito complicado / etapas demais","tooComplicatedTooManySteps","thumb-down"],["Desatualizado","outOfDate","thumb-down"],["Problema na tradução","translationIssue","thumb-down"],["Problema com as amostras / o código","samplesCodeIssue","thumb-down"],["Outro","otherDown","thumb-down"]],["Última atualização 2025-07-25 UTC."],[[["\u003cp\u003ePush notifications can be sent to Android and iOS users to provide timely reminders or updates from your Action.\u003c/p\u003e\n"],["\u003cp\u003eYou need to create a global intent that will be triggered when the user interacts with the notification.\u003c/p\u003e\n"],["\u003cp\u003eUsers must explicitly opt-in to receive push notifications through a prompt within your Action.\u003c/p\u003e\n"],["\u003cp\u003eSending notifications requires using the Actions API with a service account key for authentication.\u003c/p\u003e\n"],["\u003cp\u003eStore the \u003ccode\u003eupdatesUserId\u003c/code\u003e securely to target specific users with notifications.\u003c/p\u003e\n"]]],[],null,["# Push notifications\n\nYour Action can push notifications to users whenever relevant, such as sending a reminder when the due date for a task is near.\n\nThis guide describes how to set up push notifications for your Action.\n\nSupported surfaces\n------------------\n\nPush notifications are available on Android and iOS devices (iOS devices must have the Assistant app installed to receive push notifications). They are not currently supported on voice-activated speakers, smart displays, or other surfaces.\n\nPrerequisites\n-------------\n\nYour project must contain at least one [global intent](/assistant/conversational/intents#custom_intents), which is invoked when the user taps a push notification received from Assistant.\n\nGet started\n-----------\n\nThe following sections describe how to set up push notifications in your Action.\n\n### Create an intent for triggering\n\nThe intent you create in this section triggers the notifications flow. To create\nthis intent, follow these steps:\n\n1. Go to the [Actions console](//console.actions.google.com/) and click **Develop** in the top menu.\n2. Click **Intents** in the left menu to expand the section.\n3. Click the add_circle_outline at the bottom of the list and enter a name for the new intent.\n4. Press `Enter/Return` to create the new intent.\n5. Add training phrases for triggering the notifications flow. Some examples are:\n\n - `Notify me`\n - `Send notifications`\n - `Subscribe to notifications`\n6. Click **Save**.\n\n### Transition to system intent\n\nTo set up the transition to the `Notifications` system scene, follow these steps:\n\n1. Under **Scenes** in the left menu, click the scene you want to add the notifications subscription flow to.\n2. Under the **User intent handling** section of the scene, click **+** to add a new intent handler.\n3. Under **Intent**, select the intent you created in the previous section.\n4. Under **Transition** , select the **Notifications** system scene.\n\n5. Click **Save**.\n\n### Configure system scene\n\nTo configures the `Notifications` system scene, follow these steps:\n\n1. Under **Scenes** in the left menu, select the new **Notifications** system scene.\n2. Under the **Configure intent** section, click **Select intent**.\n3. Under the **Select intent** section, select the intent you want to be matched when a user taps a push notification.\n\n | **Note:** The intent you choose for this step needs to be a global intent.\n4. For **Customize opt-in prompt**, enter a prompt that is displayed to users when they're asked to subscribe to push notifications. The prompt is in the form of \"Is it ok if I send push notifications for $prompt\".\n\n5. Click **Save**.\n\n### Configure opt-in\n\nTo configure opting in to push notifications, follow these steps:\n\n1. Under **Scenes** , select the **Notifications** system scene.\n2. Under **Conditions** , select **If the user says \"yes\"**.\n3. Enable **Call your webhook** and provide an event handler name, such as `subscribe_to_notifications`.\n4. Enable **Send prompts** and provide a simple prompt to let the user know they'll be sent notifications:\n\n candidates:\n - first simple:\n variants:\n - speech: 'Great, I'll send you notifications.'\n\n5. Under **Transition** , select **End conversation** to end the conversation after a user subscribes to notifications.\n\n### Configure opt-out\n\nTo configure opting out of push notifications, follow these steps:\n\n1. Under **Conditions** , select **If the user says \"no\"**.\n2. Enable **Send prompts** and provide a simple prompt to let the user know they won't be sent notifications:\n\n candidates:\n - first simple:\n variants:\n - speech: Okay, I won't send you notifications.\n\n3. Under **Transition** , select **End conversation** to end the conversation after a user opts out of notifications.\n\n### Configure webhook\n\nTo configure your webhook, follow these steps:\n\n1. In your webhook, add an intent handler for storing the `updatesUserId`:\n\n app.handle('subscribe_to_notifications', conv =\u003e {\n const intentName = '\u003cname_of_intent_to_trigger\u003e';\n const notificationsSlot = conv.session.params['NotificationSlot_${intentName}'];\n if(notificationsSlot.permissionStatus == 'PERMISSION_GRANTED') {\n const updateUserId = notificationsSlot.additionalUserData.updateUserId;\n // Store the user ID and the notification's target intent for later use.\n // (Use a database, like Firestore, for best practice.)\n }\n });\n\nSend notifications\n------------------\n\nPush notifications are sent to users using the Actions API. To use this API, you need to activate the API in your Google Cloud project and set up and download a JSON service account key.\n\nYou can then use the Google OAuth2 client library to exchange the service account key for an access token and use the token to authenticate your requests to the Actions API.\n\n### Get a service account key\n\n1. Go to the [Google API console](//console.developers.google.com/apis/api/actions.googleapis.com/overview) and select your project from the **Select a project** dropdown.\n2. Click **Enable** to enable the Actions API for your project.\n3. Go to the [Google Cloud console credentials page](//console.developers.google.com/apis/credentials) and select your project from the **Select a project** dropdown.\n4. Click **Create credentials \\\u003e Service account**.\n5. Enter a service account name and click **Create**.\n6. From the **Select a role** dropdown, select **Project \\\u003e Owner**.\n7. Click **Continue**.\n8. Click **Create key** to download the service account JSON file.\n\n### Exchange the key for an access token and send a notification\n\nTo send push notifications through the Actions API, you need to exchange the service account key for an access token. We recommend using a Google API client library for this. In the series of code snippets that follow, we use the Google API Node.js client library.\n\n1. Install the Google API client library and request:\n\n `npm install googleapis request --save`\n2. Use the following code to get an access token from the service account key and send a push notification:\n\n // Use the Actions API to send a Google Assistant push notification.\n let client = auth.fromJSON(require('./service-account.json'));\n client.scopes = ['https://www.googleapis.com/auth/actions.fulfillment.conversation'];\n let notification = {\n userNotification: {\n title: 'Example notification title',\n },\n target: {\n userId: '\u003cUPDATES_USER_ID\u003e',\n intent: 'Notifications Intent',\n },\n };\n client.authorize((err, tokens) =\u003e {\n if (err) {\n throw new Error('Auth error: ${err}');\n }\n request.post('https://actions.googleapis.com/v2/conversations:send', {\n 'auth': {\n 'bearer': tokens.access_token,\n },\n 'json': true,\n 'body': {'customPushMessage': notification, 'isInSandbox': true},\n }, (err, httpResponse, body) =\u003e {\n if (err) {\n throw new Error('API request error: ${err}');\n }\n console.log('${httpResponse.statusCode}: ' + '${httpResponse.statusMessage}');\n console.log(JSON.stringify(body));\n });\n });"]]