Zadbaj o dobrą organizację dzięki kolekcji
Zapisuj i kategoryzuj treści zgodnie ze swoimi preferencjami.
Akcja może przekazywać użytkownikom powiadomienia zawsze, gdy jest to konieczne, np. wysyłając przypomnienie, gdy zbliża się termin wykonania zadania.
Z tego przewodnika dowiesz się, jak skonfigurować powiadomienia push dotyczące akcji.
Obsługiwane platformy
Powiadomienia push są dostępne na urządzeniach z Androidem i iOS (aby je otrzymywać, na urządzeniach z iOS musi być zainstalowana aplikacja Asystent). Obecnie nie obsługujemy ich na głośnikach aktywowanych głosem, inteligentnych ekranach ani innych platformach.
Wymagania wstępne
Projekt musi zawierać co najmniej 1 intencję globalną, która jest wywoływana, gdy użytkownik kliknie powiadomienie push otrzymane od Asystenta.
Rozpocznij
W sekcjach poniżej opisujemy, jak skonfigurować powiadomienia push w akcji.
Utwórz intencję do aktywowania
Intencja utworzona w tej sekcji aktywuje przepływ powiadomień. Aby utworzyć
wykonaj te czynności:
Otwórz konsolę Actions i w menu u góry kliknij Programowanie.
W menu po lewej stronie kliknij Intents (Intencje), aby rozwinąć sekcję.
Kliknij add_circle_outline na dole listy i wpisz nazwę nowej intencji.
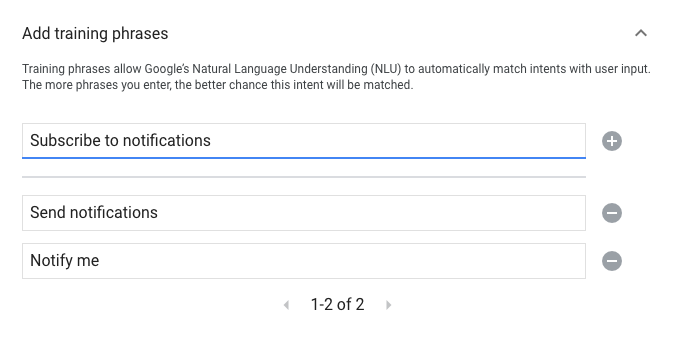
Naciśnij Enter/Return, aby utworzyć nową intencję.
Dodaj wyrażenia na potrzeby nauki, które będą uruchamiać przepływ powiadomień. Przykłady:
Notify me
Send notifications
Subscribe to notifications
Kliknij Zapisz.
Przejdź na intencję systemową
Aby skonfigurować przejście na scenę systemową Notifications, wykonaj te czynności:
W sekcji Sceny w menu po lewej stronie kliknij scenę, do której chcesz dodać subskrypcję powiadomień.
W sekcji Obsługa intencji użytkownika kliknij +, aby dodać nowy moduł obsługi intencji.
W sekcji Intent (Intencja) wybierz intencję utworzoną w poprzedniej sekcji.
W sekcji Przejście wybierz scenę systemową Powiadomienia.
Kliknij Zapisz.
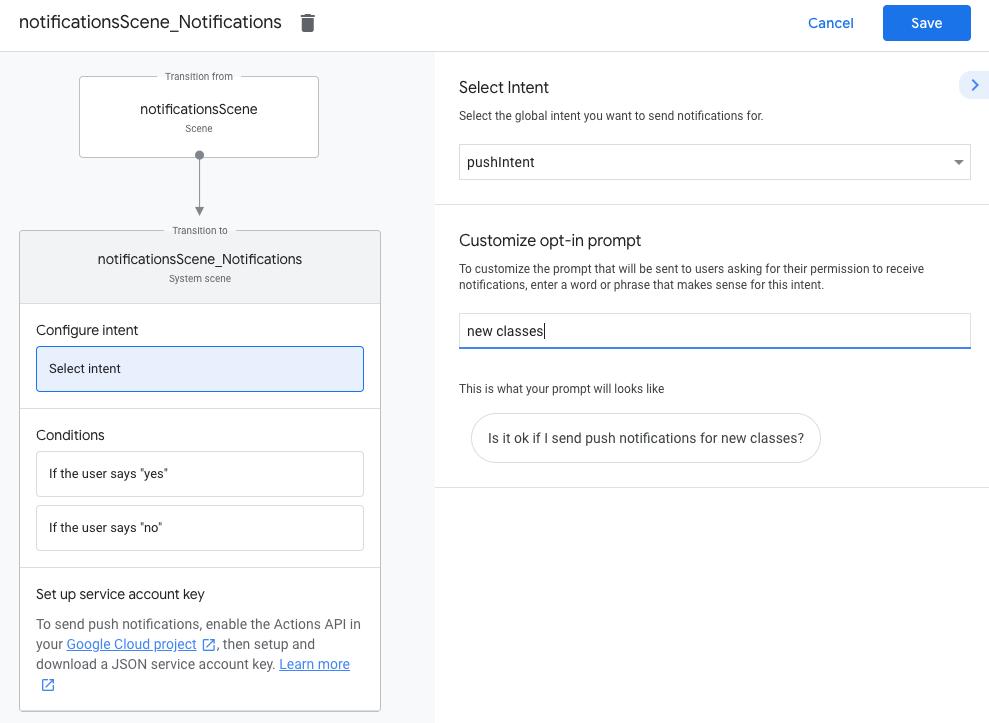
Skonfiguruj scenę systemową
Aby skonfigurować scenę systemową Notifications, wykonaj te czynności:
W sekcji Sceny w menu po lewej stronie wybierz nową scenę systemową Powiadomienia.
W sekcji Skonfiguruj intencję kliknij Wybierz intencję.
W sekcji Wybierz zamiar wybierz intencję, która ma być dopasowywana, gdy użytkownik kliknie powiadomienie push.
W polu Dostosuj prośbę o wyrażenie zgody wpisz prompt, który będzie wyświetlany, gdy użytkownicy otrzymają prośbę o zasubskrybowanie powiadomień push. Może on mieć postać „Czy mogę wysyłać powiadomienia push na temat $prompt”.
Kliknij Zapisz.
Skonfiguruj akceptację
Aby skonfigurować włączanie powiadomień push, wykonaj te czynności:
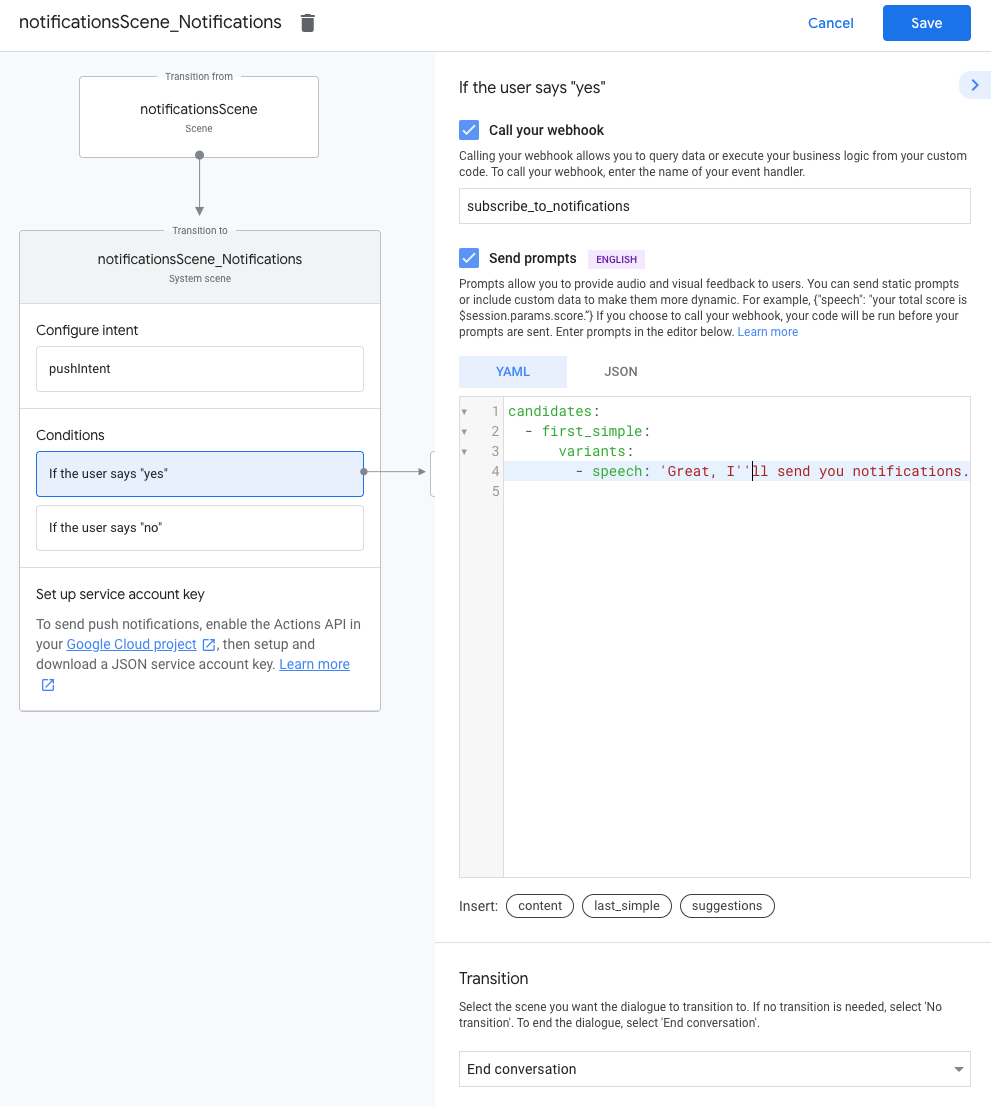
W sekcji Sceny wybierz scenę systemową Powiadomienia.
W sekcji Warunki wybierz Jeśli użytkownik powie „tak”.
Włącz opcję Wywołaj webhooka i podaj nazwę modułu obsługi zdarzeń, np. subscribe_to_notifications.
Włącz Wysyłaj potwierdzenia i w prosty sposób daj użytkownikowi znać, że będą otrzymywać powiadomienia:
W sekcji Przenoszenie wybierz Zakończ rozmowę, aby zakończyć rozmowę, gdy użytkownik zasubskrybuje powiadomienia.
Skonfiguruj rezygnację
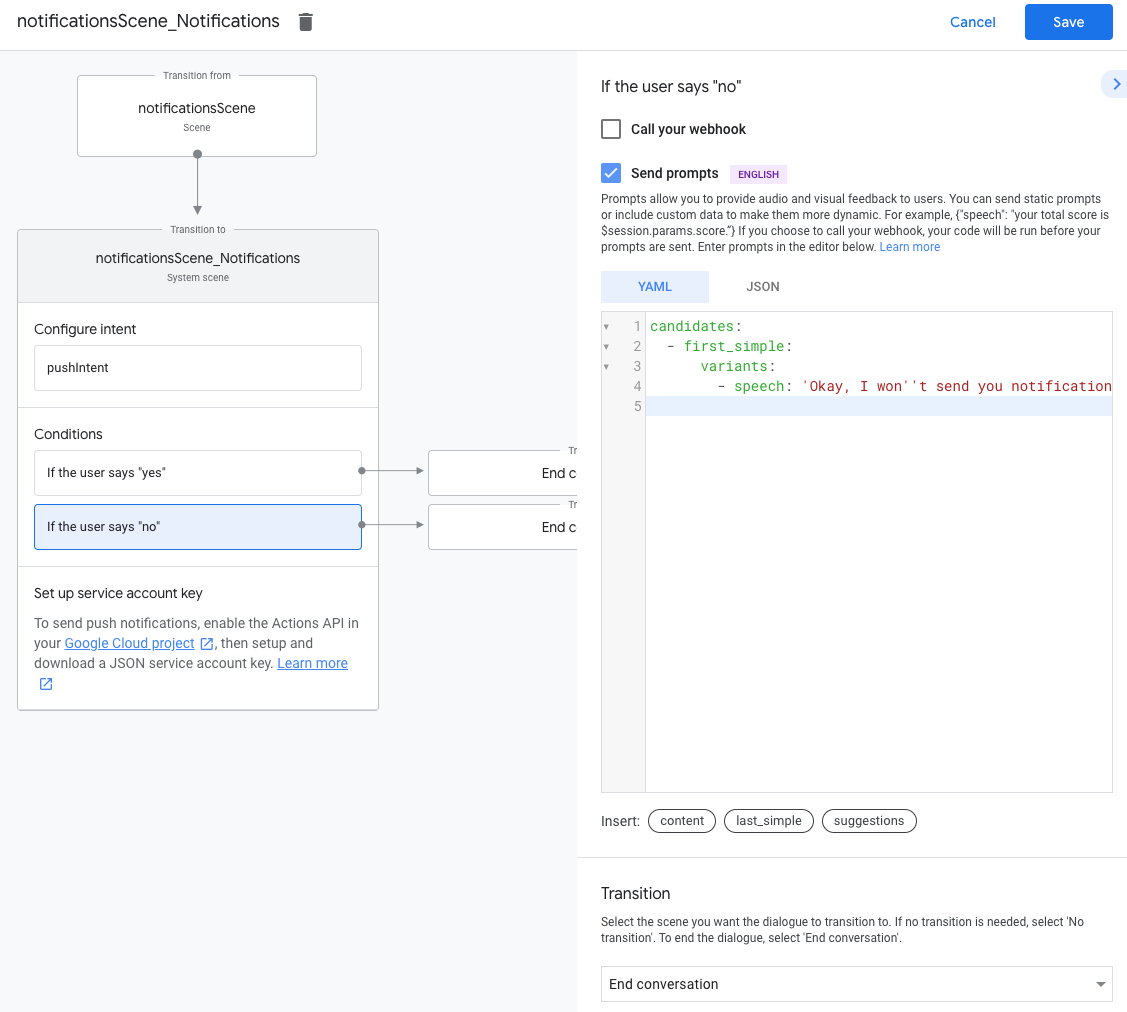
Aby skonfigurować rezygnację z powiadomień push:
W sekcji Warunki wybierz Jeśli użytkownik mówi „nie”.
Włącz Wysyłaj potwierdzenia i w prosty sposób zaproponuj użytkownikowi informację, że nie będzie otrzymywać powiadomień:
candidates:-firstsimple:variants:-speech:Okay,Iwon't send you notifications.
W sekcji Przenoszenie wybierz Zakończ rozmowę, aby zakończyć rozmowę, gdy użytkownik zrezygnuje z powiadomień.
Skonfiguruj webhooka
Aby skonfigurować webhooka, wykonaj te czynności:
Do webhooka dodaj moduł obsługi intencji do przechowywania elementu updatesUserId:
app.handle('subscribe_to_notifications',conv=>{constintentName='<name_of_intent_to_trigger>';constnotificationsSlot=conv.session.params['NotificationSlot_${intentName}'];if(notificationsSlot.permissionStatus=='PERMISSION_GRANTED'){constupdateUserId=notificationsSlot.additionalUserData.updateUserId;//StoretheuserIDandthenotification's target intent for later use.//(Useadatabase,likeFirestore,forbestpractice.)}});
Wyślij powiadomienia
Powiadomienia push są wysyłane do użytkowników za pomocą interfejsu Actions API. Aby używać tego interfejsu API, musisz go aktywować w swoim projekcie Google Cloud oraz skonfigurować i pobrać klucz konta usługi JSON.
Następnie za pomocą biblioteki klienta Google OAuth2 możesz wymienić klucz konta usługi na token dostępu i używać go do uwierzytelniania żądań do interfejsu Actions API.
Kliknij Utwórz klucz, aby pobrać plik JSON konta usługi.
Wymień klucz na token dostępu i wyślij powiadomienie
Aby wysyłać powiadomienia push za pomocą interfejsu Actions API, musisz wymienić klucz konta usługi na token dostępu. Zalecamy użycie do tego biblioteki klienta interfejsów API Google. W serii poniższych fragmentów kodu używamy biblioteki klienta Node.js interfejsu API Google.
Zainstaluj bibliotekę klienta interfejsów API Google i poproś o wykonanie tych czynności:
npm install googleapis request --save
Aby uzyskać token dostępu z klucza konta usługi i wysłać powiadomienie push, użyj tego kodu:
[[["Łatwo zrozumieć","easyToUnderstand","thumb-up"],["Rozwiązało to mój problem","solvedMyProblem","thumb-up"],["Inne","otherUp","thumb-up"]],[["Brak potrzebnych mi informacji","missingTheInformationINeed","thumb-down"],["Zbyt skomplikowane / zbyt wiele czynności do wykonania","tooComplicatedTooManySteps","thumb-down"],["Nieaktualne treści","outOfDate","thumb-down"],["Problem z tłumaczeniem","translationIssue","thumb-down"],["Problem z przykładami/kodem","samplesCodeIssue","thumb-down"],["Inne","otherDown","thumb-down"]],["Ostatnia aktualizacja: 2025-07-25 UTC."],[[["\u003cp\u003ePush notifications can be sent to Android and iOS users to provide timely reminders or updates from your Action.\u003c/p\u003e\n"],["\u003cp\u003eYou need to create a global intent that will be triggered when the user interacts with the notification.\u003c/p\u003e\n"],["\u003cp\u003eUsers must explicitly opt-in to receive push notifications through a prompt within your Action.\u003c/p\u003e\n"],["\u003cp\u003eSending notifications requires using the Actions API with a service account key for authentication.\u003c/p\u003e\n"],["\u003cp\u003eStore the \u003ccode\u003eupdatesUserId\u003c/code\u003e securely to target specific users with notifications.\u003c/p\u003e\n"]]],[],null,["# Push notifications\n\nYour Action can push notifications to users whenever relevant, such as sending a reminder when the due date for a task is near.\n\nThis guide describes how to set up push notifications for your Action.\n\nSupported surfaces\n------------------\n\nPush notifications are available on Android and iOS devices (iOS devices must have the Assistant app installed to receive push notifications). They are not currently supported on voice-activated speakers, smart displays, or other surfaces.\n\nPrerequisites\n-------------\n\nYour project must contain at least one [global intent](/assistant/conversational/intents#custom_intents), which is invoked when the user taps a push notification received from Assistant.\n\nGet started\n-----------\n\nThe following sections describe how to set up push notifications in your Action.\n\n### Create an intent for triggering\n\nThe intent you create in this section triggers the notifications flow. To create\nthis intent, follow these steps:\n\n1. Go to the [Actions console](//console.actions.google.com/) and click **Develop** in the top menu.\n2. Click **Intents** in the left menu to expand the section.\n3. Click the add_circle_outline at the bottom of the list and enter a name for the new intent.\n4. Press `Enter/Return` to create the new intent.\n5. Add training phrases for triggering the notifications flow. Some examples are:\n\n - `Notify me`\n - `Send notifications`\n - `Subscribe to notifications`\n6. Click **Save**.\n\n### Transition to system intent\n\nTo set up the transition to the `Notifications` system scene, follow these steps:\n\n1. Under **Scenes** in the left menu, click the scene you want to add the notifications subscription flow to.\n2. Under the **User intent handling** section of the scene, click **+** to add a new intent handler.\n3. Under **Intent**, select the intent you created in the previous section.\n4. Under **Transition** , select the **Notifications** system scene.\n\n5. Click **Save**.\n\n### Configure system scene\n\nTo configures the `Notifications` system scene, follow these steps:\n\n1. Under **Scenes** in the left menu, select the new **Notifications** system scene.\n2. Under the **Configure intent** section, click **Select intent**.\n3. Under the **Select intent** section, select the intent you want to be matched when a user taps a push notification.\n\n | **Note:** The intent you choose for this step needs to be a global intent.\n4. For **Customize opt-in prompt**, enter a prompt that is displayed to users when they're asked to subscribe to push notifications. The prompt is in the form of \"Is it ok if I send push notifications for $prompt\".\n\n5. Click **Save**.\n\n### Configure opt-in\n\nTo configure opting in to push notifications, follow these steps:\n\n1. Under **Scenes** , select the **Notifications** system scene.\n2. Under **Conditions** , select **If the user says \"yes\"**.\n3. Enable **Call your webhook** and provide an event handler name, such as `subscribe_to_notifications`.\n4. Enable **Send prompts** and provide a simple prompt to let the user know they'll be sent notifications:\n\n candidates:\n - first simple:\n variants:\n - speech: 'Great, I'll send you notifications.'\n\n5. Under **Transition** , select **End conversation** to end the conversation after a user subscribes to notifications.\n\n### Configure opt-out\n\nTo configure opting out of push notifications, follow these steps:\n\n1. Under **Conditions** , select **If the user says \"no\"**.\n2. Enable **Send prompts** and provide a simple prompt to let the user know they won't be sent notifications:\n\n candidates:\n - first simple:\n variants:\n - speech: Okay, I won't send you notifications.\n\n3. Under **Transition** , select **End conversation** to end the conversation after a user opts out of notifications.\n\n### Configure webhook\n\nTo configure your webhook, follow these steps:\n\n1. In your webhook, add an intent handler for storing the `updatesUserId`:\n\n app.handle('subscribe_to_notifications', conv =\u003e {\n const intentName = '\u003cname_of_intent_to_trigger\u003e';\n const notificationsSlot = conv.session.params['NotificationSlot_${intentName}'];\n if(notificationsSlot.permissionStatus == 'PERMISSION_GRANTED') {\n const updateUserId = notificationsSlot.additionalUserData.updateUserId;\n // Store the user ID and the notification's target intent for later use.\n // (Use a database, like Firestore, for best practice.)\n }\n });\n\nSend notifications\n------------------\n\nPush notifications are sent to users using the Actions API. To use this API, you need to activate the API in your Google Cloud project and set up and download a JSON service account key.\n\nYou can then use the Google OAuth2 client library to exchange the service account key for an access token and use the token to authenticate your requests to the Actions API.\n\n### Get a service account key\n\n1. Go to the [Google API console](//console.developers.google.com/apis/api/actions.googleapis.com/overview) and select your project from the **Select a project** dropdown.\n2. Click **Enable** to enable the Actions API for your project.\n3. Go to the [Google Cloud console credentials page](//console.developers.google.com/apis/credentials) and select your project from the **Select a project** dropdown.\n4. Click **Create credentials \\\u003e Service account**.\n5. Enter a service account name and click **Create**.\n6. From the **Select a role** dropdown, select **Project \\\u003e Owner**.\n7. Click **Continue**.\n8. Click **Create key** to download the service account JSON file.\n\n### Exchange the key for an access token and send a notification\n\nTo send push notifications through the Actions API, you need to exchange the service account key for an access token. We recommend using a Google API client library for this. In the series of code snippets that follow, we use the Google API Node.js client library.\n\n1. Install the Google API client library and request:\n\n `npm install googleapis request --save`\n2. Use the following code to get an access token from the service account key and send a push notification:\n\n // Use the Actions API to send a Google Assistant push notification.\n let client = auth.fromJSON(require('./service-account.json'));\n client.scopes = ['https://www.googleapis.com/auth/actions.fulfillment.conversation'];\n let notification = {\n userNotification: {\n title: 'Example notification title',\n },\n target: {\n userId: '\u003cUPDATES_USER_ID\u003e',\n intent: 'Notifications Intent',\n },\n };\n client.authorize((err, tokens) =\u003e {\n if (err) {\n throw new Error('Auth error: ${err}');\n }\n request.post('https://actions.googleapis.com/v2/conversations:send', {\n 'auth': {\n 'bearer': tokens.access_token,\n },\n 'json': true,\n 'body': {'customPushMessage': notification, 'isInSandbox': true},\n }, (err, httpResponse, body) =\u003e {\n if (err) {\n throw new Error('API request error: ${err}');\n }\n console.log('${httpResponse.statusCode}: ' + '${httpResponse.statusMessage}');\n console.log(JSON.stringify(body));\n });\n });"]]