Mit Sammlungen den Überblick behalten
Sie können Inhalte basierend auf Ihren Einstellungen speichern und kategorisieren.
Deine Aktion kann Nutzern Push-Benachrichtigungen senden, wenn sie relevant sind, z. B. eine Erinnerung senden, wenn der Abgabetermin einer Aufgabe näher rückt.
In diesem Leitfaden wird beschrieben, wie du Push-Benachrichtigungen für deine Aktion einrichtest.
Unterstützte Oberflächen
Push-Benachrichtigungen sind auf Android- und iOS-Geräten verfügbar. Auf iOS-Geräten muss die Assistant App installiert sein, um Push-Benachrichtigungen zu erhalten. Auf Lautsprechern mit Sprachsteuerung, Smart Displays und anderen Oberflächen werden sie derzeit nicht unterstützt.
Vorbereitung
Ihr Projekt muss mindestens einen globalen Intent enthalten, der aufgerufen wird, wenn der Nutzer auf eine von Assistant empfangene Push-Benachrichtigung tippt.
Erste Schritte
In den folgenden Abschnitten wird beschrieben, wie du Push-Benachrichtigungen in deiner Aktion einrichtest.
Intent zum Auslösen erstellen
Der Intent, den Sie in diesem Abschnitt erstellen, löst den Benachrichtigungsablauf aus. Zum Erstellen
für diesen Intent, gehen Sie so vor:
Rufen Sie die Actions Console auf und klicken Sie im Menü oben auf Develop.
Klicken Sie im linken Menü auf Intents, um den Bereich zu maximieren.
Klicken Sie unten in der Liste auf das add_circle_outline und geben Sie einen Namen für den neuen Intent ein.
Drücken Sie 
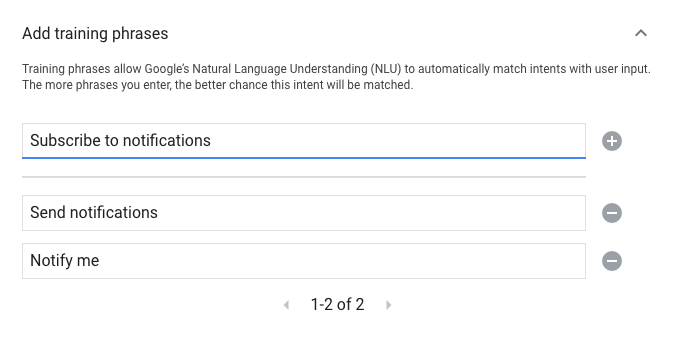
Enter/Return, um den neuen Intent zu erstellen.
Fügen Sie Trainingsformulierungen hinzu, um den Benachrichtigungsablauf auszulösen. Dazu einige Beispiele:
Notify me
Send notifications
Subscribe to notifications
Klicken Sie auf Speichern.
Übergang zu System Intent
So richten Sie den Übergang zur Systemszene Notifications ein:
Klicken Sie im Menü auf der linken Seite unter Szenen auf die Szene, der Sie Benachrichtigungen hinzufügen möchten.
Klicken Sie im Abschnitt Umgang mit Nutzer-Intents auf +, um einen neuen Intent-Handler hinzuzufügen.
Wählen Sie unter Intent den Intent aus, den Sie im vorherigen Abschnitt erstellt haben.
Wählen Sie unter Übergang die Systemszene Benachrichtigungen aus.
Klicken Sie auf Speichern.
Systemszene konfigurieren
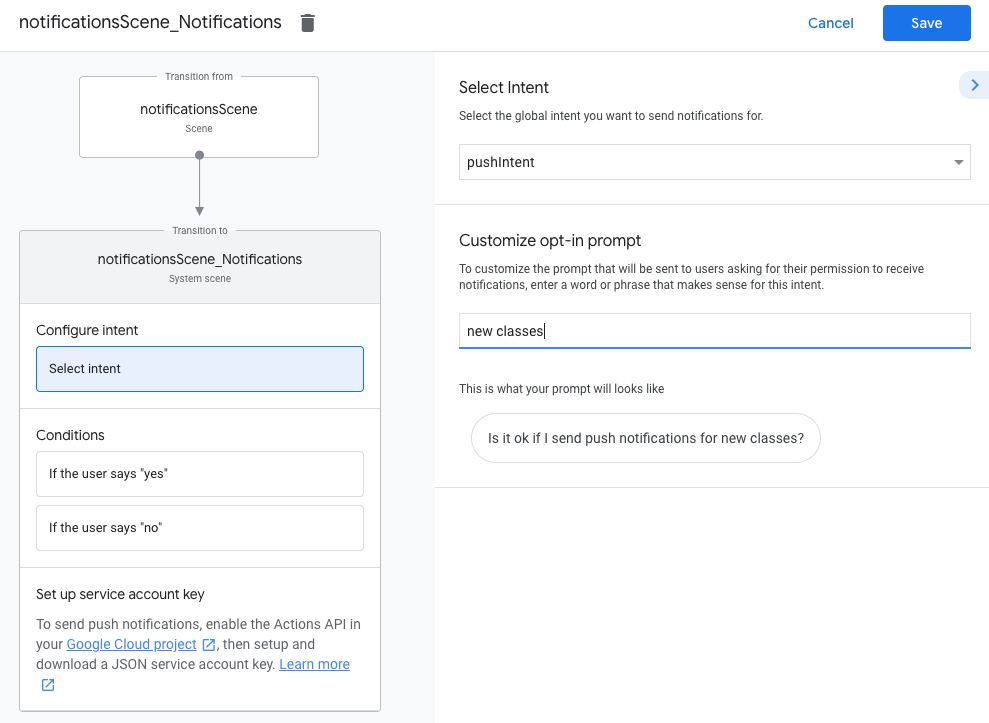
So konfigurieren Sie die Systemszene: Notifications:
Wählen Sie im Menü auf der linken Seite unter Szenen die neue Systemszene Benachrichtigungen aus.
Klicken Sie unter Intent konfigurieren auf Intent auswählen.
Wählen Sie im Abschnitt Intent auswählen den Intent aus, der zugeordnet werden soll, wenn ein Nutzer auf eine Push-Benachrichtigung tippt.
Geben Sie unter Opt-in-Aufforderung anpassen einen Prompt ein, der Nutzern angezeigt wird, wenn sie aufgefordert werden, Push-Benachrichtigungen zu abonnieren. Die Aufforderung hat die Form „Is it ok if I send push notifications for $prompt“ (Ist es in Ordnung, wenn ich Push-Benachrichtigungen für $prompt senden).
Klicken Sie auf Speichern.
Aktivierung konfigurieren
So konfigurieren Sie die Aktivierung von Push-Benachrichtigungen:
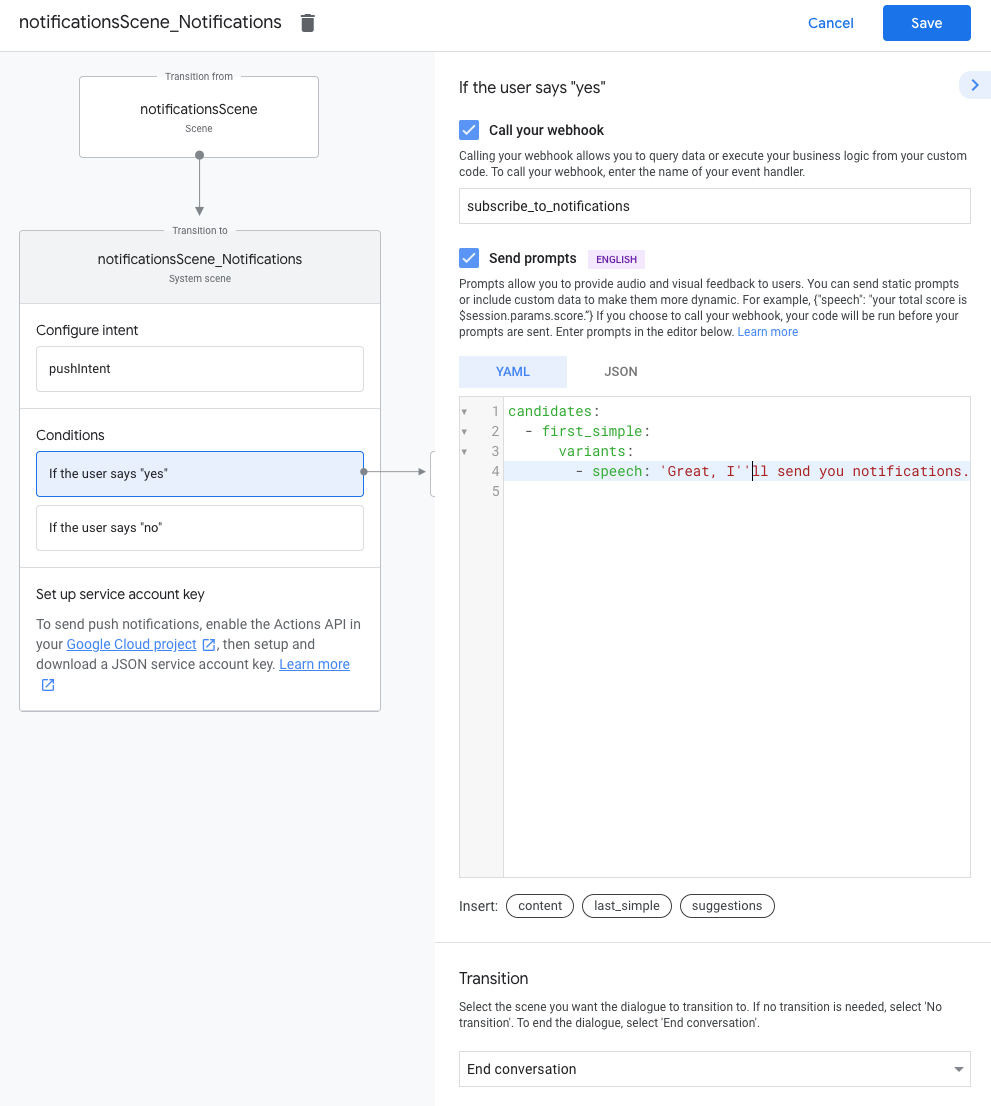
Wählen Sie unter Szenen die Systemszene Benachrichtigungen aus.
Wählen Sie unter Bedingungen die Option Wenn der Nutzer „Ja“ sagt aus.
Aktivieren Sie Webhook aufrufen und geben Sie einen Namen für den Event-Handler an, z. B. subscribe_to_notifications.
Aktiviere Prompts senden und lass den Nutzer mit einer einfachen Aufforderung wissen, dass Benachrichtigungen gesendet werden:
Wählen Sie unter Umstellung die Option Unterhaltung beenden aus, um die Unterhaltung zu beenden, nachdem ein Nutzer Benachrichtigungen abonniert hat.
Deaktivierung konfigurieren
So konfigurieren Sie die Deaktivierung von Push-Benachrichtigungen:
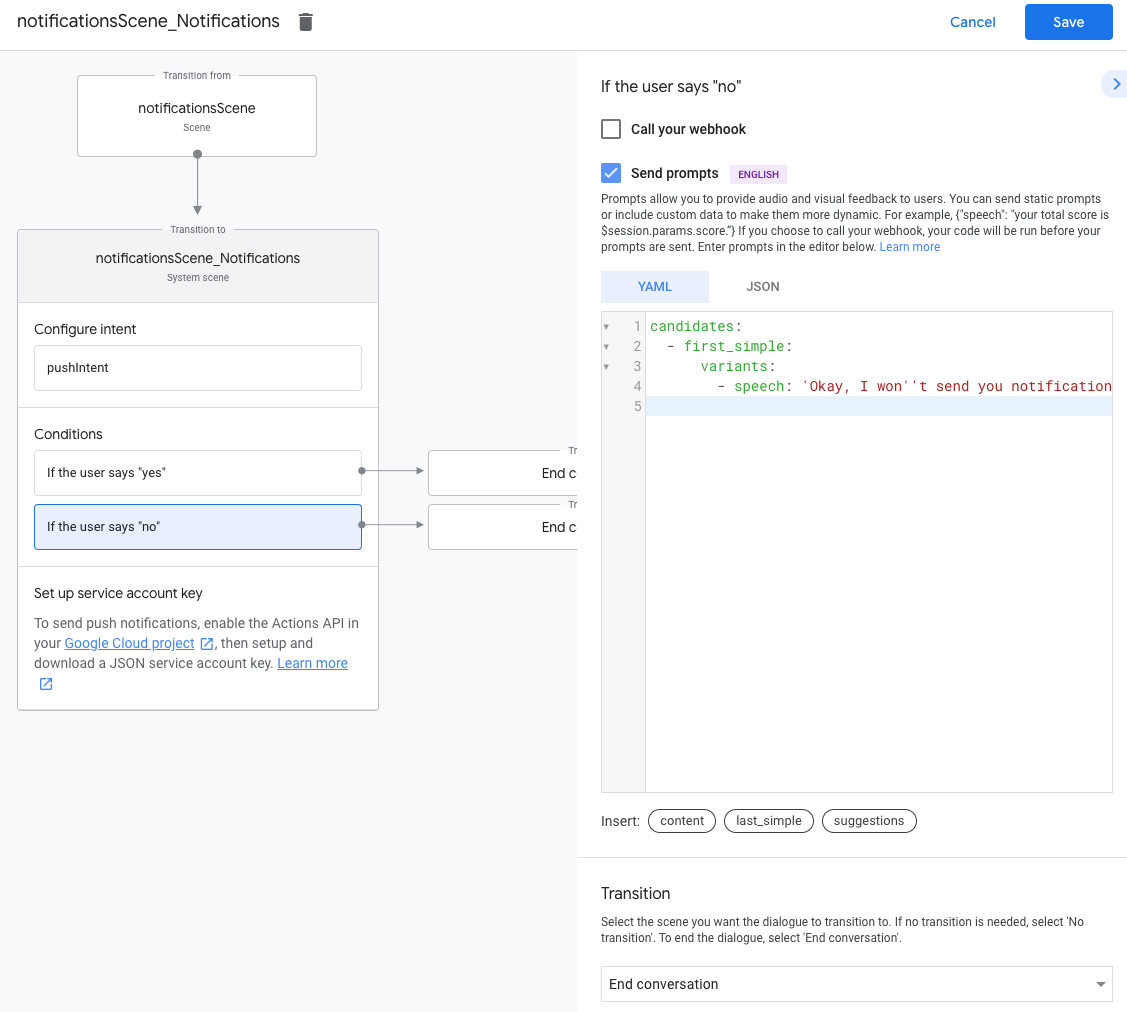
Wählen Sie unter Bedingungen die Option Wenn der Nutzer „Nein“ sagt aus.
Aktivieren Sie Prompts senden und geben Sie dem Nutzer mit einer einfachen Aufforderung an, dass er keine Benachrichtigungen erhält:
candidates:-firstsimple:variants:-speech:Okay,Iwon't send you notifications.
Wählen Sie unter Umstellung die Option Unterhaltung beenden aus, um die Unterhaltung zu beenden, nachdem ein Nutzer Benachrichtigungen deaktiviert hat.
Webhook konfigurieren
So konfigurieren Sie den Webhook:
Fügen Sie dem Webhook einen Intent-Handler zum Speichern von updatesUserId hinzu:
app.handle('subscribe_to_notifications',conv=>{constintentName='<name_of_intent_to_trigger>';constnotificationsSlot=conv.session.params['NotificationSlot_${intentName}'];if(notificationsSlot.permissionStatus=='PERMISSION_GRANTED'){constupdateUserId=notificationsSlot.additionalUserData.updateUserId;//StoretheuserIDandthenotification's target intent for later use.//(Useadatabase,likeFirestore,forbestpractice.)}});
Benachrichtigungen senden
Push-Benachrichtigungen werden über die Actions API an Nutzer gesendet. Wenn Sie diese API verwenden möchten, müssen Sie sie in Ihrem Google Cloud-Projekt aktivieren und einen JSON-Dienstkontoschlüssel einrichten und herunterladen.
Sie können dann die Google OAuth2-Clientbibliothek verwenden, um den Dienstkontoschlüssel gegen ein Zugriffstoken auszutauschen, und das Token verwenden, um Ihre Anfragen an die Actions API zu authentifizieren.
Schlüssel für Dienstkonto abrufen
Gehen Sie zur Google API Console und wählen Sie Ihr Projekt aus dem Drop-down-Menü Projekt auswählen aus.
Klicken Sie auf Aktivieren, um die Actions API für Ihr Projekt zu aktivieren.
Klicken Sie auf Anmeldedaten erstellen > Dienstkonto.
Geben Sie einen Namen für das Dienstkonto ein und klicken Sie auf Erstellen.
Wählen Sie im Drop-down-Menü Rolle auswählen die Option Projekt > Inhaber.
Klicken Sie auf Weiter.
Klicken Sie auf Schlüssel erstellen, um die JSON-Datei des Dienstkontos herunterzuladen.
Schlüssel gegen Zugriffstoken austauschen und Benachrichtigung senden
Zum Senden von Push-Benachrichtigungen über die Actions API müssen Sie den Dienstkontoschlüssel gegen ein Zugriffstoken austauschen. Wir empfehlen hierfür die Verwendung einer Google API-Clientbibliothek. In den folgenden Code-Snippets verwenden wir die Google API-Clientbibliothek für Node.js.
Installieren Sie die Google API-Clientbibliothek und senden Sie folgende Anfrage:
npm install googleapis request --save
Verwenden Sie den folgenden Code, um ein Zugriffstoken aus dem Dienstkontoschlüssel abzurufen und eine Push-Benachrichtigung zu senden:
[[["Leicht verständlich","easyToUnderstand","thumb-up"],["Mein Problem wurde gelöst","solvedMyProblem","thumb-up"],["Sonstiges","otherUp","thumb-up"]],[["Benötigte Informationen nicht gefunden","missingTheInformationINeed","thumb-down"],["Zu umständlich/zu viele Schritte","tooComplicatedTooManySteps","thumb-down"],["Nicht mehr aktuell","outOfDate","thumb-down"],["Problem mit der Übersetzung","translationIssue","thumb-down"],["Problem mit Beispielen/Code","samplesCodeIssue","thumb-down"],["Sonstiges","otherDown","thumb-down"]],["Zuletzt aktualisiert: 2025-07-25 (UTC)."],[[["\u003cp\u003ePush notifications can be sent to Android and iOS users to provide timely reminders or updates from your Action.\u003c/p\u003e\n"],["\u003cp\u003eYou need to create a global intent that will be triggered when the user interacts with the notification.\u003c/p\u003e\n"],["\u003cp\u003eUsers must explicitly opt-in to receive push notifications through a prompt within your Action.\u003c/p\u003e\n"],["\u003cp\u003eSending notifications requires using the Actions API with a service account key for authentication.\u003c/p\u003e\n"],["\u003cp\u003eStore the \u003ccode\u003eupdatesUserId\u003c/code\u003e securely to target specific users with notifications.\u003c/p\u003e\n"]]],[],null,["# Push notifications\n\nYour Action can push notifications to users whenever relevant, such as sending a reminder when the due date for a task is near.\n\nThis guide describes how to set up push notifications for your Action.\n\nSupported surfaces\n------------------\n\nPush notifications are available on Android and iOS devices (iOS devices must have the Assistant app installed to receive push notifications). They are not currently supported on voice-activated speakers, smart displays, or other surfaces.\n\nPrerequisites\n-------------\n\nYour project must contain at least one [global intent](/assistant/conversational/intents#custom_intents), which is invoked when the user taps a push notification received from Assistant.\n\nGet started\n-----------\n\nThe following sections describe how to set up push notifications in your Action.\n\n### Create an intent for triggering\n\nThe intent you create in this section triggers the notifications flow. To create\nthis intent, follow these steps:\n\n1. Go to the [Actions console](//console.actions.google.com/) and click **Develop** in the top menu.\n2. Click **Intents** in the left menu to expand the section.\n3. Click the add_circle_outline at the bottom of the list and enter a name for the new intent.\n4. Press `Enter/Return` to create the new intent.\n5. Add training phrases for triggering the notifications flow. Some examples are:\n\n - `Notify me`\n - `Send notifications`\n - `Subscribe to notifications`\n6. Click **Save**.\n\n### Transition to system intent\n\nTo set up the transition to the `Notifications` system scene, follow these steps:\n\n1. Under **Scenes** in the left menu, click the scene you want to add the notifications subscription flow to.\n2. Under the **User intent handling** section of the scene, click **+** to add a new intent handler.\n3. Under **Intent**, select the intent you created in the previous section.\n4. Under **Transition** , select the **Notifications** system scene.\n\n5. Click **Save**.\n\n### Configure system scene\n\nTo configures the `Notifications` system scene, follow these steps:\n\n1. Under **Scenes** in the left menu, select the new **Notifications** system scene.\n2. Under the **Configure intent** section, click **Select intent**.\n3. Under the **Select intent** section, select the intent you want to be matched when a user taps a push notification.\n\n | **Note:** The intent you choose for this step needs to be a global intent.\n4. For **Customize opt-in prompt**, enter a prompt that is displayed to users when they're asked to subscribe to push notifications. The prompt is in the form of \"Is it ok if I send push notifications for $prompt\".\n\n5. Click **Save**.\n\n### Configure opt-in\n\nTo configure opting in to push notifications, follow these steps:\n\n1. Under **Scenes** , select the **Notifications** system scene.\n2. Under **Conditions** , select **If the user says \"yes\"**.\n3. Enable **Call your webhook** and provide an event handler name, such as `subscribe_to_notifications`.\n4. Enable **Send prompts** and provide a simple prompt to let the user know they'll be sent notifications:\n\n candidates:\n - first simple:\n variants:\n - speech: 'Great, I'll send you notifications.'\n\n5. Under **Transition** , select **End conversation** to end the conversation after a user subscribes to notifications.\n\n### Configure opt-out\n\nTo configure opting out of push notifications, follow these steps:\n\n1. Under **Conditions** , select **If the user says \"no\"**.\n2. Enable **Send prompts** and provide a simple prompt to let the user know they won't be sent notifications:\n\n candidates:\n - first simple:\n variants:\n - speech: Okay, I won't send you notifications.\n\n3. Under **Transition** , select **End conversation** to end the conversation after a user opts out of notifications.\n\n### Configure webhook\n\nTo configure your webhook, follow these steps:\n\n1. In your webhook, add an intent handler for storing the `updatesUserId`:\n\n app.handle('subscribe_to_notifications', conv =\u003e {\n const intentName = '\u003cname_of_intent_to_trigger\u003e';\n const notificationsSlot = conv.session.params['NotificationSlot_${intentName}'];\n if(notificationsSlot.permissionStatus == 'PERMISSION_GRANTED') {\n const updateUserId = notificationsSlot.additionalUserData.updateUserId;\n // Store the user ID and the notification's target intent for later use.\n // (Use a database, like Firestore, for best practice.)\n }\n });\n\nSend notifications\n------------------\n\nPush notifications are sent to users using the Actions API. To use this API, you need to activate the API in your Google Cloud project and set up and download a JSON service account key.\n\nYou can then use the Google OAuth2 client library to exchange the service account key for an access token and use the token to authenticate your requests to the Actions API.\n\n### Get a service account key\n\n1. Go to the [Google API console](//console.developers.google.com/apis/api/actions.googleapis.com/overview) and select your project from the **Select a project** dropdown.\n2. Click **Enable** to enable the Actions API for your project.\n3. Go to the [Google Cloud console credentials page](//console.developers.google.com/apis/credentials) and select your project from the **Select a project** dropdown.\n4. Click **Create credentials \\\u003e Service account**.\n5. Enter a service account name and click **Create**.\n6. From the **Select a role** dropdown, select **Project \\\u003e Owner**.\n7. Click **Continue**.\n8. Click **Create key** to download the service account JSON file.\n\n### Exchange the key for an access token and send a notification\n\nTo send push notifications through the Actions API, you need to exchange the service account key for an access token. We recommend using a Google API client library for this. In the series of code snippets that follow, we use the Google API Node.js client library.\n\n1. Install the Google API client library and request:\n\n `npm install googleapis request --save`\n2. Use the following code to get an access token from the service account key and send a push notification:\n\n // Use the Actions API to send a Google Assistant push notification.\n let client = auth.fromJSON(require('./service-account.json'));\n client.scopes = ['https://www.googleapis.com/auth/actions.fulfillment.conversation'];\n let notification = {\n userNotification: {\n title: 'Example notification title',\n },\n target: {\n userId: '\u003cUPDATES_USER_ID\u003e',\n intent: 'Notifications Intent',\n },\n };\n client.authorize((err, tokens) =\u003e {\n if (err) {\n throw new Error('Auth error: ${err}');\n }\n request.post('https://actions.googleapis.com/v2/conversations:send', {\n 'auth': {\n 'bearer': tokens.access_token,\n },\n 'json': true,\n 'body': {'customPushMessage': notification, 'isInSandbox': true},\n }, (err, httpResponse, body) =\u003e {\n if (err) {\n throw new Error('API request error: ${err}');\n }\n console.log('${httpResponse.statusCode}: ' + '${httpResponse.statusMessage}');\n console.log(JSON.stringify(body));\n });\n });"]]