
OAuth ve Google ile Oturum Açma bağlantı türü, OAuth tabanlı yöntemlere ek olarak Google ile Oturum Açma özelliğini ekler. hesap bağlama. Bu, Google kullanıcıları için sorunsuz, ses tabanlı bağlantı sağlar aynı zamanda hizmetinize kaydolan kullanıcılar için hesap bağlamayı etkinleştirir Google dışı bir kimlikle oturum açın.
Bu bağlantı türü, Google ile Oturum Açma özelliğiyle başlar. Google ile Oturum Açma, kullanıcının Google profil bilgileri sisteminizde mevcut. Kullanıcının bilgileri bulunamadığından, standart bir OAuth akışı başlar. Kullanıcı ayrıca Google profil bilgileriyle yeni bir hesap oluşturmayı seçebilir.
OAuth ve Google ile Oturum Açma ile hesap bağlama işlemi gerçekleştirmek için aşağıdaki genel talimatları uygulayın. için şu adımları izleyin:
- İlk olarak kullanıcıdan Google profiline erişim izni vermesini isteyin.
- Kullanıcıyı tanımlamak için profilindeki bilgileri kullanın.
- Kimlik doğrulama sisteminizde Google kullanıcısı için eşleşme bulamıyorsanız
akış, Actions projenizi yapılandırıp yapılandırmadığınıza bağlı olarak devam eder
Sesle veya yalnızca açık olarak kullanıcı hesabı oluşturulmasına izin vermek için Actions konsolunda
sitenizi ziyaret edin.
- Sesle hesap oluşturmaya izin verirseniz kimliği doğrulayın Google'dan alınan simge. Daha sonra, kullandığınız kimlik jetonunda bulunan profil bilgilerini sağlayın.
- Sesle hesap oluşturulmasına izin vermezseniz kullanıcı şuraya aktarılır: bir tarayıcı kullanarak yetkilendirme sayfanızı yükleyip kullanıcıyı içerik üretme akışıyla ilgilidir.
Sesle hesap oluşturmayı destekleyin
Sesle kullanıcı hesabı oluşturulmasına izin verirseniz Asistan, kullanıcıya şunları yapmak istiyorlar:
- Google hesap bilgilerini kullanarak sisteminizde yeni bir hesap oluşturun veya
- Varsa kimlik doğrulama sisteminizde farklı bir hesapla oturum açın. mevcut bir Google dışı hesabınız olabilir.
soruna neden olabilir. Kullanıcının yalnızca ses akışını bırakması gerekir Mevcut bir Google dışı hesabını kullanarak oturum açmak istiyorlarsa.
Sesle hesap oluşturmaya izin verme
Sesle kullanıcı hesabı oluşturulmasına izin vermediyseniz Asistan kullanıcı kimlik doğrulaması için sağladığınız web sitesi. Etkileşim gerçekleşiyorsa ekranı olmayan bir cihazda; Asistan, kullanıcıyı telefona yönlendirirse devam edin.
Oluşturmaya izin vermemeniz şu durumlarda önerilir:
Google dışı hesapları olan kullanıcıların yeni bir hesap oluşturmasına izin vermek istemiyorsanız ve hesabınızındaki mevcut kullanıcı hesaplarına bağlanmasını istiyorsanız kimlik doğrulama sistemi kullanır. Örneğin, bir bağlılık programı sunuyorsanız kullanıcının puanlarını kaybetmediğinden emin olmak isteyebilirsiniz. mevcut hesabınızda oturum açın.
Hesap oluşturma akışı üzerinde tam kontrole sahip olmanız gerekir. Örneğin herkesin sırasında kullanıcıya hizmet şartlarınızı göstermeniz gerekiyorsa içerik oluşturulmasına izin vermeme hesap oluşturma.
OAuth ve Google ile Oturum Açma hesap bağlamayı uygulama
Hesaplar, endüstri standardı OAuth 2.0 akışlarına bağlıdır. Actions on Google, örtülü ve yetkilendirme kod akışlarını destekler.
Dolaylı kod akışında Google, yetkilendirme uç noktanızı kullanıcının tarayıcısında açar. Başarılı bir şekilde oturum açtıktan sonra Google'a uzun ömürlü bir erişim jetonu döndürürsünüz. Bu erişim jetonu artık Asistan'dan Action'ınıza gönderilen her isteğe dahil edilir.
Yetkilendirme kodu akışında iki uç noktaya ihtiyacınız vardır:
- Oturum açma kullanıcı arayüzünü henüz oturum açmamış kullanıcılara sunmaktan ve istenen erişime kısa süreli bir yetkilendirme kodu biçiminde izin kaydetmekten sorumlu olan yetkilendirme uç noktası.
- İki tür exchange'den sorumlu olan jeton değişimi uç noktası:
- Yetkilendirme kodunu uzun ömürlü yenileme jetonu ve kısa ömürlü erişim jetonu ile değiştirir. Bu değişim, kullanıcı hesap bağlama akışından geçer.
- Kısa ömürlü bir erişim jetonu için uzun süreli yenileme jetonunu değiştirir. Bu exchange, Google'ın süresi dolmuş olduğundan yeni bir erişim jetonuna ihtiyacı olduğunda gerçekleşir.
Örtülü akış kullanılarak verilen erişim jetonlarının geçerlilik süresinin hiçbir zaman dolmaması, Google'ın örtülü akışla kullanılması nedeniyle kullanıcının hesabını tekrar bağlamayı zorunlu kıldığı için Google, örtülü akış akışının uygulanmasını önerir. Güvenlik nedeniyle jetonun süresinin dolması gerekiyorsa kimlik doğrulama kodu akışını kullanmanız önerilir.
Projeyi yapılandırma
Projenizi OAuth ve Google ile Oturum Açma hesabını kullanacak şekilde yapılandırmak için aşağıdaki adımları uygulayın:
- Actions konsolunu açın ve kullanmak istediğiniz projeyi seçin.
- Geliştir sekmesini tıklayıp Hesap bağlama'yı seçin.
- Hesap bağlama'nın yanındaki anahtarı etkinleştirin.
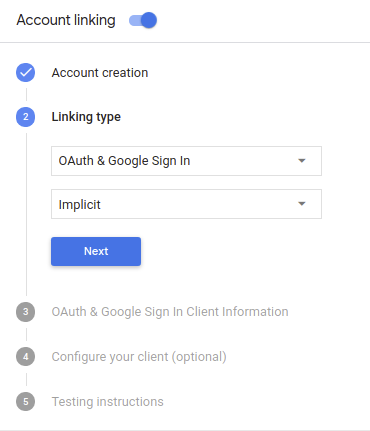
- Hesap oluşturma bölümünde Evet'i seçin.
Bağlantı türü'nde OAuth ve Google ile Oturum Açma ve Dolaylı.
İstemci Bilgileri bölümünde aşağıdakileri yapın:
- Aşağıdakileri belirlemek için Actions'ınız tarafından Google'a verilen Client-ID'ye Google'dan gelen isteklerle karşılaşıyorum.
- Yetkilendirme ve Token Exchange uç noktalarınızın URL'lerini ekleyin.
Kaydet'i tıklayın.
OAuth sunucunuzu uygulama
OAuth 2.0 örtülü akışını desteklemek için hizmetiniz bir yetkilendirme yapar uç nokta ile kullanılabilir. Bu uç nokta, kimlik doğrulama ve güvenlikten ve verilere erişim için kullanıcılardan izin alınması gerekir. Yetkilendirme uç noktası Henüz oturum açmamış kullanıcılarınıza bir oturum açma kullanıcı arayüzü sunar ve istenen erişim için izin verin.
İşleminizin, hizmetinizin yetkili API'lerinden birini çağırması gerektiğinde Google, API'leri kendi cihazlarında çağırmak için bu uç noktayı anlamına gelir.
Google tarafından başlatılan tipik bir OAuth 2.0 örtülü akış oturumunda, takip eden akış:
- Google, yetkilendirme uç noktanızı kullanıcının tarayıcısında açar. İlgili içeriği oluşturmak için kullanılan kullanıcı oturum açmış değilse oturum açar ve Google'a erişim için izin verir izin vermedilerse verilerini API'nizle birlikte göndermelerini isteyin.
- Hizmetiniz bir erişim jetonu oluşturur ve bu jetonu Kullanıcının tarayıcısını erişim jetonuyla tekrar Google'a yönlendirerek Google ekleyebilirsiniz.
- Google, hizmetinizin API'lerini çağırır ve erişim jetonunu dikkat edin. Hizmetiniz, erişim jetonunun Google'a ve ardından API çağrısını tamamlar.
Yetkilendirme isteklerini işleme
İşleminizin OAuth2 örtülü akışı üzerinden hesap bağlama yapması gerektiğinde Google, kullanıcıyı yetkilendirme uç noktanıza şunu içeren bir istekle gönderir: şu parametrelere sahip olursunuz:
| Yetkilendirme uç noktası parametreleri | |
|---|---|
client_id |
Google'a atadığınız istemci kimliği. |
redirect_uri |
Bu isteğe yanıt gönderdiğiniz URL. |
state |
yönlendirme URI'si. |
response_type |
Yanıtta döndürülecek değerin türü. OAuth 2.0 dolaylı için
akışında, yanıt türü her zaman token olur. |
Örneğin, yetkilendirme uç noktanız https://myservice.example.com/auth üzerinde mevcutsa,
talep şu şekilde görünebilir:
GET https://myservice.example.com/auth?client_id=GOOGLE_CLIENT_ID&redirect_uri=REDIRECT_URI&state=STATE_STRING&response_type=token
Yetkilendirme uç noktanızın oturum açma isteklerini işlemesi için aşağıdaki adımları uygulayın:
Aşağıdaki işlemler için
client_idveredirect_urideğerlerini doğrulayın: istenmeyen veya yanlış yapılandırılmış istemci uygulamalarına erişim verilmesini önleyin:client_iddeğerinin, kullandığınız istemci kimliğiyle eşleştiğini doğrulayın Google'a atanmıştır.redirect_uritarafından belirtilen URL'yi doğrulayın parametresi aşağıdaki biçimdedir:https://oauth-redirect.googleusercontent.com/r/YOUR_PROJECT_ID
Kullanıcının hizmetinizde oturum açıp açmadığını kontrol edin. Kullanıcı oturum açmamışsa hizmetinizin oturum açma veya kaydolma akışını tamamlayın.
Google'ın API'nize erişmek için kullanacağı bir erişim jetonu oluşturun. İlgili içeriği oluşturmak için kullanılan erişim jetonu herhangi bir dize değeri olabilir, ancak jetonun ait olduğu ve tahmin edilememesi gerekir.
Kullanıcının tarayıcısını URL'ye yönlendiren bir HTTP yanıtı gönderme
redirect_uriparametresiyle belirtilir. Aşağıdakilerin tümünü dahil edin: aşağıdaki parametreleri kullanabilirsiniz:access_token: Az önce oluşturduğunuz erişim jetonutoken_type:bearerdizesistate: Orijinal durumdaki değiştirilmemiş durum değeri istek Sonuçta elde edilen URL'nin bir örneği aşağıda verilmiştir:https://oauth-redirect.googleusercontent.com/r/YOUR_PROJECT_ID#access_token=ACCESS_TOKEN&token_type=bearer&state=STATE_STRING
Google'ın OAuth 2.0 yönlendirme işleyicisi, erişim jetonunu alır ve onay verir
state değerinin değişmediğinden emin olun. Google,
erişim jetonunuz varsa Google, jetonu sonraki çağrılara ekler
AppRequest'in bir parçası olarak İşleminize ekleyin.
Otomatik bağlama işlemini gerçekleştirme
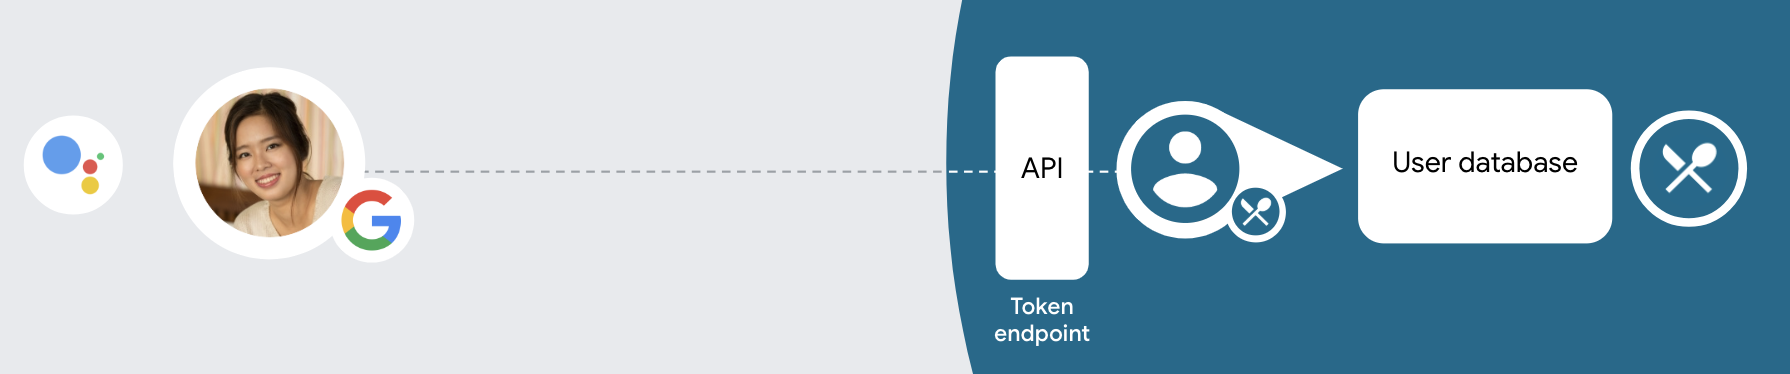
Kullanıcı Google profiline erişmesi için İşleminize izin verdikten sonra, Google Google kullanıcısının kimliği için imzalı bir onay içeren istek gönderir. Onaylama; kullanıcının Google Hesabı kimliğini, adını, ve e-posta adresi. Projenizin işleyicileri için yapılandırılan jeton değişimi uç noktası söz konusu istekte bulunabilirsiniz.
İlgili Google Hesabı kimlik doğrulama sisteminizde zaten varsa
jeton değişimi uç noktanız, kullanıcı için bir jeton döndürür. Google Hesabı
mevcut bir kullanıcıyla eşleşirse jeton değişimi uç noktanız user_not_found hatası döndürüyor.
Talep aşağıdaki biçimdedir:
POST /token HTTP/1.1
Host: oauth2.example.com
Content-Type: application/x-www-form-urlencoded

grant_type=urn:ietf:params:oauth:grant-type:jwt-bearer&intent=get&assertion=JWT&consent_code=CONSENT_CODE&scope=SCOPES
Jeton değişimi uç noktanız aşağıdaki parametreleri işleyebilmelidir:
| Jeton uç noktası parametreleri | |
|---|---|
grant_type |
Değişen jetonun türü. Söz konusu
parametresi urn:ietf:params:oauth:grant-type:jwt-bearer değerine sahiptir. |
intent |
Bu istekler için parametrenin değeri "get" şeklindedir. |
assertion |
Google Cloud konsolunun imzalı onayını sağlayan bir JSON Web Token (JWT) kullanıcı kimliği. JWT, kullanıcının Google Hesap kimliği, ad ve e-posta adresi. |
consent_code |
İsteğe bağlı: Varsa kullanıcı, işleminizin belirtilen kapsamlara erişmesine izin verdi. |
scope |
İsteğe bağlı: Google'ın kullanıcılardan isteyeceği şekilde yapılandırdığınız kapsamlar. |
Jeton değişimi uç noktanız bağlantı isteğini aldığında takip etmek için:
JWT onayını doğrulama ve kodunu çözme
Diliniz için JWT kod çözme kitaplığı kullanarak JWT onayını doğrulayıp kodunu çözebilirsiniz. Google'ın genel anahtarlarını kullanın (JWK veya PEM biçimini) kullanarak jetonun imzası var.
Kodu çözüldüğünde JWT onayı aşağıdaki örnek gibi görünür:
{
  "sub": 1234567890,        // The unique ID of the user's Google Account
  "iss": "https://accounts.google.com",        // The assertion's issuer
  "aud": "123-abc.apps.googleusercontent.com", // Your server's client ID
  "iat": 233366400,         // Unix timestamp of the assertion's creation time
  "exp": 233370000,         // Unix timestamp of the assertion's expiration time
  "name": "Jan Jansen",
  "given_name": "Jan",
  "family_name": "Jansen",
  "email": "jan@gmail.com", // If present, the user's email address
  "locale": "en_US"
}
Jetonun imzasını doğrulamanın yanı sıra onaylamayı verenin de
(iss alanı) https://accounts.google.com ve kitle (aud alanı)
İşleminize atanan istemci kimliğidir.
Google Hesabı'nın kimlik doğrulama sisteminizde olup olmadığını kontrol edin
Aşağıdaki koşullardan herhangi birinin doğru olup olmadığını kontrol edin:
- Onaylamanın
subalanında bulunan Google Hesabı kimliği, kullanıcı veritabanınızda yer alır. - Onaylamadaki e-posta adresi, kullanıcı veritabanınızdaki bir kullanıcıyla eşleşiyor.
İki koşul da doğruysa kullanıcı zaten kaydolmuş demektir. erişim jetonu.
Onaylamada belirtilmeyen Google Hesabı kimliği veya e-posta adresi
veritabanınızdaki bir kullanıcıyla eşleşiyorsa kullanıcı henüz kaydolmamış. Bu durumda,
jeton değişimi uç noktası, error=user_not_found değerini belirten bir HTTP 401 hatasıyla yanıt vermelidir
aşağıdaki örnekte olduğu gibi:
HTTP/1.1 401 Unauthorized
Content-Type: application/json;charset=UTF-8

{
  "error":"user_not_found",
}
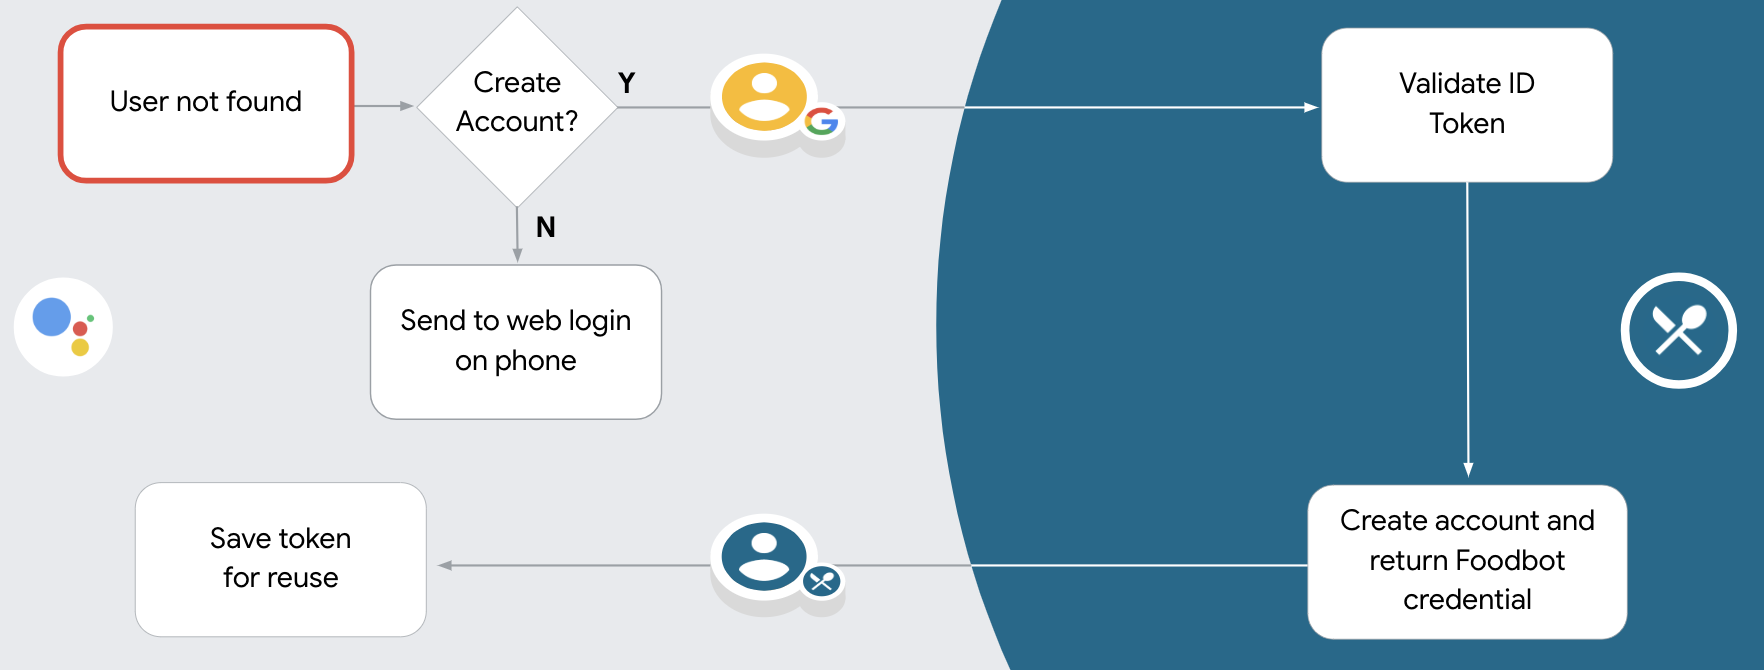
user_not_found hatası içeren 401 hatası yanıtı aldığında, Google
jeton değişimi uç noktanızı intent parametresinin değeriyle çağırır
create olarak ayarlanmış ve kullanıcının profil bilgilerini içeren bir kimlik jetonu gönderiyor
işleme koyacağız.
Google ile Oturum Açma aracılığıyla hesap oluşturma
Bir kullanıcının hizmetinizde hesap oluşturması gerektiğinde Google,
intent=create, aşağıdaki örnekte gösterildiği gibi:
POST /token HTTP/1.1
Host: oauth2.example.com
Content-Type: application/x-www-form-urlencoded

response_type=token&grant_type=urn:ietf:params:oauth:grant-type:jwt-bearer&scope=SCOPES&intent=create&consent_code=CONSENT_CODE&assertion=JWT[&NEW_ACCOUNT_INFO]
assertion parametresi, şunları sağlayan bir JSON Web Token (JWT) içerir:
Google kullanıcısının kimliğinin imzalı onayı. JWT, alan adında
Kullanıcının Google Hesap kimliğini, adını ve e-posta adresini içeren
hizmetinizde yeni bir hesap oluşturun.
Hesap oluşturma isteklerine yanıt vermek için jeton değişimi uç noktanızın şunu yapması gerekir: şu:
JWT onayını doğrulama ve kodunu çözme
Diliniz için JWT kod çözme kitaplığı kullanarak JWT onayını doğrulayıp kodunu çözebilirsiniz. Google'ın genel anahtarlarını kullanın (JWK veya PEM biçimini) kullanarak jetonun imzası var.
Kodu çözüldüğünde JWT onayı aşağıdaki örnek gibi görünür:
{
  "sub": 1234567890,        // The unique ID of the user's Google Account
  "iss": "https://accounts.google.com",        // The assertion's issuer
  "aud": "123-abc.apps.googleusercontent.com", // Your server's client ID
  "iat": 233366400,         // Unix timestamp of the assertion's creation time
  "exp": 233370000,         // Unix timestamp of the assertion's expiration time
  "name": "Jan Jansen",
  "given_name": "Jan",
  "family_name": "Jansen",
  "email": "jan@gmail.com", // If present, the user's email address
  "locale": "en_US"
}
Jetonun imzasını doğrulamanın yanı sıra onaylamayı verenin de
(iss alanı) https://accounts.google.com ve kitle (aud alanı)
İşleminize atanan istemci kimliğidir.
Kullanıcı bilgilerini doğrulayın ve yeni hesap oluşturun
Aşağıdaki koşullardan herhangi birinin doğru olup olmadığını kontrol edin:
- Onaylamanın
subalanında bulunan Google Hesabı kimliği, kullanıcı veritabanınızda yer alır. - Onaylamadaki e-posta adresi, kullanıcı veritabanınızdaki bir kullanıcıyla eşleşiyor.
İki koşul da doğruysa kullanıcıdan mevcut hesabını
isteğe bir HTTP 401 hatasıyla yanıt vererek ve
error=linking_error ve kullanıcının e-posta adresi login_hint olarak (örneğin,)
şu örneği inceleyin:
HTTP/1.1 401 Unauthorized
Content-Type: application/json;charset=UTF-8

{
  "error":"linking_error",
  "login_hint":"foo@bar.com"
}
İki koşul da doğru değilse bilgileri kullanarak yeni bir kullanıcı hesabı oluşturun bu formu doldurmanızı öneririm. Yeni hesaplarda genellikle belirlenmiş bir şifre bulunmaz. Evet kullanıcıların giriş yapmasına olanak tanımak için Google ile Oturum Açma'yı diğer platformlara eklemenizi önerdi bir ürün gösterebilirsiniz. Alternatif olarak şifre kurtarma akışınızı başlatan bir bağlantı içeren bir e-posta gönderin. diğer platformlarda oturum açmak için kullanabileceğiniz bir şifre oluşturun.
Oluşturma işlemi tamamlandığında bir erişim jetonu düzenleyin ve değerleri şurada bir JSON nesnesinin içinde döndürür: aşağıdaki örnekte olduğu gibi HTTPS yanıtınızın gövdesini yazın:
{
  "token_type": "Bearer",
  "access_token": "ACCESS_TOKEN",

  "expires_in": SECONDS_TO_EXPIRATION
}
Kimlik doğrulama akışını başlat
Hesapta Oturum Açma yardımcı amacını kullanma kimlik doğrulama akışını başlatın.
const app = dialogflow({
  // REPLACE THE PLACEHOLDER WITH THE CLIENT_ID OF YOUR ACTIONS PROJECT
  clientId: CLIENT_ID,
})

// Intent that starts the account linking flow.
app.intent('Start Signin', conv => {
  conv.ask(new SignIn('To get your account details'))
})
private String clientId = "<your_client_id>";

@ForIntent("Start Signin")
public ActionResponse text(ActionRequest request) {
  ResponseBuilder rb = getResponseBuilder(request);
  return rb.add(new SignIn().setContext("To get your account details")).build();
}
const app = actionssdk({
  clientId: CLIENT_ID,
})

app.intent('Start Signin', conv => {
  conv.ask(new SignIn('To get your account details'))
})
private String clientId = "<your_client_id>";

@ForIntent("actions.intent.TEXT")
public ActionResponse text(ActionRequest request) {
  ResponseBuilder rb = getResponseBuilder(request);
  return rb.add(new SignIn().setContext("To get your account details")).build();
}
Veri erişimi isteklerini işleme
Asistan isteği bir erişim jetonu içeriyorsa: önce erişim jetonunun geçerli olduğundan ve süresinin dolmadığından emin olun, ardından kullanıcı hesabı veritabanı, jetonla ilişkilendirilen kullanıcı hesabı.