
Il tipo di collegamento OAuth e Accedi con Google aggiunge Accedi con Google oltre alle impostazioni basate su OAuth collegamento dell'account. In questo modo, gli utenti Google possono collegarsi tramite comandi vocali e abilitare il collegamento degli account per gli utenti che si sono registrati al tuo servizio con un'identità non Google.
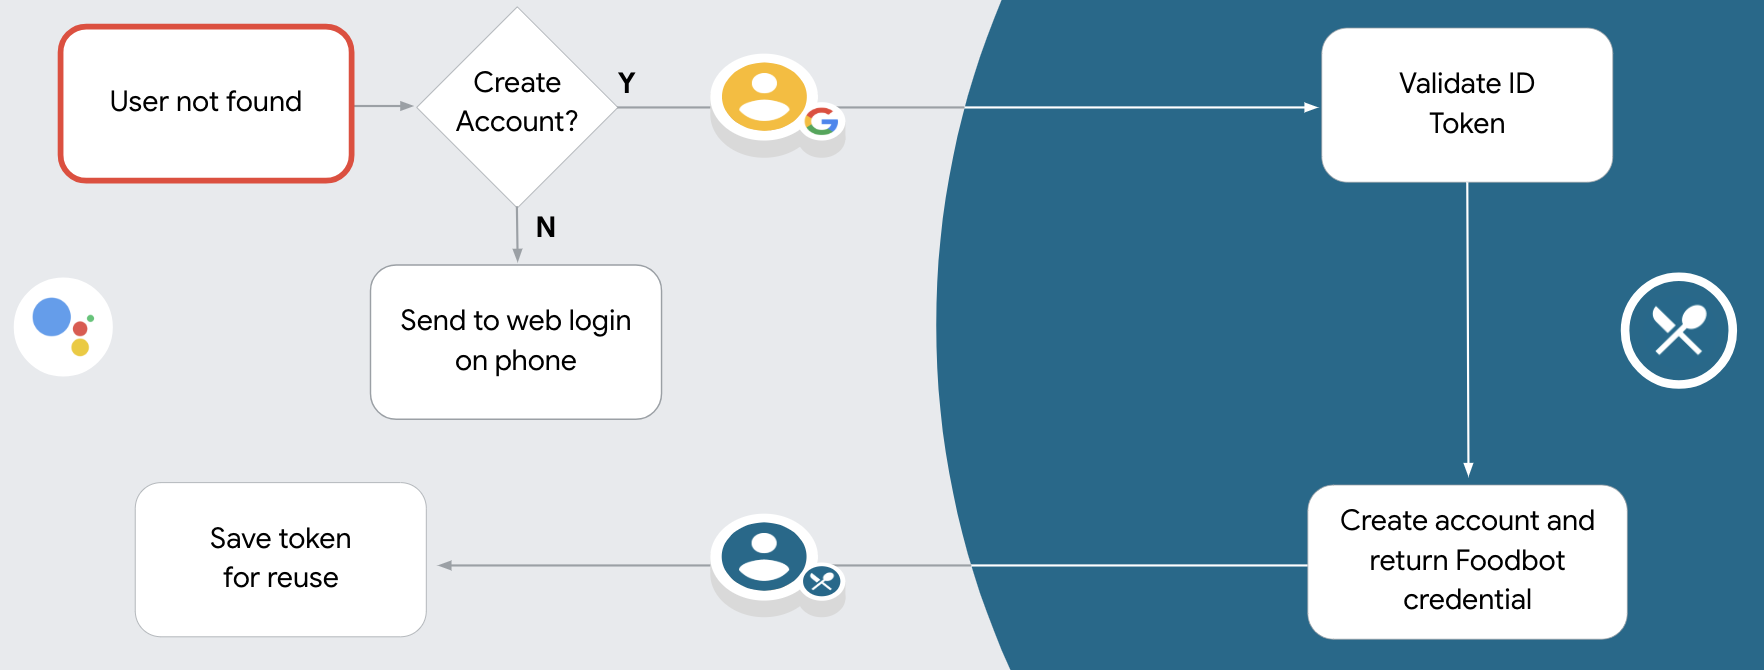
Questo tipo di collegamento inizia con Accedi con Google, che ti consente di verificare se l'utente Nel sistema sono presenti informazioni del profilo Google. Se le informazioni dell'utente non è presente nel sistema, viene avviato un flusso OAuth standard. L'utente può inoltre sceglie di creare un nuovo account con i dati del proprio profilo Google.

Per eseguire il collegamento dell'account con OAuth e Accedi con Google, segui queste informazioni generali passaggi:
- Per prima cosa, chiedi all'utente di dare il consenso per accedere al suo profilo Google.
- Utilizza le informazioni presenti nel profilo per identificare l'utente.
- Se non riesci a trovare una corrispondenza per l'utente Google nel tuo sistema di autenticazione,
il flusso procede a seconda che tu abbia configurato o meno il progetto Actions
Nella console di Actions per consentire la creazione di account utente tramite comandi vocali o solo
del tuo sito web.
- Se consenti la creazione di account tramite comandi vocali, convalida l'ID di accesso al token ricevuto da Google. Puoi quindi creare un utente in base le informazioni del profilo contenute nel token ID.
- Se non consenti la creazione di account tramite comandi vocali, l'utente viene trasferito a un browser in cui possano caricare la pagina di autorizzazione e completare la procedura flusso di creazione di contenuti.
Assistenza per la creazione di account tramite comandi vocali
Se consenti la creazione di account utente tramite comandi vocali, l'assistente chiede all'utente se l'utente vuole effettuare le seguenti operazioni:
- Creare un nuovo account sul tuo sistema utilizzando i dati del loro Account Google oppure
- Accedere al sistema di autenticazione con un account diverso, se dispone di un account non Google esistente.
Ti consigliamo di consentire la creazione di account tramite comandi vocali se vuoi ridurre al minimo le le difficoltà del flusso di creazione dell'account. L'utente deve solo uscire dal flusso vocale se l'utente vuole accedere utilizzando un account non Google esistente.
Non consentire la creazione di account tramite comandi vocali
Se non consenti la creazione di account utente tramite comandi vocali, l'assistente apre l'URL nella sezione fornito per l'autenticazione degli utenti. Se l'interazione è in corso su un dispositivo privo di schermo, l'assistente indirizza l'utente a un telefono per continuare il flusso di collegamento dell'account.
Si consiglia di non consentire la creazione se:
Non vuoi consentire agli utenti che hanno account non Google di creare un nuovo account utente e vuoi che si colleghino ai loro account utente esistenti nel tuo sistema di autenticazione basato su query. Ad esempio, se offri un programma fedeltà, potresti voler assicurarti che l'utente non perda i punti accumulati sulla sua account esistente.
Devi avere il controllo completo del flusso di creazione dell'account. Ad esempio, potresti non consentire la creazione se devi mostrare i tuoi Termini di servizio all'utente durante creazione di account.
Implementare il collegamento degli account OAuth e Accedi con Google
Gli account sono collegati ai flussi OAuth 2.0 standard di settore. Actions on Google supporta i flussi implicito e del codice di autorizzazione.
Nel flusso del codice implicito, Google apre il tuo endpoint di autorizzazione nel browser dell'utente. Dopo aver eseguito l'accesso, restituisci a Google un token di accesso di lunga durata. Questo token di accesso è ora incluso in ogni richiesta inviata dall'assistente alla tua azione.
Nel flusso del codice di autorizzazione, sono necessari due endpoint:
- L'endpoint di autorizzazione, che è responsabile della presentazione dell'interfaccia utente di accesso agli utenti che non hanno ancora eseguito l'accesso, nonché della registrazione del consenso all'accesso richiesto sotto forma di codice di autorizzazione di breve durata.
- L'endpoint token scambio, che è responsabile di due tipi di scambi:
- Scambia un codice di autorizzazione con un token di aggiornamento di lunga durata e un token di accesso di breve durata. Questo scambio avviene quando l'utente esegue il flusso di collegamento dell'account.
- Scambia un token di aggiornamento di lunga durata con un token di accesso di breve durata. Questa piattaforma di scambio avviene quando Google ha bisogno di un nuovo token di accesso perché quello scaduto.
Anche se il flusso del codice implicito è più facile da implementare, Google consiglia che i token di accesso emessi utilizzando il flusso implicito non scadano mai, perché l'uso della scadenza del token con il flusso implicito obbliga l'utente a collegare di nuovo il proprio account. Se per motivi di sicurezza è necessaria la scadenza del token, ti consigliamo di utilizzare il flusso del codice di autenticazione.
Configura il progetto
Per configurare il progetto in modo che utilizzi OAuth e l'account Accedi con Google segui questi passaggi:
- Apri la console di Actions e seleziona il progetto che vuoi utilizzare.
- Fai clic sulla scheda Sviluppo e scegli Collegamento dell'account.
- Attiva l'opzione Collegamento dell'account.
- Nella sezione Creazione dell'account, seleziona Sì.
In Tipo di collegamento, seleziona OAuth e Accedi con Google e implicito.
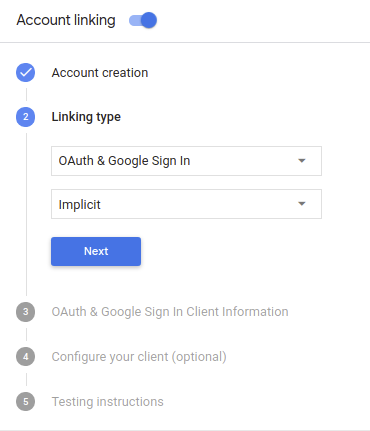
In Informazioni sul cliente, procedi nel seguente modo:
- Assegna un valore all'ID client emesso dalle tue Azioni a Google per identificare da Google.
- Inserisci gli URL degli endpoint di autorizzazione e di scambio di token.
Fai clic su Salva.
Implementare il server OAuth
Per supportare il flusso implicito OAuth 2.0, il servizio effettua un'autorizzazione endpoint disponibile tramite HTTPS. Questo endpoint è responsabile dell'autenticazione e ottenere il consenso degli utenti per l'accesso ai dati. Endpoint di autorizzazione presenta una UI di accesso agli utenti che non hanno ancora effettuato l'accesso e registra acconsentire all'accesso richiesto.
Se l'Azione deve chiamare una delle API autorizzate del tuo servizio, Google utilizza per ottenere l'autorizzazione degli utenti per chiamare queste API sui loro per conto tuo.
Una tipica sessione di flusso implicito OAuth 2.0 avviata da Google ha flusso seguente:
- Google apre il tuo endpoint di autorizzazione nel browser dell'utente. La l'utente accede se non l'ha già fatto e concede a Google l'autorizzazione ad accedere i propri dati con l'API, se non hanno già concesso l'autorizzazione.
- Il servizio crea un token di accesso e lo restituisce a Google reindirizzando il browser dell'utente a Google tramite il token di accesso in allegato alla richiesta.
- Google chiama le API del tuo servizio e collega il token di accesso con per ogni richiesta. Il tuo servizio verifica che il token di accesso conceda a Google l'autorizzazione ad accedere all'API e quindi completa la chiamata API.
Gestire le richieste di autorizzazione
Se l'azione deve eseguire il collegamento dell'account tramite un flusso implicito OAuth2, Google invia l'utente al tuo endpoint di autorizzazione con una richiesta che include i seguenti parametri:
| Parametri endpoint di autorizzazione | |
|---|---|
client_id |
L'ID client che hai assegnato a Google. |
redirect_uri |
L'URL a cui invii la risposta a questa richiesta. |
state |
Un valore di riferimento che viene restituito a Google invariato nelle URI di reindirizzamento. |
response_type |
Il tipo di valore da restituire nella risposta. Per il token OAuth 2.0 implicito,
il tipo di risposta è sempre token. |
Ad esempio, se l'endpoint di autorizzazione è disponibile all'indirizzo https://myservice.example.com/auth,
una richiesta potrebbe avere il seguente aspetto:
GET https://myservice.example.com/auth?client_id=GOOGLE_CLIENT_ID&redirect_uri=REDIRECT_URI&state=STATE_STRING&response_type=token
Affinché l'endpoint di autorizzazione possa gestire le richieste di accesso, segui questi passaggi:
Verifica i valori
client_ideredirect_uriper evitare di concedere l'accesso ad app client indesiderate o configurate in modo errato:- Verifica che il
client_idcorrisponda all'ID cliente che hai indicato assegnati a Google. - Verifica che l'URL specificato dal
redirect_uriha il seguente formato:https://oauth-redirect.googleusercontent.com/r/YOUR_PROJECT_ID
- Verifica che il
Verifica se l'utente ha eseguito l'accesso al tuo servizio. Se l'utente non ha firmato completa la procedura di accesso o registrazione al servizio.
Genera un token di accesso che Google utilizzerà per accedere alla tua API. La il token di accesso può essere qualsiasi valore di stringa, ma deve rappresentare in modo univoco l'utente e il client a cui è destinato il token e non deve essere prevedibile.
Invia una risposta HTTP che reindirizza il browser dell'utente all'URL specificato dal parametro
redirect_uri. Includi tutti i seguenti parametri nel frammento URL:access_token: il token di accesso che hai appena generatotoken_type: la stringabearerstate: il valore dello stato non modificato dell'originale richiesta Di seguito è riportato un esempio dell'URL risultante:https://oauth-redirect.googleusercontent.com/r/YOUR_PROJECT_ID#access_token=ACCESS_TOKEN&token_type=bearer&state=STATE_STRING
Il gestore del reindirizzamento OAuth 2.0 di Google riceverà il token di accesso e confermerà
che il valore state sia rimasto invariato. Dopo che Google ha ottenuto
di accesso al tuo servizio, Google lo collegherà alle chiamate successive
all'Azione nell'ambito di AppRequest.
Gestire il collegamento automatico
Dopo che l'utente ha dato il consenso all'azione per accedere al suo profilo Google, Google invia una richiesta contenente un'asserzione firmata dell'identità dell'utente Google. L'asserzione contiene informazioni che includono l'ID, il nome e e indirizzo email. L'endpoint dello scambio di token configurato per gli handle del progetto a quella richiesta.
Se l'Account Google corrispondente è già presente nel tuo sistema di autenticazione,
l'endpoint dello scambio di token restituisce un token per l'utente. Se l'Account Google non
corrisponde a un utente esistente, l'endpoint di scambio di token restituisce un errore user_not_found.
La richiesta ha il seguente modulo:
POST /token HTTP/1.1
Host: oauth2.example.com
Content-Type: application/x-www-form-urlencoded

grant_type=urn:ietf:params:oauth:grant-type:jwt-bearer&intent=get&assertion=JWT&consent_code=CONSENT_CODE&scope=SCOPES
L'endpoint di scambio di token deve essere in grado di gestire i seguenti parametri:
| Parametri endpoint token | |
|---|---|
grant_type |
Il tipo di token che viene scambiato. Per queste richieste,
ha il valore urn:ietf:params:oauth:grant-type:jwt-bearer. |
intent |
Per queste richieste, il valore di questo parametro è "get". |
assertion |
un token JWT (JSON Web Token) che fornisce un'asserzione firmata dei l'identità dell'utente. Il JWT contiene informazioni che includono i dati Google dell'utente ID account, nome e indirizzo email. |
consent_code |
Facoltativo: se presente, un codice monouso che indica che la proprietà l'utente ha concesso il consenso all'azione per accedere agli ambiti specificati. |
scope |
Facoltativo: tutti gli ambiti che hai configurato Google per richiedere agli utenti. |
Quando l'endpoint di scambio di token riceve la richiesta di collegamento, dovrebbe eseguire seguenti:
convalida e decodifica l'asserzione JWT
Puoi convalidare e decodificare l'asserzione JWT utilizzando una libreria di decodifica JWT per il tuo linguaggio. Utilizza le chiavi pubbliche di Google (disponibili in JWK o PEM) per verificare il token firma.
Una volta decodificata, l'asserzione JWT è simile all'esempio seguente:
{
  "sub": 1234567890,        // The unique ID of the user's Google Account
  "iss": "https://accounts.google.com",        // The assertion's issuer
  "aud": "123-abc.apps.googleusercontent.com", // Your server's client ID
  "iat": 233366400,         // Unix timestamp of the assertion's creation time
  "exp": 233370000,         // Unix timestamp of the assertion's expiration time
  "name": "Jan Jansen",
  "given_name": "Jan",
  "family_name": "Jansen",
  "email": "jan@gmail.com", // If present, the user's email address
  "locale": "en_US"
}
Oltre a verificare la firma del token, verifica che l'emittente dell'asserzione
(campo iss) è https://accounts.google.com e che il segmento di pubblico (campo aud)
è l'ID client assegnato all'Azione.
Controllare se l'Account Google è già presente nel sistema di autenticazione
Controlla se è vera una delle seguenti condizioni:
- L'ID Account Google, trovato nel campo
subdell'asserzione, è nel database degli utenti. - L'indirizzo email nell'asserzione corrisponde a un utente nel tuo database utenti.
Se una delle condizioni è vera, l'utente si è già registrato e puoi emettere un token di accesso.
Se né l'ID Account Google né l'indirizzo email specificato nell'asserzione
corrisponde a un utente presente nel tuo database, l'utente non si è ancora registrato. In questo caso,
l'endpoint dello scambio di token deve rispondere con un errore HTTP 401, che specifica error=user_not_found,
come nell'esempio seguente:
HTTP/1.1 401 Unauthorized
Content-Type: application/json;charset=UTF-8

{
  "error":"user_not_found",
}
user_not_found, Google
chiama l'endpoint di scambio di token con il valore del parametro intent
impostata su create e invia un token ID contenente le informazioni del profilo dell'utente.
con la richiesta.
Gestire la creazione di account tramite Accedi con Google
Quando un utente deve creare un account nel tuo servizio, Google effettua una
una richiesta all'endpoint di scambio di token che specifica
intent=create, come nell'esempio seguente:
POST /token HTTP/1.1
Host: oauth2.example.com
Content-Type: application/x-www-form-urlencoded

response_type=token&grant_type=urn:ietf:params:oauth:grant-type:jwt-bearer&scope=SCOPES&intent=create&consent_code=CONSENT_CODE&assertion=JWT[&NEW_ACCOUNT_INFO]
Il parametro assertion contiene un token JWT (JSON Web Token) che fornisce
un'asserzione firmata dell'identità dell'utente Google. Il JWT contiene informazioni
che include l'ID, il nome e l'indirizzo email dell'Account Google dell'utente, che puoi utilizzare
per creare un nuovo account nel tuo servizio.
Per rispondere alle richieste di creazione degli account, l'endpoint di scambio di token deve eseguire l'operazione le seguenti:
convalida e decodifica l'asserzione JWT
Puoi convalidare e decodificare l'asserzione JWT utilizzando una libreria di decodifica JWT per il tuo linguaggio. Utilizza le chiavi pubbliche di Google (disponibili in JWK o PEM) per verificare il token firma.
Una volta decodificata, l'asserzione JWT è simile all'esempio seguente:
{
  "sub": 1234567890,        // The unique ID of the user's Google Account
  "iss": "https://accounts.google.com",        // The assertion's issuer
  "aud": "123-abc.apps.googleusercontent.com", // Your server's client ID
  "iat": 233366400,         // Unix timestamp of the assertion's creation time
  "exp": 233370000,         // Unix timestamp of the assertion's expiration time
  "name": "Jan Jansen",
  "given_name": "Jan",
  "family_name": "Jansen",
  "email": "jan@gmail.com", // If present, the user's email address
  "locale": "en_US"
}
Oltre a verificare la firma del token, verifica che l'emittente dell'asserzione
(campo iss) è https://accounts.google.com e che il segmento di pubblico (campo aud)
è l'ID client assegnato all'Azione.
Convalida le informazioni dell'utente e crea un nuovo account
Controlla se è vera una delle seguenti condizioni:
- L'ID Account Google, trovato nel campo
subdell'asserzione, è nel database degli utenti. - L'indirizzo email nell'asserzione corrisponde a un utente nel tuo database utenti.
Se una delle condizioni è vera, chiedi all'utente di collegare il suo account esistente a
l'Account Google rispondendo alla richiesta con un errore HTTP 401, specificando
error=linking_error e l'indirizzo email dell'utente come login_hint, come nell'
nell'esempio seguente:
HTTP/1.1 401 Unauthorized
Content-Type: application/json;charset=UTF-8

{
  "error":"linking_error",
  "login_hint":"foo@bar.com"
}
Se nessuna delle due condizioni è vera, crea un nuovo account utente utilizzando le informazioni forniti nel JWT. In genere per i nuovi account non è impostata una password. È ti consigliamo di aggiungere l'opzione Accedi con Google ad altre piattaforme per consentire agli utenti di accedere tramite Google su tutte le piattaforme della tua applicazione. In alternativa, puoi invia all'utente via email un link che avvia il flusso di recupero della password per consentirgli di impostare una password per accedere su altre piattaforme.
Al termine della creazione, invia un token di accesso e restituisce i valori in un oggetto JSON in il corpo della risposta HTTPS, come nell'esempio seguente:
{
  "token_type": "Bearer",
  "access_token": "ACCESS_TOKEN",

  "expires_in": SECONDS_TO_EXPIRATION
}
Avvia il flusso di autenticazione
Utilizzare l'intent di supporto per l'accesso all'account per avviare il flusso di autenticazione.
const app = dialogflow({
  // REPLACE THE PLACEHOLDER WITH THE CLIENT_ID OF YOUR ACTIONS PROJECT
  clientId: CLIENT_ID,
})

// Intent that starts the account linking flow.
app.intent('Start Signin', conv => {
  conv.ask(new SignIn('To get your account details'))
})
private String clientId = "<your_client_id>";

@ForIntent("Start Signin")
public ActionResponse text(ActionRequest request) {
  ResponseBuilder rb = getResponseBuilder(request);
  return rb.add(new SignIn().setContext("To get your account details")).build();
}
const app = actionssdk({
  clientId: CLIENT_ID,
})

app.intent('Start Signin', conv => {
  conv.ask(new SignIn('To get your account details'))
})
private String clientId = "<your_client_id>";

@ForIntent("actions.intent.TEXT")
public ActionResponse text(ActionRequest request) {
  ResponseBuilder rb = getResponseBuilder(request);
  return rb.add(new SignIn().setContext("To get your account details")).build();
}
Gestire le richieste di accesso ai dati
Se la richiesta dell'assistente contiene un token di accesso, verifica che il token di accesso sia valido e non scaduto, quindi recuperalo dal tuo l'account utente associato al token.