本教學課程說明如何在網站上設定 purchase 事件,以便執行下列操作:
能評估使用者完成購物的時機教學課程包含維度
以及 Analytics 填入的事件資料報表。學習
如要進一步瞭解電子商務事件,請參閱「評估電子商務」一文。
事前準備
本教學課程假設您已完成下列操作:
此外,您也需要具備下列權限:
- 可存取網站原始碼
- Google Analytics 帳戶的「編輯者」(或更高層級) 角色
步驟 1:將事件新增至網站
請在網站的網頁中放置 purchase 事件
就會產生消費舉例來說,您可以在
然後顯示的確認頁。本教學課程
說明如何將事件加入使用者點選「購買」的頁面
按鈕。
將事件放在 <body> 標記結尾的 <script> 標記中。將
事件,在網頁載入時就會觸發事件。<script>
下一節將說明如何在使用者點選「購買」時觸發事件。
<!--
  Note: In the following code sample, make sure to
  replace "TAG_ID" with your tag ID.
  Learn more: https://support.google.com/tagmanager/answer/12326985
-->
<!DOCTYPE html>
<html lang="en">
<head>
    <!-- Google tag (gtag.js) -->
    <script async src="https://www.googletagmanager.com/gtag/js?id=TAG_ID"></script>
    <script>
        window.dataLayer = window.dataLayer || [];
        function gtag(){dataLayer.push(arguments);}
        gtag('js', new Date());

        gtag('config', 'TAG_ID');
    </script>
</head>
<body>
    <div>This is where the purchase form would go</div>
    <button>Submit</button>
    <script>
    gtag("event", "purchase", {
        transaction_id: "T_12345_1",
        value: 30.03,
        tax: 4.90,
        shipping: 5.99,
        currency: "USD",
        coupon: "SUMMER_SALE",
        items: [
        // If someone purchases more than one item,
        // you can add those items to the items array
         {
          item_id: "SKU_12345",
          item_name: "Stan and Friends Tee",
          affiliation: "Google Merchandise Store",
          coupon: "SUMMER_FUN",
          discount: 2.22,
          index: 0,
          item_brand: "Google",
          item_category: "Apparel",
          item_category2: "Adult",
          item_category3: "Shirts",
          item_category4: "Crew",
          item_category5: "Short sleeve",
          item_list_id: "related_products",
          item_list_name: "Related Products",
          item_variant: "green",
          location_id: "ChIJIQBpAG2ahYAR_6128GcTUEo",
          price: 10.01,
          quantity: 3
        }]
    });
    </script>
</body>
</html>
步驟 2:將活動連結至按鈕
您可以設定 purchase 事件,在有人點選
「Purchase」(購買)按鈕。其中一種方法是在「購物」中加入 ID
按鈕,然後將事件代碼放入事件監聽器。在下列項目中
舉例來說,只有當使用者按下具有 ID 的按鈕時,才會傳送事件
purchase。
<!--
  Note: In the following code sample, make sure to
  replace "TAG_ID" with your tag ID.
  Learn more: https://support.google.com/tagmanager/answer/12326985
-->
<!DOCTYPE html>
<html lang="en">
<head>
    <!-- Google tag (gtag.js) -->
    <script async src="https://www.googletagmanager.com/gtag/js?id=TAG_ID"></script>
    <script>
        window.dataLayer = window.dataLayer || [];
        function gtag(){dataLayer.push(arguments);}
        gtag('js', new Date());

        gtag('config', 'TAG_ID');
    </script>
</head>
<body>
    <div>This is where the purchase form would go</div>
    <button id="purchase">Purchase</button>
    <script>
    document.getElementById("purchase").addEventListener("click", function () {
        gtag("event", "purchase", {
                // This purchase event uses a different transaction ID
                // from the previous purchase event so Analytics
                // doesn't deduplicate the events.
                // Learn more: https://support.google.com/analytics/answer/12313109
                transaction_id: "T_12345_2",
                value: 30.03,
                tax: 4.90,
                shipping: 5.99,
                currency: "USD",
                coupon: "SUMMER_SALE",
                items: [
                {
                  item_id: "SKU_12345",
                  item_name: "Stan and Friends Tee",
                  affiliation: "Google Merchandise Store",
                  coupon: "SUMMER_FUN",
                  discount: 2.22,
                  index: 0,
                  item_brand: "Google",
                  item_category: "Apparel",
                  item_category2: "Adult",
                  item_category3: "Shirts",
                  item_category4: "Crew",
                  item_category5: "Short sleeve",
                  item_list_id: "related_products",
                  item_list_name: "Related Products",
                  item_variant: "green",
                  location_id: "ChIJIQBpAG2ahYAR_6128GcTUEo",
                  price: 10.01,
                  quantity: 3
                }]
          });
      });
    </script>
</body>
</html>
步驟 3:確認您正在收集資料
「DebugView」DebugView報表會顯示網站的即時資料,方便您進行
請確認您的事件設定正確。如要在網頁上啟用偵錯模式,請在
將下列 debug_mode 參數新增至 config 指令:
<!--
  Note: In the following code sample, make sure to
  replace "TAG_ID" with your tag ID.
  Learn more: https://support.google.com/tagmanager/answer/12326985
-->
<!DOCTYPE html>
<html lang="en">
<head>
    <!-- Google tag (gtag.js) -->
    <script async src="https://www.googletagmanager.com/gtag/js?id=TAG_ID"></script>
    <script>
        window.dataLayer = window.dataLayer || [];
        function gtag(){dataLayer.push(arguments);}
        gtag('js', new Date());

        gtag('config', 'TAG_ID',{ 'debug_mode': true });
    </script>
</head>
<body>
    <div>This is where the purchase form would go</div>
    <button id="purchase">Purchase</button>
    <script>
    document.getElementById("purchase").addEventListener("click", function () {
        gtag("event", "purchase", {
                // This purchase event uses a different transaction ID
                // from the previous purchase event so Analytics
                // doesn't deduplicate the events.
                // Learn more: https://support.google.com/analytics/answer/12313109
                transaction_id: "T_12345_3",
                value: 30.03,
                tax: 4.90,
                shipping: 5.99,
                currency: "USD",
                coupon: "SUMMER_SALE",
                items: [
                {
                  item_id: "SKU_12345",
                  item_name: "Stan and Friends Tee",
                  affiliation: "Google Merchandise Store",
                  coupon: "SUMMER_FUN",
                  discount: 2.22,
                  index: 0,
                  item_brand: "Google",
                  item_category: "Apparel",
                  item_category2: "Adult",
                  item_category3: "Shirts",
                  item_category4: "Crew",
                  item_category5: "Short sleeve",
                  item_list_id: "related_products",
                  item_list_name: "Related Products",
                  item_variant: "green",
                  location_id: "ChIJIQBpAG2ahYAR_6128GcTUEo",
                  price: 10.01,
                  quantity: 3
                }]
        });
    });
    </script>
</body>
</html>
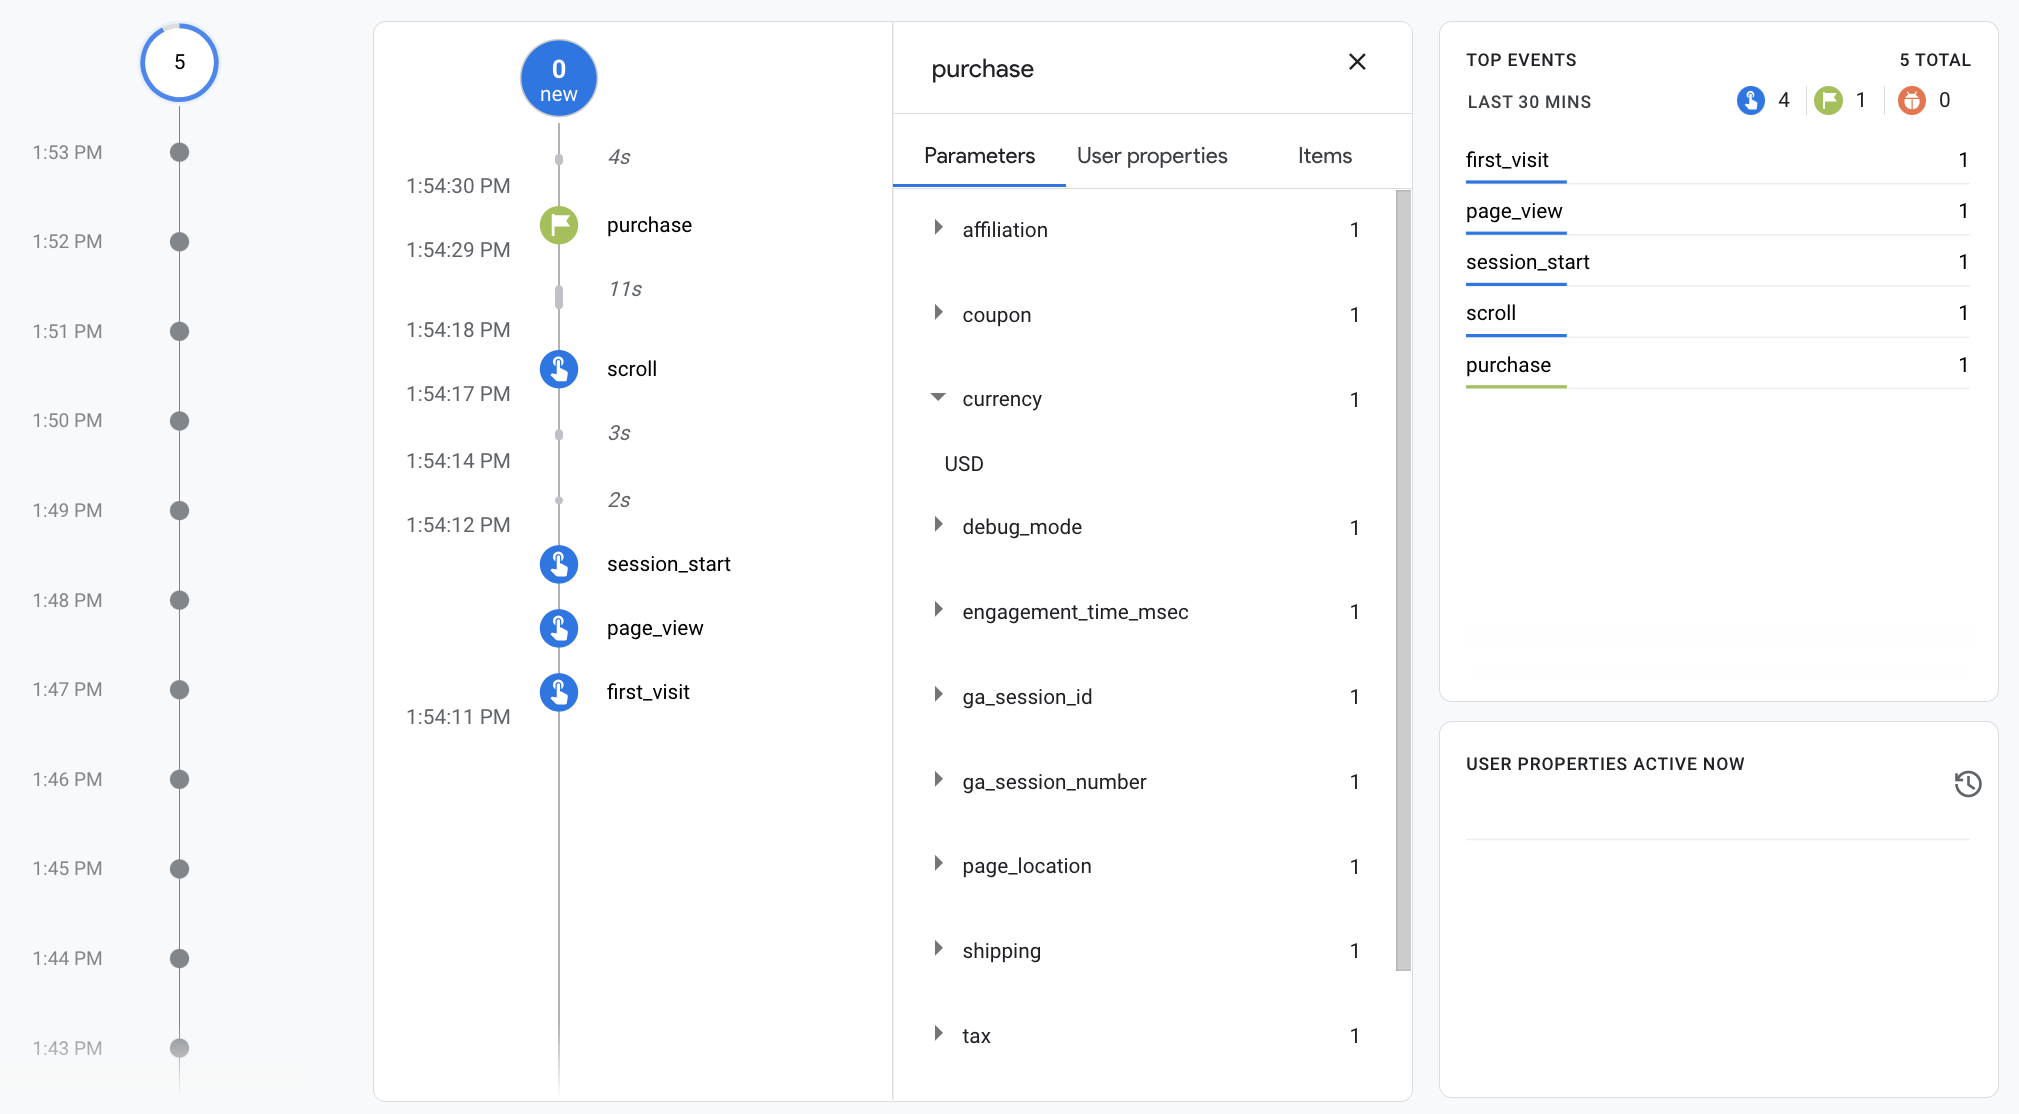
啟用偵錯模式後,您就會開始看到填入 DebugView 報表,瞭解使用者瀏覽您網站的情形。舉例來說,按一下 「Purchase」(購買)系統會在報表內填入下列資料。 您可以選取事件來查看參數、使用者屬性和項目 與事件建立關聯
步驟 4:查看電子商務資料
大約 24 小時後,您透過 purchase 事件傳送的資料就會變為
在報表、探索和 Google Analytics Data API 中使用。
您也可以在設定 BigQuery Export 時存取 BigQuery 中的資料。
「purchase」事件會自動填入各種預先建立維度
和指標,用於報表和探索
這裡列出的是系統為當中資料填入的部分維度
第一個步驟有 purchase 事件:
| 參數 | 維度 | 值 |
|---|---|---|
affiliation |
項目聯盟 | Google 商品網路商店 |
currency |
幣別 | 美元 |
discount |
商品折扣金額 | 2 月 22 日 |
index |
商品清單位置 | 0 |
item_brand |
商品品牌 | |
item_category |
商品類別 | 服飾 |
item_id |
項目 ID | SKU_12345 |
item_list_id |
商品清單 ID | related_products |
item_list_name |
商品清單名稱 | 相關產品 |
item_name |
項目名稱 | 史坦與朋友 T 恤 |
item_variant |
商品子類 | 綠色 |
location_id |
項目位置 ID | ChIJIQBpAG2ahYAR_6128GcTUEo (舊金山的 Google 地點 ID) |
shipping |
運費 | 歐元 |
tax |
稅額 | 4.90 美元 |
transaction_id |
交易 ID | T_12345 |
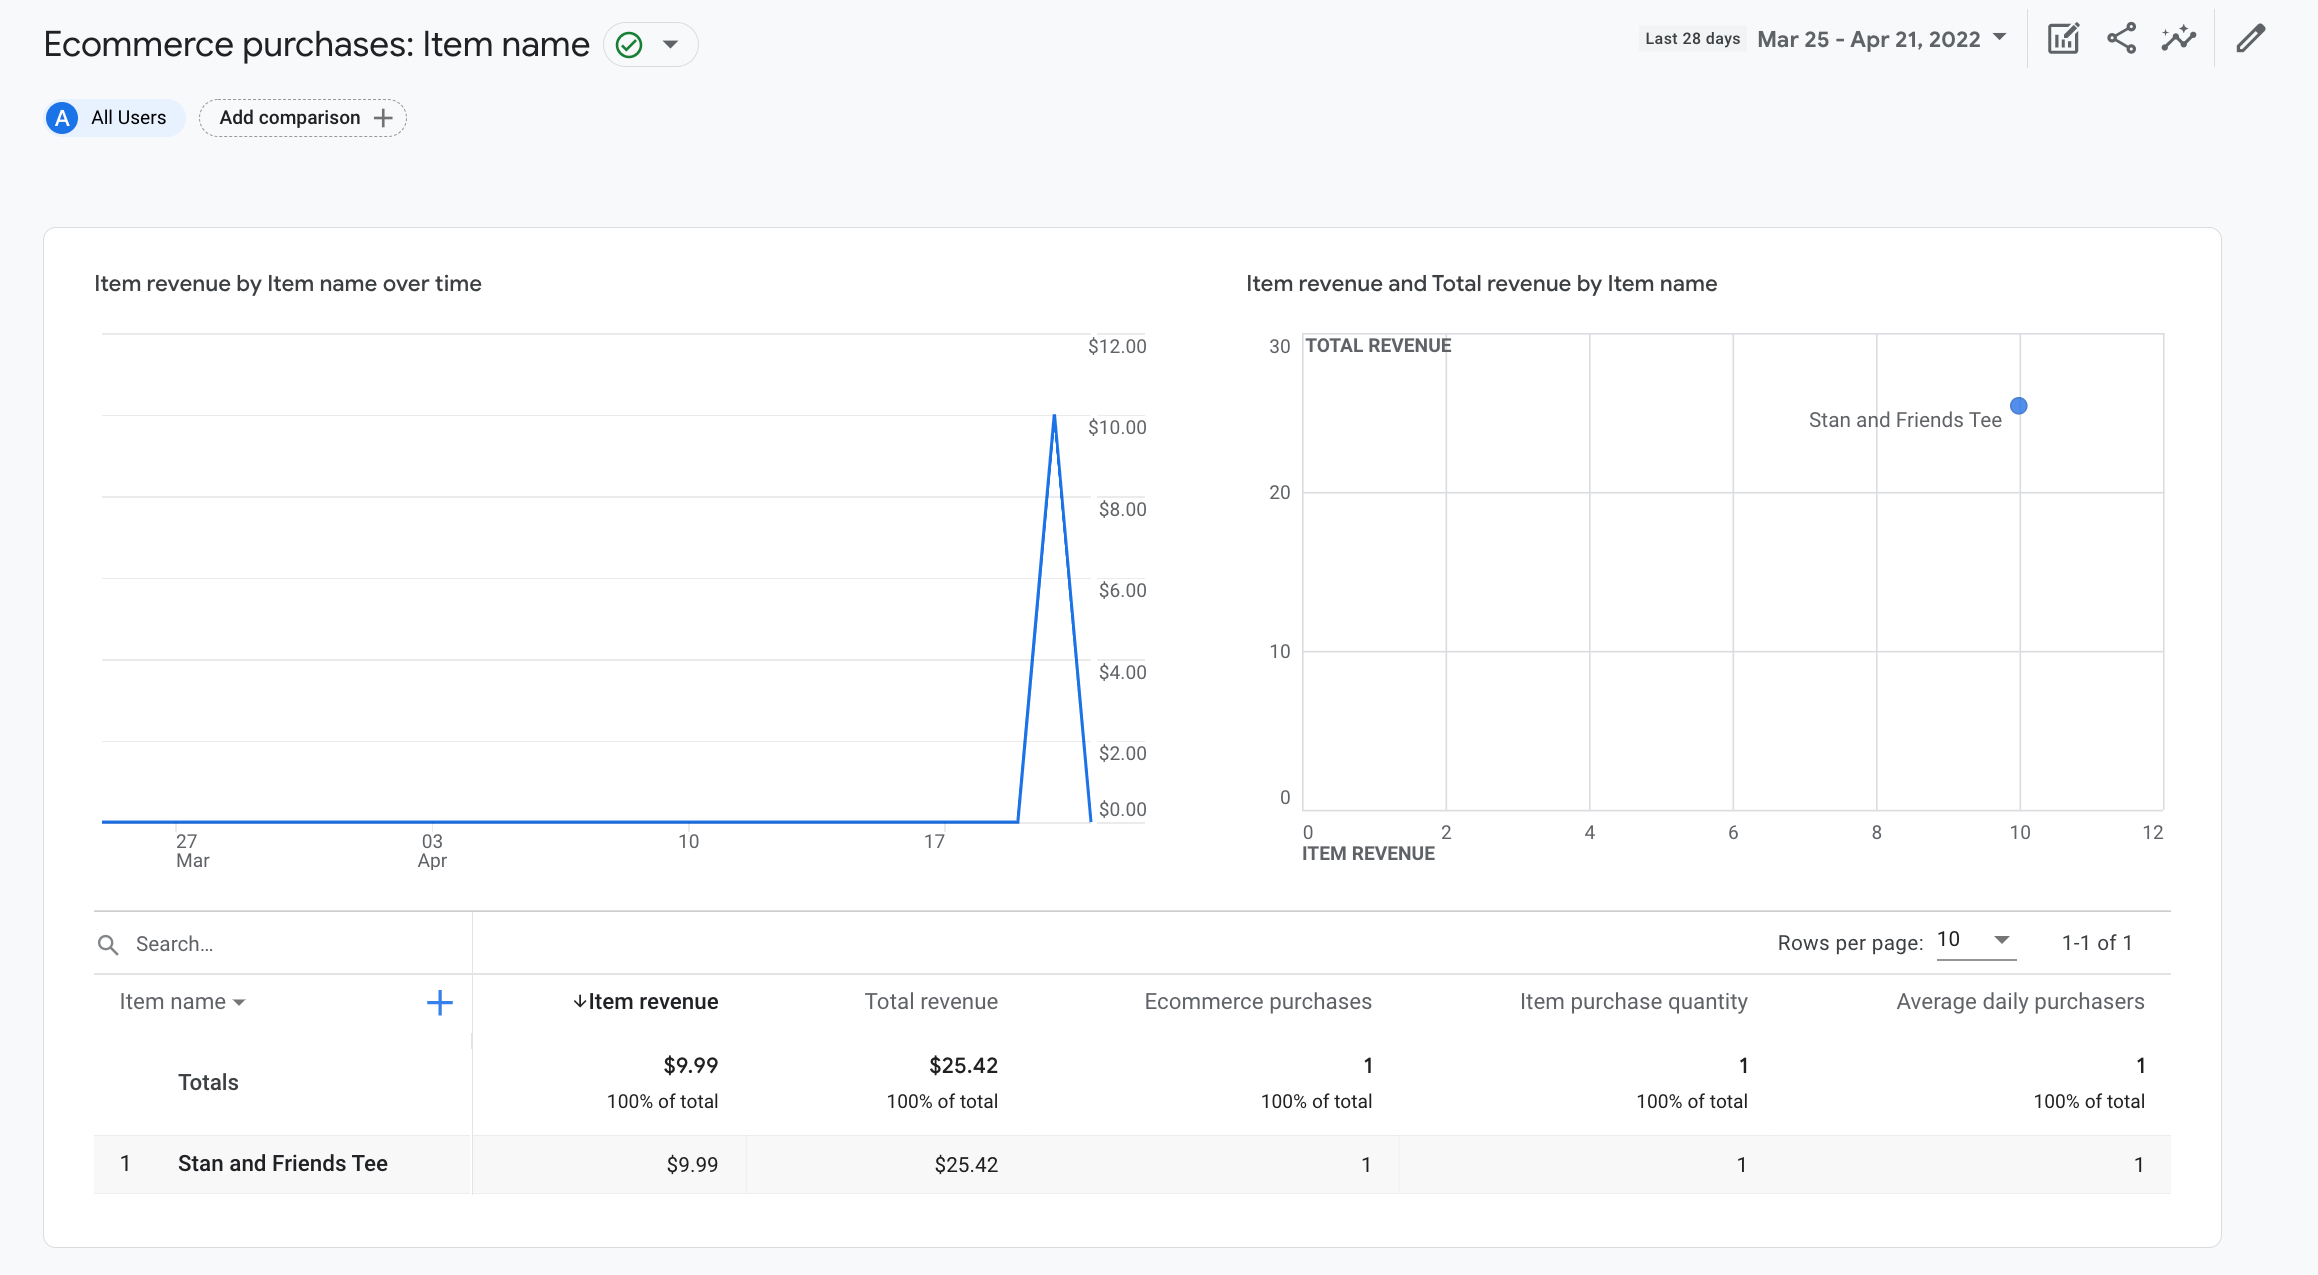
除了維度外,Google Analytics 也會填入多種電子商務資料 和收益相關指標舉例來說,如果使用者按下「購買」按鈕 一次,系統就會在 Google Analytics 中填入下列指標:
- 「商品收益」指標的值為 $30.03 美元
- 「總收益」指標的值為 $30.03 美元
- 「電子商務購買」指標的值為 1
您可以使用這些維度和指標建立探索和自訂 不過,您還是可以使用以下預先建立的電子商務購買 報表,即可查看電子商務資料: