Organiza tus páginas con colecciones
Guarda y categoriza el contenido según tus preferencias.
Para aprovisionar una nueva llave multifamiliar, el usuario debe completar un flujo de autenticación y asociación en su dispositivo. De esta manera, se vinculará su cuenta de usuario externa a una cuenta de la Billetera de Google.
En este documento, se describe ese proceso a un nivel general en diferentes plataformas.
Cómo agregar elementos a la Billetera de Google desde una app para Android
En esta sección, describimos el flujo para guardar una tarjeta en la Billetera de Google desde la app para Android de un proveedor de servicios.
Flujo de usuarios
Estas figuras ilustran el flujo del usuario para aprovisionar una llave multifamiliar desde la perspectiva de la Billetera de Google.
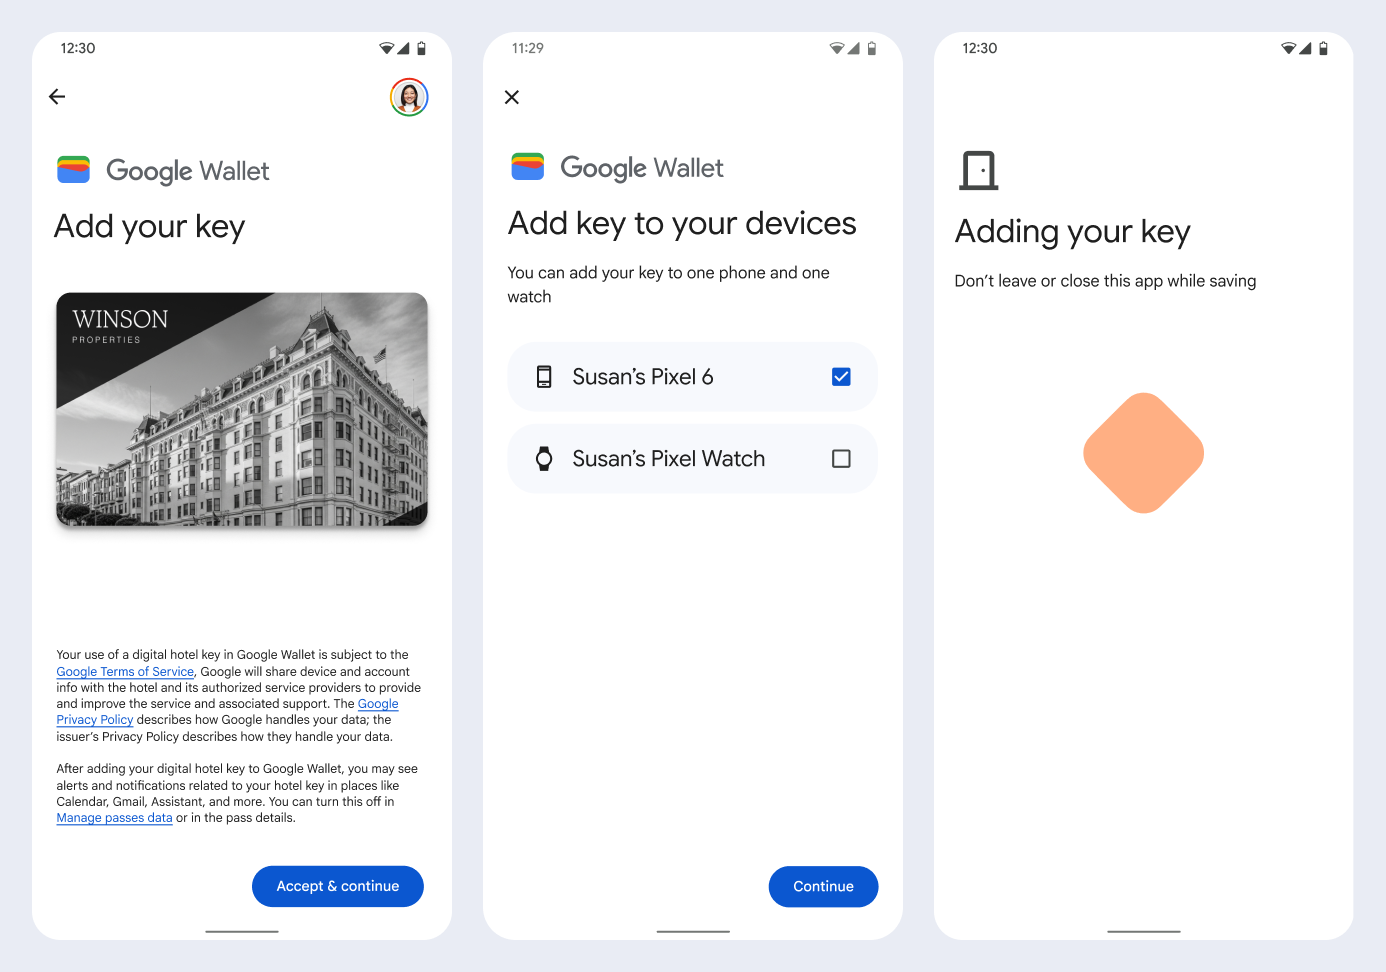
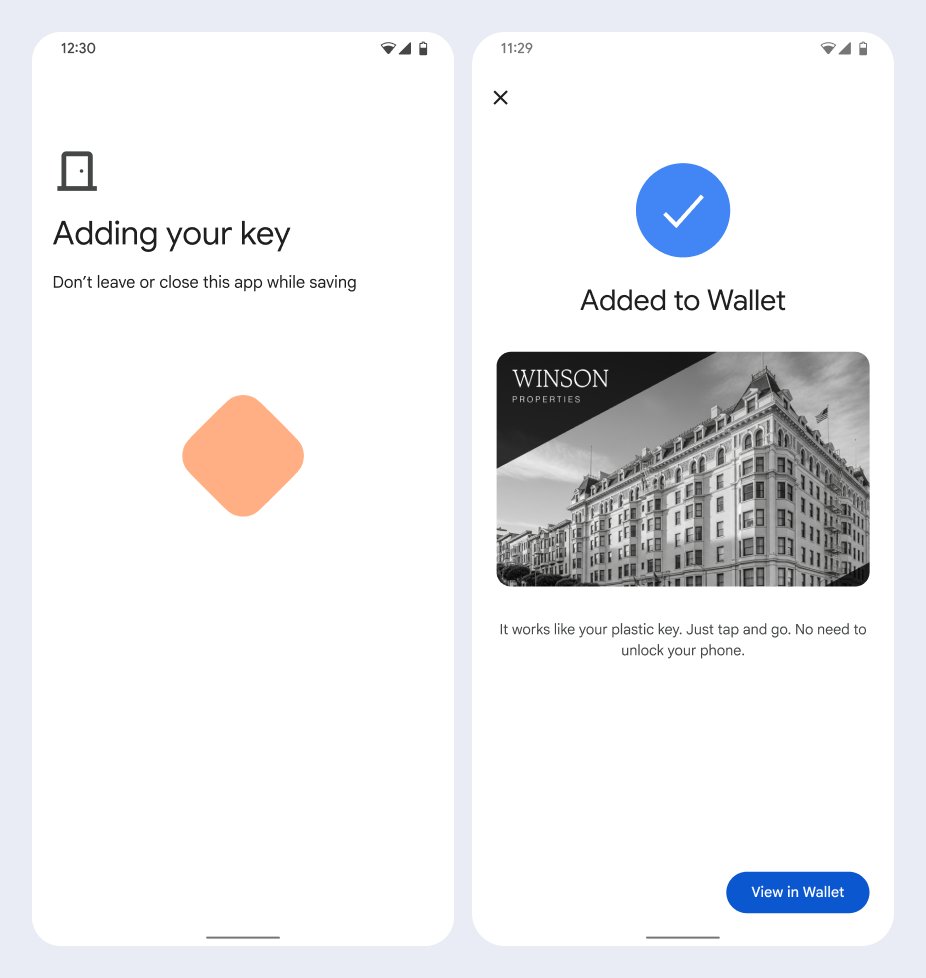
Figura 1: Un usuario comienza a aprovisionar su tarjeta y acepta las Condiciones del Servicio.
Se muestra una animación de conexión giratoria al usuario mientras se configuran la conectividad de red y los servicios iniciales.
Una vez que se completa este paso, el usuario acepta las Condiciones del Servicio y continúa con el flujo.
Figura 2: Se completa el aprovisionamiento del usuario.
Se muestra una animación de guardado giratoria al usuario mientras los servicios en segundo plano
aprovisionan la cuenta en el dispositivo.
Una vez que se completen los servicios, aparecerá una pantalla de éxito.
Es posible que, en pantallas posteriores, se le solicite al usuario que descargue la
app de la Billetera de Google si aún no existe en su
dispositivo.
Puntos clave
Si la tarjeta ya está guardada en la Cuenta de Google seleccionada, al usuario se le mostrará un vínculo para abrir la tarjeta en la app de la Billetera de Google, donde podrá ver los detalles de la tarjeta.
Si la tarjeta se guarda en una Cuenta de Google diferente de la que el usuario accedió, este recibirá un mensaje que indica que otra Cuenta de Google ya guardó esa tarjeta.
Si el usuario intenta agregar una tarjeta y no tiene una Cuenta de Google, aparecerá un mensaje para crear una cuenta. Después de crear la Cuenta de Google, el flujo continúa normalmente.
Las apps que admiten flujos de claves familiares múltiples deben integrarse con las APIs de los servicios de Google Play. Sin embargo, las llamadas a métodos desde la app del proveedor de servicios a los Servicios de Google Play no están disponibles en la versión de distribución pública de los Servicios de Google Play.
El desarrollador de la app del proveedor de servicios debe agregar módulos personalizados y obtener acceso a ellos para llamar a ciertos métodos. Consulta a tu proveedor de servicios para obtener más información.
Cómo agregar una tarjeta a la Billetera de Google en un dispositivo wearable desde una app para Android
Los usuarios pueden aprovisionar sus wearables iniciando el flujo de aprovisionamiento en su teléfono y seleccionando un solo wearable, como se muestra en esta figura:
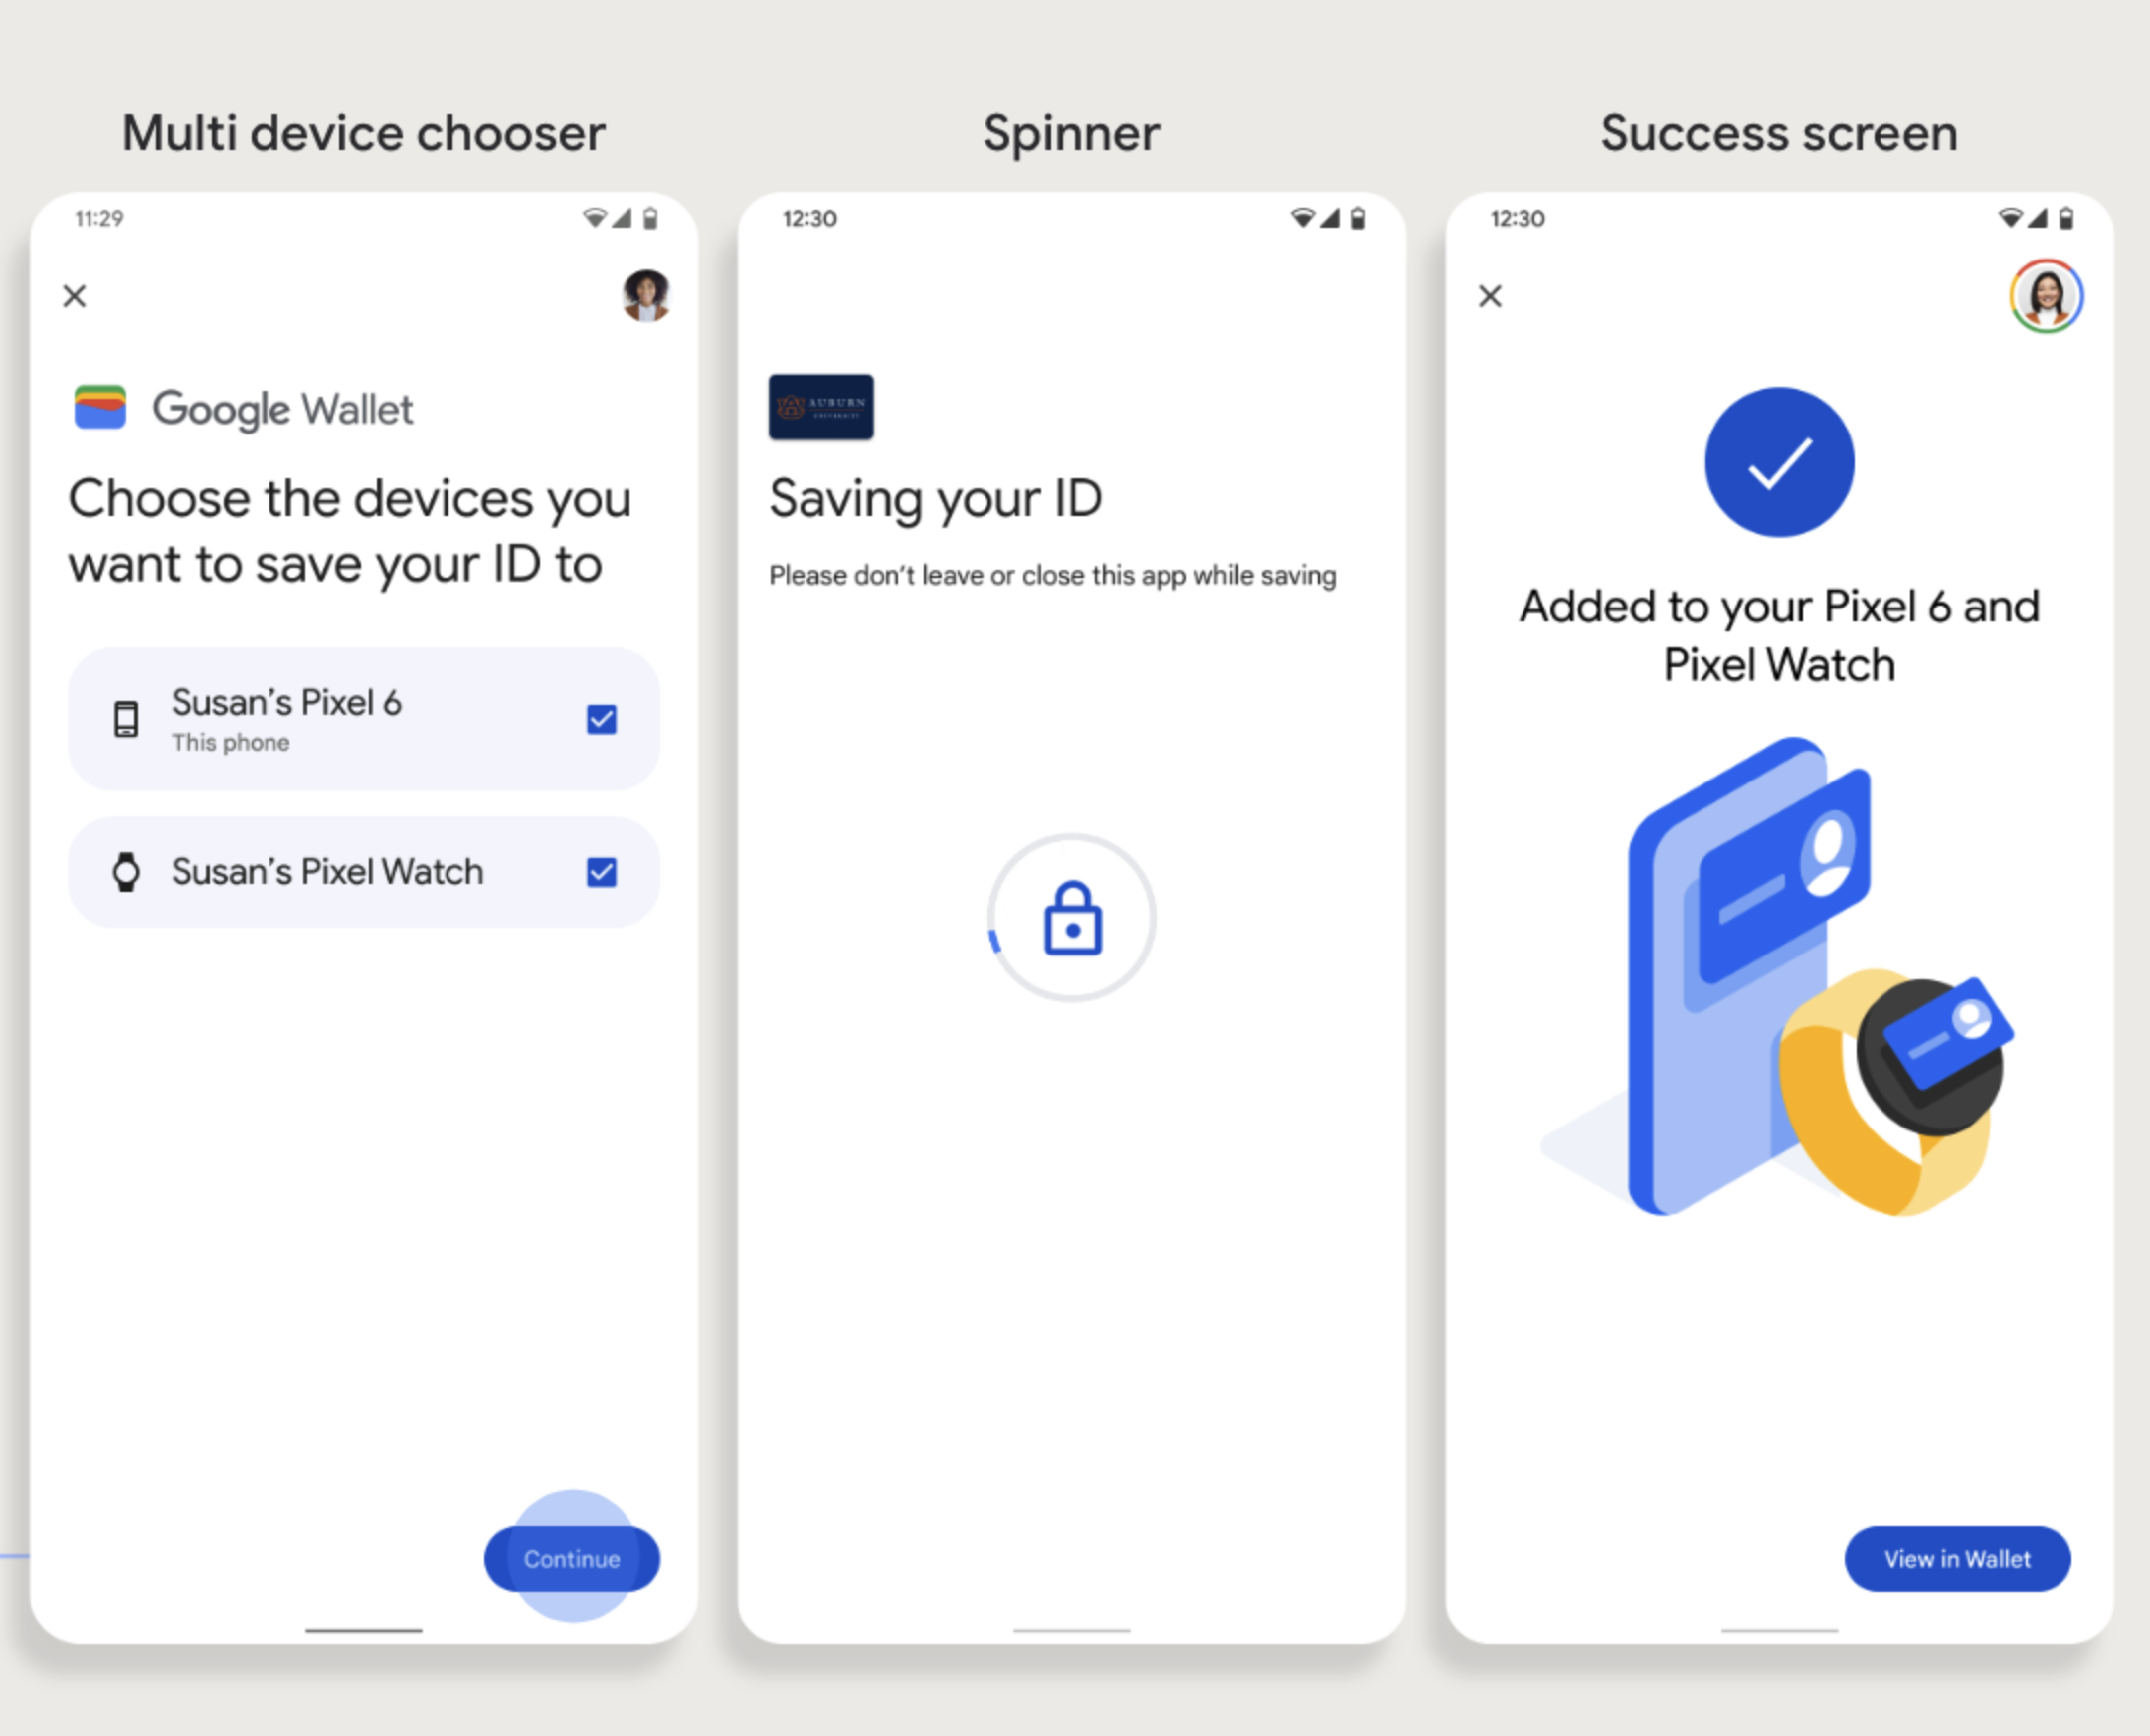
Figura 1: Flujo de aprovisionamiento de wearables.
Puntos clave
El aprovisionamiento en un dispositivo wearable requiere un teléfono capaz de aprovisionar una tarjeta.
Los usuarios pueden aprovisionar su teléfono y su dispositivo wearable en un solo flujo, o bien pueden reiniciar el flujo para agregarlo a un dispositivo wearable después de que se complete el primer aprovisionamiento en su teléfono.
El proveedor de servicios debe limitar a los usuarios a aprovisionar solo un dispositivo wearable.
Consulta a tu proveedor de servicios sobre la disponibilidad del aprovisionamiento de dispositivos wearables.
Las apps que admiten flujos de claves familiares múltiples deben integrarse con las APIs de los servicios de Google Play. Sin embargo, las llamadas a métodos desde la app del proveedor de servicios a los Servicios de Google Play no están disponibles en la versión de distribución pública de los Servicios de Google Play.
El desarrollador de la app del proveedor de servicios debe agregar módulos personalizados y obtener acceso a ellos para llamar a ciertos métodos. Consulta a tu proveedor de servicios para obtener más información.
Cómo agregar elementos a la Billetera de Google desde un sitio web
En esta sección, se describe el flujo para guardar una tarjeta en la Billetera de Google desde el sitio web de una entidad emisora.
Paso 1: Accede al sitio web
El primer paso del flujo es acceder al sitio web de la entidad emisora y seleccionar el botón Agregar a la Billetera de Google.
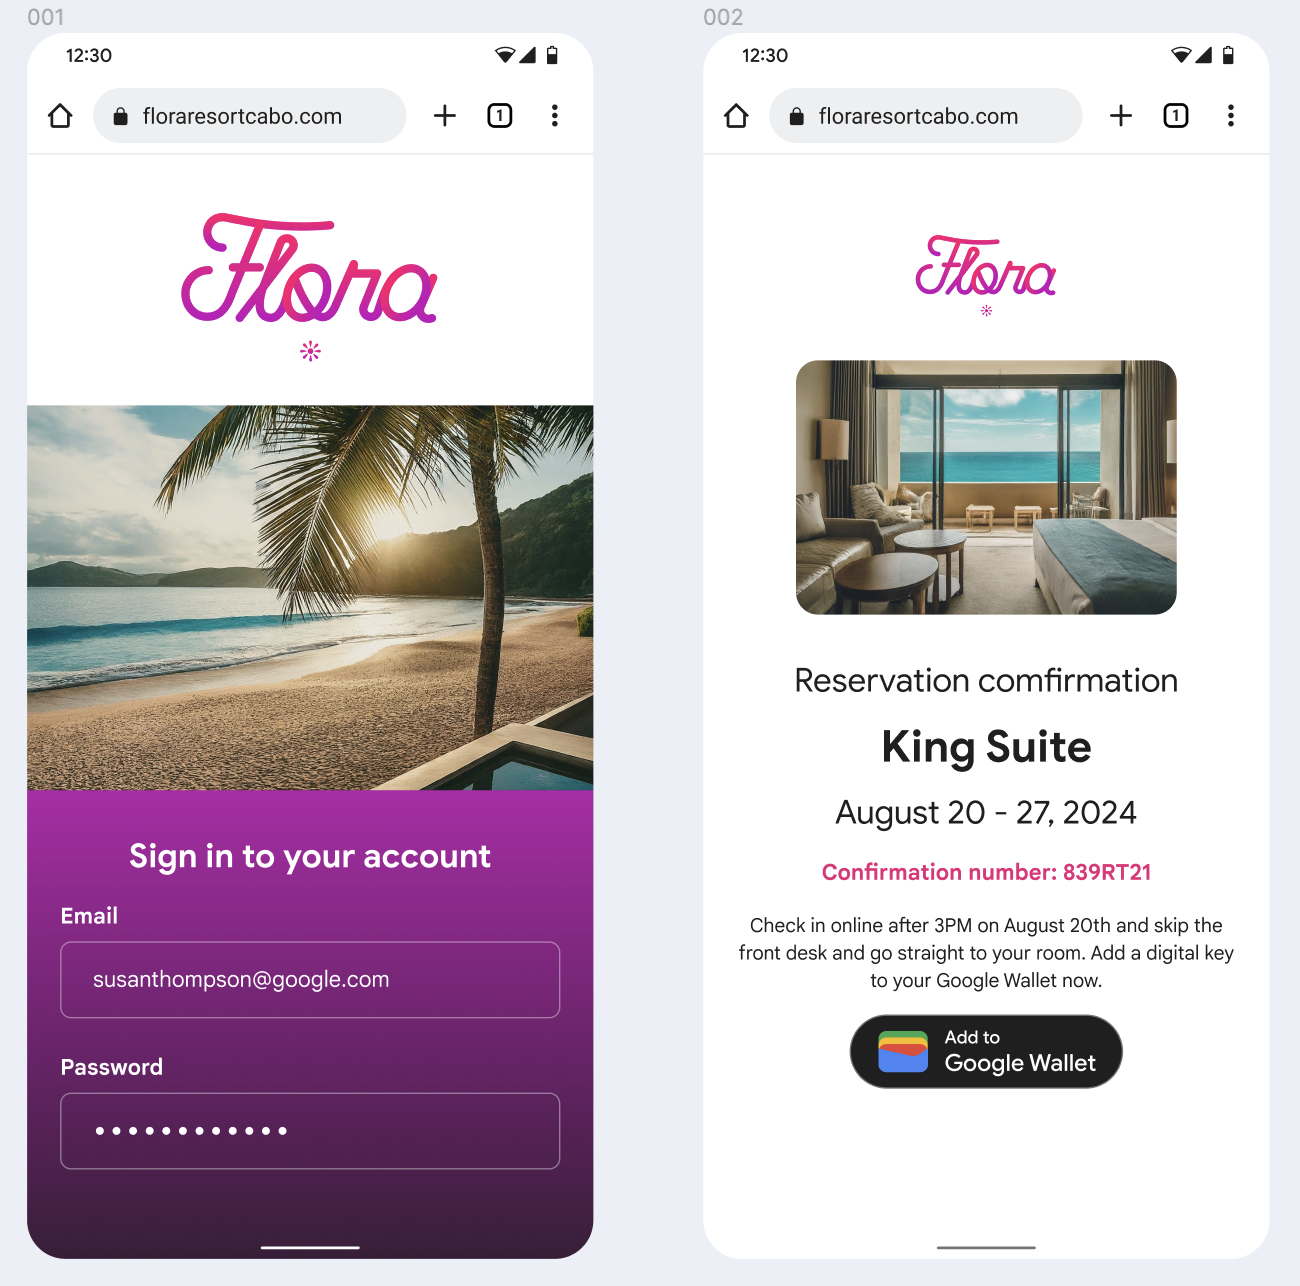
Figura 3: Un usuario accede a un sitio web y navega hasta el
botón Agregar a la Billetera de Google.
Paso 2: Accede con Google
El usuario completa el acceso con Google y, luego, ve una pantalla de carga en el sitio web del emisor antes de que se lo redireccione a la Billetera de Google en el siguiente paso.
Figura 3: Un usuario elige una Cuenta de Google para vincularla a su llave
multifamiliar.
Paso 3: Completa el aprovisionamiento
El usuario completa el flujo de aprovisionamiento en la Billetera de Google.
Figura 3: Un usuario continúa con el aprovisionamiento, acepta las condiciones del servicio y completa el flujo.
[[["Fácil de comprender","easyToUnderstand","thumb-up"],["Resolvió mi problema","solvedMyProblem","thumb-up"],["Otro","otherUp","thumb-up"]],[["Falta la información que necesito","missingTheInformationINeed","thumb-down"],["Muy complicado o demasiados pasos","tooComplicatedTooManySteps","thumb-down"],["Desactualizado","outOfDate","thumb-down"],["Problema de traducción","translationIssue","thumb-down"],["Problema con las muestras o los códigos","samplesCodeIssue","thumb-down"],["Otro","otherDown","thumb-down"]],["Última actualización: 2025-07-11 (UTC)"],[],[],null,["# Provision a new card\n\nTo provision a new Multi-family Key, the user must complete an authentication\nand association flow on their device. This links their external\nuser account to a Google Wallet account.\nThis document describes that process at a high level across different surfaces.\n\nAdd to Google Wallet from an Android app\n----------------------------------------\n\nIn this section, we describe the flow to save a card to\nGoogle Wallet from a Service Provider's Android app.\n\n### User flow\n\nThese figures illustrate the user flow to provision a Multi-family Key from a\nGoogle Wallet perspective.\n| **Note:** Before this flow begins, the user must authenticate within the Service Provider's app. Next, they must select the [Add to Google Wallet](/wallet/access/multi-family-key/get-started/brand-guidelines#add-to-google-wallet-button) button. If the user doesn't have a Google Account, they complete a flow to create one and then continue the flow to provision their card.\n**Figure 1**: A user begins to provision their card and accepts the Terms of Service.\n\n\n- A spinning connection animation is shown to the user while network connectivity and initial services configure.\n- After this completes, the user accepts the Terms of Service and continues with the flow.\n\n\u003cbr /\u003e\n\n**Figure 2**: User provisioning completes.\n\n\n- A spinning save animation is shown to the user while background services provision the account on the device.\n- After the services complete, a success screen appears.\n- The user might be prompted in subsequent screens to download the Google Wallet app, if it doesn't already exist on their device.\n\n\u003cbr /\u003e\n\n\u003cbr /\u003e\n\n### Key points\n\n- If the card is already saved to the selected Google Account, the user is instead shown a link to open the card in the Google Wallet app, where they can view card details.\n- If the card is saved to a Google Account other than the one the user is logged into, the user receives a message that indicates another Google Account has already saved that card.\n- If the user attempts to add a card and doesn't have a Google Account, a prompt to create an account appears. After creation of the Google Account, the flow continues normally.\n- Apps that support Multi-family Keys flows need to integrate with Google Play services APIs. However, the method calls from the Service Provider app to Google Play services aren't available in the publicly distributed version of [Google Play services](https://developers.google.com/android/guides/overview). The Service Provider app developer must add and get access to custom modules to call certain methods. Check with your Service Provider for more information.\n\nAdd to Google Wallet on a Wearable from an Android app\n------------------------------------------------------\n\nUsers can provision to their Wearables by initiating the provisioning flow on\ntheir phone and selecting a single Wearable, as seen in this figure:\n**Figure 1**: Wearable provisioning flow.\n\n### Key points\n\n- Provisioning to a Wearable requires a phone capable of provisioning a card.\n- Users can provision to their phone and Wearable in a single flow, or they can restart the flow to add it to a Wearable after the first provisioning to their phone is complete.\n- Users should be limited by the Service Provider to provisioning only a single Wearable.\n- Inquire with your Service Provider about the availability of Wearable provisioning.\n- Apps that support Multi-family Keys flows need to integrate with Google Play services APIs. However, the method calls from the Service Provider app to Google Play services aren't available in the publicly distributed version of [Google Play services](https://developers.google.com/android/guides/overview). The Service Provider app developer must add and get access to custom modules to call certain methods. Check with your Service Provider for more information.\n\nAdd to Google Wallet from a Website\n-----------------------------------\n\nThis section describes the flow to save a card to Google Wallet from\nan issuer's website.\n\n### Step 1: Sign in to Website\n\nThe first step in the flow is to sign in to the issuer's website and select\nthe Add to Google Wallet button.\n**Figure 3**: A user logs into a website and navigates to the Add to Google Wallet button. **Important:** Google requires that your website authenticates users before you show the Add to Google Wallet button. Sending the user an email with a \"secret\" link is not sufficient authentication.\n\n### Step 2: Sign in with Google\n\nThe user completes Sign in with Google and then sees a loading screen\non the issuer's website before being redirected to Google Wallet in the next\nstep.\n**Figure 3**: A user chooses a Google Account to link to their Multi-family Key. **Note:** You can download this [loading gif](/static/wallet/access/images/web-provisioning-loading.gif) for use on your website's loading page if you would like to match the Google Wallet loading screen.\n\n### Step 3: Complete Provisioning\n\nThe user completes the provisioning flow within Google Wallet.\n**Figure 3**: A user continues with provisioning, accepts terms of service, and completes the flow."]]