หากต้องการจัดสรรป้ายประจำตัวพนักงานใหม่ ผู้ใช้ต้องดำเนินการตามขั้นตอนการตรวจสอบสิทธิ์ และการเชื่อมโยงในอุปกรณ์ให้เสร็จสมบูรณ์ ซึ่งจะลิงก์บัญชีผู้ใช้ภายนอกกับบัญชี Google Wallet เอกสารนี้อธิบายกระบวนการดังกล่าวในระดับสูงในแพลตฟอร์มต่างๆ
เพิ่มลงใน Google Wallet จากแอป Android
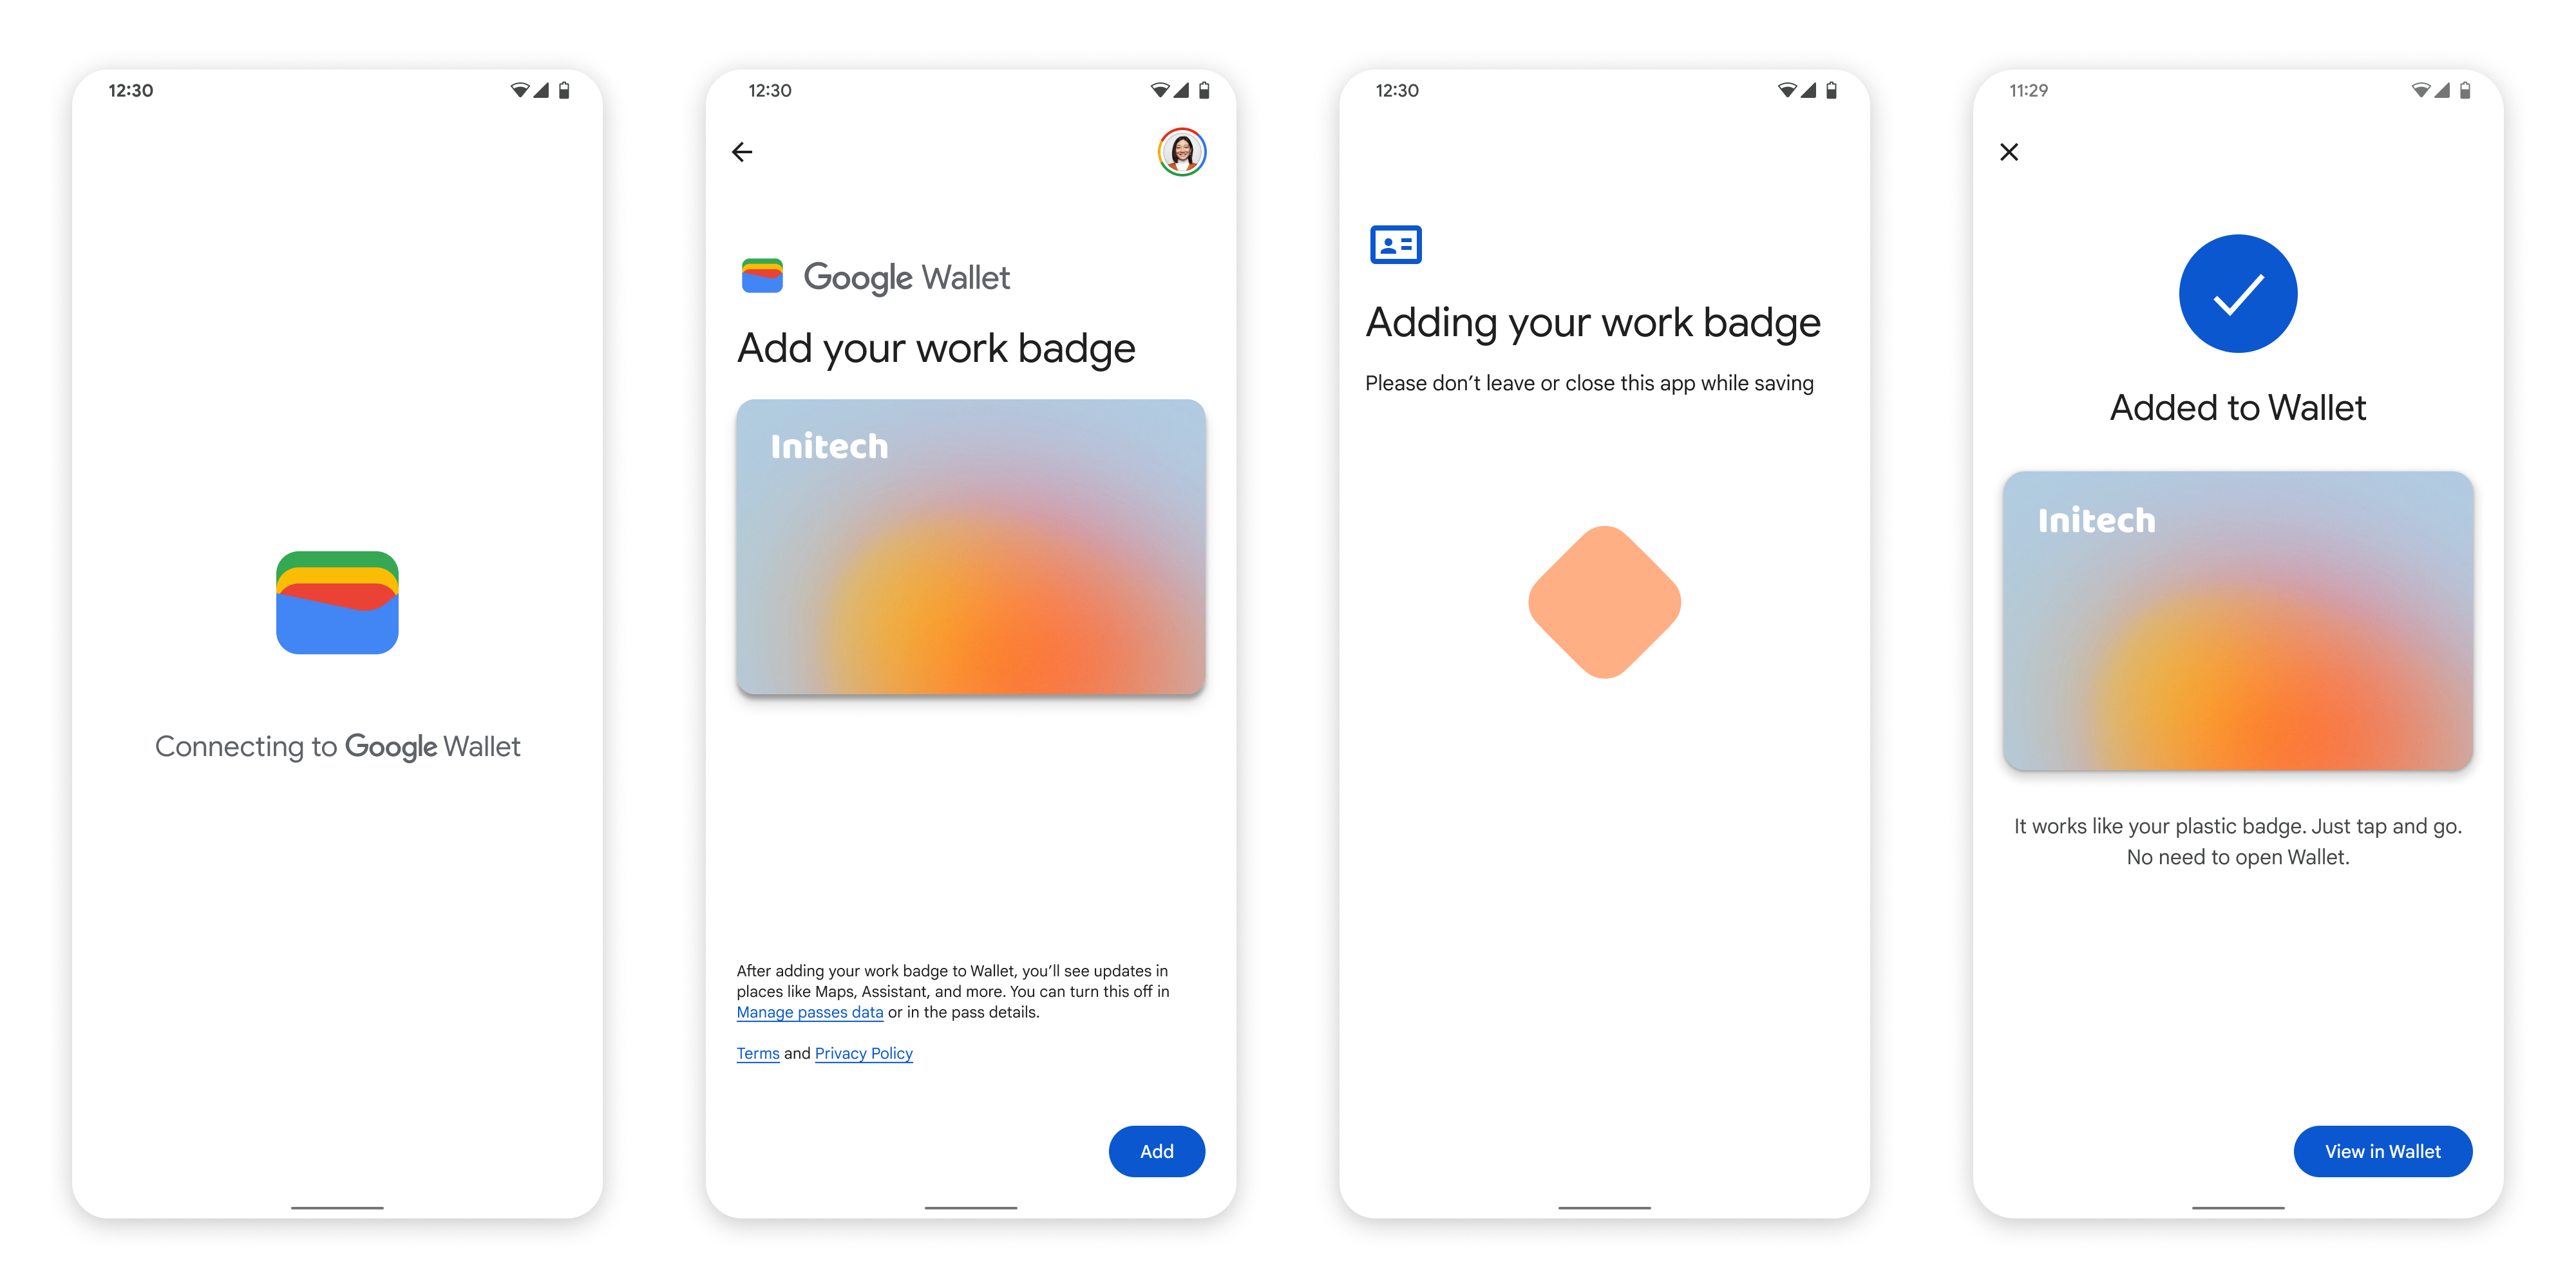
ในส่วนนี้ เราจะอธิบายขั้นตอนการบันทึกบัตรไปยัง Google Wallet จากแอป Android ของผู้ให้บริการ
โฟลว์ผู้ใช้
ตัวเลขเหล่านี้แสดงขั้นตอนของผู้ใช้ในการจัดสรรบัตรประจำตัวพนักงานจากมุมมองของ Google Wallet
- ภาพเคลื่อนไหวการเชื่อมต่อที่หมุนจะแสดงต่อผู้ใช้ในขณะที่ระบบกำลังกำหนดค่าการเชื่อมต่อเครือข่ายและบริการเริ่มต้น
- หลังจากดำเนินการเสร็จแล้ว ผู้ใช้จะยอมรับข้อกำหนดในการให้บริการและ ดำเนินการตามขั้นตอนต่อ
- ระบบจะแสดงภาพเคลื่อนไหวการบันทึกที่หมุนอยู่ให้ผู้ใช้เห็นในขณะที่บริการในเบื้องหลัง จัดสรรบัญชีในอุปกรณ์
- หลังจากบริการเสร็จสมบูรณ์แล้ว หน้าจอแสดงความสำเร็จจะปรากฏขึ้น
- ระบบอาจแจ้งให้ผู้ใช้ดาวน์โหลดแอป Google Wallet ในหน้าจอถัดไป หากยังไม่มีแอปในอุปกรณ์
ข้อมูลสำคัญ
- หากบันทึกบัตรไว้ในบัญชี Google ที่เลือกแล้ว ระบบจะแสดงลิงก์ให้ผู้ใช้เปิดบัตรในแอป Google Wallet แทน ซึ่งผู้ใช้จะดูรายละเอียดบัตรได้
- หากบัตรบันทึกไว้ในบัญชี Google อื่นที่ไม่ใช่บัญชีที่ผู้ใช้ เข้าสู่ระบบ ผู้ใช้จะได้รับข้อความที่ระบุว่าบัญชี Google อื่นได้บันทึกบัตรนั้นไว้แล้ว
- หากผู้ใช้พยายามเพิ่มบัตรและไม่มีบัญชี Google ระบบจะแสดงข้อความแจ้งให้สร้างบัญชี หลังจากสร้างบัญชี Google แล้ว ขั้นตอนจะดำเนินต่อไปตามปกติ
- แอปที่รองรับขั้นตอนการใช้บัตรประจำตัวพนักงานต้องผสานรวมกับ Google Play Services API อย่างไรก็ตาม การเรียกเมธอดจากแอปผู้ให้บริการ ไปยังบริการ Google Play จะไม่พร้อมใช้งานในเวอร์ชันที่เผยแพร่ต่อสาธารณะของบริการ Google Play นักพัฒนาแอปของผู้ให้บริการต้องเพิ่มและรับสิทธิ์เข้าถึงโมดูลที่กำหนดเอง เพื่อเรียกใช้เมธอดบางอย่าง โปรดขอข้อมูลเพิ่มเติมจากผู้ให้บริการ
เพิ่มลงใน Google Wallet บนอุปกรณ์ที่สวมใส่ได้จากแอป Android
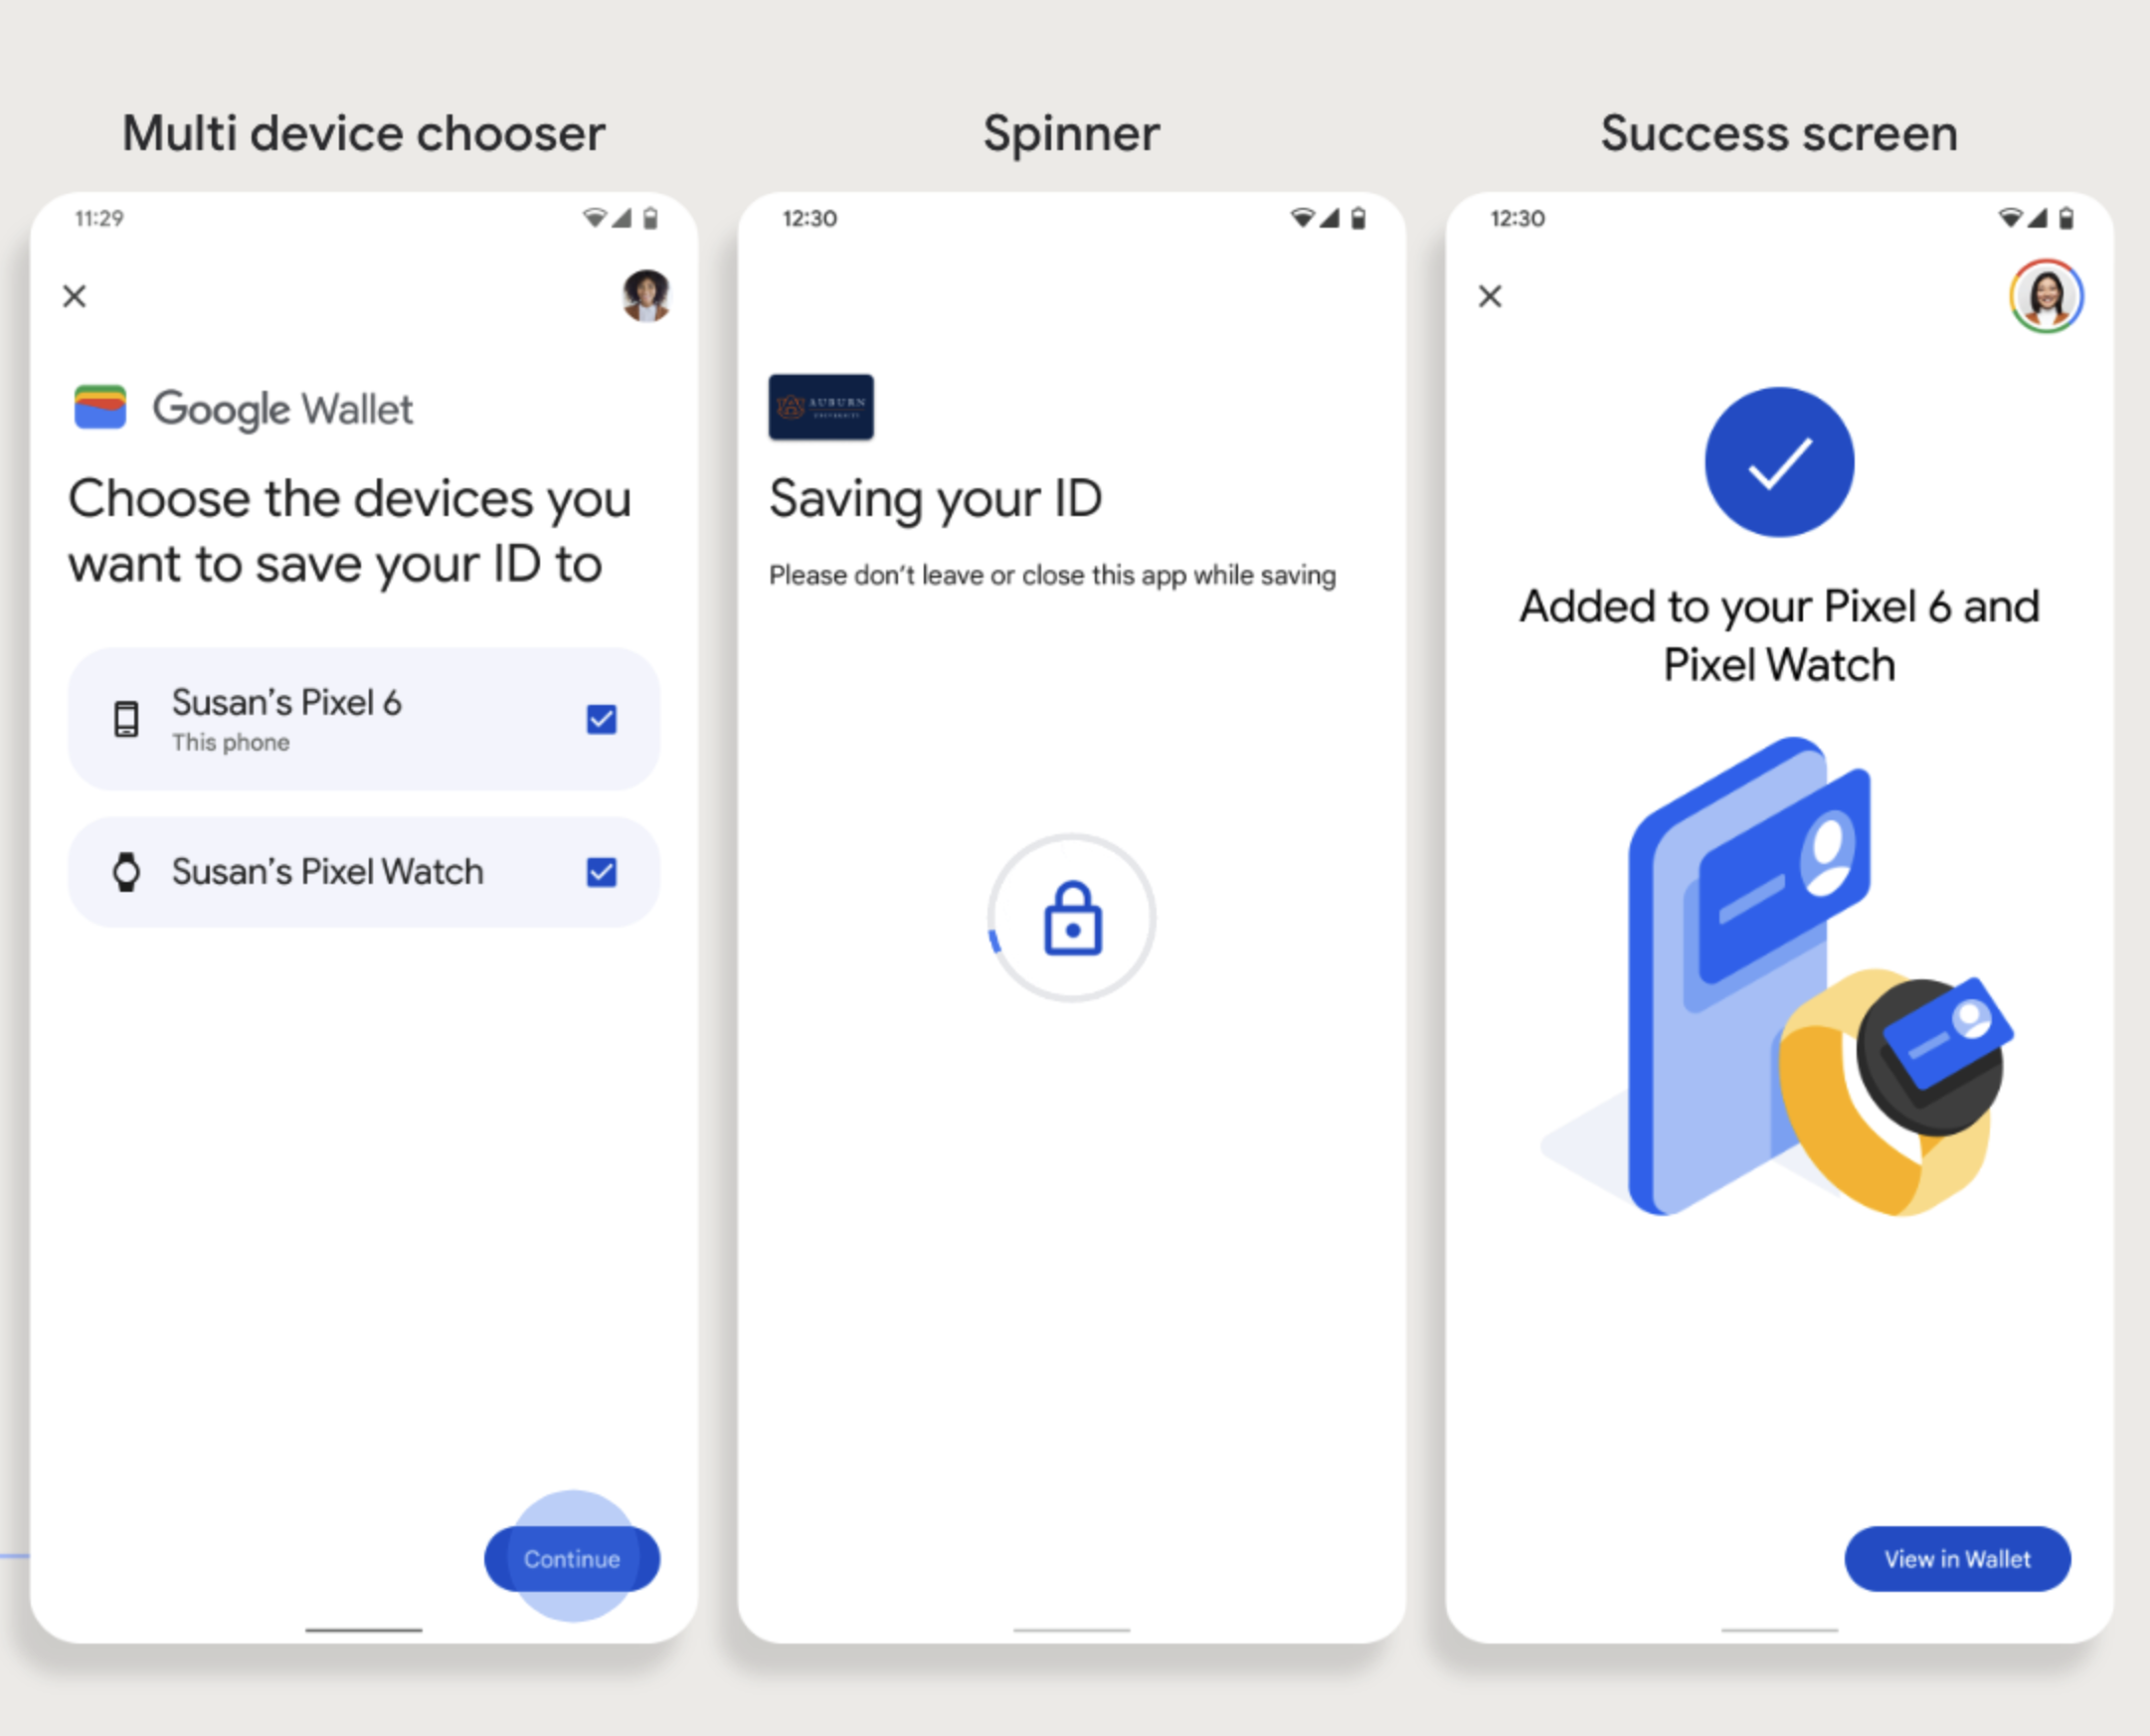
ผู้ใช้สามารถจัดสรรอุปกรณ์ที่สวมใส่ได้โดยเริ่มขั้นตอนการจัดสรรในโทรศัพท์และเลือกอุปกรณ์ที่สวมใส่ได้เพียงเครื่องเดียว ดังที่แสดงในรูปนี้
ข้อมูลสำคัญ
- การจัดสรรไปยังอุปกรณ์ที่สวมใส่ได้ต้องใช้โทรศัพท์ที่จัดสรรบัตรได้ ดังนั้นจึงต้องจับคู่ทั้ง 2 อย่าง
- ผู้ใช้สามารถจัดสรรไปยังโทรศัพท์และอุปกรณ์ที่สวมใส่ได้ในขั้นตอนเดียว หรือจะรีสตาร์ทขั้นตอนเพื่อเพิ่มไปยังอุปกรณ์ที่สวมใส่ได้หลังจากจัดสรรครั้งแรกไปยังโทรศัพท์เสร็จสมบูรณ์แล้วก็ได้
- ผู้ให้บริการควรจำกัดผู้ใช้ให้จัดสรรอุปกรณ์ที่สวมใส่ได้เพียงเครื่องเดียวเท่านั้น
- หากยกเลิกการจับคู่อุปกรณ์ที่สวมใส่ได้กับโทรศัพท์ บัตรดิจิทัลจะยังคงอยู่ในอุปกรณ์ แต่ผู้ใช้จะจัดเก็บบัตรลงในอุปกรณ์ที่สวมใส่ได้เครื่องที่ 2 ไม่ได้หากไม่ลบเครื่องแรก
- สอบถามผู้ให้บริการเกี่ยวกับความพร้อมใช้งานการจัดสรรอุปกรณ์ที่สวมใส่ได้
- แอปที่รองรับขั้นตอนการใช้บัตรประจำตัวพนักงานต้องผสานรวมกับ Google Play Services API อย่างไรก็ตาม การเรียกเมธอดจากแอปผู้ให้บริการ ไปยังบริการ Google Play จะไม่พร้อมใช้งานในเวอร์ชันที่เผยแพร่ต่อสาธารณะของบริการ Google Play นักพัฒนาแอปของผู้ให้บริการต้องเพิ่มและรับสิทธิ์เข้าถึงโมดูลที่กำหนดเอง เพื่อเรียกใช้เมธอดบางอย่าง โปรดขอข้อมูลเพิ่มเติมจากผู้ให้บริการ
เพิ่มลงใน Google Wallet จากเว็บไซต์
ส่วนนี้จะอธิบายขั้นตอนการบันทึกบัตรลงใน Google Wallet จากเว็บไซต์ของผู้ออกบัตร
ขั้นตอนที่ 1: ลงชื่อเข้าใช้เว็บไซต์
ขั้นตอนแรกในโฟลว์คือการลงชื่อเข้าใช้เว็บไซต์ของผู้ออกบัตรและเลือกปุ่ม เพิ่มลงใน Google Wallet
ขั้นตอนที่ 2: ลงชื่อเข้าใช้ด้วย Google
ผู้ใช้ลงชื่อเข้าใช้ด้วย Google เสร็จสมบูรณ์แล้วจะเห็นหน้าจอการโหลดในเว็บไซต์ของผู้ออกบัตรก่อนที่จะเปลี่ยนเส้นทางไปยัง Google Wallet ในขั้นตอนถัดไป
ขั้นตอนที่ 3: จัดสรรให้เสร็จสมบูรณ์
ผู้ใช้จะดำเนินการตามขั้นตอนการจัดสรรภายใน Google Wallet จนเสร็จสมบูรณ์
เพิ่มลงใน Google Wallet จากแอปในโปรไฟล์งาน
หากผู้ใช้ติดตั้งแอปของผู้ให้บริการในโปรไฟล์งาน Android ผู้ใช้จะยังเพิ่มบัตรประจำตัวพนักงานลงใน Google Wallet ได้ ซึ่งจะทำงานในโปรไฟล์ส่วนตัว เมื่อผู้ใช้แตะปุ่ม เพิ่มลงใน Google Wallet จากแอปในโปรไฟล์งาน Google Wallet จะนำผู้ใช้ไปยัง แอป Google Wallet ในโปรไฟล์ส่วนตัว ซึ่งผู้ใช้จะเพิ่มบัตรต่อได้ การจัดการบัตรที่เหลือจะสอดคล้องกับวิธีจัดการบัตร เมื่อบันทึกบัตรจากโปรไฟล์ส่วนตัวโดยตรง