| Key concepts | Set up your development environment | Build an RE SDK | Consume the RE SDK | Testing, and building for distribution |
Key concepts
This section explains the SDK Runtime architecture, how runtime-enabled SDKs are installed, backwards compatibility, and how to migrate existing SDKs to the SDK Runtime.
Glossary
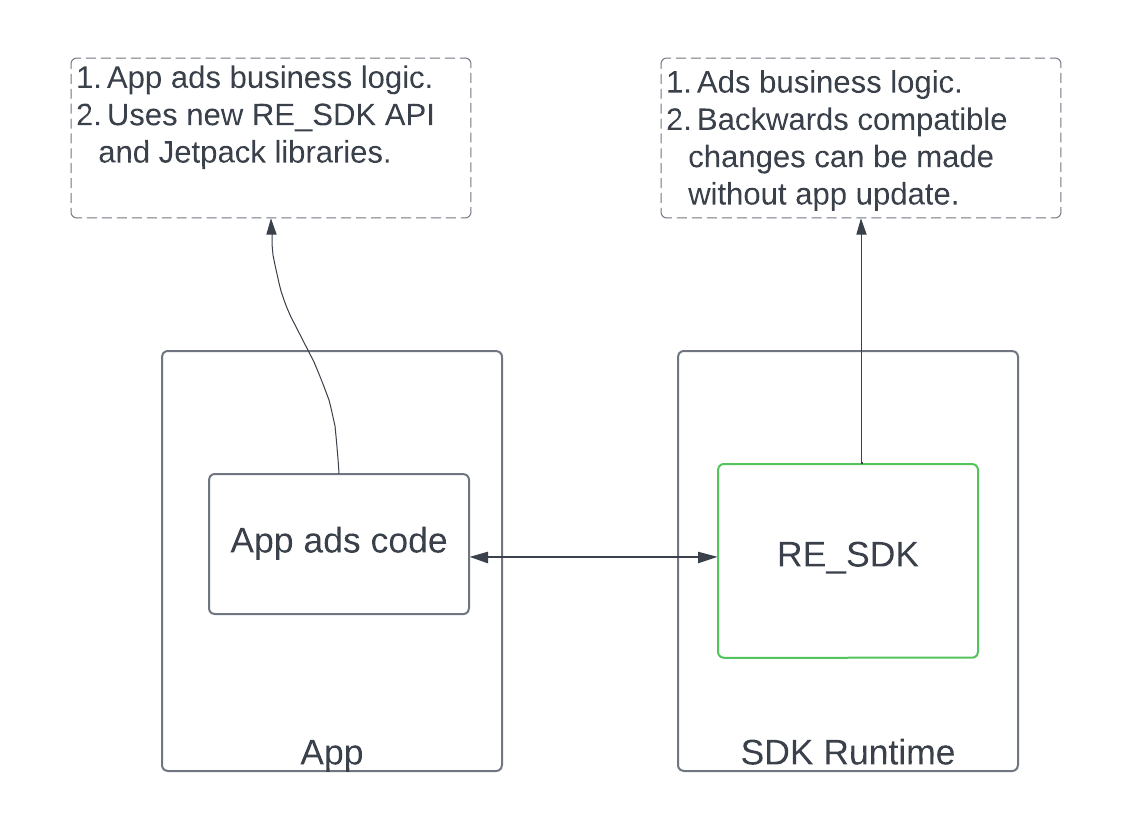
- Runtime-enabled SDK (RE SDK): An SDK made to run in the SDK Runtime environment and communicate with the app over inter-process communication (IPC).
- Runtime-aware SDK (RA SDK): A non runtime-enabled SDK, linked to the app
statically, which may contain your existing SDK code as well as new code to call into your runtime-enabled SDK.
- This is sometimes also referred to as statically-linked or static SDK.
- Shim: A Jetpack library that helps abstract communication across processes or inter-process communication (IPC), and maintain the same app-SDK interface.
SDK Runtime architecture
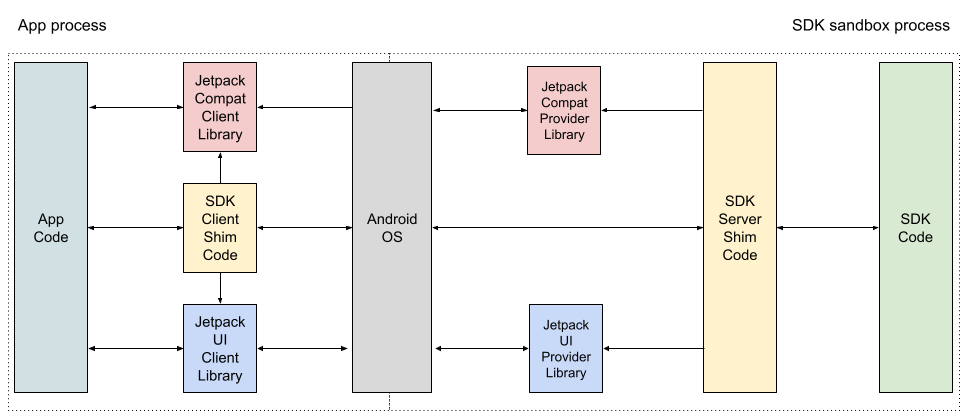
The SDK Runtime adopts a client-server type of model.
The main difference is that the "client" (app) and the "server" (runtime-enabled SDKs) run on the same device, and this communication happens across processes.
To help with these challenges, we've built the following Jetpack libraries and tools to simplify app-SDK integration within the SDK Runtime:
- Shim library: The wrapper library (or shim) helps abstract communication across processes or inter-process communication (IPC). It also helps maintain the same app-SDK interface.
- Backcompat library: This library handles backwards compatibility, making sure your SDK is compatible regardless of whether the SDK Runtime is available or not.
- UI Library: We also provide libraries to handle remote presentation, such as fetching UI from the runtime-enabled SDK or resizing and relayout of views.
Changes to the installation flow
When you build your runtime-enabled SDK in Android Studio or other tools, you create an Android SDK Bundle (ASB), a publication format for runtime-enabled SDKs.
bundletool processes the ASB to produce an APK for your runtime-enabled SDK: this separate APK contains your SDK code but no app code.
The app's manifest file declares a dependency on your runtime-enabled SDK name and version, and this dependency is resolved by the installer app.
Once the SDK APK is sourced by the installer, the installation begins with the SDK APK installation. Upon success, it follows by installing the app's APK.
The flow is different if the app is installed on Android 13 and earlier, and in devices that don't support the SDK Runtime. In this scenario, the store installs a single APK containing both your runtime-enabled SDK and the app code. Read the distribution section to learn more.
Whenever an app depends on this SDK in production, the app store creates the correct SDK APK from this ASB, and installs it.
Backwards compatibility
As the SDK Runtime has been introduced in Android 14, we needed to support earlier versions without introducing overhead for SDK or App developers.
To handle backwards compatibility on Android 13 and earlier, we have introduced a Jetpack library that can seamlessly run your runtime-enabled SDK regardless of the device support for SDK Runtime.
Following this guide makes your runtime-enabled SDK backward compatible by default, and there are no further steps that you should take.
We highlight what the actions connected to backwards compatibility at relevant stages, but in general terms, you should ensure that you have declared the right dependencies, and that you are using the *Compat classes whenever applicable.
Migrate existing SDKs
If you have an existing SDK you'd like to migrate to the Runtime, you don't have to refactor your entire codebase in one go. Instead, you may choose to migrate existing SDK logic incrementally into the new runtime-enabled SDK.
We recommend the following three phases to migrate an existing SDK into the SDK Runtime:
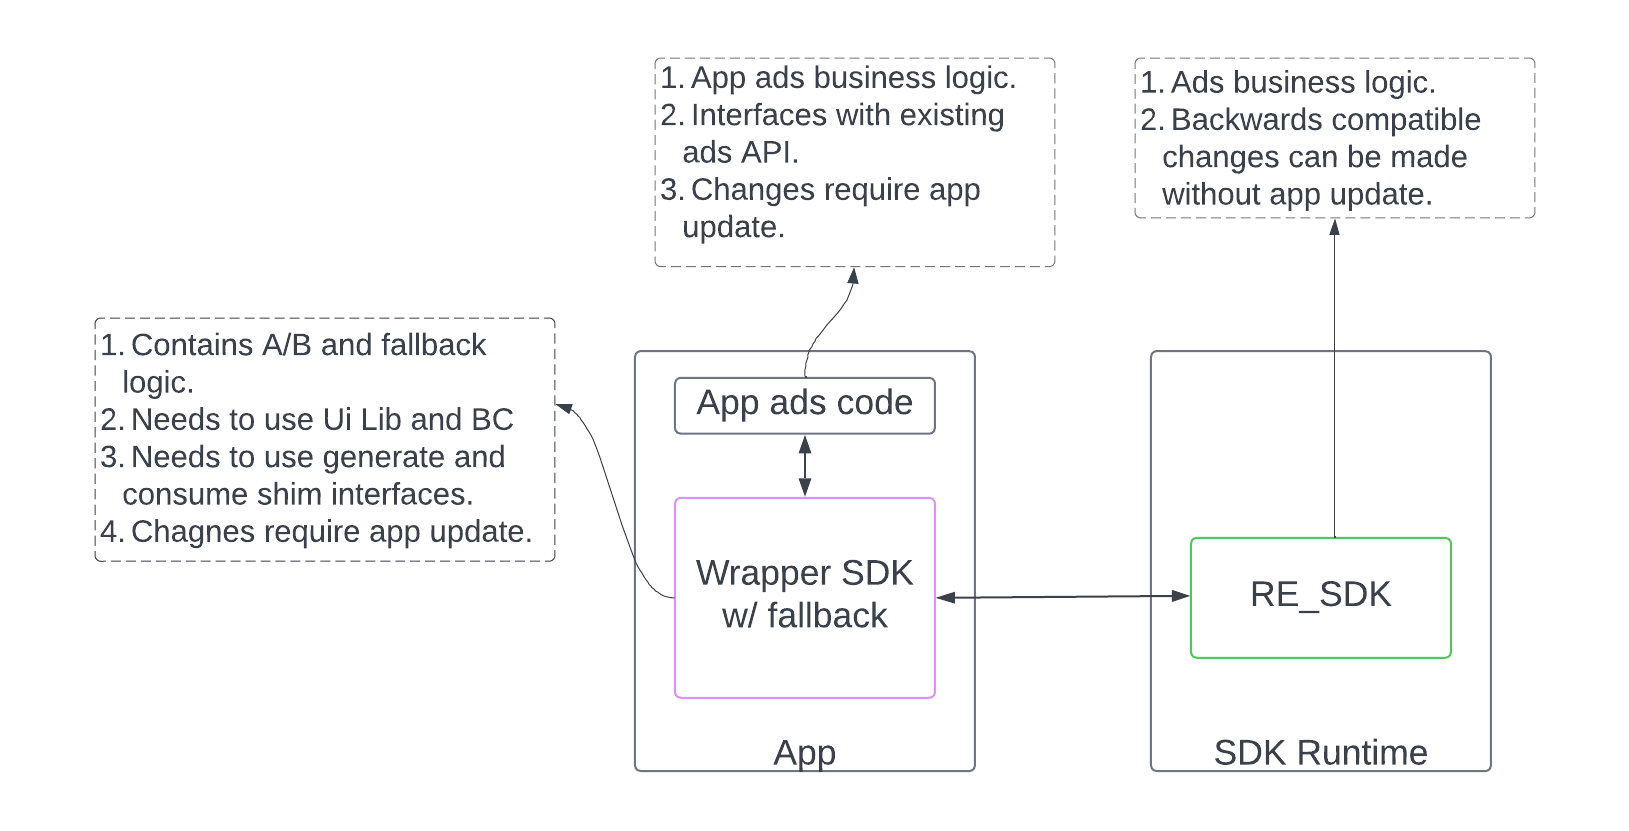
- Building a transition period runtime-enabled SDK along with a counterpart thick runtime-aware SDK. This lets you incrementally migrate business logic from your existing SDK, and give you a testing platform for A/B testing
- Moving all existing SDK business logic to a steady state a long with a counterpart thin runtime-aware SDK to ease app migration
- Supporting interested apps with full migration to consume your runtime-enabled SDK directly without a thin runtime-aware SDK
Phase 1 - Transition period: Thick runtime-aware SDK
You can start by choosing to keep some of your business logic in your runtime-aware SDK. We call this a thick runtime-aware SDK or in-app wrapper.
This approach lets you keep all or some of your SDK's capabilities in the static app library, alongside a newly built runtime-enabled SDK.
This lets you incrementally migrate your use cases into the runtime-enabled SDK, and to test your runtime-enabled SDK against your existing SDK.
In this phase, the app developer doesn't need to change anything in how they consume your SDK, because it is your static app library (runtime-aware SDK) that does the work necessary to consume your runtime-aware SDK.
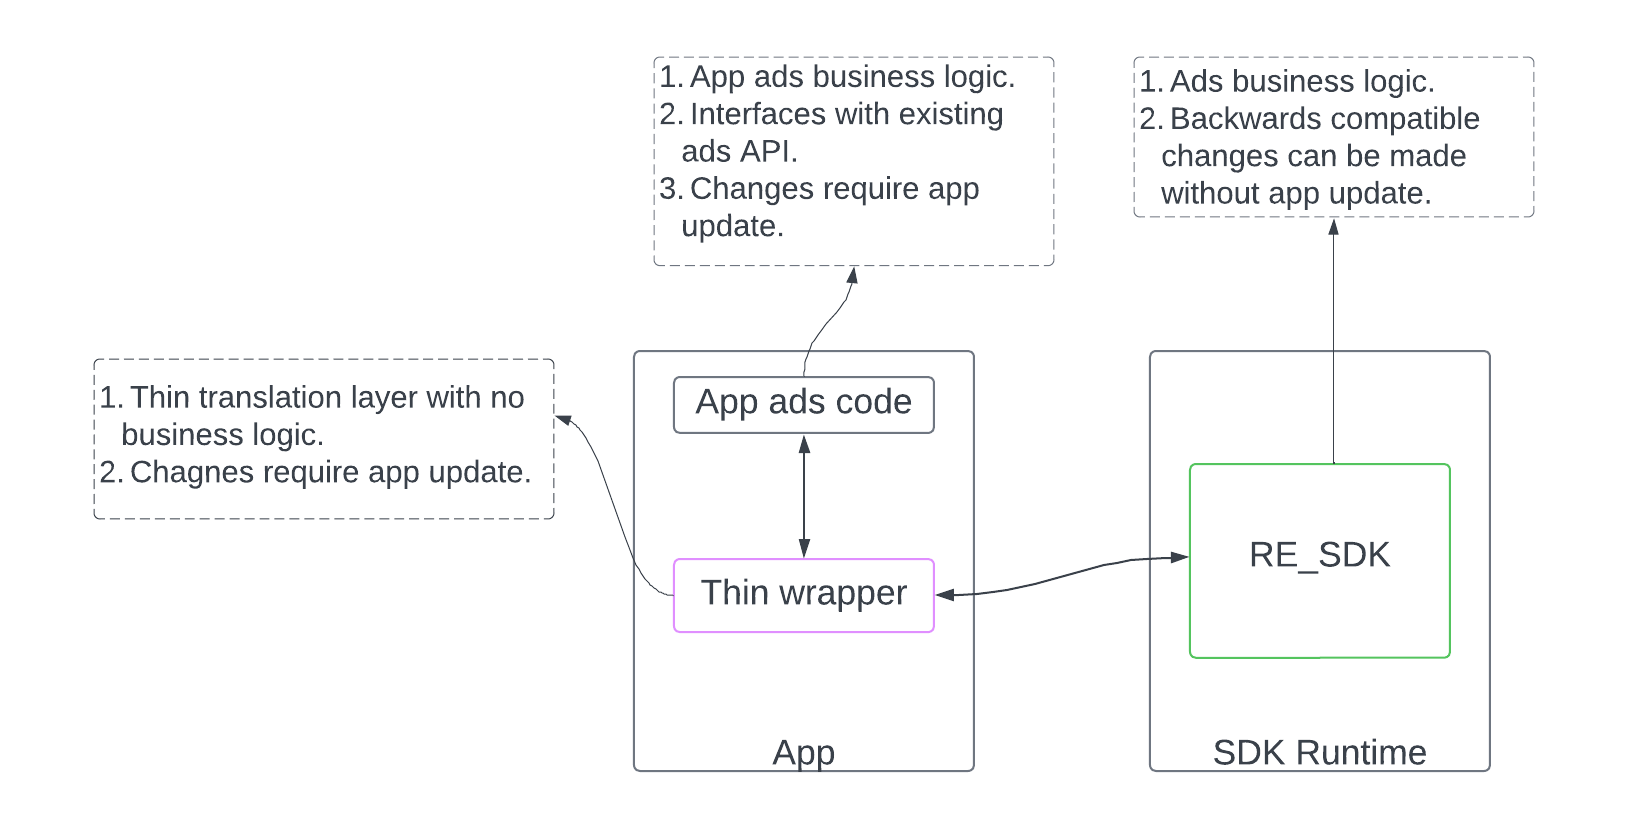
Phase 2 - Steady state: Thin runtime-aware SDK
In contrast to the thick runtime-aware SDK, a thin wrapper, or thin runtime-aware SDK (thin RA_SDK), only contains API translation and runtime-enabled SDK calling code in your statically linked library SDK.
At this stage, you should have migrated all your SDK code out of your static app library SDK and into your runtime-enabled SDK.
App developers don't have to make any changes from phase 1 because your in-app thin runtime-aware SDK handles calling into your runtime-enabled SDK inside the SDK Runtime.
Phase 3 - Full migration
In this final phase, you have migrated all your SDK's capabilities into the runtime-enabled SDK, and removed all static libraries from the app.
At this point, your app clients no longer need to include your libraries in their builds, but only list the SDK dependencies in the manifest and include the SDK calls in their app code.
The SDK calls are routed through by the system into the SDK Runtime, where your runtime-enabled SDK is automatically loaded.