Relying Parties (RPs) need to complete the following steps to enable FedCM on their site:
- Make sure FedCM endpoints are allowed on the RP's site.
- Use the FedCM JavaScript API to initiate user authentication.
- Provide their metadata (such as privacy policy and terms of service URLs) to the IdP.
- [optional] Customize user experience by choosing a UX mode, providing login or domain hints, passing custom parameters, requesting specific user information, providing a custom error message, or choosing how to re-authenticate users.
Once the IdP's configuration and endpoints are available, RPs can call navigator.credentials.get() to request allowing users to sign in to the RP with the IdP.
Before calling the API, you need to confirm that FedCM is available on the user's browser. To check if FedCM is available, wrap this code around your FedCM implementation:
  if ('IdentityCredential' in window) {
    // If the feature is available, take action
  } else {
    // FedCM is not supported, use a different identity solution
  }
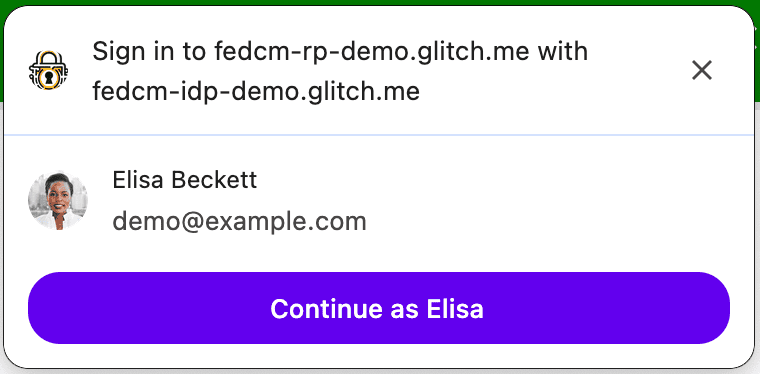
To allow users to sign in to the IdP on an RP using FedCM, the RP can call navigator.credentials.get(), for example:
  const credential = await navigator.credentials.get({
    identity: {
      context: 'signin',
      providers: [{
        configURL: 'https://accounts.idp.example/config.json',
        clientId: '********',
        mode: 'active',
        params: {
          nonce: '******'
        }
      }]
    }
  });
  const { token } = credential;
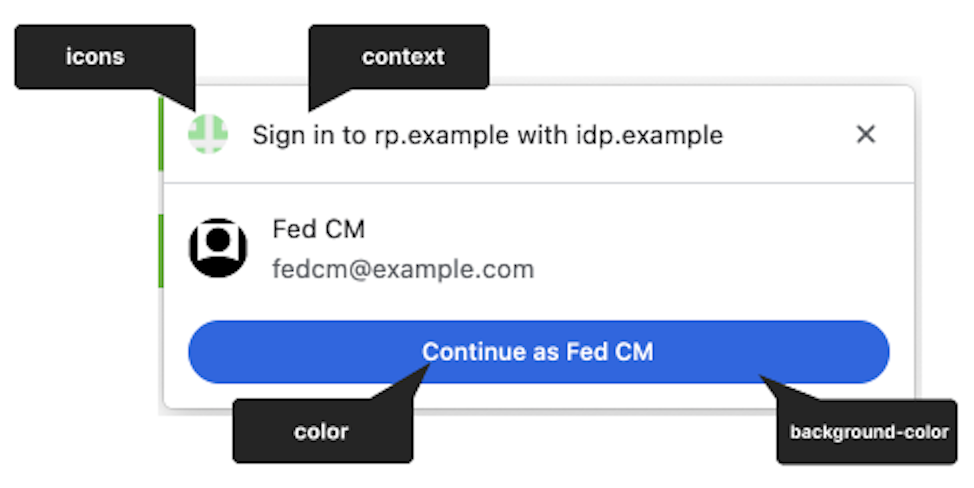
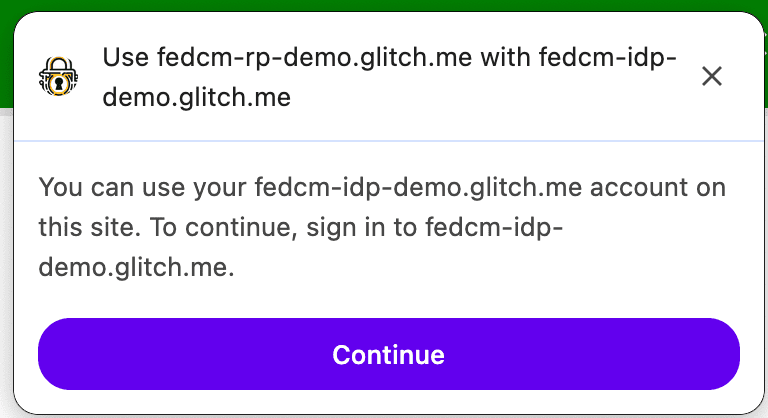
Context property
With the optional context property, RP can modify the string in the FedCM dialog UI (for example, "Sign in to rp.example…", "Use idp.example…") to accommodate predefined authentication contexts, for example. The context property can have the following values:
signin(default)signupuse
For example, setting context to use will result in the following message:
The browser handles sign-up and sign-in use cases differently depending on the existence of approved_clients in the response from the accounts list endpoint. The browser won't display a disclosure text "To continue with ...." if the user has already signed up to the RP.
The providers property takes an array of IdentityProvider objects that have the following properties:
Providers property
The providers property takes an array of IdentityProvider objects that have
the following properties:
| Property | Description |
|---|---|
configURL (required) |
A full path of the IdP config file. |
clientId (required) |
The RP's client identifier, issued by the IdP. |
loginHint (optional) |
By specifying one of login_hints values provided by
the accounts endpoints, the FedCM
dialog selectively shows the specified account. |
domainHint (optional) |
By specifying one of domain_hints values provided by
the accounts endpoints, the FedCM
dialog selectively shows the specified account. |
mode (optional) |
String that specifies the UI mode of FedCM. It can be of one of these values:
Note: mode parameter is supported from Chrome 132.
|
fields (optional) |
Array of strings that specifies the user information ("name", " email", "picture") that RP needs IdP to share with them. Note: Field API is supported by Chrome 132 and later. |
params (optional) |
Custom object that allows to specify additional key-value parameters:
Note: params is supported from Chrome 132.
|
Active mode
FedCM supports different UX mode configurations. Passive mode is the default mode, and developers don't need to configure it.
To use FedCM in active mode:
- Check the feature availability in the user's browser.
- Invoke the API with a transient user gesture, such as a button click.
- Pass the
modeparameter to the API call:
  let supportsFedCmMode = false;
  try {
    navigator.credentials.get({
      identity: Object.defineProperty(
        // Check if this Chrome version supports the Mode API.
        {}, 'mode', {
          get: function () { supportsFedCmMode = true; }
        }
      )
    });
  } catch(e) {}

  if (supportsFedCmMode) {
    // The button mode is supported. Call the API with mode property:
    return await navigator.credentials.get({
      identity: {
        providers: [{
          configURL: 'https://idp.example/config.json',
          clientId: '123',
        }],
        // The 'mode' value defines the UX mode of FedCM.
        // - 'active': Must be initiated by user interaction (e.g., clicking a button).
        // - 'passive': Can be initiated without direct user interaction.
        mode: 'active'
      }
    });
  }
Custom icon in active mode
Active mode allows IdPs to include the RP's official logo icon directly in the client metadata endpoint response. The RP must provide their branding data in advance.
Call FedCM from within a cross-origin iframe
FedCM can be invoked from within a cross-origin iframe using an
identity-credentials-get permissions policy, if the parent frame allows it. To
do so, append the allow="identity-credentials-get" attribute to the iframe tag
as follows:
<iframe src="https://fedcm-cross-origin-iframe.glitch.me" allow="identity-credentials-get"></iframe>
You can see it in action in an example.
Optionally, if the parent frame wants to restrict the origins to call FedCM,
send a Permissions-Policy header with a list of allowed origins.
Permissions-Policy: identity-credentials-get=(self "https://fedcm-cross-origin-iframe.glitch.me")
You can learn more about how the Permissions Policy works at Controlling browser features with Permissions Policy.
Login Hint API
Using the Login Hint, the RP can recommend which account a user should sign in with. This can be helpful for re-authenticating users who're not sure which account they've used before.
RPs can selectively show a specific account by invoking
navigator.credentials.get() with the loginHint property with one of
login_hints values fetched from the accounts list
endpoint, as shown in the following code sample:
  return await navigator.credentials.get({
    identity: {
      providers: [{
        configURL: 'https://idp.example/manifest.json',
        clientId: '123',
        // Accounts endpoint can specify a 'login_hints' array for an account.
        // When RP specifies a 'exampleHint' value, only those accounts will be
        // shown to the user whose 'login_hints' array contains the 'exampleHint'
        // value
        loginHint : 'exampleHint'
      }]
    }
  });
When no accounts match the loginHint, the FedCM dialog shows a login prompt,
which allows the user to login to an IdP account matching the hint requested by
the RP. When the user taps on the prompt, a popup window is opened with the
login URL specified in the config file. The link is then
appended with the login hint and the domain hint query parameters.
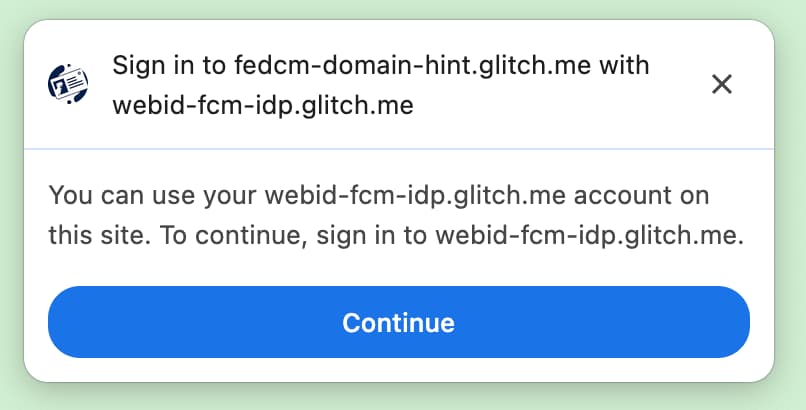
Domain Hint API
RPs can selectively show only accounts associated with a certain domain. This can be useful for the RPs that are restricted to a corporate domain.
To display specific domain accounts only, RP should call navigator.credentials.get()
with the domainHint property with one of domain_hints values fetched from
the accounts list endpoint, as shown in the following
code sample:
  return await navigator.credentials.get({
    identity: {
      providers: [{
        configURL: 'https://idp.example/manifest.json',
        clientId: 'abc',
        // Accounts endpoint can specify a 'domain_hints' array for an account.
        // When RP specifies a '@domain.example' value, only those accounts will be
        // shown to the user whose 'domain_hints' array contains the
        // '@domain.example' value
        domainHint : '@domain.example'
      }]
    }
  });
When no accounts match the domainHint, the FedCM dialog shows a login prompt,
which allows the user to login to an IdP account matching the hint requested by
the RP. When the user taps on the prompt, a popup window is opened with the
login URL specified in the config file. The link is then
appended with the login hint and the domain hint query parameters.
domainHint.Custom parameters
The Custom Parameters feature allows the RP to provide additional key-value parameters to the ID assertion endpoint. With the Parameters API, RPs can pass additional parameters to the IdP to request permissions for resources beyond basic sign-in. Passing additional parameters can be useful in these scenario:
- The RP needs to request additional permissions dynamically that the IdP has, such as billing address or calendar access. The user can authorize these permissions through an IdP-controlled UX flow that is launched using the Continue on feature, and the IdP would then share this information.
To use the API, the RP adds parameters to the params property as an object in the navigator.credentials.get() call:
  let {token} = await navigator.credentials.get({
    identity: {
      providers: [{
        clientId: '1234',
        configURL: 'https://idp.example/fedcm.json',
        // Key/value pairs that need to be passed from the
        // RP to the IdP but that don't really play any role with
        // the browser.
        params: {
          IDP_SPECIFIC_PARAM: '1',
          foo: 'BAR'
        }
      },
    }
  });
The browser will automatically translate this into a POST request to the IdP with parameters as a single url-encoded JSON-serialized object:
// The assertion endpoint is drawn from the config file
POST /fedcm_assertion_endpoint HTTP/1.1
Host: idp.example
Origin: https://rp.example/
Content-Type: application/x-www-form-urlencoded
Cookie: 0x23223
Sec-Fetch-Dest: webidentity
// params are translated into urlencoded version of `{"IDP_SPECIFIC_PARAM":"1","foo":"bar"}`
account_id=123&client_id=client1234¶ms=%22%7B%5C%22IDP_SPECIFIC_PARAM%5C%22%3A1%2C%5C%22foo%5C%22%3A%5C%22BAR%5C%22%7D%22.
If the RP needs any additional permissions, the IdP can provide a redirect link. For example, in node.js:
  if (rpRequestsPermissions) {
    // Response with a URL if the RP requests additional permissions
    return res.json({
      continue_on: '/example-redirect',
    });
  }
Fields
The RP can specify the user information (any combination of name, email address, and profile picture) they need the IdP to share with them. The requested information will be included in the disclosure UI of the FedCM dialog. The user will see a message notifying them that idp.example will share the requested information with the rp.example if the user chooses to sign in.

To use the Fields feature, RP should add a fields array in the navigator.credentials.get() call. The fields can contain any permutation of name, email and picture. This can be expanded to include more values in the future.
A request with fields would look like this:
  let { token } = await navigator.credentials.get({
    identity: {
      providers: [{
        // RP requests the IdP to share only user email and profile picture
        fields: [ 'email', 'picture'],
        clientId: '1234',
        configURL: 'https://idp.example/fedcm.json',

      },
    }
  });
The browser will automatically translate it into an HTTP request to the ID assertion endpoint that includes the RP-specified fields parameter, with the fields that the browser disclosed to the user in a disclosure_shown_for parameter. For backwards compatibility, the browser will also send disclosure_text_shown=true if the disclosure text was shown and the requested fields include all the three fields: 'name', 'email', and 'picture'.
  POST /id_assertion_endpoint HTTP/1.1
  Host: idp.example
  Origin: https://rp.example/
  Content-Type: application/x-www-form-urlencoded
  Cookie: 0x23223
  Sec-Fetch-Dest: webidentity

  // The RP only requested to share email and picture. The browser will send `disclosure_text_shown=false`, as the 'name' field value is missing
  account_id=123&client_id=client1234&disclosure_text_shown=false&fields=email,picture&disclosure_shown_for=email,picture
If fields is an empty array, the user agent will skip the disclosure UI.
This is the case even if the response from the accounts endpoint
does not contain a client ID that matches the RP in approved_clients.
In this case, the disclosure_text_shown sent to the ID assertion endpoint
is false in the HTTP body:
  POST /id_assertion_endpoint HTTP/1.1
  Host: idp.example
  Origin: https://rp.example/
  Content-Type: application/x-www-form-urlencoded
  Cookie: 0x23223
  Sec-Fetch-Dest: webidentity

  account_id=123&client_id=client1234&nonce=234234&disclosure_text_shown=false
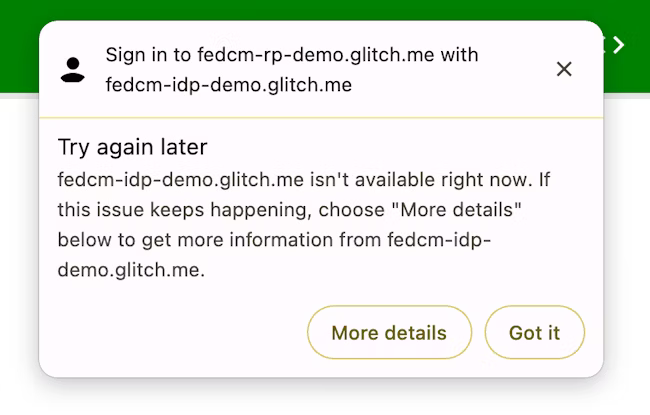
Show an error message
Sometimes, the IdP may not be able to issue a token for legitimate reasons, such as when the client is unauthorized, or the server is temporarily unavailable. If the IdP returns an "error" response, the RP can catch it, and Chrome can notify the user by showing browser UI with the error information provided by the IdP.
  try {
    const cred = await navigator.credentials.get({
      identity: {
        providers: [
          {
            configURL: 'https://idp.example/manifest.json',
            clientId: '1234',
          },
        ],
      }
    });
  } catch (e) {
    const code = e.code;
    const url = e.url;
  }
Auto-reauthenticate users after the initial authentication
FedCM auto-reauthentication ("auto-reauthn" in short) can let users reauthenticate automatically, when they come back after their initial authentication using FedCM. "The initial authentication" here means the user creates an account or signs into the RP's website by tapping on the "Continue as..." button on FedCM's sign-in dialog for the first time on the same browser instance.
While the explicit user experience makes sense before the user has created the federated account to prevent tracking (which is one of the main goals of FedCM), it is unnecessarily cumbersome after the user has gone through it once: after the user grants permission to allow communication between the RP and the IdP, there's no privacy or security benefit for enforcing another explicit user confirmation for something that they have already previously acknowledged.
With auto-reauthn, the browser changes its behavior depending on the option you
specify for the mediation when calling navigator.credentials.get().
  const cred = await navigator.credentials.get({
    identity: {
      providers: [{
        configURL: 'https://idp.example/fedcm.json',
        clientId: '1234',
      }],
    },
    mediation: 'optional', // this is the default
  });

  // `isAutoSelected` is `true` if auto-reauthn was performed.
  const isAutoSelected = cred.isAutoSelected;
The mediation is a property in the Credential Management
API,
it behaves in the same
way
as it does for
PasswordCredential
and
FederatedCredential
and it's partially supported by
PublicKeyCredential
as well. The property accepts the following four values:
'optional'(default): Auto-reauthn if possible, requires a mediation if not. We recommend choosing this option on the sign-in page.'required': Always requires a mediation to proceed, for example, clicking the "Continue" button on the UI. Choose this option if your users are expected to grant permission explicitly every time they need to be authenticated.'silent': Auto-reauthn if possible, silently fail without requiring a mediation if not. We recommend choosing this option on the pages other than the dedicated sign-in page but where you want to keep users signed in—for example, an item page on a shipping website or an article page on a news website.'conditional': Used for WebAuthn and not available for FedCM at the moment.
With this call, auto-reauthn happens under the following conditions:
- FedCM is available to use. For example, the user has not disabled FedCM either globally or for the RP in the settings.
- The user used only one account with FedCM API to sign into the website on this browser.
- The user is signed into the IdP with that account.
- The auto-reauthn didn't happen within the last 10 minutes.
- The RP hasn't called
navigator.credentials.preventSilentAccess()after the previous sign in.
When these conditions are met, an attempt to automatically reauthenticate the
user starts as soon as the FedCM navigator.credentials.get() is invoked.
When mediation: optional, auto-reauthn may be
unavailable due to reasons that
only the browser knows; the RP can check whether auto-reauthn is performed by
examining the isAutoSelected property.
This is helpful to evaluate the API performance and improve UX accordingly.
Also, when it's unavailable, the user may be prompted to sign in with explicit
user mediation, which is a flow with mediation: required.
Enforce mediation with preventSilentAccess()
Auto-reauthenticating users immediately after they sign out wouldn't make for a
very good user experience. That's why FedCM has a 10-minute quiet period after
an auto-reauthn to prevent this behavior. This means that auto-reauthn happens
at most once in every 10-minutes unless the user signs back in within
10-minutes. The RP should call navigator.credentials.preventSilentAccess() to
explicitly request the browser to disable auto-reauthn when a user signs out of
the RP explicitly, for example, by clicking a sign-out button.
  function signout() {
    navigator.credentials.preventSilentAccess();
    location.href = '/signout';
  }
Users can opt-out of auto-reauthn in settings
Users can opt-out from auto-reauth from the settings menu:
- On desktop Chrome, go to
chrome://password-manager/settings> Sign in automatically. - On Android Chrome, open Settings > Password Manager > Tap on a cog at the top right corner > Auto sign-in.
By disabling the toggle, the user can opt-out from auto-reauthn behavior all together. This setting is stored and synchronized across devices, if the user is signed into a Google Account on the Chrome instance and synchronization is enabled.
Disconnect the IdP from the RP
If a user has previously signed into the RP using the IdP through FedCM, the
relationship is memorized by the browser locally as the list of connected
accounts. The RP may initiate a disconnection by invoking the
IdentityCredential.disconnect() function. This function can be called from a
top-level RP frame. The RP needs to pass a configURL, the clientId it uses
under the IdP, and an accountHint for the IdP to be disconnected. An account
hint can be an arbitrary string as long as the disconnect endpoint can identify
the account, for example an email address or user ID which does not necessarily
match the account ID that the account list endpoint has provided:
  // Disconnect an IdP account 'account456' from the RP 'https://idp.com/'. This is invoked on the RP domain.
  IdentityCredential.disconnect({
    configURL: 'https://idp.com/config.json',
    clientId: 'rp123',
    accountHint: 'account456'
  });
IdentityCredential.disconnect() returns a Promise. This promise may throw an
exception for the following reasons:
- The user hasn't signed in to the RP using the IdP through FedCM.
- The API is invoked from within an iframe without FedCM permissions policy.
- The configURL is invalid or missing the disconnect endpoint.
- Content Security Policy (CSP) check fails.
- There is a pending disconnect request.
- The user has disabled FedCM in the browser settings.
When the IdP's disconnect endpoint returns a response, the RP and the IdP are disconnected on the browser and the promise is resolved. The ID of the disconnected accounts are specified in the response from the disconnect endpoint.