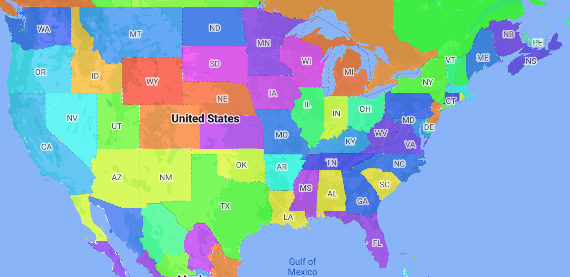
Un mapa de coropletas es un tipo de mapa temático en el que las áreas administrativas se marcan con distintos colores o sombreados según un valor de datos. Puedes usar una función de fábrica de diseño para aplicar diseño a un mapa en función de datos en los que cada área administrativa se asocia con un rango de valores numéricos. En el siguiente mapa de ejemplo, se muestra un mapa coroplético de los estados de Estados Unidos.
En este ejemplo, los datos consisten en el ID del lugar del estado. La función de fábrica de diseño aplica un color a cada estado de manera condicional en función de un valor hash del ID de lugar del estado.

Si aún no lo hiciste, sigue los pasos que se indican en Cómo comenzar para crear un ID y un diseño de mapa nuevos. Asegúrate de habilitar la capa del componente Administrative Area Level 1.
Obtén una referencia a la capa de componente de área administrativa de nivel 1 cuando se inicialice el mapa. En el caso de Estados Unidos, estos niveles administrativos corresponden a los estados individuales.
Java
private FeatureLayer areaLevel1Layer;

@Override
public void onMapReady(GoogleMap map) {
  areaLevel1Layer = map.getFeatureLayer(new FeatureLayerOptions.Builder()
    .featureType(FeatureType.ADMINISTRATIVE_AREA_LEVEL_1)
    .build());

  // Apply style factory function to ADMINISTRATIVE_AREA_LEVEL_1 layer.
  styleAreaLevel1Layer();
}
Kotlin
private var areaLevel1Layer: FeatureLayer? = null

override fun onMapReady(googleMap: GoogleMap) {
  // Get the ADMINISTRATIVE_AREA_LEVEL_1 feature layer.
  areaLevel1Layer = googleMap.getFeatureLayer(FeatureLayerOptions.Builder()
    .featureType(FeatureType.ADMINISTRATIVE_AREA_LEVEL_1)
    .build())

  // Apply style factory function to ADMINISTRATIVE_AREA_LEVEL_1 layer.
  styleAreaLevel1Layer()
}
Crea una función de fábrica de diseño y aplícala a la capa de componentes de área administrativa de nivel 1. En el siguiente ejemplo, se aplica la función al polígono que representa cada estado de Estados Unidos.
Java
private void styleAreaLevel1Layer() {
  FeatureLayer.StyleFactory styleFactory = (Feature feature) -> {
    if (feature instanceof PlaceFeature) {
      PlaceFeature placeFeature = (PlaceFeature) feature;

      // Return a hueColor in the range [-299,299]. If the value is
      // negative, add 300 to make the value positive.
      int hueColor = placeFeature.getPlaceId().hashCode() % 300;
      if (hueColor < 0) {
        hueColor += 300;
      }

      return new FeatureStyle.Builder()
        // Set the fill color for the state based on the hashed hue color.
        .fillColor(Color.HSVToColor(150, new float[] {hueColor, 1, 1}))
        .build();
    }
    return null;
  };

  // Apply the style factory function to the feature layer.
  areaLevel1Layer.setFeatureStyle(styleFactory);
}
Kotlin
private fun styleAreaLevel1Layer() {
  val styleFactory = FeatureLayer.StyleFactory { feature: Feature ->
      if (feature is PlaceFeature) {
          val placeFeature: PlaceFeature = feature as PlaceFeature

          // Return a hueColor in the range [-299,299]. If the value is
          // negative, add 300 to make the value positive.
          var hueColor: Int = placeFeature.getPlaceId().hashCode() % 300
          if (hueColor < 0) {
              hueColor += 300
          }
          return@StyleFactory FeatureStyle.Builder()
          // Set the fill color for the state based on the hashed hue color.
            .fillColor(Color.HSVToColor(150, floatArrayOf(hueColor.toFloat(), 1f, 1f)))
            .build()
      }
      return@StyleFactory null
  }

  // Apply the style factory function to the feature layer.
  areaLevel1Layer?.setFeatureStyle(styleFactory)
}
