Page Summary
-
To view and edit issues in Google Issue Tracker, you must be signed in to a Google Account and have the appropriate permissions.
-
The Issue details page includes a header with various fields and actions, navigation tabs for different panels (Comments, Dependencies, Duplicates, Blocking, Resources), and an Issue fields panel to view or edit issue details.
-
The Comments panel is the primary display area showing the status, description, and comments, with options to add, edit, and copy comments.
-
The Dependencies panel shows related issues like parents, blockers, and child issues, while the Duplicates and Blocking panels list issues marked as duplicates of or blocked by the current issue, respectively.
-
The Issue fields panel on the right allows you to view and edit the issue's state and custom fields.
This page shows how to view and edit an issue in Google Issue Tracker.
To view and edit issues, you must be signed in to a Google Account. You also must have Edit Issues or Admin Issues permission for the component that contains the issue in order to edit its fields. If you have Comment on Issues permission, you can only view and add comments to the issues.
View and edit an issue
To view and edit an issue:
Open Issue Tracker in your web browser.
Find the issue by its URL or by searching for it in Issue Tracker and open the Issue details page.
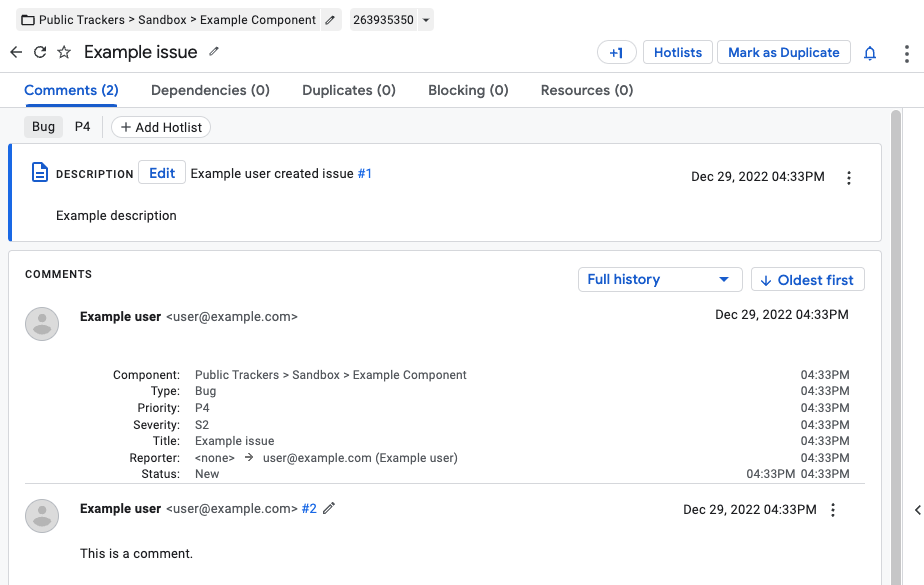
Issue details header
On the Issue details page, some fields and actions are presented in a header below the search bar.
The Component is displayed in the header. Click the name of the component to open a search for open issues in that component. To change the component, click the pencil icon and select a component in the component picker. For more information on how to change a component, see Finding Components.
Click the Issue ID to copy the ID of the issue to the clipboard. The drop-down icon next to the issue ID opens a menu with additional links to the issue.
Click the Previous and Next icons to navigate between issues in the search results. These icons are only visible if you nagivated to the issue from an issue list.
Click the Back icon to return to the previous search or return to the home page.
Click Refresh to reload the page.
Click the Star icon to bookmark the issue and have it appear in your Starred by me searches.
The issue title is displayed in the header. Click the pencil icon to edit the issue title.
Click the +1 icon to add a vote to the issue. The icon displays the total number of people who are impacted by the issue.
Click the Hotlists button to add or remove hotlists from the issue. The number on the hotlists button indicates the total number of hotlists on the issue.
Click Mark as Duplicate to change the issue status to "Duplicate" by pointing to a particular canonical issue.
Click the Notifications icon to change how you're notified of changes to the issue.
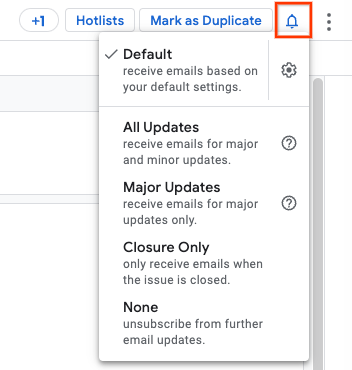
For more information, see Setting Notification Preferences.
Click the More actions icon to access additional actions like Archive issue and Mark as spam. These actions may not be available if you don't have the necessary permission on the issue.
Navigation tabs
Use the navigation tabs to change the view between the Comments, Dependencies, Duplicates, Blocking, and Resources panels. The panel is the central area of display on the Issue details page.
Comments panel
The Comments panel is the primary display of information for an issue. It displays the current status, an overall description, as well as a list of all comments and edits associated with the issue.
The top bar of the Comments panel shows the issue type, the priority, and hotlists associated with the issue. Click the Add Hotlists button to add new hotlists to the issue, or click the x icon in a hotlist chip to remove that hotlist from the issue.
Status update
The Status update is used to track the current state of the issue. To edit the status update, click the Edit button. Click the Status update actions icon to open the additional actions menu. For more information, see Using the Status Update field.
Description
The Description field contains a detailed description of the issue including steps to reproduce it, if applicable.
To edit the description, click the Edit button. To edit the description you must have Edit Issues permission, or you must be the original creator of the issue.
The description can only be edited if the component enables the Editable comments setting.
Click the Description actions icon to open the additional actions menu.
Comments
The comments section displays an ordered list of all comments that have been posted to the issue.
The comments section does not display minor changes to the state of the issue by default. To view these changes, switch to the filter level to Full history in the top right of the Comments panel.
There are a total of 4 filter levels:
- Full history
- All comments and updates
- Users' comments (only shows human-authored comments)
- Team and assignee comments
The order of the comment thread can be configured to show either Oldest first or Newest first. Clicking this button will toggle the thread direction.
Add a comment
To add a new comment to the issue:
Type the comment text into the text input box. Adding a comment requires having Comment on Issues permission.
Optionally, click the Markdown checkbox to select whether the comment is using Markdown formatting.
Optionally, click the Attachment icon to upload attachments to the issue. You can remove attachments before submitting the comment by clicking the Remove attachment button next to the attachment. You can also upload attachments directly from Google Drive using the Google Drive icon.
Optionally, if your comment or attachments contain sensitive information, click the Restriction settings icon to select a restriction setting. For more information, see Restricted Content.
Click the Comment button to post the comment and any uploaded attachments to the issue.
Edit a comment
To edit a comment:
Click the pencil icon next to the comment number. You can edit your own comments if you have Comment on Issues permission.
Comments can only be edited if the component enables the Editable comments setting.
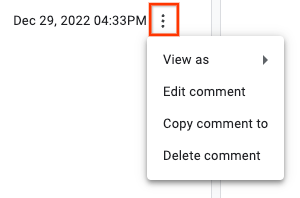
If you have appropriate permission, you can also click the "more" icon next to the comment timestamp to edit the comment or to delete it.
A comment which has been edited will include an additional note in the Comments panel:
"Message last modified on Jan 26, 2017 02:24PM"
Click the Show History link to view the edits made to the comment.
Don't use comment editing to redact sensitive information because the history of the comment can still be viewed by users. Instead, request removal by filing a support ticket.
Editing a comment does not send a change notification.
Copy a comment to another issue
To copy a comment to another issue:
Click the "more" button next to the comment timestamp and select the Copy comment to option.
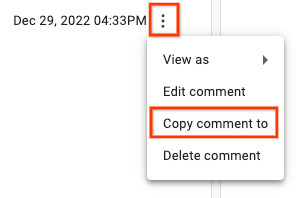
In the dialog, select a target issue and click Copy.
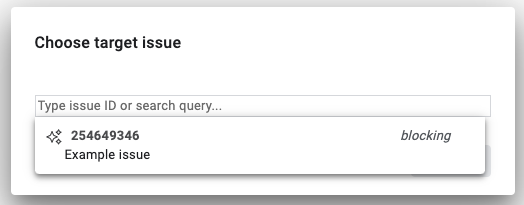
The target issue opens in a new browser tab, with the selected comment text in the comment box at the bottom of the Comments panel.
Dependencies panel
The Dependencies panel lists issues related to the current issue. Each section shows a count of how many issues are listed as well as how many are still incomplete. You can click an issue on the dependencies panel to access the issue details page for that issue.
The Parents section shows the larger work effort containing this issue. To add a new parent, click Add parent and select an issue. To remove a parent, click the More options icon on the row for that issue and select Unlink parent. For more information about parent issues, see Parent-Child Relationships.
The Blockers section shows issues that are blocking this issue from getting fixed. To add a new blocker, click Add blocker and select an issue. To remove a blocker, click the More options icon on the row for that issue and select Remove blocker. For more information, see Blocking an issue.
The Child issues section shows issues tracking smaller items of work under the current issue. To create a new child bug, click Create new child, type an issue title, then click Create. To add a child bug that already exists in Issue Tracker, click Add existing child and select the existing issue. To remove a child, click the More options icon on the row for that issue and select Unlink from parent. For more information about child issues, see Parent-Child Relationships.
Duplicates panel
The Duplicates panel shows a list of issues that have been marked as a duplicate of the current issue. To mark an issue as a duplicate of the current issue, click the Add button and select an issue. For more information, see Marking an Issue as Duplicate.
Blocking panel
The Blocking panel shows a list of issues that are blocked by the current issue. To mark an issue as being blocked by the current issue, click the Add button and select an issue. For more information, see Blocking an issue.
Resources panel
The Resources panel shows related resources linked from the current issue. This includes other issues and screenshots mentioned in the comments.
Issue fields
Use the Issue fields panel on the right side of the page to view or edit the state of the issue.
The Issue fields panel contains many of the fields first reported when the issue was created. It also includes the component's custom fields. You can edit a field in this panel by clicking on its current value or associated link.

For information about the default issue fields in the Issue fields panel, see Glossary of Fields.