Учетные записи связаны с использованием неявных потоков кода авторизации и неявных потоков OAuth 2.0, являющихся отраслевым стандартом. Ваша служба должна поддерживать конечные точки авторизации и обмена токенами, совместимые с OAuth 2.0.
In the implicit flow, Google opens your authorization endpoint in the user's browser. After successful sign in, you return a long-lived access token to Google. This access token is now included in every request sent from Google.
In the authorization code flow, you need two endpoints:
The authorization endpoint, which presents the sign-in UI to your users that aren't already signed in. The authorization endpoint also creates a short-lived authorization code to record users' consent to the requested access.
The token exchange endpoint, which is responsible for two types of exchanges:
- Exchanges an authorization code for a long-lived refresh token and a short-lived access token. This exchange happens when the user goes through the account linking flow.
- Exchanges a long-lived refresh token for a short-lived access token. This exchange happens when Google needs a new access token because the one it had expired.
Choose an OAuth 2.0 flow
Although the implicit flow is simpler to implement, Google recommends that access tokens issued by the implicit flow never expire. This is because the user is forced to link their account again after a token expires with the implicit flow. If you need token expiration for security reasons, we strongly recommend that you use the authorization code flow instead.
Design guidelines
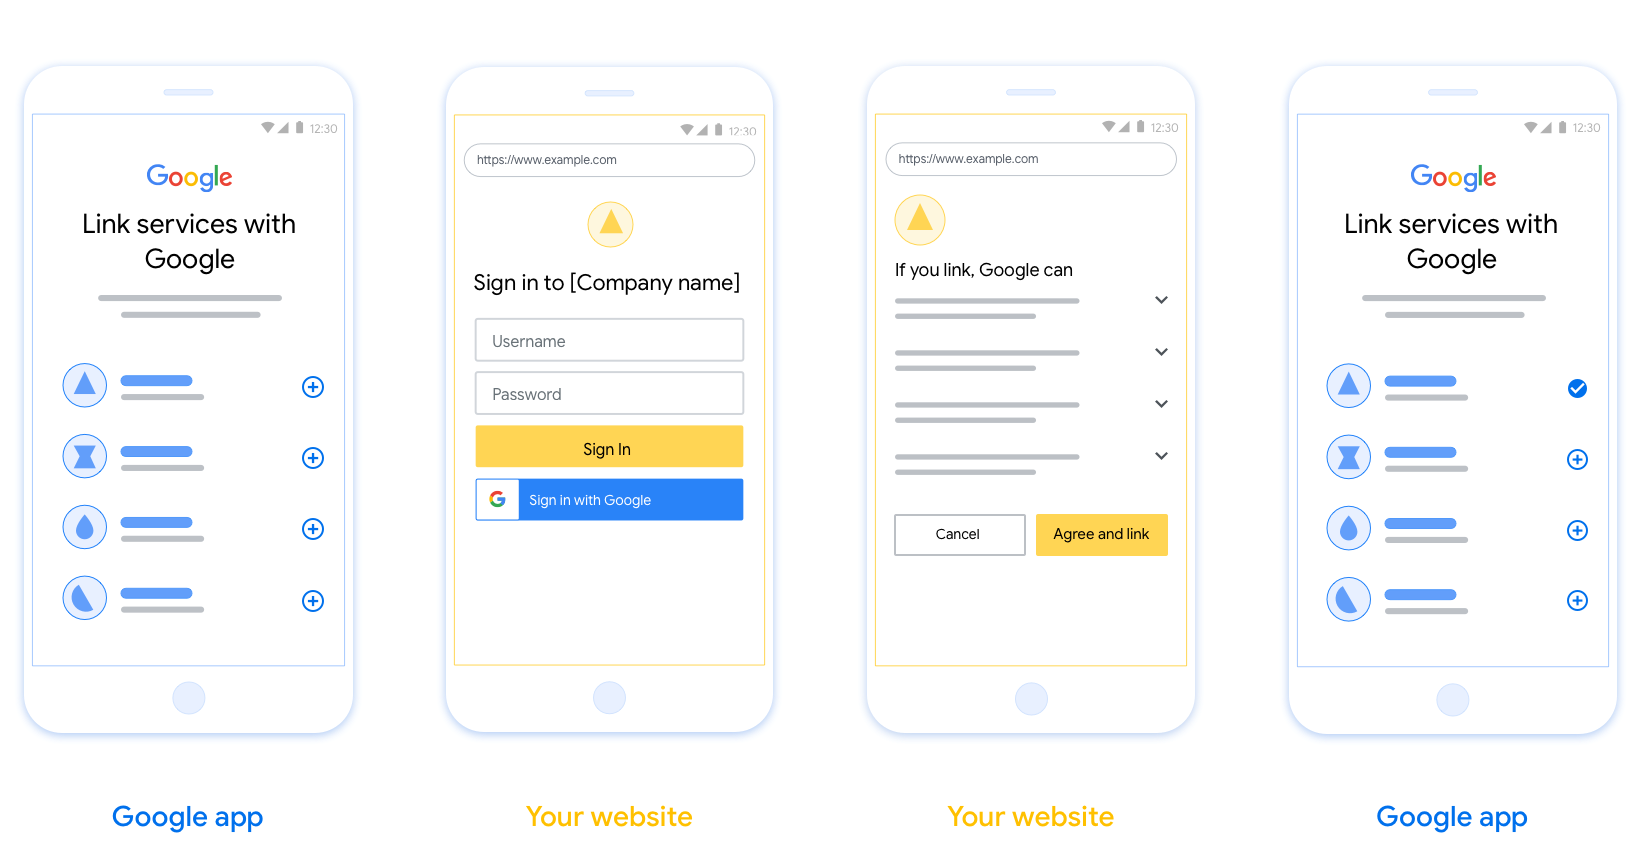
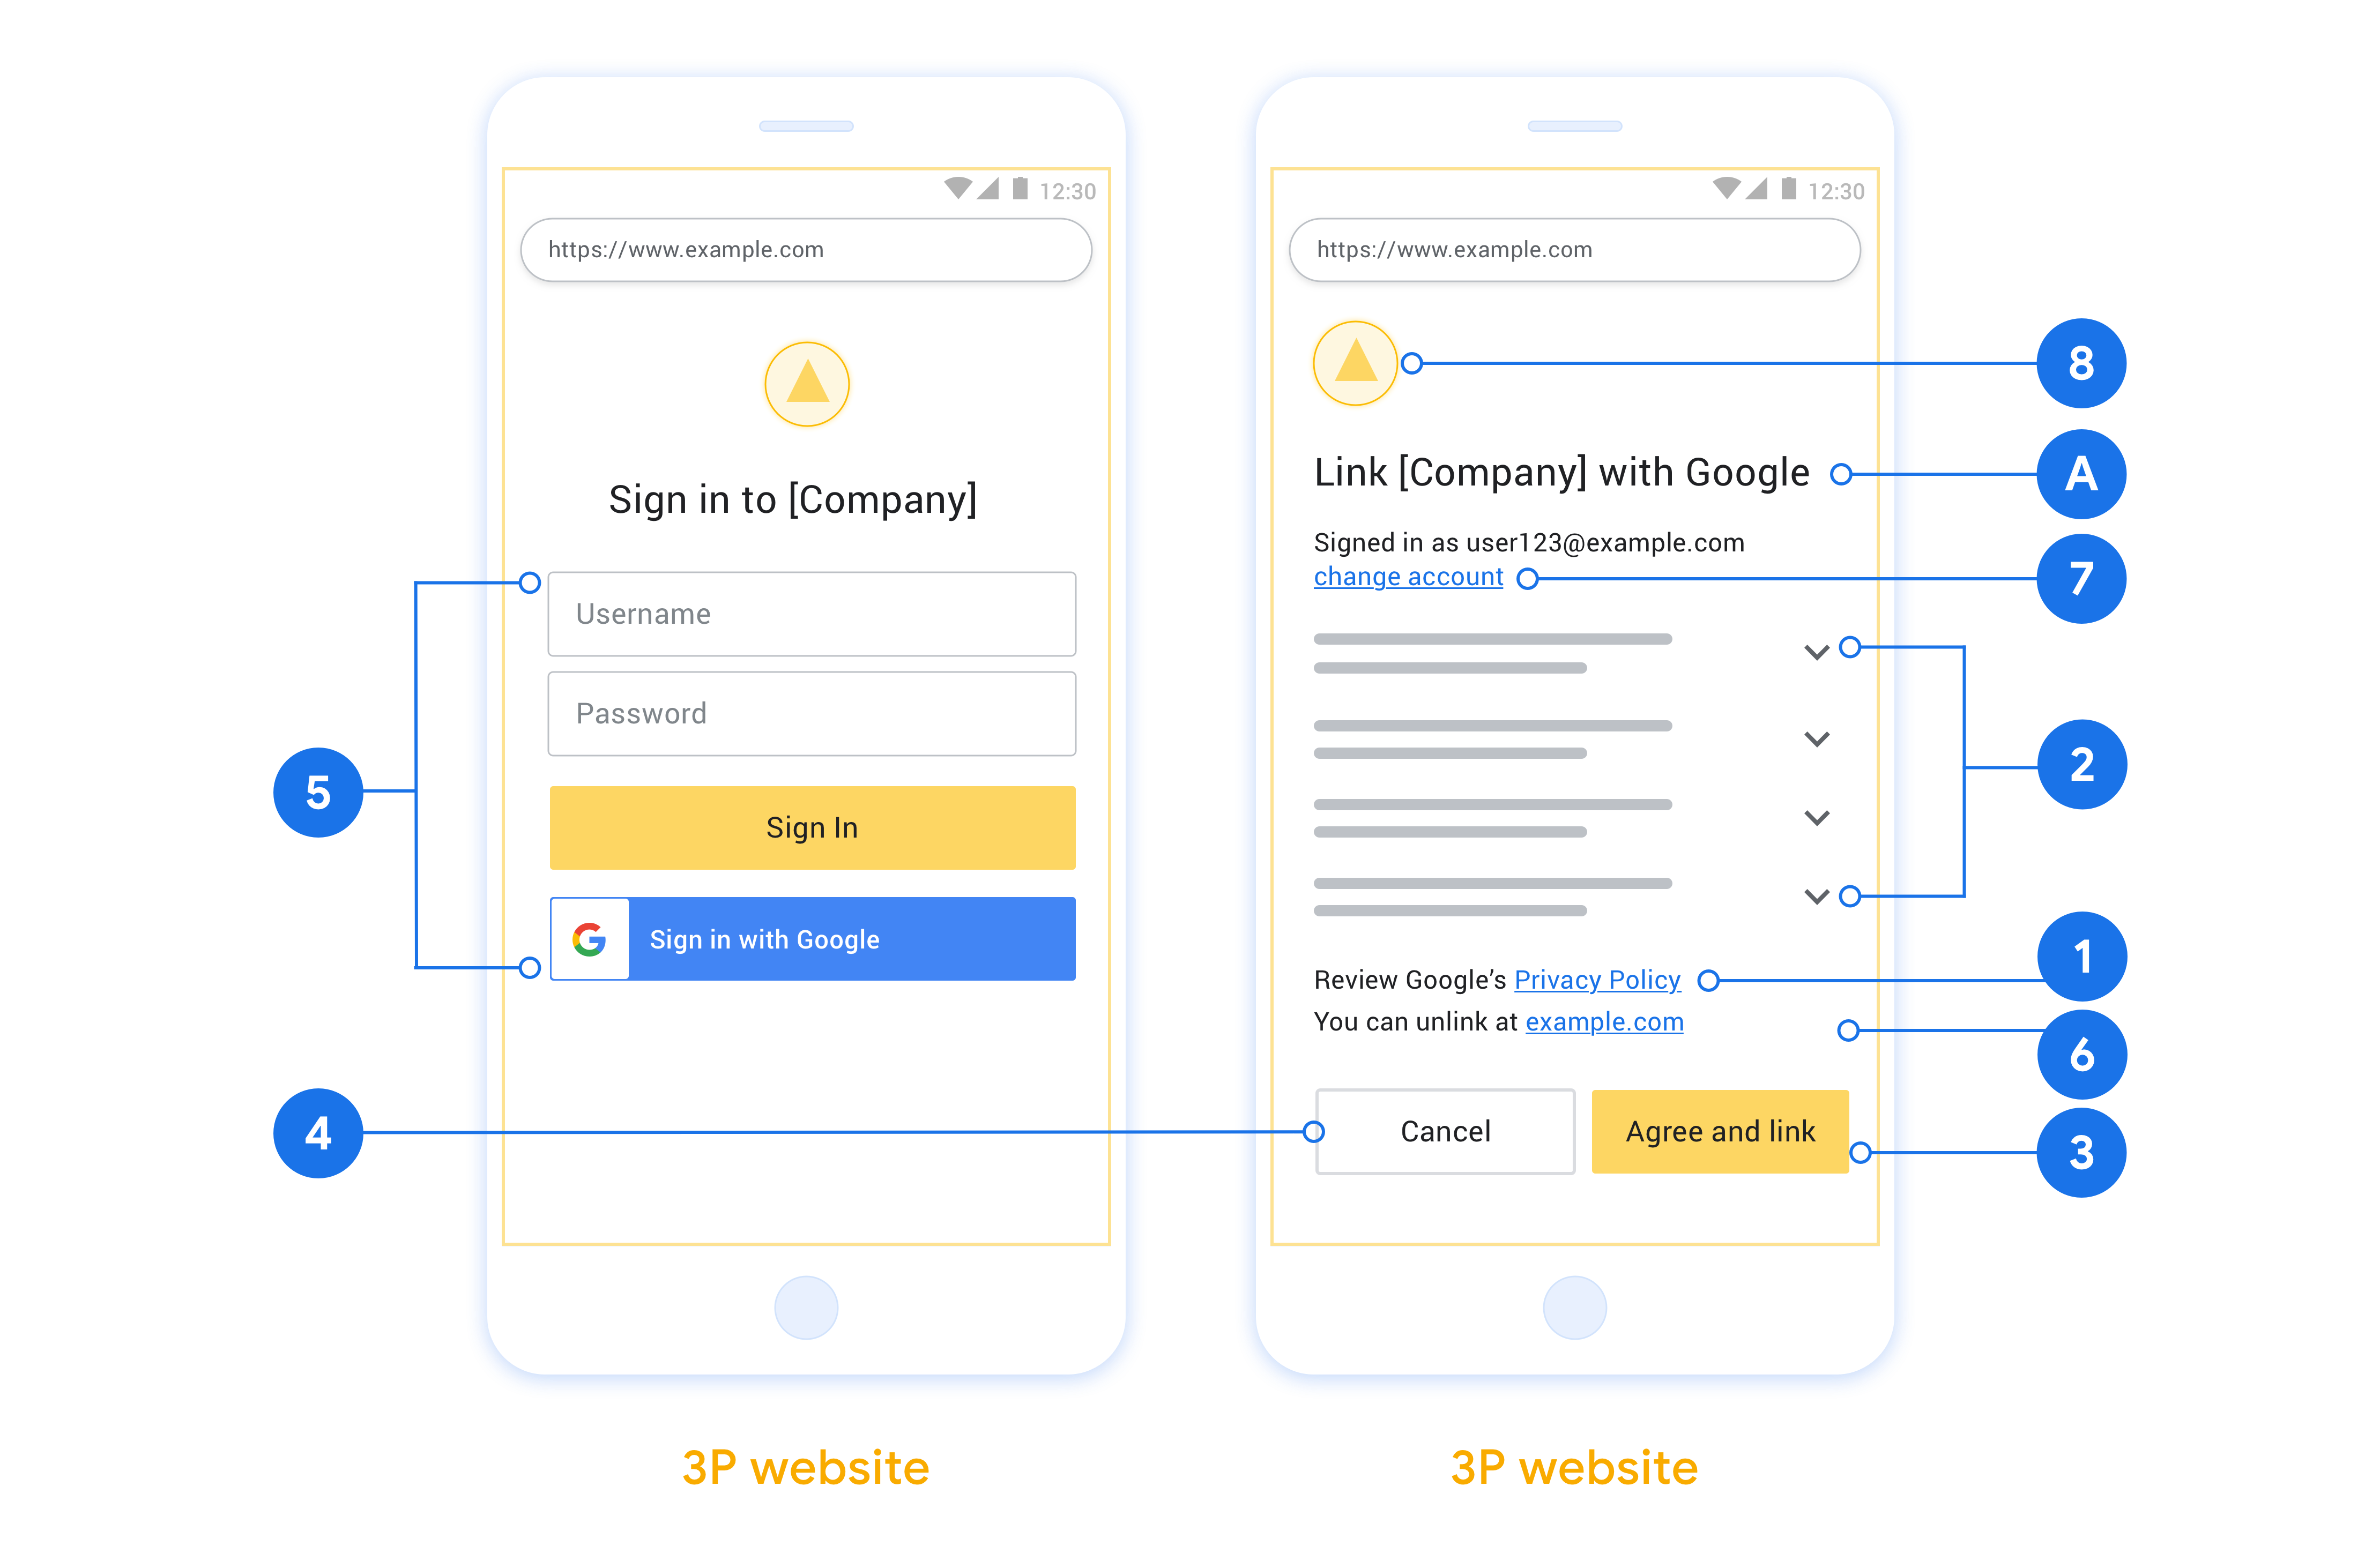
This section describes the design requirements and recommendations for the user screen that you host for OAuth linking flows. After it's called by Google's app, your platform displays a sign in to Google page and account linking consent screen to the user. The user is directed back to Google's app after giving their consent to link accounts.
Requirements
- You must communicate that the user’s account will be linked to Google, not a specific Google product like Google Home or Google Assistant.
Recommendations
We recommend that you do the following:
Display Google's Privacy Policy. Include a link to Google’s Privacy Policy on the consent screen.
Data to be shared. Use clear and concise language to tell the user what data of theirs Google requires and why.
Clear call-to-action. State a clear call-to-action on your consent screen, such as “Agree and link.” This is because users need to understand what data they're required to share with Google to link their accounts.
Ability to cancel. Provide a way for users to go back or cancel, if they choose not to link.
Clear sign-in process. Ensure that users have clear method for signing in to their Google account, such as fields for their username and password or Sign in with Google.
Ability to unlink. Offer a mechanism for users to unlink, such as a URL to their account settings on your platform. Alternatively, you can include a link to Google Account where users can manage their linked account.
Ability to change user account. Suggest a method for users to switch their account(s). This is especially beneficial if users tend to have multiple accounts.
- If a user must close the consent screen to switch accounts, send a recoverable error to Google so the user can sign in to the desired account with OAuth linking and the implicit flow.
Include your logo. Display your company logo on the consent screen. Use your style guidelines to place your logo. If you wish to also display Google's logo, see Logos and trademarks.
Create the project
To create your project to use account linking:
- Go to the Google API Console.
- Нажмите Создать проект .
- Введите имя или примите сгенерированное предложение.
- Подтвердите или отредактируйте оставшиеся поля.
- Нажмите Создать .
Для просмотра идентификатора вашего проекта:
- Go to the Google API Console.
- Найдите свой проект в таблице на целевой странице. Идентификатор проекта отображается в столбце идентификаторов .
Configure your OAuth Consent Screen
The Google Account Linking process includes a consent screen which tells users the application requesting access to their data, what kind of data they are asking for and the terms that apply. You will need to configure your OAuth consent screen before generating a Google API client ID.
- Open the OAuth consent screen page of the Google APIs console.
- If prompted, select the project you just created.
On the "OAuth consent screen" page, fill out the form and click the “Save” button.
Application name: The name of the application asking for consent. The name should accurately reflect your application and be consistent with the application name users see elsewhere. The application name will be shown on the Account Linking consent screen.
Application logo: An image on the consent screen that will help users recognize your app. The logo is shown on Account linking consent screen and on account settings
Support email: For users to contact you with questions about their consent.
Scopes for Google APIs: Scopes allow your application to access your user's private Google data. For the Google Account Linking use case, default scope (email, profile, openid) is sufficient, you don’t need to add any sensitive scopes. It is generally a best practice to request scopes incrementally, at the time access is required, rather than up front. Learn more.
Authorized domains: To protect you and your users, Google only allows applications that authenticate using OAuth to use Authorized Domains. Your applications' links must be hosted on Authorized Domains. Learn more.
Application Homepage link: Home page for your application. Must be hosted on an Authorized Domain.
Application Privacy Policy link: Shown on Google Account Linking consent screen. Must be hosted on an Authorized Domain.
Application Terms of Service link (Optional): Must be hosted on an Authorized Domain.

Figure 1. Google Account Linking Consent Screen for a fictitious Application, Tunery
Check "Verification Status", if your application needs verification then click the "Submit For Verification" button to submit your application for verification. Refer to OAuth verification requirements for details.
Внедрите свой сервер OAuth
Для того, чтобы поддержать неявный поток OAuth 2.0, ваша служба делает конечную точку авторизации доступную по протоколу HTTPS. Эта конечная точка отвечает за аутентификацию и получение согласия пользователей на доступ к данным. Конечная точка авторизации представляет пользовательский интерфейс для входа вашим пользователям, которые еще не вошли в систему, и записывает согласие на запрошенный доступ.
Когда приложению Google необходимо вызвать один из авторизованных API вашей службы, Google использует эту конечную точку, чтобы получить разрешение от ваших пользователей на вызов этих API от их имени.
Типичный сеанс неявного потока OAuth 2.0, инициированный Google, имеет следующий поток:
- Google открывает вашу конечную точку авторизации в браузере пользователя. Пользователь входит в систему, если еще не вошел в систему, и предоставляет Google разрешение на доступ к своим данным с помощью вашего API, если он еще не предоставил разрешение.
- Ваша служба создает маркер доступа и возвращает его в Google. Для этого перенаправьте браузер пользователя обратно в Google с токеном доступа, прикрепленным к запросу.
- Google вызывает API вашей службы и прикрепляет токен доступа к каждому запросу. Ваша служба проверяет, разрешает ли токен доступа Google доступ к API, а затем выполняет вызов API.
Обработка запросов на авторизацию
Когда приложению Google необходимо выполнить привязку учетной записи через неявный поток OAuth 2.0, Google отправляет пользователя в конечную точку авторизации с запросом, который включает следующие параметры:
| Параметры конечной точки авторизации | |
|---|---|
client_id | Идентификатор клиента, который вы присвоили Google. |
redirect_uri | URL-адрес, на который вы отправляете ответ на этот запрос. |
state | Бухгалтерская стоимость, которая возвращается в Google без изменений в URI перенаправления. |
response_type | Тип значения, возвращаемого в ответе. Для неявного потока OAuth 2.0, тип ответа всегда token . |
user_locale | Настройка учетной записи Google языка в RFC5646 формате используется для локализации вашего контента в предпочтительном языке пользователя. |
Например, если конечная точка авторизации доступна на https://myservice.example.com/auth , запрос может выглядеть следующим образом :
GET https://myservice.example.com/auth?client_id=GOOGLE_CLIENT_ID&redirect_uri=REDIRECT_URI&state=STATE_STRING&response_type=token&user_locale=LOCALE
Чтобы конечная точка авторизации могла обрабатывать запросы на вход, выполните следующие действия:
Проверьте
client_idиredirect_uriзначения для предотвращения предоставления доступа к непредвиденным или некорректной настройки приложений клиента:- Убедитесь , что
client_idсоответствует идентификатор клиента, назначенный для Google. - Убедитесь , что URL - адрес задается
redirect_uriпараметром имеет следующий вид:https://oauth-redirect.googleusercontent.com/r/YOUR_PROJECT_ID https://oauth-redirect-sandbox.googleusercontent.com/r/YOUR_PROJECT_ID
- Убедитесь , что
Проверьте, вошел ли пользователь в вашу службу. Если пользователь не вошел в систему, завершите процесс входа или регистрации в вашей службе.
Создайте токен доступа, который Google будет использовать для доступа к вашему API. Токеном доступа может быть любое строковое значение, но он должен однозначно представлять пользователя и клиента, для которого предназначен токен, и его нельзя угадывать.
Отправить ответ HTTP , который перенаправляет браузер пользователя на URL , указанный
redirect_uriпараметра. Включите во фрагмент URL все следующие параметры:-
access_token: Доступ лексемы вы только что генерируется -
token_type: Строкаbearer -
state: Неизмененное значение состояния из исходного запроса
Ниже приведен пример результирующего URL:
https://oauth-redirect.googleusercontent.com/r/YOUR_PROJECT_ID#access_token=ACCESS_TOKEN&token_type=bearer&state=STATE_STRING
-
OAuth 2.0 обработчик редирект Google получает доступ токенов и подтверждает , что state значение не изменилось. После того, как Google получит токен доступа для вашей службы, Google прикрепит этот токен к последующим вызовам API ваших служб.
Handle userinfo requests
The userinfo endpoint is an OAuth 2.0 protected resource that return claims about the linked user. Implementing and hosting the userinfo endpoint is optional, except for the following use cases:
- Linked Account Sign-In with Google One Tap.
- Frictionless subscription on AndroidTV.
After the access token has been successfully retrieved from your token endpoint, Google sends a request to your userinfo endpoint to retrieve basic profile information about the linked user.
| userinfo endpoint request headers | |
|---|---|
Authorization header |
The access token of type Bearer. |
For example, if your userinfo endpoint is available at
https://myservice.example.com/userinfo, a request might look like the following:
GET /userinfo HTTP/1.1
Host: myservice.example.com
Authorization: Bearer ACCESS_TOKEN
For your userinfo endpoint to handle requests, do the following steps:
- Extract access token from the Authorization header and return information for the user associated with the access token.
- If the access token is invalid, return an HTTP 401 Unauthorized error with using the
WWW-AuthenticateResponse Header. Below is an example of a userinfo error response:HTTP/1.1 401 Unauthorized WWW-Authenticate: error="invalid_token", error_description="The Access Token expired"
If a 401 Unauthorized, or any other unsuccessful error response is returned during the linking process, the error will be non-recoverable, the retrieved token will be discarded and the user will have to initiate the linking process again. If the access token is valid, return and HTTP 200 response with the following JSON object in the body of the HTTPS response:
{
"sub": "USER_UUID",
"email": "EMAIL_ADDRESS",
"given_name": "FIRST_NAME",
"family_name": "LAST_NAME",
"name": "FULL_NAME",
"picture": "PROFILE_PICTURE",
}
If your userinfo endpoint returns an HTTP 200 success response, the retrieved token and claims are registered against the user's Google account.userinfo endpoint response subA unique ID that identifies the user in your system. emailEmail address of the user. given_nameOptional: First name of the user. family_nameOptional: Last name of the user. nameOptional: Full name of the user. pictureOptional: Profile picture of the user.
Проверка вашей реализации
Вы можете проверить свою реализацию с помощью Playground OAuth 2.0 инструмента.
В инструменте проделайте следующие шаги:
- Нажмите Конфигурация , чтобы открыть окно настройки OAuth 2.0.
- В поле потока OAuth, выберите на стороне клиента.
- В поле OAuth Endpoints, выберите Custom.
- Укажите конечную точку OAuth 2.0 и идентификатор клиента, назначенный Google, в соответствующих полях.
- В разделе Шаг 1, не выбирайте области Google. Вместо этого оставьте это поле пустым или введите область действия, действительную для вашего сервера (или произвольную строку, если вы не используете области действия OAuth). Когда вы закончите, нажмите Авторизовать API.
- В секциях Шаг 2 и Шаг 3, пройти через поток OAuth 2.0 и убедитесь , что каждый шаг работает как задумано.
Вы можете проверить свою реализацию с помощью учетной записи Google Linking Демо инструмент.
В инструменте проделайте следующие шаги:
- Нажмите для входа в систему с помощью кнопки Google.
- Выберите учетную запись, которую вы хотите связать.
- Введите идентификатор службы.
- При желании введите одну или несколько областей, для которых вы запрашиваете доступ.
- Нажмите кнопку Пуск Demo.
- При появлении запроса подтвердите, что вы можете согласиться, и отклоните запрос на установление связи.
- Подтвердите, что вы перенаправлены на свою платформу.