Учетные записи связаны с использованием неявных потоков кода авторизации и неявных потоков OAuth 2.0, являющихся отраслевым стандартом. Ваша служба должна поддерживать конечные точки авторизации и обмена токенами, совместимые с OAuth 2.0.
В неявном потоке Google открывает вашу конечную точку авторизации в браузере пользователя. После успешного входа вы возвращаете долговременный токен доступа в Google. Этот токен доступа теперь включается в каждый запрос, отправляемый из Google.
В потоке кода авторизации вам нужны две конечные точки:
Конечная точка авторизации , которая представляет пользовательский интерфейс для входа пользователям, которые еще не вошли в систему. Конечная точка авторизации также создает кратковременный код авторизации для записи согласия пользователей на запрошенный доступ.
Конечная точка обмена токенами, которая отвечает за два типа обмена:
- Обменивает код авторизации на долгоживущий токен обновления и недолговечный токен доступа. Этот обмен происходит, когда пользователь проходит процесс связывания учетной записи.
- Заменяет долгоживущий токен обновления на недолговечный токен доступа. Этот обмен происходит, когда Google нужен новый токен доступа, потому что срок его действия истек.
Выберите поток OAuth 2.0
Хотя неявный поток реализовать проще, Google рекомендует, чтобы токены доступа, выдаваемые неявным потоком, никогда не истекали. Это связано с тем, что пользователь вынужден снова связать свою учетную запись после истечения срока действия токена с неявным потоком. Если вам требуется истечение срока действия токена по соображениям безопасности, мы настоятельно рекомендуем вместо этого использовать поток кода авторизации .
Рекомендации по дизайну
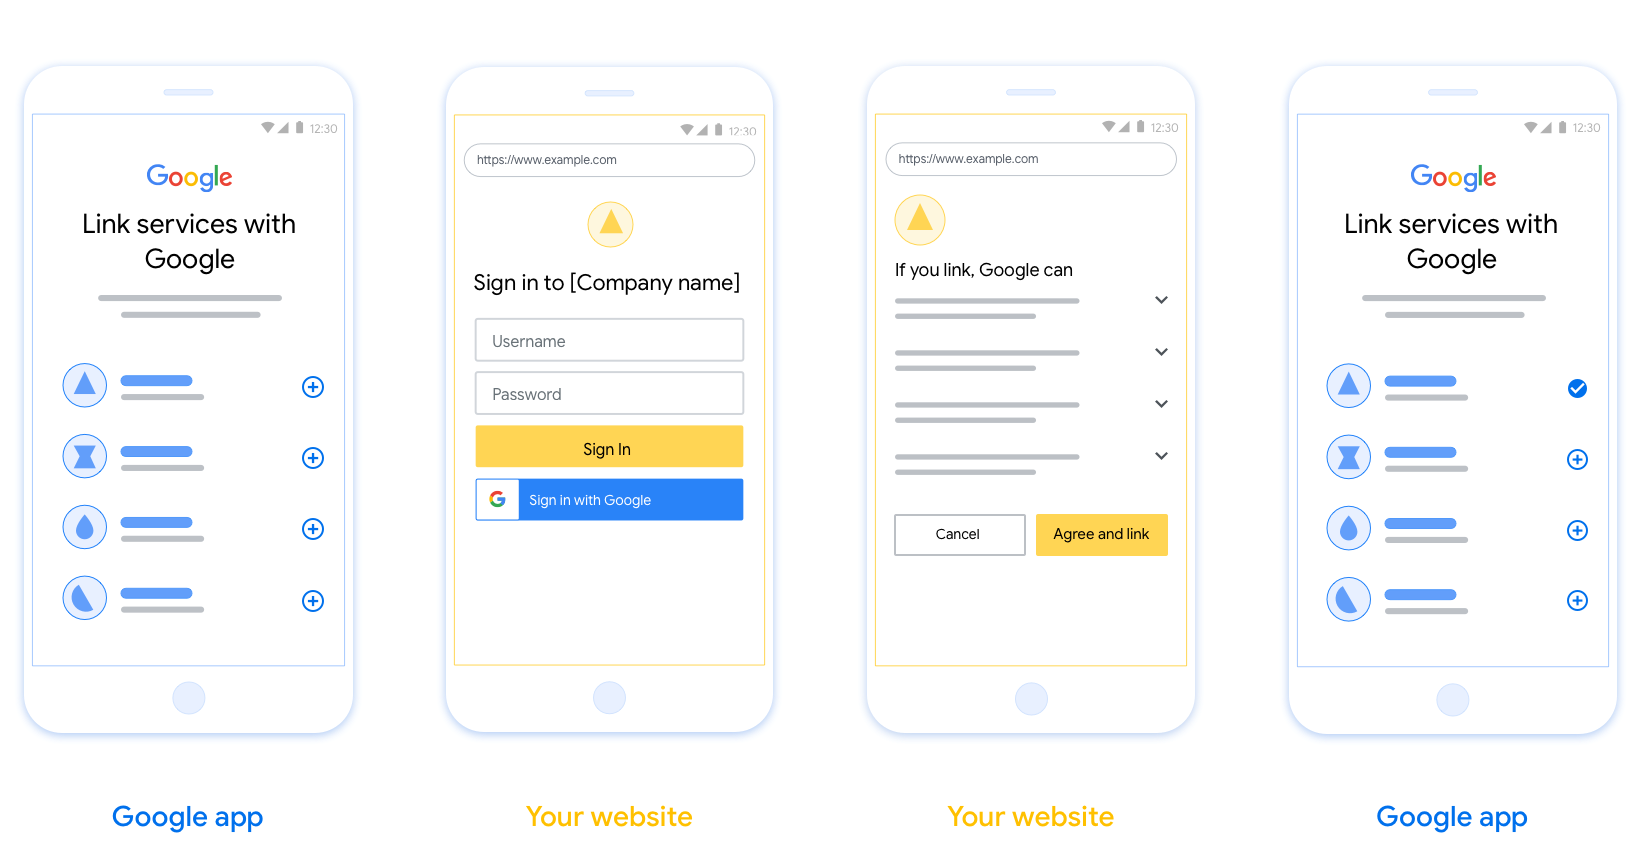
В этом разделе описаны требования к дизайну и рекомендации для экрана пользователя, который вы размещаете для потоков связывания OAuth. После вызова приложением Google на вашей платформе отображается страница входа в Google и экран согласия учетной записи, связывающий пользователя с пользователем. Пользователь возвращается в приложение Google после того, как дает свое согласие на связывание учетных записей.
Требования
- Вы должны сообщить, что учетная запись пользователя будет связана с Google, а не с конкретным продуктом Google, таким как Google Home или Google Assistant.
Рекомендации
Мы рекомендуем вам сделать следующее:
Показать Политику конфиденциальности Google. Включите ссылку на Политику конфиденциальности Google на экране согласия.
Данные для совместного использования. Используйте четкий и лаконичный язык, чтобы сообщить пользователю, какие данные требуются Google и почему.
Четкий призыв к действию. Сформулируйте четкий призыв к действию на экране согласия, например «Согласиться и дать ссылку». Это связано с тем, что пользователи должны понимать, какими данными они должны делиться с Google, чтобы связать свои учетные записи.
Возможность отмены. Предоставьте пользователям возможность вернуться или отменить, если они решат не связываться.
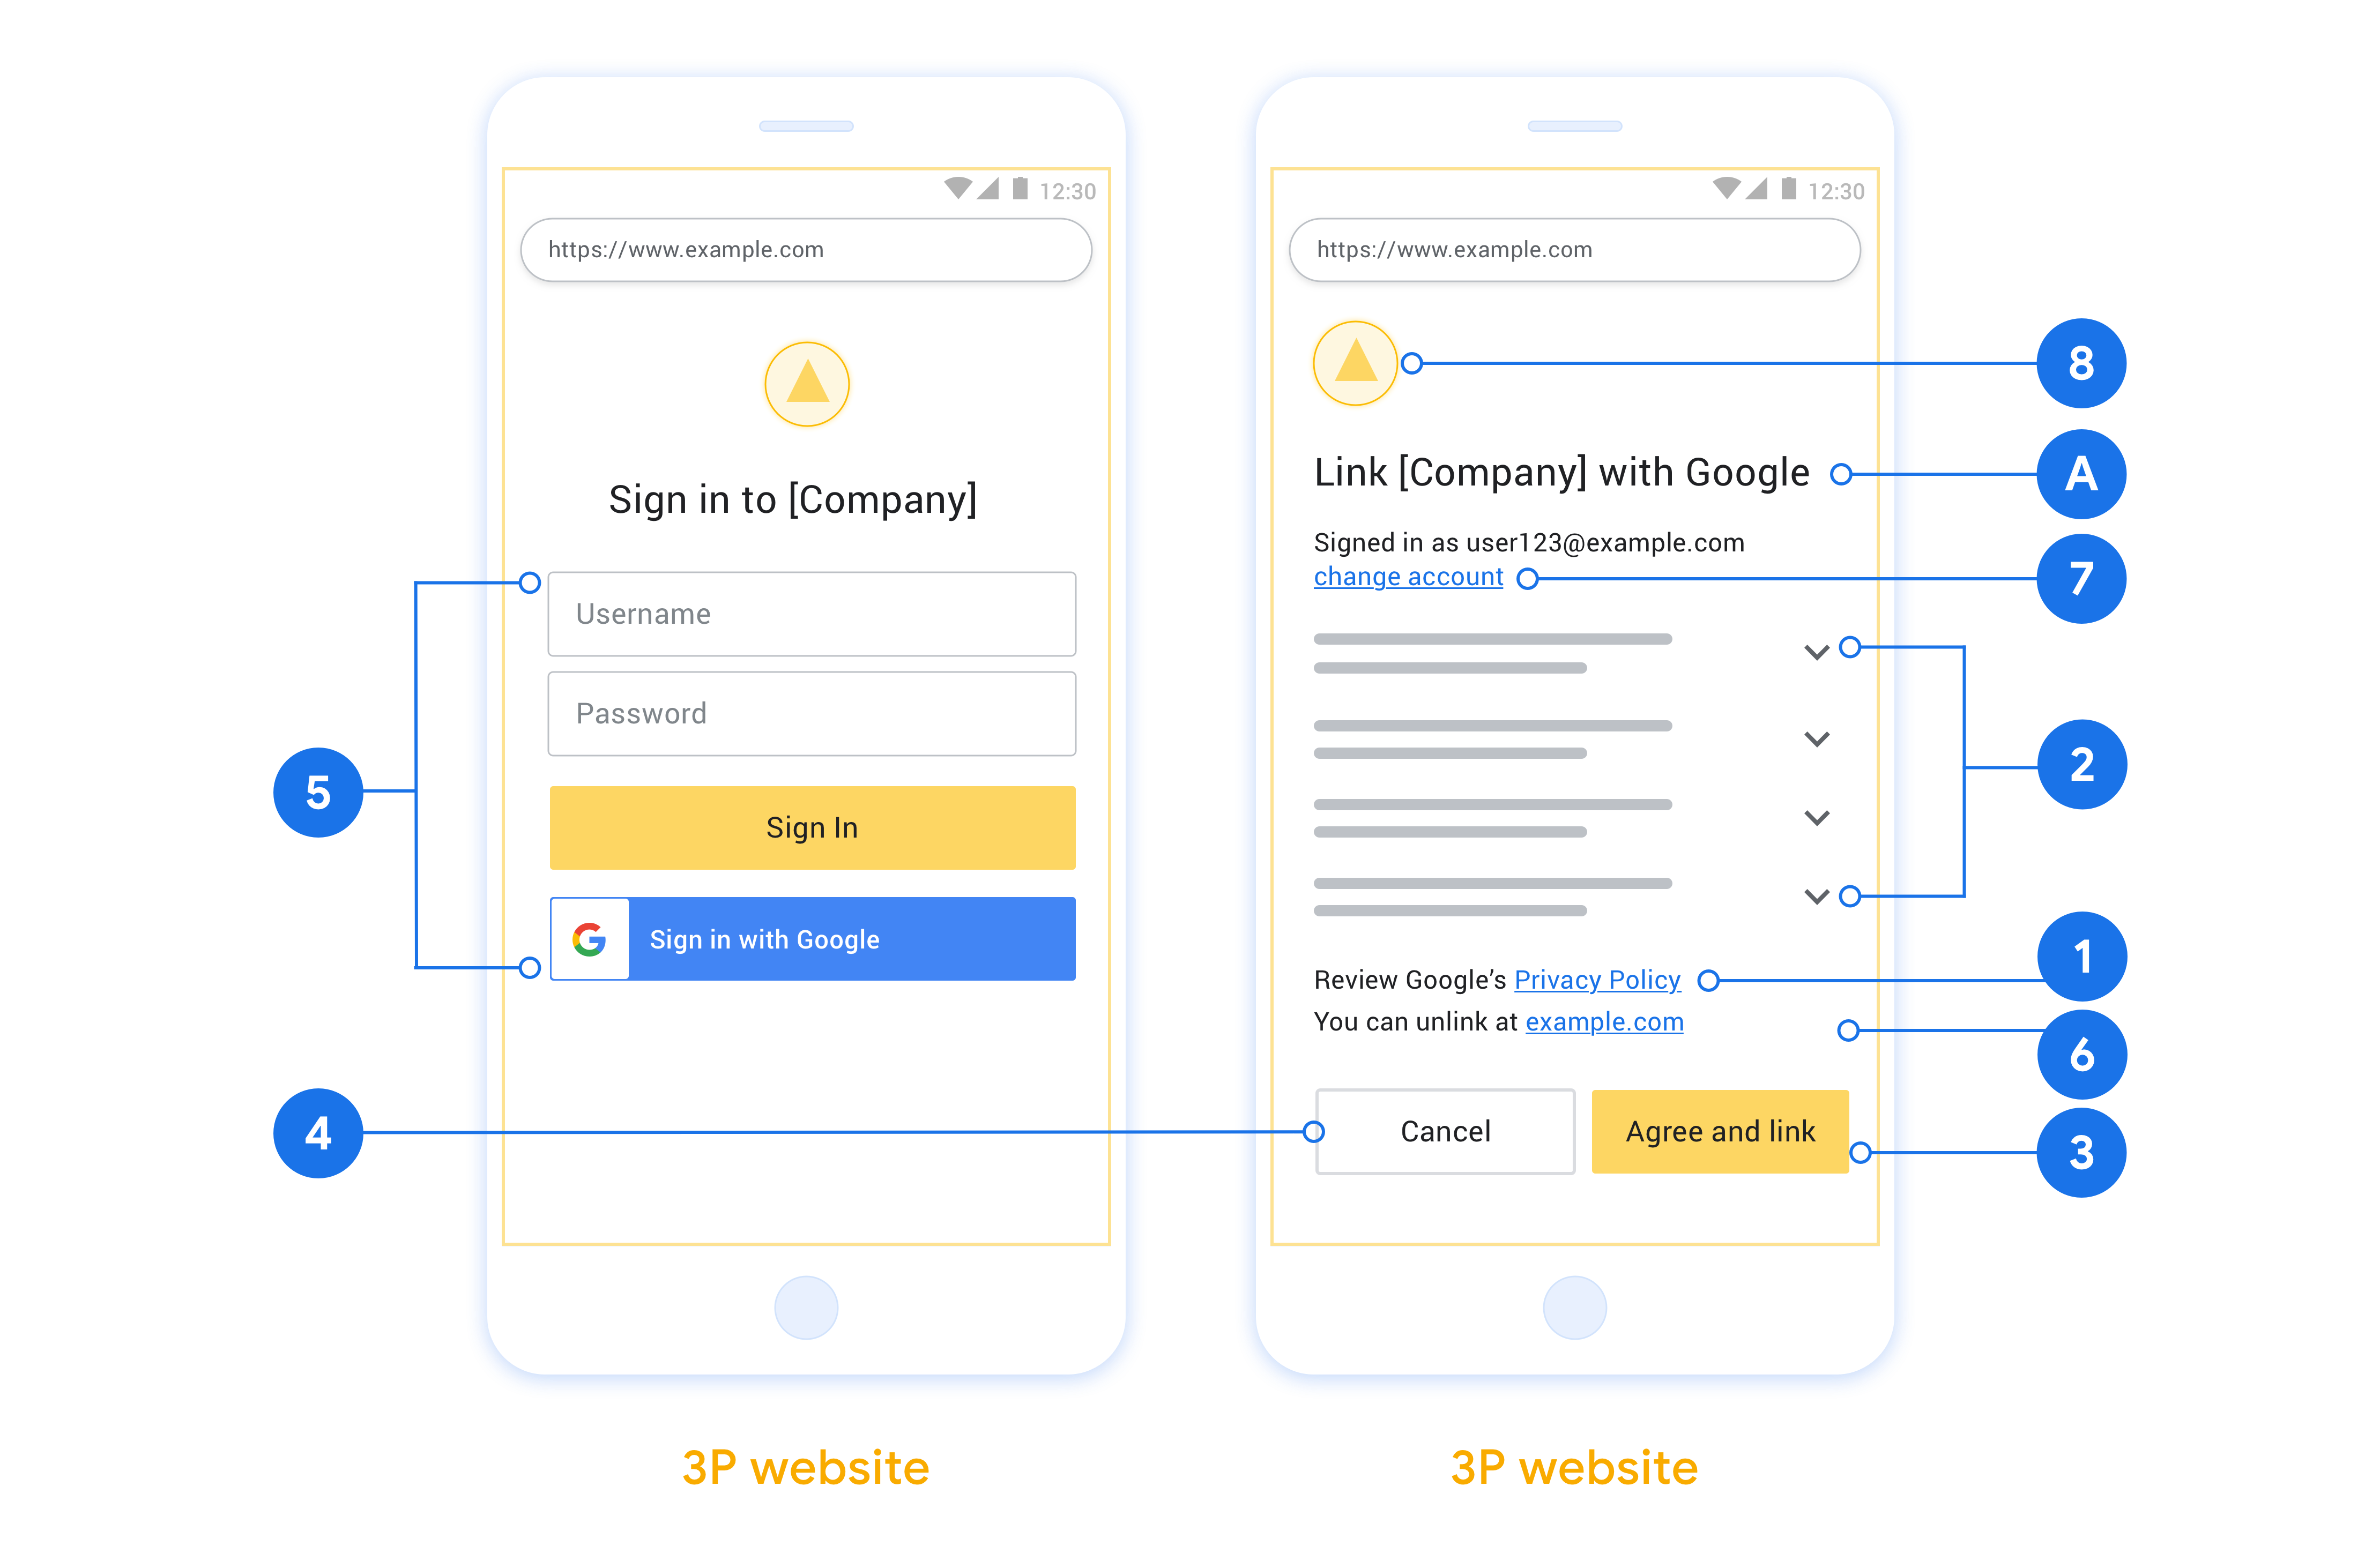
Очистить процесс входа. Убедитесь, что у пользователей есть четкий способ входа в свою учетную запись Google, например поля для имени пользователя и пароля или Войти с помощью Google .
Возможность отвязать. Предложите пользователям механизм отмены связи, например URL-адрес их настроек учетной записи на вашей платформе. Кроме того, вы можете включить ссылку на учетную запись Google , где пользователи могут управлять своей связанной учетной записью.
Возможность смены учетной записи пользователя. Предложите пользователям способ переключения их учетных записей. Это особенно полезно, если пользователи склонны иметь несколько учетных записей.
- Если пользователю необходимо закрыть экран согласия для переключения учетных записей, отправьте в Google устранимую ошибку, чтобы пользователь мог войти в нужную учетную запись с помощью привязки OAuth и неявного потока.
Включите свой логотип. Отобразите логотип вашей компании на экране согласия. Используйте свои рекомендации по стилю, чтобы разместить свой логотип. Если вы хотите также отобразить логотип Google, см. раздел Логотипы и товарные знаки .
Создать проект
Чтобы создать проект для использования привязки аккаунтов:
- Go to the Google API Console.
- Нажмите Создать проект .
- Введите имя или примите сгенерированное предложение.
- Подтвердите или отредактируйте оставшиеся поля.
- Нажмите Создать .
Для просмотра идентификатора вашего проекта:
- Go to the Google API Console.
- Найдите свой проект в таблице на целевой странице. Идентификатор проекта отображается в столбце идентификаторов .
Настройте экран согласия OAuth
Процесс привязки учетной записи Google включает в себя экран согласия, на котором пользователям сообщается, какое приложение запрашивает доступ к их данным, какие данные они запрашивают и какие условия применяются. Прежде чем создавать идентификатор клиента Google API, вам необходимо будет настроить экран согласия OAuth.
- Откройте страницу экрана согласия OAuth консоли API Google.
- При появлении запроса выберите только что созданный проект.
На странице «Экран согласия OAuth» заполните форму и нажмите кнопку «Сохранить».
Имя приложения: имя приложения, запрашивающего согласие. Имя должно точно отражать ваше приложение и соответствовать имени приложения, которое пользователи видят в других местах. Название приложения будет показано на экране согласия на привязку учетной записи.
Логотип приложения: изображение на экране согласия, которое поможет пользователям узнать ваше приложение. Логотип отображается на экране согласия на привязку учетной записи и в настройках учетной записи.
Электронная почта поддержки: чтобы пользователи могли связаться с вами и задать вопросы о своем согласии.
Области для API Google. Области позволяют вашему приложению получать доступ к личным данным Google вашего пользователя. Для варианта использования привязки учетной записи Google достаточно области по умолчанию (электронная почта, профиль, openid), вам не нужно добавлять какие-либо конфиденциальные области. Обычно рекомендуется запрашивать области постепенно, в тот момент, когда требуется доступ, а не заранее. Узнайте больше .
Авторизованные домены. Чтобы защитить вас и ваших пользователей, Google разрешает использовать авторизованные домены только приложениям, которые проходят аутентификацию с помощью OAuth. Ссылки ваших приложений должны размещаться на авторизованных доменах. Узнайте больше .
Ссылка на домашнюю страницу приложения: Домашняя страница вашего приложения. Должен быть размещен на авторизованном домене.
Ссылка на политику конфиденциальности приложения: отображается на экране согласия на привязку учетной записи Google. Должен быть размещен на авторизованном домене.
Ссылка на Условия использования приложения (необязательно): должна быть размещена в авторизованном домене.

Рисунок 1 . Экран согласия на привязку учетной записи Google к вымышленному приложению, Tunery
Проверьте «Статус проверки». Если ваше приложение требует проверки, нажмите кнопку «Отправить на проверку», чтобы отправить заявку на проверку. Подробную информацию см. в требованиях к проверке OAuth .
Внедрите свой сервер OAuth
An OAuth 2.0 server implementation of the authorization code flow consists of two endpoints, which your service makes available by HTTPS. The first endpoint is the authorization endpoint, which is responsible for finding or obtaining consent from users for data access. The authorization endpoint presents a sign-in UI to your users that aren't already signed in and records consent to the requested access. The second endpoint is the token exchange endpoint, which is used to obtain encrypted strings, called tokens, that authorize a user to access your service.
When a Google application needs to call one of your service's APIs, Google uses these endpoints together to get permission from your users to call these APIs on their behalf.
An OAuth 2.0 authorization code flow session initiated by Google has the following flow:
- Google opens your authorization endpoint in the user's browser. If the flow started on a voice-only device for an Action, Google transfers the execution to a phone.
- The user signs in, if not signed in already, and grants Google permission to access their data with your API, if they haven't already granted permission.
- Your service creates an authorization code and returns it to Google. To do so, redirect the user's browser back to Google with the authorization code attached to the request.
- Google sends the authorization code to your token exchange endpoint, which verifies the authenticity of the code and returns an access token and a refresh token. The access token is a short-lived token that your service accepts as credentials to access APIs. The refresh token is a long-lived token that Google can store and use to acquire new access tokens when they expire.
- After the user has completed the account linking flow, every subsequent request sent from Google contains an access token.
Handle authorization requests
When you need to perform account linking using the OAuth 2.0 authorization code flow, Google sends the user to your authorization endpoint with a request that includes the following parameters:
| Authorization endpoint parameters | |
|---|---|
client_id |
The Client ID you assigned to Google. |
redirect_uri |
The URL to which you send the response to this request. |
state |
A bookkeeping value that is passed back to Google unchanged in the redirect URI. |
scope |
Optional: A space-delimited set of scope strings that specify the data Google is requesting authorization for. |
response_type |
The type of value to return in the response. For the OAuth 2.0
authorization code flow, the response type is always code.
|
user_locale |
The Google Account language setting in RFC5646 format, used to localize your content in the user's preferred language. |
For example, if your authorization endpoint is available at
https://myservice.example.com/auth, a request might look like the following:
GET https://myservice.example.com/auth?client_id=GOOGLE_CLIENT_ID&redirect_uri=REDIRECT_URI&state=STATE_STRING&scope=REQUESTED_SCOPES&response_type=code&user_locale=LOCALE
For your authorization endpoint to handle sign-in requests, do the following steps:
- Verify that the
client_idmatches the Client ID you assigned to Google, and that theredirect_urimatches the redirect URL provided by Google for your service. These checks are important to prevent granting access to unintended or misconfigured client apps. If you support multiple OAuth 2.0 flows, also confirm that theresponse_typeiscode. - Check if the user is signed in to your service. If the user isn't signed in, complete your service's sign-in or sign-up flow.
- Generate an authorization code for Google to use to access your API. The authorization code can be any string value, but it must uniquely represent the user, the client the token is for, and the code's expiration time, and it must not be guessable. You typically issue authorization codes that expire after approximately 10 minutes.
- Confirm that the URL specified by the
redirect_uriparameter has the following form:https://oauth-redirect.googleusercontent.com/r/YOUR_PROJECT_ID https://oauth-redirect-sandbox.googleusercontent.com/r/YOUR_PROJECT_ID
- Redirect the user's browser to the URL specified by the
redirect_uriparameter. Include the authorization code you just generated and the original, unmodified state value when you redirect by appending thecodeandstateparameters. The following is an example of the resulting URL:https://oauth-redirect.googleusercontent.com/r/YOUR_PROJECT_ID?code=AUTHORIZATION_CODE&state=STATE_STRING
Handle token exchange requests
Your service's token exchange endpoint is responsible for two kinds of token exchanges:
- Exchange authorization codes for access tokens and refresh tokens
- Exchange refresh tokens for access tokens
Token exchange requests include the following parameters:
| Token exchange endpoint parameters | |
|---|---|
client_id |
A string that identifies the request origin as Google. This string must be registered within your system as Google's unique identifier. |
client_secret |
A secret string that you registered with Google for your service. |
grant_type |
The type of token being exchanged. It's either
authorization_code or refresh_token. |
code |
When grant_type=authorization_code, this parameter is the
code Google received from either your sign-in or token exchange
endpoint. |
redirect_uri |
When grant_type=authorization_code, this parameter is the
URL used in the initial authorization request. |
refresh_token |
When grant_type=refresh_token, this parameter is the
refresh token Google received from your token exchange endpoint. |
Exchange authorization codes for access tokens and refresh tokens
After the user signs in and your authorization endpoint returns a short-lived authorization code to Google, Google sends a request to your token exchange endpoint to exchange the authorization code for an access token and a refresh token.
For these requests, the value of grant_type is authorization_code, and the
value of code is the value of the authorization code you previously granted
to Google. The following is an example of a request to exchange an
authorization code for an access token and a refresh token:
POST /token HTTP/1.1
Host: oauth2.example.com
Content-Type: application/x-www-form-urlencoded

client_id=GOOGLE_CLIENT_ID&client_secret=GOOGLE_CLIENT_SECRET&grant_type=authorization_code&code=AUTHORIZATION_CODE&redirect_uri=REDIRECT_URI
To exchange authorization codes for an access token and a refresh token, your
token exchange endpoint responds to POST requests by executing the following
steps:
- Verify that the
client_ididentifies the request origin as an authorized origin, and that theclient_secretmatches the expected value. - Verify that the authorization code is valid and not expired, and that the client ID specified in the request matches the client ID associated with the authorization code.
- Confirm that the URL specified by the
redirect_uriparameter is identical to the value used in the initial authorization request. - If you can't verify all of the above criteria, return an HTTP
400 Bad Request error with
{"error": "invalid_grant"}as the body. - Otherwise, use the user ID from the authorization code to generate a refresh token and an access token. These tokens can be any string value, but they must uniquely represent the user and the client the token is for, and they must not be guessable. For access tokens, also record the expiration time of the token, which is typically an hour after you issue the token. Refresh tokens don't expire.
- Return the following JSON object in the body of the HTTPS response:
{
"token_type": "Bearer",
"access_token": "ACCESS_TOKEN",
"refresh_token": "REFRESH_TOKEN",
"expires_in": SECONDS_TO_EXPIRATION
}
Google stores the access token and the refresh token for the user and records the expiration of the access token. When the access token expires, Google uses the refresh token to get a new access token from your token exchange endpoint.
Exchange refresh tokens for access tokens
When an access token expires, Google sends a request to your token exchange endpoint to exchange a refresh token for a new access token.
For these requests, the value of grant_type is refresh_token, and the value
of refresh_token is the value of the refresh token you previously granted to
Google. The following is an example of a request to exchange a refresh token
for an access token:
POST /token HTTP/1.1
Host: oauth2.example.com
Content-Type: application/x-www-form-urlencoded

client_id=GOOGLE_CLIENT_ID&client_secret=GOOGLE_CLIENT_SECRET&grant_type=refresh_token&refresh_token=REFRESH_TOKEN
To exchange a refresh token for an access token, your token exchange endpoint
responds to POST requests by executing the following steps:
- Verify that the
client_ididentifies the request origin as Google, and that theclient_secretmatches the expected value. - Verify that the refresh token is valid, and that the client ID specified in the request matches the client ID associated with the refresh token.
- If you can't verify all of the above criteria, return an HTTP 400
Bad Request error with
{"error": "invalid_grant"}as the body. - Otherwise, use the user ID from the refresh token to generate an access token. These tokens can be any string value, but they must uniquely represent the user and the client the token is for, and they must not be guessable. For access tokens, also record the expiration time of the token, typically an hour after you issue the token.
- Return the following JSON object in the body of the HTTPS
response:
{
"token_type": "Bearer",
"access_token": "ACCESS_TOKEN",
"expires_in": SECONDS_TO_EXPIRATION
}
Обработка запросов информации пользователя
UserInfo конечной точкой является OAuth 2,0 защищенный ресурс, возвратные претензии по поводу связанного пользователя. Внедрение и размещение конечной точки userinfo необязательно, за исключением следующих случаев использования:
- Linked входа в аккаунт с Google One Tap.
- Frictionless подписка на AndroidTV.
После того, как маркер доступа был успешно получен из вашей конечной точки маркера, Google отправляет запрос вашей конечной точке userinfo для получения базовой информации профиля о связанном пользователе.
| заголовки запроса конечной точки userinfo | |
|---|---|
Authorization header | Маркер доступа типа Bearer. |
Например, если ваша USERINFO конечная точка доступна на https://myservice.example.com/userinfo , запрос может выглядеть следующим образом :
GET /userinfo HTTP/1.1
Host: myservice.example.com
Authorization: Bearer ACCESS_TOKEN
Чтобы ваша конечная точка userinfo могла обрабатывать запросы, выполните следующие действия:
- Извлеките токен доступа из заголовка авторизации и верните информацию для пользователя, связанного с токеном доступа.
- Если маркер доступа неверен, возвращает Несанкционированное ошибку HTTP 401 с помощью
WWW-Authenticateзаголовок ответа. Ниже приведен пример ответа ошибки UserInfo:HTTP/1.1 401 Unauthorized WWW-Authenticate: error="invalid_token", error_description="The Access Token expired"
Если 401 Несанкционированные, или любой другой неудачный ответ возвращается ошибка во время процесса , связывающего, ошибка будет неустранимой, извлеченный маркер будет отброшен , и пользователь будет иметь чтобы снова запустить процесс связывания. Если маркер доступа действителен, возврат и HTTP 200 ответ со следующим объектом JSON в теле ответа HTTPS:
{
"sub": "USER_UUID",
"email": "EMAIL_ADDRESS",
"given_name": "FIRST_NAME",
"family_name": "LAST_NAME",
"name": "FULL_NAME",
"picture": "PROFILE_PICTURE",
}
Если ваша USERINFO конечная точка возвращает ответ успех HTTP 200, извлеченный маркер и претензии зарегистрированы на Google пользователя учетная запись.ответ конечной точки userinfo subУникальный идентификатор, который идентифицирует пользователя в вашей системе. emailЭлектронный адрес пользователя. given_nameДополнительно: Имя пользователя. family_nameДополнительно: Фамилия пользователя. nameДополнительно: Полное имя пользователя. pictureДополнительно: Рисунок профиля пользователя.
Проверка вашей реализации
Вы можете проверить свою реализацию с помощью Playground OAuth 2.0 инструмента.
В инструменте проделайте следующие шаги:
- Нажмите Конфигурация , чтобы открыть окно настройки OAuth 2.0.
- В поле потока OAuth, выберите на стороне клиента.
- В поле OAuth Endpoints, выберите Custom.
- Укажите конечную точку OAuth 2.0 и идентификатор клиента, назначенный Google, в соответствующих полях.
- В разделе Шаг 1, не выбирайте области Google. Вместо этого оставьте это поле пустым или введите область действия, действительную для вашего сервера (или произвольную строку, если вы не используете области действия OAuth). Когда вы закончите, нажмите Авторизовать API.
- В секциях Шаг 2 и Шаг 3, пройти через поток OAuth 2.0 и убедитесь , что каждый шаг работает как задумано.
Вы можете проверить свою реализацию с помощью учетной записи Google Linking Демо инструмент.
В инструменте проделайте следующие шаги:
- Нажмите для входа в систему с помощью кнопки Google.
- Выберите учетную запись, которую вы хотите связать.
- Введите идентификатор службы.
- При желании введите одну или несколько областей, для которых вы запрашиваете доступ.
- Нажмите кнопку Пуск Demo.
- При появлении запроса подтвердите, что вы можете согласиться, и отклоните запрос на установление связи.
- Подтвердите, что вы перенаправлены на свою платформу.