Creare un'unione dinamica con Gmail e Fogli Google

Livello di codifica: principiante
Durata: 10 minuti
Tipo di progetto: automazione con un menu personalizzato

Preferisci imparare tramite video?
Il canale Google Workspace Developers offre video con suggerimenti, trucchi e le ultime funzionalità.

Obiettivi

  • Scopri cosa fa la soluzione.
  • Scopri cosa fanno i servizi di Apps Script all'interno della soluzione.
  • Configura lo script.
  • Esegui lo script.

Informazioni su questa soluzione

Compila automaticamente un modello email con i dati di Fogli Google. Le email vengono inviate dal tuo account Gmail per consentirti di rispondere alle risposte dei destinatari.

Importante: questo esempio di unione dinamica è soggetto ai limiti per le email descritti in Quote per i servizi Google.
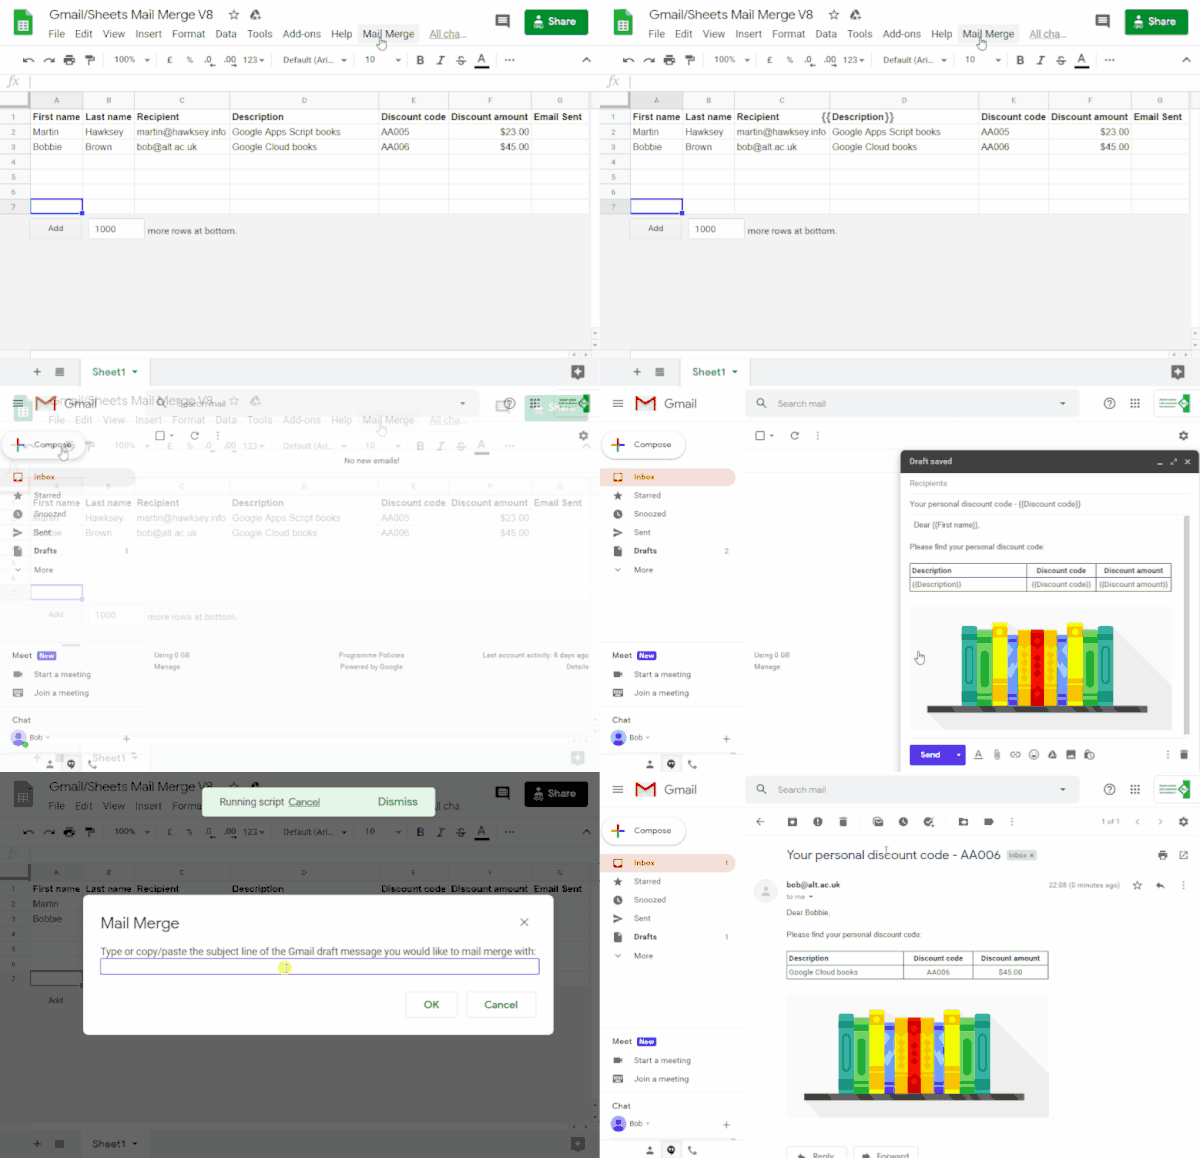
Esempio di stampa unione

Come funziona

Crea un modello di bozza di Gmail con segnaposto che corrispondono ai dati in un foglio di lavoro di Fogli. Ogni intestazione di colonna in un foglio rappresenta un tag segnaposto. Lo script invia le informazioni su ciascun segnaposto dal foglio di lavoro alla posizione del tag segnaposto corrispondente nella bozza dell'email.

Servizi Apps Script

Questa soluzione utilizza i seguenti servizi:

Prerequisiti

Per utilizzare questo esempio, sono necessari i seguenti prerequisiti:

  • Un Account Google (gli account Google Workspace potrebbero richiedere l'approvazione dell'amministratore).
  • Un browser web con accesso a internet.

Configurare lo script

Crea il progetto Apps Script

  1. Fai clic sul pulsante seguente per creare una copia del foglio di lavoro di esempio per l'unione dinamica di Gmail/Fogli. Il progetto Apps Script per questa soluzione è allegato al foglio di lavoro.
    Crea una copia
  2. Nel foglio di lavoro copiato, aggiorna la colonna Destinatari con gli indirizzi email che vuoi utilizzare nell'unione dinamica.
  3. (Facoltativo) Aggiungi, modifica o rimuovi le colonne per personalizzare i dati da includere nel modello email.

Se modifichi il nome delle colonne Destinatario o Email inviata, devi aggiornare il codice corrispondente nel progetto Apps Script. Puoi aprire il progetto Apps Script dal foglio di lavoro facendo clic su Estensioni > Apps Script.

Creare un modello email

  1. Nel tuo account Gmail, crea una bozza di email. Per includere i dati del foglio di lavoro nell'email, utilizza i segnaposto corrispondenti ai nomi delle colonne racchiusi tra parentesi graffe, ad esempio {{First name}}.
    • Se formatti il testo nell'email, devi formattare anche le parentesi parametro.
    • I segnaposto sono sensibili alle maiuscole e devono corrispondere esattamente alle intestazioni delle colonne.
  2. Copia la riga dell'oggetto della bozza dell'email.

Esegui lo script

  1. Nel foglio di lavoro, fai clic su Unione dinamica > Invia email. Potresti dover aggiornare la pagina per visualizzare questo menu personalizzato.
  2. Quando richiesto, autorizza lo script. Se nella schermata per il consenso OAuth viene visualizzato l'avviso Questa app non è verificata, prosegui selezionando Avanzate > Vai a {Project Name} (non sicuro).

  3. Fai di nuovo clic su Unione dinamica > Invia email.

  4. Incolla la riga dell'oggetto del modello email e fai clic su OK.

Se hai applicato un filtro al foglio, lo script invia comunque un'email ai partecipanti filtrati, ma non aggiunge il timestamp.

Esamina il codice

Per esaminare il codice di Apps Script per questa soluzione, fai clic su Visualizza codice sorgente di seguito:

Visualizza codice sorgente

Code.gs

solutions/automations/mail-merge/Code.js
// To learn how to use this script, refer to the documentation:
// https://developers.google.com/apps-script/samples/automations/mail-merge

/*
Copyright 2022 Martin Hawksey

Licensed under the Apache License, Version 2.0 (the "License");
you may not use this file except in compliance with the License.
You may obtain a copy of the License at

    https://www.apache.org/licenses/LICENSE-2.0

Unless required by applicable law or agreed to in writing, software
distributed under the License is distributed on an "AS IS" BASIS,
WITHOUT WARRANTIES OR CONDITIONS OF ANY KIND, either express or implied.
See the License for the specific language governing permissions and
limitations under the License.
*/

/**
 * @OnlyCurrentDoc
*/

/**
 * Change these to match the column names you are using for email 
 * recipient addresses and email sent column.
*/
const RECIPIENT_COL  = "Recipient";
const EMAIL_SENT_COL = "Email Sent";

/** 
 * Creates the menu item "Mail Merge" for user to run scripts on drop-down.
 */
function onOpen() {
  const ui = SpreadsheetApp.getUi();
  ui.createMenu('Mail Merge')
      .addItem('Send Emails', 'sendEmails')
      .addToUi();
}

/**
 * Sends emails from sheet data.
 * @param {string} subjectLine (optional) for the email draft message
 * @param {Sheet} sheet to read data from
*/
function sendEmails(subjectLine, sheet=SpreadsheetApp.getActiveSheet()) {
  // option to skip browser prompt if you want to use this code in other projects
  if (!subjectLine){
    subjectLine = Browser.inputBox("Mail Merge", 
                                      "Type or copy/paste the subject line of the Gmail " +
                                      "draft message you would like to mail merge with:",
                                      Browser.Buttons.OK_CANCEL);

    if (subjectLine === "cancel" || subjectLine == ""){ 
    // If no subject line, finishes up
    return;
    }
  }

  // Gets the draft Gmail message to use as a template
  const emailTemplate = getGmailTemplateFromDrafts_(subjectLine);

  // Gets the data from the passed sheet
  const dataRange = sheet.getDataRange();
  // Fetches displayed values for each row in the Range HT Andrew Roberts 
  // https://mashe.hawksey.info/2020/04/a-bulk-email-mail-merge-with-gmail-and-google-sheets-solution-evolution-using-v8/#comment-187490
  // @see https://developers.google.com/apps-script/reference/spreadsheet/range#getdisplayvalues
  const data = dataRange.getDisplayValues();

  // Assumes row 1 contains our column headings
  const heads = data.shift(); 

  // Gets the index of the column named 'Email Status' (Assumes header names are unique)
  // @see http://ramblings.mcpher.com/Home/excelquirks/gooscript/arrayfunctions
  const emailSentColIdx = heads.indexOf(EMAIL_SENT_COL);

  // Converts 2d array into an object array
  // See https://stackoverflow.com/a/22917499/1027723
  // For a pretty version, see https://mashe.hawksey.info/?p=17869/#comment-184945
  const obj = data.map(r => (heads.reduce((o, k, i) => (o[k] = r[i] || '', o), {})));

  // Creates an array to record sent emails
  const out = [];

  // Loops through all the rows of data
  obj.forEach(function(row, rowIdx){
    // Only sends emails if email_sent cell is blank and not hidden by a filter
    if (row[EMAIL_SENT_COL] == ''){
      try {
        const msgObj = fillInTemplateFromObject_(emailTemplate.message, row);

        // See https://developers.google.com/apps-script/reference/gmail/gmail-app#sendEmail(String,String,String,Object)
        // If you need to send emails with unicode/emoji characters change GmailApp for MailApp
        // Uncomment advanced parameters as needed (see docs for limitations)
        GmailApp.sendEmail(row[RECIPIENT_COL], msgObj.subject, msgObj.text, {
          htmlBody: msgObj.html,
          // bcc: 'a.bcc@email.com',
          // cc: 'a.cc@email.com',
          // from: 'an.alias@email.com',
          // name: 'name of the sender',
          // replyTo: 'a.reply@email.com',
          // noReply: true, // if the email should be sent from a generic no-reply email address (not available to gmail.com users)
          attachments: emailTemplate.attachments,
          inlineImages: emailTemplate.inlineImages
        });
        // Edits cell to record email sent date
        out.push([new Date()]);
      } catch(e) {
        // modify cell to record error
        out.push([e.message]);
      }
    } else {
      out.push([row[EMAIL_SENT_COL]]);
    }
  });

  // Updates the sheet with new data
  sheet.getRange(2, emailSentColIdx+1, out.length).setValues(out);

  /**
   * Get a Gmail draft message by matching the subject line.
   * @param {string} subject_line to search for draft message
   * @return {object} containing the subject, plain and html message body and attachments
  */
  function getGmailTemplateFromDrafts_(subject_line){
    try {
      // get drafts
      const drafts = GmailApp.getDrafts();
      // filter the drafts that match subject line
      const draft = drafts.filter(subjectFilter_(subject_line))[0];
      // get the message object
      const msg = draft.getMessage();

      // Handles inline images and attachments so they can be included in the merge
      // Based on https://stackoverflow.com/a/65813881/1027723
      // Gets all attachments and inline image attachments
      const allInlineImages = draft.getMessage().getAttachments({includeInlineImages: true,includeAttachments:false});
      const attachments = draft.getMessage().getAttachments({includeInlineImages: false});
      const htmlBody = msg.getBody(); 

      // Creates an inline image object with the image name as key 
      // (can't rely on image index as array based on insert order)
      const img_obj = allInlineImages.reduce((obj, i) => (obj[i.getName()] = i, obj) ,{});

      //Regexp searches for all img string positions with cid
      const imgexp = RegExp('<img.*?src="cid:(.*?)".*?alt="(.*?)"[^\>]+>', 'g');
      const matches = [...htmlBody.matchAll(imgexp)];

      //Initiates the allInlineImages object
      const inlineImagesObj = {};
      // built an inlineImagesObj from inline image matches
      matches.forEach(match => inlineImagesObj[match[1]] = img_obj[match[2]]);

      return {message: {subject: subject_line, text: msg.getPlainBody(), html:htmlBody}, 
              attachments: attachments, inlineImages: inlineImagesObj };
    } catch(e) {
      throw new Error("Oops - can't find Gmail draft");
    }

    /**
     * Filter draft objects with the matching subject linemessage by matching the subject line.
     * @param {string} subject_line to search for draft message
     * @return {object} GmailDraft object
    */
    function subjectFilter_(subject_line){
      return function(element) {
        if (element.getMessage().getSubject() === subject_line) {
          return element;
        }
      }
    }
  }

  /**
   * Fill template string with data object
   * @see https://stackoverflow.com/a/378000/1027723
   * @param {string} template string containing {{}} markers which are replaced with data
   * @param {object} data object used to replace {{}} markers
   * @return {object} message replaced with data
  */
  function fillInTemplateFromObject_(template, data) {
    // We have two templates one for plain text and the html body
    // Stringifing the object means we can do a global replace
    let template_string = JSON.stringify(template);

    // Token replacement
    template_string = template_string.replace(/{{[^{}]+}}/g, key => {
      return escapeData_(data[key.replace(/[{}]+/g, "")] || "");
    });
    return  JSON.parse(template_string);
  }

  /**
   * Escape cell data to make JSON safe
   * @see https://stackoverflow.com/a/9204218/1027723
   * @param {string} str to escape JSON special characters from
   * @return {string} escaped string
  */
  function escapeData_(str) {
    return str
      .replace(/[\\]/g, '\\\\')
      .replace(/[\"]/g, '\\\"')
      .replace(/[\/]/g, '\\/')
      .replace(/[\b]/g, '\\b')
      .replace(/[\f]/g, '\\f')
      .replace(/[\n]/g, '\\n')
      .replace(/[\r]/g, '\\r')
      .replace(/[\t]/g, '\\t');
  };
}

Modifiche

Puoi modificare l'automazione dell'unione dinamica in base alle tue esigenze. Di seguito sono riportate alcune modifiche facoltative che puoi apportare al codice sorgente.

Aggiungere i parametri email Ccn, Cc, ReplyTo o Da

Il codice di esempio include una serie di parametri aggiuntivi, attualmente Commentati, che ti consentono di controllare il nome dell'account da cui viene inviata l'email, gli indirizzi email di risposta e gli indirizzi email Ccn e Cc.

Attiva i parametri che vuoi aggiungere rimuovendo le barre oblique // davanti a ciascuno.

L'esempio seguente mostra un estratto della funzione sendEmails che attiva la maggior parte dei parametri email:

GmailApp.sendEmail(row[RECIPIENT_COL], msgObj.subject, msgObj.text, {
         htmlBody: msgObj.html,
         bcc: 'bcc@example.com',
         cc: 'cc@example.com',
         from: 'from.alias@example.com',
         name: 'name of the sender',
         replyTo: 'reply@example.com',
        // noReply: true, // if the email should be sent from a generic no-reply email address (not available to gmail.com users)

Nell'esempio precedente, il parametro noReply è ancora commentato perché è impostato il parametro replyTo.

Includi caratteri Unicode nelle email

Se vuoi includere caratteri Unicode, come gli emoji, nelle tue email, devi aggiornare il codice in modo da utilizzare il servizio Mail anziché il servizio Gmail.

Nel codice di esempio, aggiorna la seguente riga:

GmailApp.sendEmail(row[RECIPIENT_COL], msgObj.subject, msgObj.text, {

Sostituisci la riga con il seguente codice:

MailApp.sendEmail(row[RECIPIENT_COL], msgObj.subject, msgObj.text, {

Collaboratori

L'esempio è stato creato da Martin Hawksey, Learning Design and Technology Lead presso Edinburgh Futures Institute, blogger ed esperto Google Developer.

Questo Sample è gestito da Google con l'aiuto degli esperti Google Developer.

Passaggi successivi