Tutorial ini menunjukkan cara menyiapkan peristiwa purchase di situs Anda agar Anda dapat
mengukur saat seseorang melakukan pembelian. Tutorial ini membahas dimensi,
metrik, dan laporan yang diisi Analytics dengan data dari peristiwa tersebut. Untuk mempelajari
selengkapnya tentang peristiwa e-commerce, lihat artikel Mengukur e-commerce.
Sebelum memulai
Tutorial ini mengasumsikan bahwa Anda telah melakukan tindakan berikut:
- Membuat akun dan properti Google Analytics
- Membuat aliran data web untuk situs Anda
- Menempatkan tag Google Analytics di situs Anda
Tutorial ini juga mengasumsikan bahwa Anda memiliki hal berikut:
- Akses ke kode sumber situs Anda
- Peran Editor (atau yang lebih tinggi) di akun Google Analytics
Langkah 1: Tambahkan peristiwa ke situs Anda
Anda harus menempatkan peristiwa purchase di halaman situs tempat
seseorang melakukan pembelian. Misalnya, Anda dapat menambahkan peristiwa di halaman konfirmasi yang muncul saat seseorang melakukan pembelian. Tutorial ini menunjukkan cara menambahkan peristiwa ke halaman tempat seseorang mengklik tombol "Beli".
Tempatkan peristiwa dalam tag <script> di akhir tag <body>. Menempatkan
peristiwa secara langsung di tag <script> akan memicu peristiwa saat halaman dimuat. Tujuan
bagian berikutnya akan menjelaskan cara memicu peristiwa saat seseorang mengklik "Beli".
<!--
  Note: In the following code sample, make sure to
  replace "TAG_ID" with your tag ID.
  Learn more: https://support.google.com/tagmanager/answer/12326985
-->
<!DOCTYPE html>
<html lang="en">
<head>
    <!-- Google tag (gtag.js) -->
    <script async src="https://www.googletagmanager.com/gtag/js?id=TAG_ID"></script>
    <script>
        window.dataLayer = window.dataLayer || [];
        function gtag(){dataLayer.push(arguments);}
        gtag('js', new Date());

        gtag('config', 'TAG_ID');
    </script>
</head>
<body>
    <div>This is where the purchase form would go</div>
    <button>Submit</button>
    <script>
    gtag("event", "purchase", {
        transaction_id: "T_12345_1",
        value: 30.03,
        tax: 4.90,
        shipping: 5.99,
        currency: "USD",
        coupon: "SUMMER_SALE",
        items: [
        // If someone purchases more than one item,
        // you can add those items to the items array
         {
          item_id: "SKU_12345",
          item_name: "Stan and Friends Tee",
          affiliation: "Google Merchandise Store",
          coupon: "SUMMER_FUN",
          discount: 2.22,
          index: 0,
          item_brand: "Google",
          item_category: "Apparel",
          item_category2: "Adult",
          item_category3: "Shirts",
          item_category4: "Crew",
          item_category5: "Short sleeve",
          item_list_id: "related_products",
          item_list_name: "Related Products",
          item_variant: "green",
          location_id: "ChIJIQBpAG2ahYAR_6128GcTUEo",
          price: 10.01,
          quantity: 3
        }]
    });
    </script>
</body>
</html>
Langkah 2: Hubungkan peristiwa ke sebuah tombol
Anda dapat menggunakan beberapa cara untuk menyiapkan peristiwa purchase agar terpicu saat seseorang mengklik tombol "Beli". Salah satu caranya adalah menambahkan ID ke tombol "Beli",
lalu menempatkan kode peristiwanya dalam pemroses peristiwa. Dalam contoh berikut,
peristiwa hanya dikirim saat seseorang mengklik tombol dengan ID
purchase.
<!--
  Note: In the following code sample, make sure to
  replace "TAG_ID" with your tag ID.
  Learn more: https://support.google.com/tagmanager/answer/12326985
-->
<!DOCTYPE html>
<html lang="en">
<head>
    <!-- Google tag (gtag.js) -->
    <script async src="https://www.googletagmanager.com/gtag/js?id=TAG_ID"></script>
    <script>
        window.dataLayer = window.dataLayer || [];
        function gtag(){dataLayer.push(arguments);}
        gtag('js', new Date());

        gtag('config', 'TAG_ID');
    </script>
</head>
<body>
    <div>This is where the purchase form would go</div>
    <button id="purchase">Purchase</button>
    <script>
    document.getElementById("purchase").addEventListener("click", function () {
        gtag("event", "purchase", {
                // This purchase event uses a different transaction ID
                // from the previous purchase event so Analytics
                // doesn't deduplicate the events.
                // Learn more: https://support.google.com/analytics/answer/12313109
                transaction_id: "T_12345_2",
                value: 30.03,
                tax: 4.90,
                shipping: 5.99,
                currency: "USD",
                coupon: "SUMMER_SALE",
                items: [
                {
                  item_id: "SKU_12345",
                  item_name: "Stan and Friends Tee",
                  affiliation: "Google Merchandise Store",
                  coupon: "SUMMER_FUN",
                  discount: 2.22,
                  index: 0,
                  item_brand: "Google",
                  item_category: "Apparel",
                  item_category2: "Adult",
                  item_category3: "Shirts",
                  item_category4: "Crew",
                  item_category5: "Short sleeve",
                  item_list_id: "related_products",
                  item_list_name: "Related Products",
                  item_variant: "green",
                  location_id: "ChIJIQBpAG2ahYAR_6128GcTUEo",
                  price: 10.01,
                  quantity: 3
                }]
          });
      });
    </script>
</body>
</html>
Langkah 3: Periksa apakah data memang dikumpulkan
Laporan DebugView menampilkan data real time dari situs Anda sehingga Anda dapat
memastikan Anda menyiapkan
peristiwa dengan benar. Untuk mengaktifkan mode debug di halaman web, tambahkan
parameter debug_mode berikut ke perintah config:
<!--
  Note: In the following code sample, make sure to
  replace "TAG_ID" with your tag ID.
  Learn more: https://support.google.com/tagmanager/answer/12326985
-->
<!DOCTYPE html>
<html lang="en">
<head>
    <!-- Google tag (gtag.js) -->
    <script async src="https://www.googletagmanager.com/gtag/js?id=TAG_ID"></script>
    <script>
        window.dataLayer = window.dataLayer || [];
        function gtag(){dataLayer.push(arguments);}
        gtag('js', new Date());

        gtag('config', 'TAG_ID',{ 'debug_mode': true });
    </script>
</head>
<body>
    <div>This is where the purchase form would go</div>
    <button id="purchase">Purchase</button>
    <script>
    document.getElementById("purchase").addEventListener("click", function () {
        gtag("event", "purchase", {
                // This purchase event uses a different transaction ID
                // from the previous purchase event so Analytics
                // doesn't deduplicate the events.
                // Learn more: https://support.google.com/analytics/answer/12313109
                transaction_id: "T_12345_3",
                value: 30.03,
                tax: 4.90,
                shipping: 5.99,
                currency: "USD",
                coupon: "SUMMER_SALE",
                items: [
                {
                  item_id: "SKU_12345",
                  item_name: "Stan and Friends Tee",
                  affiliation: "Google Merchandise Store",
                  coupon: "SUMMER_FUN",
                  discount: 2.22,
                  index: 0,
                  item_brand: "Google",
                  item_category: "Apparel",
                  item_category2: "Adult",
                  item_category3: "Shirts",
                  item_category4: "Crew",
                  item_category5: "Short sleeve",
                  item_list_id: "related_products",
                  item_list_name: "Related Products",
                  item_variant: "green",
                  location_id: "ChIJIQBpAG2ahYAR_6128GcTUEo",
                  price: 10.01,
                  quantity: 3
                }]
        });
    });
    </script>
</body>
</html>
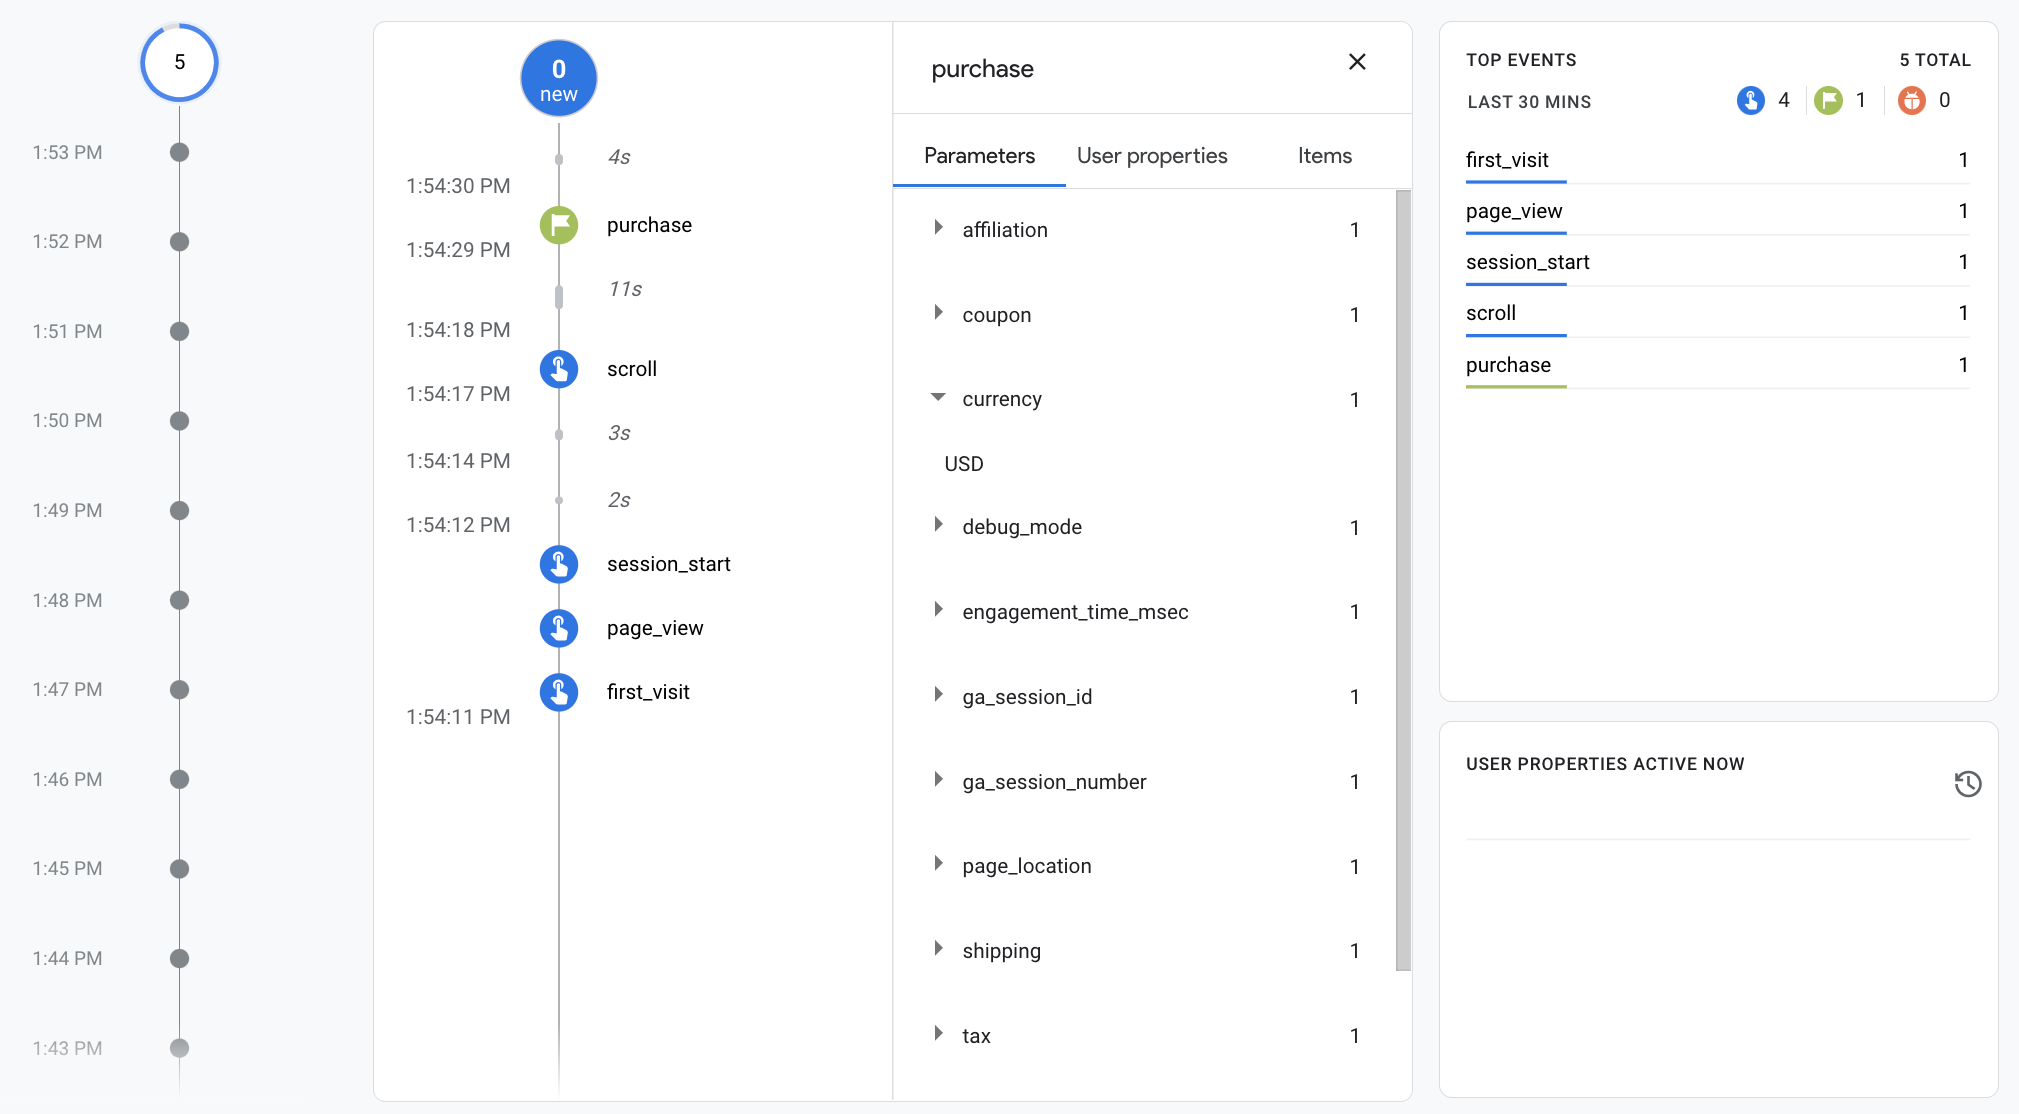
Setelah mengaktifkan mode debug, Anda akan mulai melihat peristiwa mengisi laporan DebugView saat orang menggunakan situs Anda. Misalnya, klik pada tombol "Beli" di situs Anda akan membuat laporan ini diisi dengan data berikut. Anda dapat memilih peristiwa untuk melihat parameter, properti pengguna, dan item yang terkait dengan peristiwa tersebut.

Langkah 4: Lihat data e-commerce Anda
Setelah sekitar 24 jam, data yang Anda kirimkan dengan peristiwa purchase akan tersedia di laporan, eksplorasi, dan Data API Google Analytics.
Anda juga dapat mengakses data tersebut di BigQuery saat menyiapkan BigQuery Export.
"Pembelian" peristiwa akan otomatis mengisi berbagai dimensi bawaan
dan metrik, yang digunakan dalam laporan dan eksplorasi. Tujuan
berikut adalah beberapa dimensi yang diisi dengan data dari
Peristiwa purchase di langkah pertama:
| Parameter | Dimensi | Nilai |
|---|---|---|
affiliation |
Afiliasi item | Google Merchandise Store |
currency |
Mata uang | USD |
discount |
Jumlah diskon item | 2.22 |
index |
Posisi daftar item | 0 |
item_brand |
Merek item | |
item_category |
Kategori item | Pakaian |
item_id |
ID Item | SKU_12345 |
item_list_id |
ID daftar item | related_products |
item_list_name |
Nama daftar item | Produk Terkait |
item_name |
Nama item | Stan and Friends Tee |
item_variant |
Varian item | green |
location_id |
ID lokasi item | ChIJIQBpAG2ahYAR_6128GcTUEo (ID Tempat Google untuk San Francisco) |
shipping |
Jumlah pengiriman | 5.99 |
tax |
Jumlah pajak | 4.90 |
transaction_id |
ID Transaksi | T_12345 |
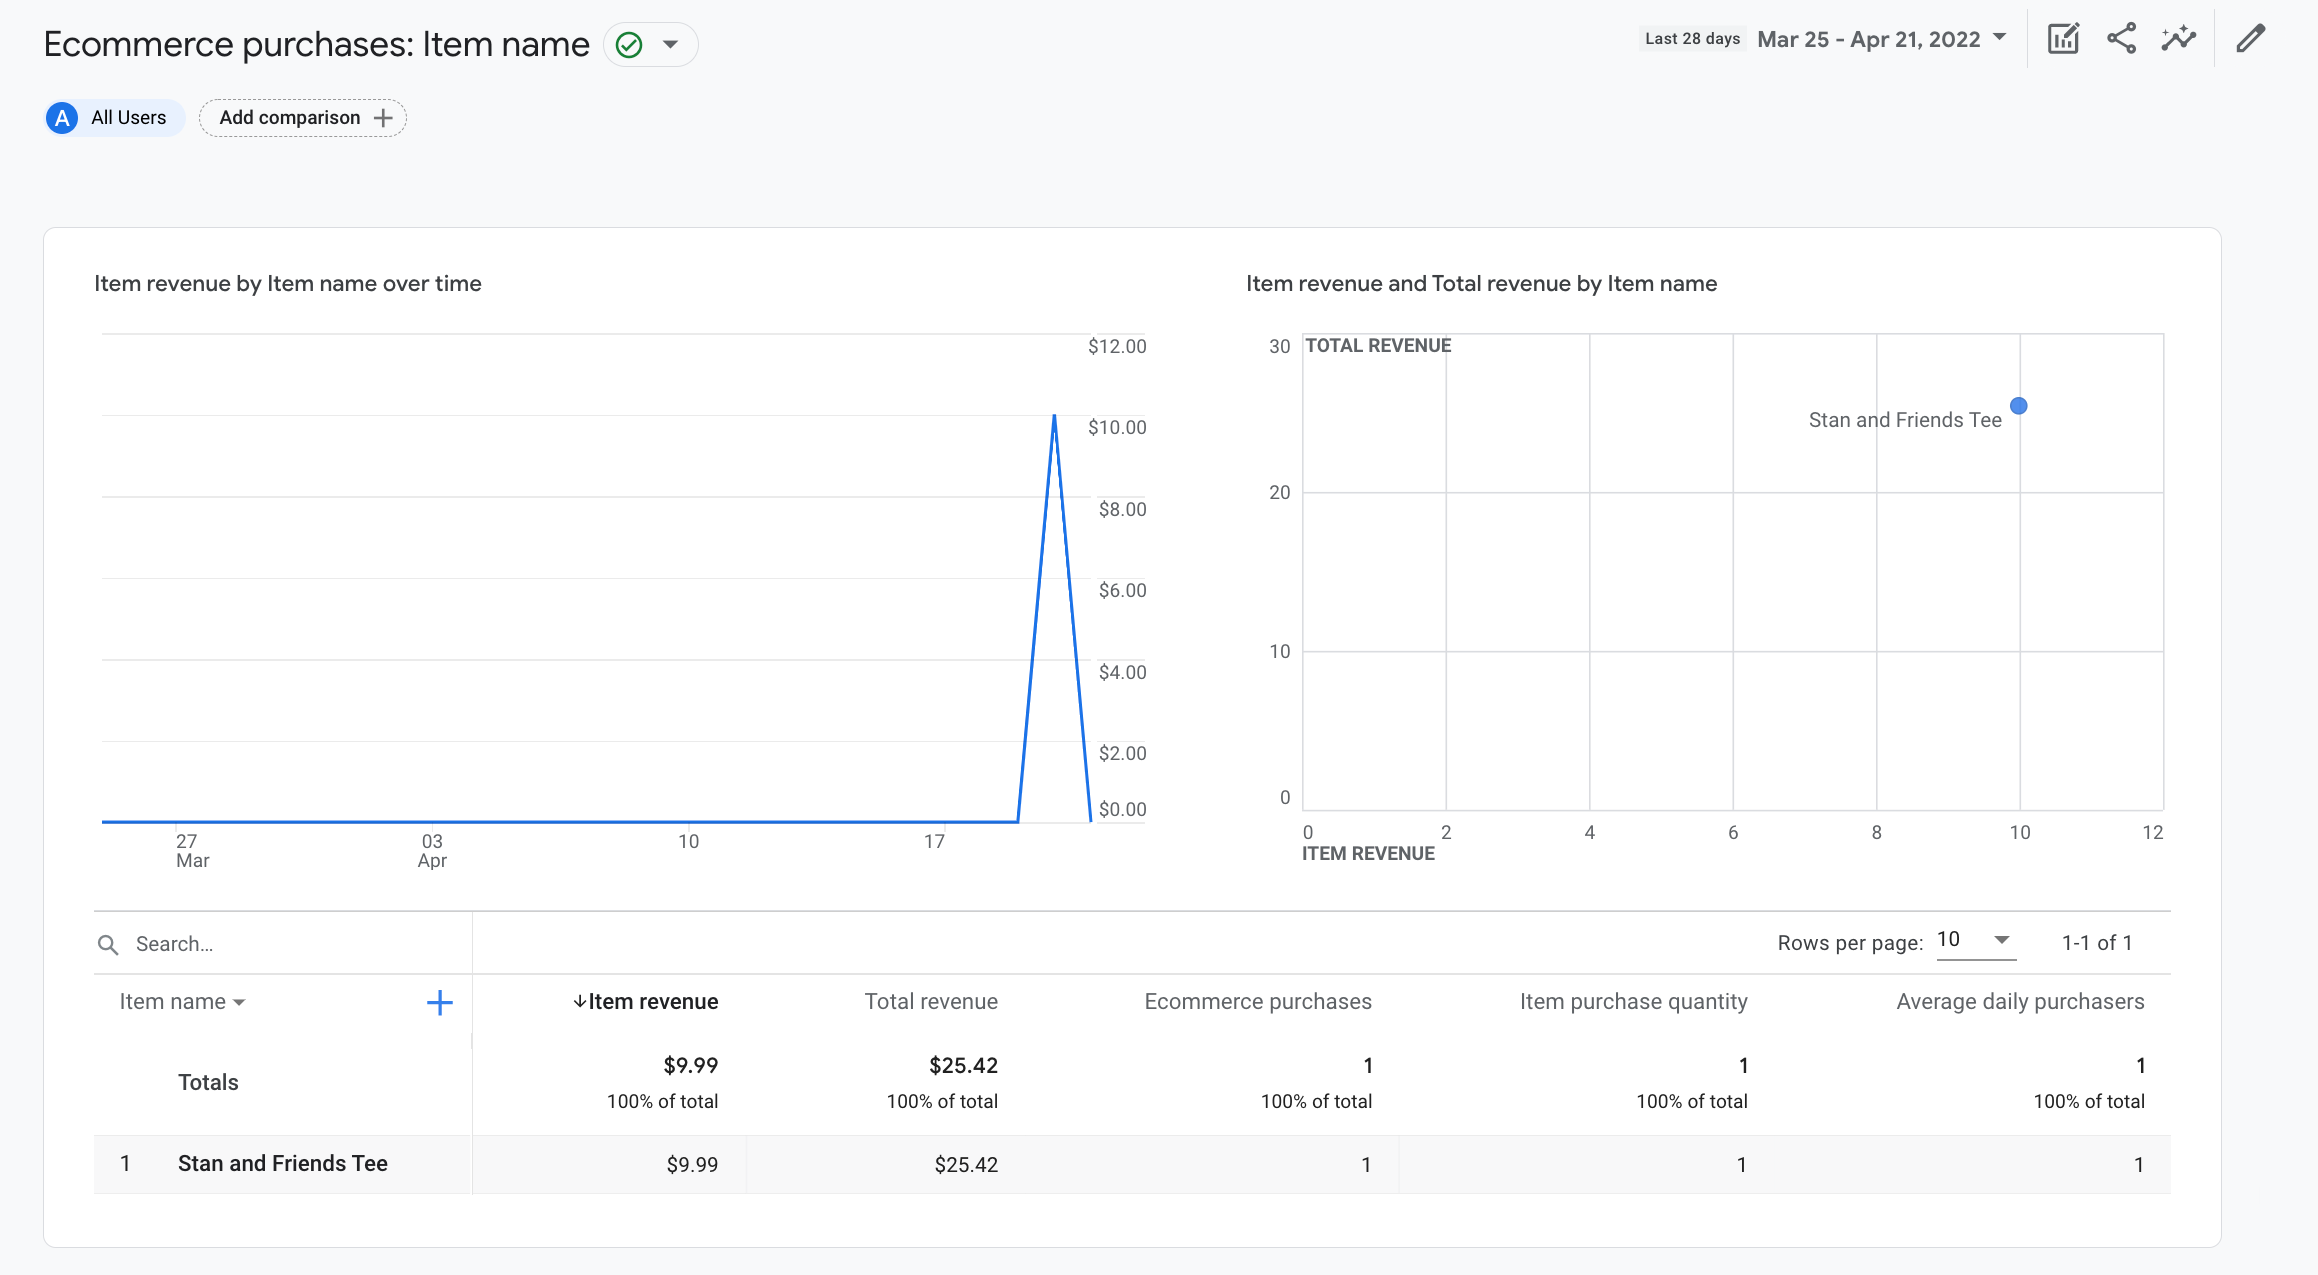
Selain dimensi, Google Analytics akan mengisi sejumlah metrik terkait e-commerce dan pendapatan. Misalnya, jika pengguna mengklik tombol "Beli" sekali, metrik berikut akan diisi di Google Analytics:
- Metrik Pendapatan item memiliki nilai $30.03
- Metrik Total pendapatan memiliki nilai $30.03
- Metrik Pembelian e-commerce memiliki nilai 1
Anda dapat menggunakan dimensi dan metrik ini untuk membuat eksplorasi laporan, tetapi Anda juga dapat menggunakan Pembelian e-commerce bawaan berikut laporan untuk melihat data e-commerce Anda:
