이 튜토리얼에서는 웹사이트에 purchase 이벤트를 설정하여 사용자가 상품을 구매할 때 이를 측정할 수 있는 방법을 보여줍니다. 이 튜토리얼에는 이러한 측정기준,
애널리틱스가 이벤트의 데이터로 채우는 보고서를 제공합니다. 배우기 위해
전자상거래 이벤트에 대한 자세한 내용은 전자상거래 측정하기를 참고하세요.
시작하기 전에
이 튜토리얼에서는 다음 작업을 완료했다고 가정합니다.
또한 다음 권한이 있다고 가정합니다.
- 웹사이트 소스 코드에 대한 액세스 권한
- Google 애널리틱스 계정에 대한 편집자 이상의 역할
1단계: 웹사이트에 이벤트 추가하기
구매가 발생하는 웹사이트 페이지에 purchase 이벤트를 설정해야 합니다. 예를 들어 사용자가 구매할 때 표시되는 확인 페이지에 구매 이벤트를 추가할 수 있습니다. 이 튜토리얼에서는 사용자가 '구매' 버튼을 클릭하는 페이지에 이벤트를 추가하는 방법을 보여줍니다.
<body> 태그 끝의 <script> 태그에 이벤트를 배치합니다. 배치된
<script> 태그에 직접 있는 이벤트는 페이지가 로드될 때 이벤트를 트리거합니다. 이
다음 섹션에서는 사용자가 '구매'를 클릭할 때 이벤트를 트리거하는 방법을 설명합니다.
<!--
  Note: In the following code sample, make sure to
  replace "TAG_ID" with your tag ID.
  Learn more: https://support.google.com/tagmanager/answer/12326985
-->
<!DOCTYPE html>
<html lang="en">
<head>
    <!-- Google tag (gtag.js) -->
    <script async src="https://www.googletagmanager.com/gtag/js?id=TAG_ID"></script>
    <script>
        window.dataLayer = window.dataLayer || [];
        function gtag(){dataLayer.push(arguments);}
        gtag('js', new Date());

        gtag('config', 'TAG_ID');
    </script>
</head>
<body>
    <div>This is where the purchase form would go</div>
    <button>Submit</button>
    <script>
    gtag("event", "purchase", {
        transaction_id: "T_12345_1",
        value: 30.03,
        tax: 4.90,
        shipping: 5.99,
        currency: "USD",
        coupon: "SUMMER_SALE",
        items: [
        // If someone purchases more than one item,
        // you can add those items to the items array
         {
          item_id: "SKU_12345",
          item_name: "Stan and Friends Tee",
          affiliation: "Google Merchandise Store",
          coupon: "SUMMER_FUN",
          discount: 2.22,
          index: 0,
          item_brand: "Google",
          item_category: "Apparel",
          item_category2: "Adult",
          item_category3: "Shirts",
          item_category4: "Crew",
          item_category5: "Short sleeve",
          item_list_id: "related_products",
          item_list_name: "Related Products",
          item_variant: "green",
          location_id: "ChIJIQBpAG2ahYAR_6128GcTUEo",
          price: 10.01,
          quantity: 3
        }]
    });
    </script>
</body>
</html>
2단계: 버튼에 이벤트 연결하기
'구매' 버튼을 클릭할 때 purchase 이벤트가 트리거되도록 설정하는 방법에는 몇 가지가 있습니다. 한 가지 방법은 '구매' 버튼에 ID를 추가한 후 이벤트 리스너에 이벤트 코드를 배치하는 것입니다. 다음 예시에서는 ID가 purchase인 버튼을 클릭할 때만 이벤트가 전송됩니다.
<!--
  Note: In the following code sample, make sure to
  replace "TAG_ID" with your tag ID.
  Learn more: https://support.google.com/tagmanager/answer/12326985
-->
<!DOCTYPE html>
<html lang="en">
<head>
    <!-- Google tag (gtag.js) -->
    <script async src="https://www.googletagmanager.com/gtag/js?id=TAG_ID"></script>
    <script>
        window.dataLayer = window.dataLayer || [];
        function gtag(){dataLayer.push(arguments);}
        gtag('js', new Date());

        gtag('config', 'TAG_ID');
    </script>
</head>
<body>
    <div>This is where the purchase form would go</div>
    <button id="purchase">Purchase</button>
    <script>
    document.getElementById("purchase").addEventListener("click", function () {
        gtag("event", "purchase", {
                // This purchase event uses a different transaction ID
                // from the previous purchase event so Analytics
                // doesn't deduplicate the events.
                // Learn more: https://support.google.com/analytics/answer/12313109
                transaction_id: "T_12345_2",
                value: 30.03,
                tax: 4.90,
                shipping: 5.99,
                currency: "USD",
                coupon: "SUMMER_SALE",
                items: [
                {
                  item_id: "SKU_12345",
                  item_name: "Stan and Friends Tee",
                  affiliation: "Google Merchandise Store",
                  coupon: "SUMMER_FUN",
                  discount: 2.22,
                  index: 0,
                  item_brand: "Google",
                  item_category: "Apparel",
                  item_category2: "Adult",
                  item_category3: "Shirts",
                  item_category4: "Crew",
                  item_category5: "Short sleeve",
                  item_list_id: "related_products",
                  item_list_name: "Related Products",
                  item_variant: "green",
                  location_id: "ChIJIQBpAG2ahYAR_6128GcTUEo",
                  price: 10.01,
                  quantity: 3
                }]
          });
      });
    </script>
</body>
</html>
3단계: 데이터가 수집되고 있는지 확인하기
DebugView 보고서는 웹사이트의 실시간 데이터를 보여주므로
확인할 수 있습니다 웹페이지에서 디버그 모드를 사용 설정하려면
config 명령어에 다음 debug_mode 매개변수를 추가합니다.
<!--
  Note: In the following code sample, make sure to
  replace "TAG_ID" with your tag ID.
  Learn more: https://support.google.com/tagmanager/answer/12326985
-->
<!DOCTYPE html>
<html lang="en">
<head>
    <!-- Google tag (gtag.js) -->
    <script async src="https://www.googletagmanager.com/gtag/js?id=TAG_ID"></script>
    <script>
        window.dataLayer = window.dataLayer || [];
        function gtag(){dataLayer.push(arguments);}
        gtag('js', new Date());

        gtag('config', 'TAG_ID',{ 'debug_mode': true });
    </script>
</head>
<body>
    <div>This is where the purchase form would go</div>
    <button id="purchase">Purchase</button>
    <script>
    document.getElementById("purchase").addEventListener("click", function () {
        gtag("event", "purchase", {
                // This purchase event uses a different transaction ID
                // from the previous purchase event so Analytics
                // doesn't deduplicate the events.
                // Learn more: https://support.google.com/analytics/answer/12313109
                transaction_id: "T_12345_3",
                value: 30.03,
                tax: 4.90,
                shipping: 5.99,
                currency: "USD",
                coupon: "SUMMER_SALE",
                items: [
                {
                  item_id: "SKU_12345",
                  item_name: "Stan and Friends Tee",
                  affiliation: "Google Merchandise Store",
                  coupon: "SUMMER_FUN",
                  discount: 2.22,
                  index: 0,
                  item_brand: "Google",
                  item_category: "Apparel",
                  item_category2: "Adult",
                  item_category3: "Shirts",
                  item_category4: "Crew",
                  item_category5: "Short sleeve",
                  item_list_id: "related_products",
                  item_list_name: "Related Products",
                  item_variant: "green",
                  location_id: "ChIJIQBpAG2ahYAR_6128GcTUEo",
                  price: 10.01,
                  quantity: 3
                }]
        });
    });
    </script>
</body>
</html>
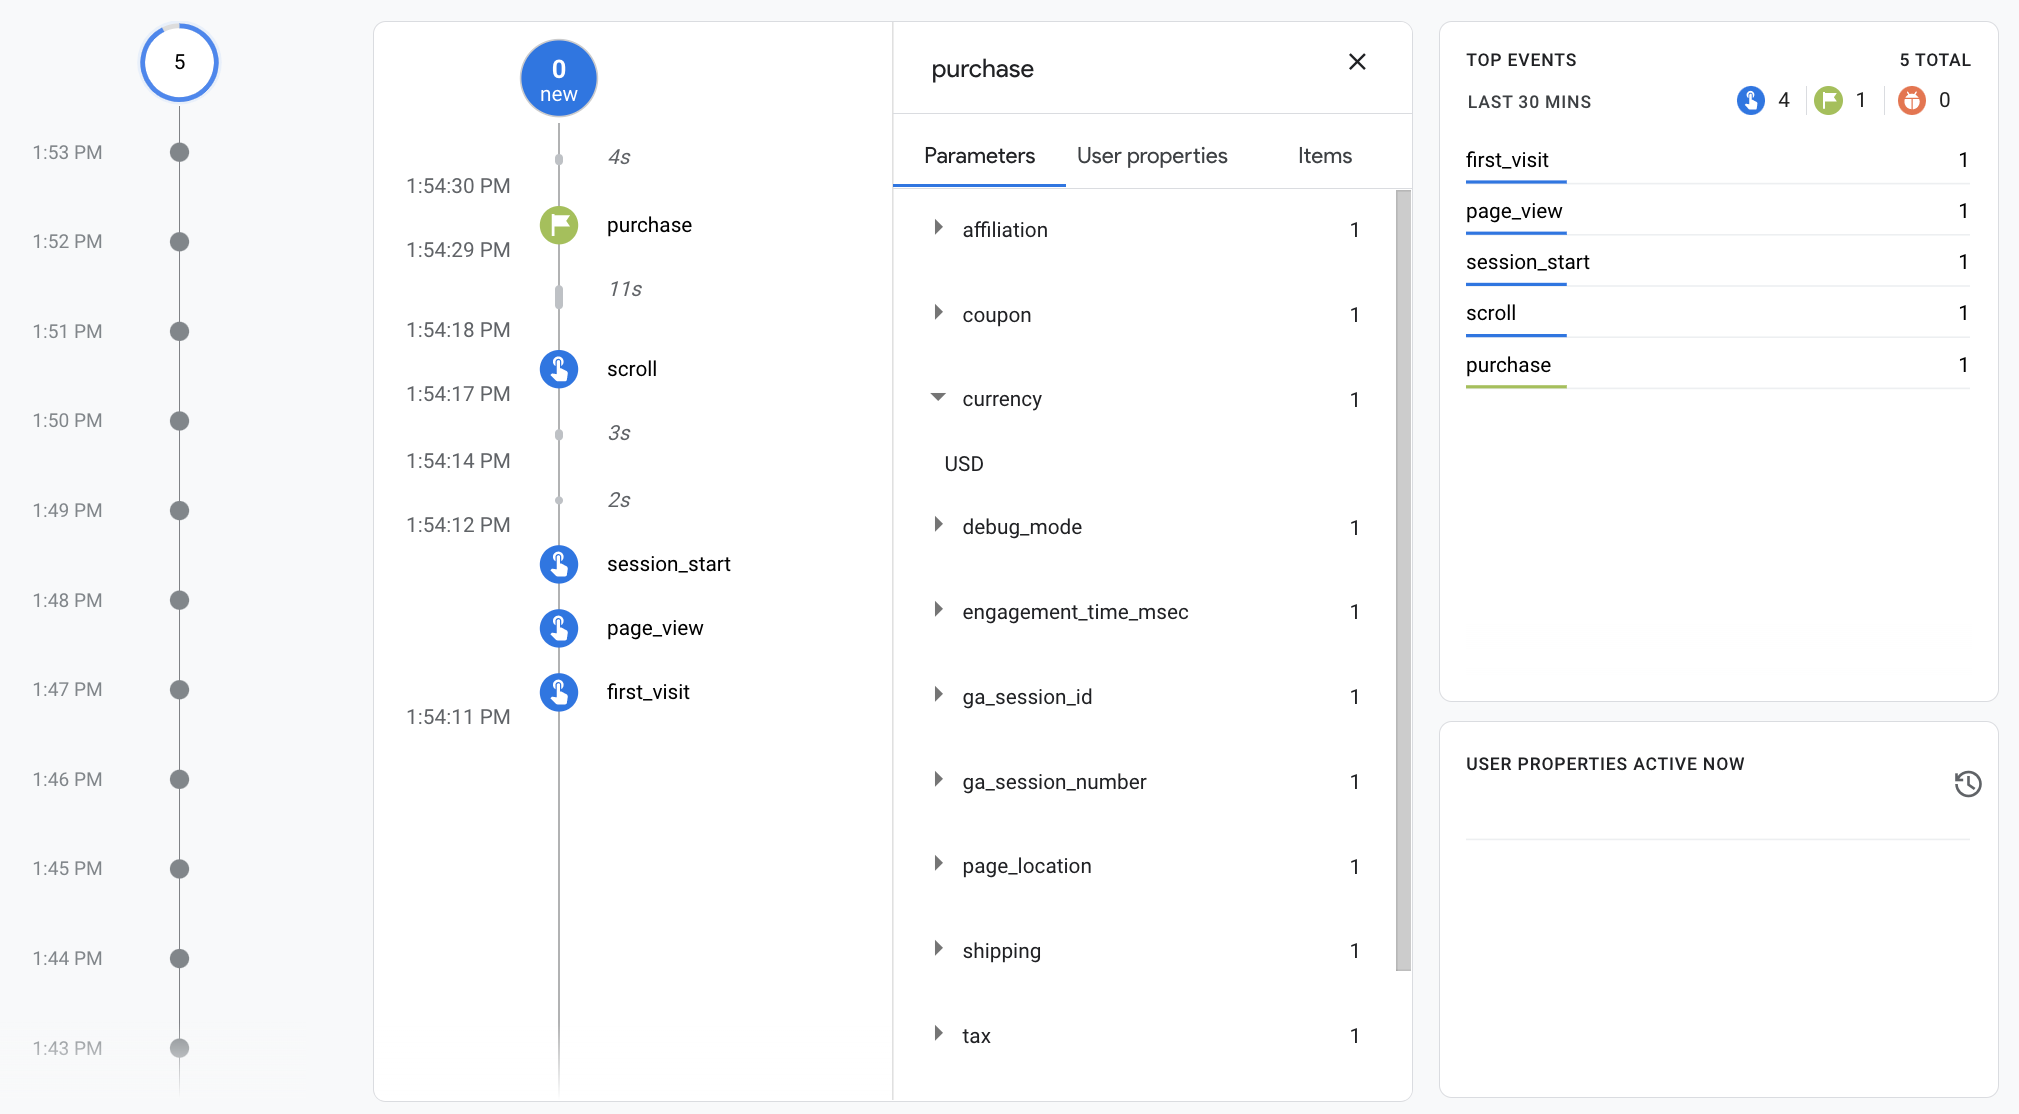
디버그 모드를 사용 설정하면 사용자가 웹사이트를 사용할 때 DebugView 보고서가 이벤트로 채워지기 시작합니다. 예를 들어 사용자가 웹사이트에서 '구매' 버튼을 클릭하면 보고서가 다음과 같은 데이터로 채워집니다. 이벤트를 선택하여 이벤트와 연결된 매개변수, 사용자 속성, 항목을 확인할 수 있습니다.

4단계: 전자상거래 데이터 보기
약 24시간이 지나면 purchase 이벤트로 전송된 데이터를 보고서, 탐색 분석, Google 애널리틱스 데이터 API에서 확인할 수 있습니다.
BigQuery Export 설정 시 BigQuery에서도 이 데이터에 액세스할 수 있습니다.
'구매' 이벤트는 사전 빌드된 다양한 크기를 자동으로 채웁니다.
및 측정항목이 포함되어 있습니다. 이
다음은
purchase 이벤트를 설정합니다.
| 매개변수 | 측정기준 | 값 |
|---|---|---|
affiliation |
상품 연계 | Google Merchandise Store |
currency |
통화 | USD |
discount |
상품 할인 금액 | 2.22 |
index |
상품 목록 위치 | 0 |
item_brand |
상품 브랜드 | |
item_category |
상품 카테고리 | 의류 |
item_id |
상품 ID | SKU_12345 |
item_list_id |
상품 목록 ID | related_products |
item_list_name |
상품 목록 이름 | 관련 제품 |
item_name |
상품 이름 | Stan and Friends Tee |
item_variant |
상품 옵션 | 녹색 |
location_id |
상품 위치 ID | ChIJIQBpAG2ahYAR_6128GcTUEo(샌프란시스코의 Google 장소 ID) |
shipping |
배송비 | 5.99 |
tax |
세액 | 4.90 |
transaction_id |
거래 ID | T_12345 |
Google 애널리틱스는 측정기준 외에도 여러 전자상거래 및 수익 관련 측정항목을 데이터로 채웁니다. 예를 들어 사용자가 '구매' 버튼을 한 번 클릭하면 Google 애널리틱스에서 다음과 같은 측정항목이 채워집니다.
- 상품 수익 측정항목의 값이 30.03달러입니다.
- 총수익 측정항목의 값이 30.03달러입니다.
- 전자상거래 구매 측정항목의 값이 1이 됩니다.
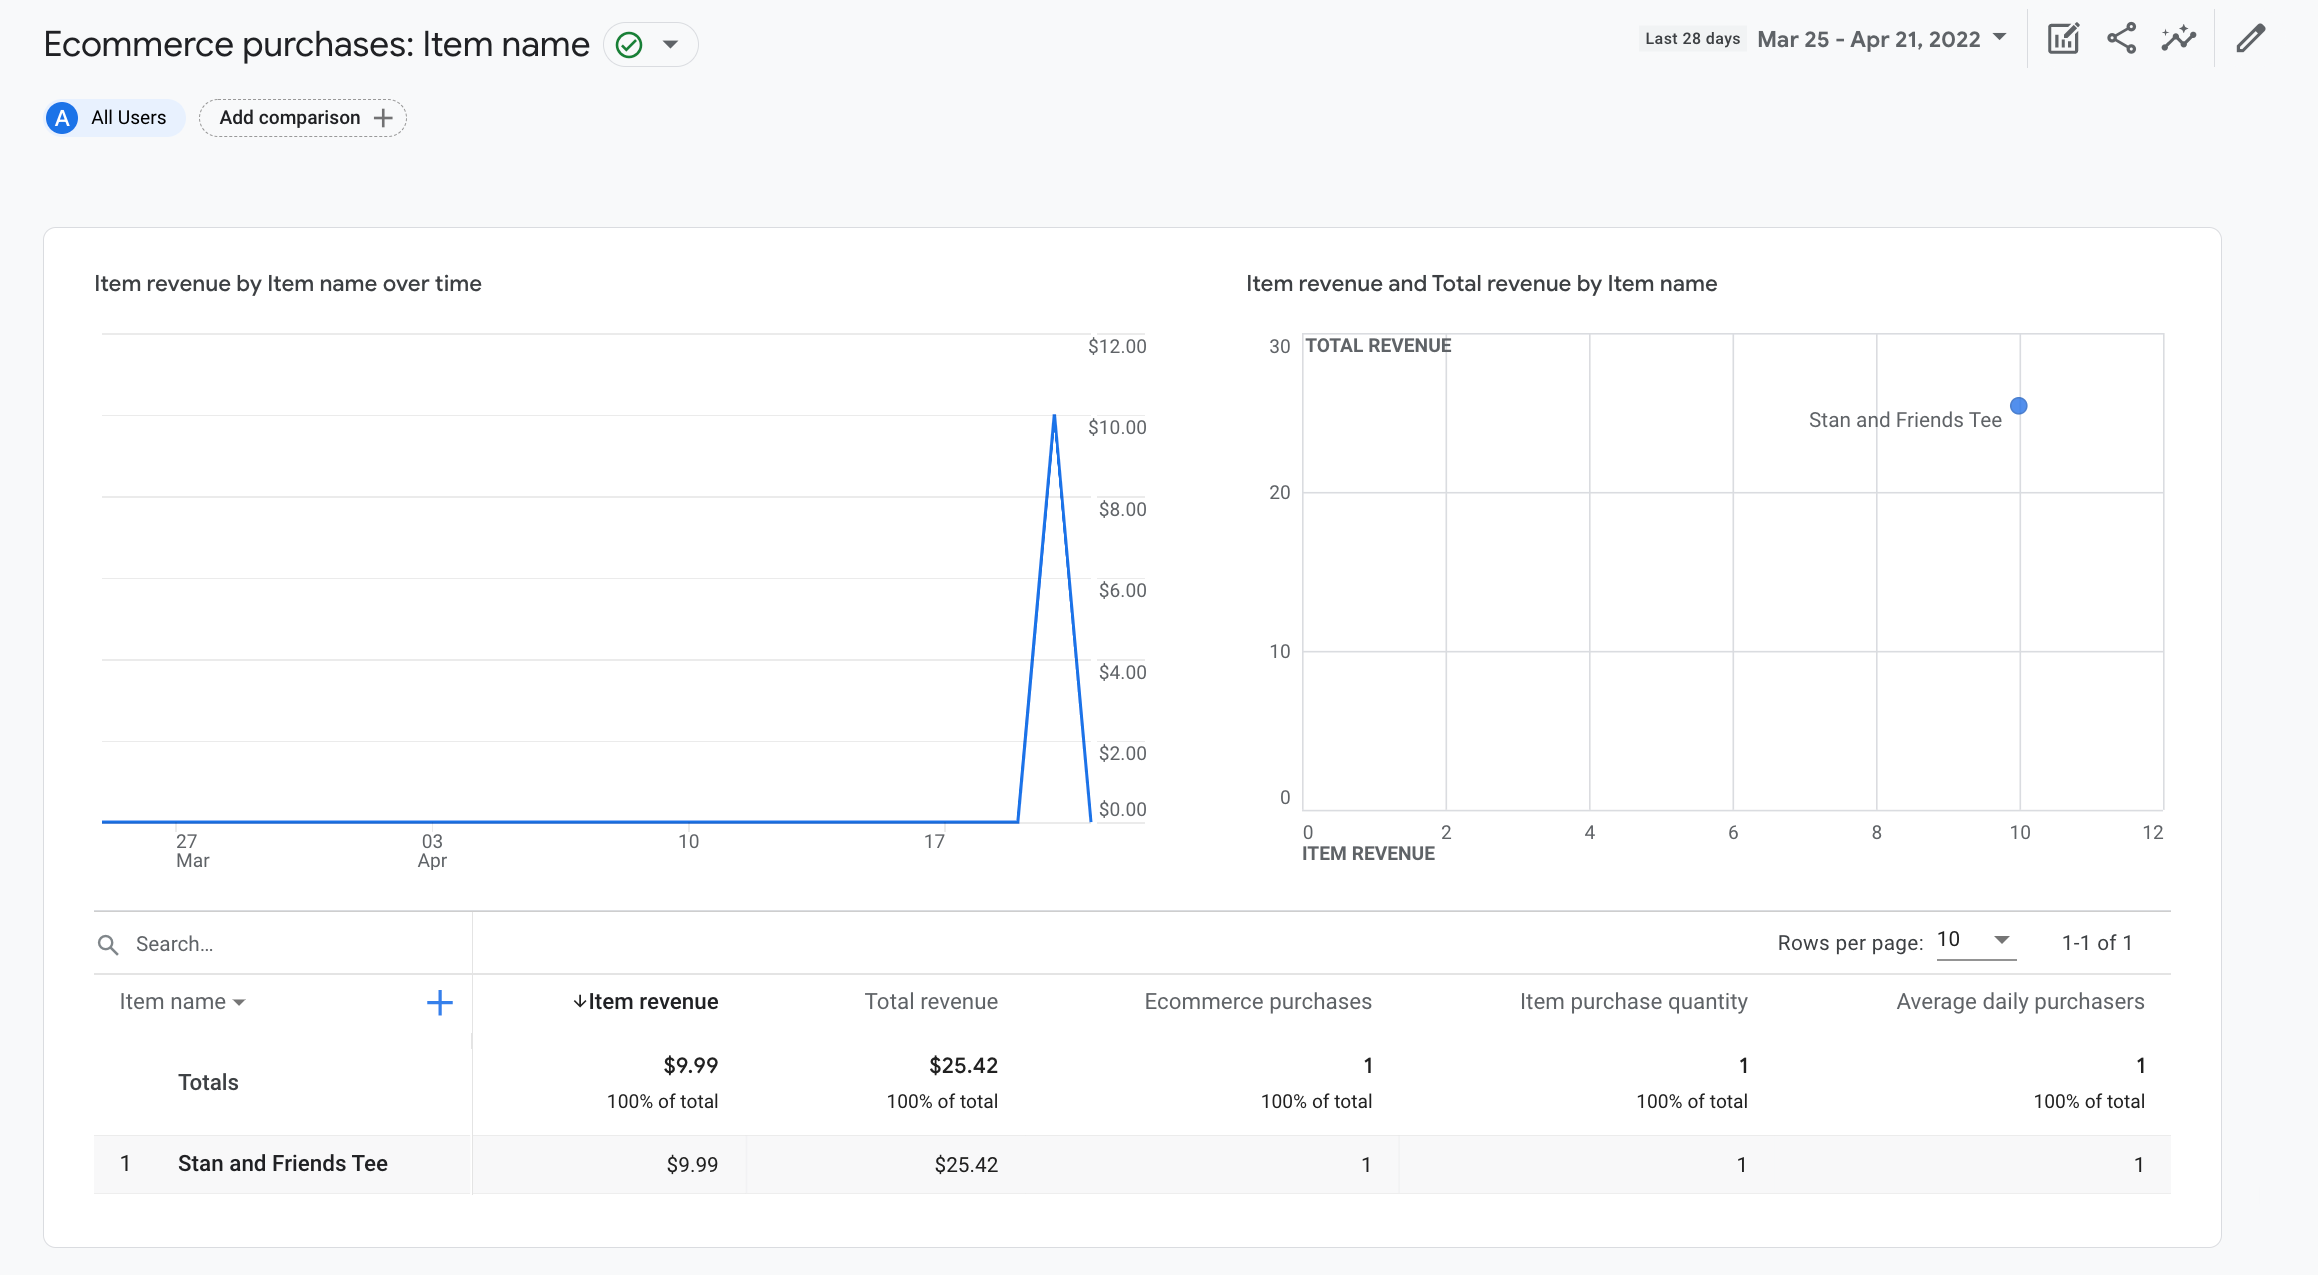
이러한 측정기준과 측정항목을 사용하여 탐색 분석 및 맞춤 측정기준을 만들 수 있습니다. 다음과 같은 사전 빌드된 전자상거래 구매 보고서를 사용하여 전자상거래 데이터를 확인합니다.
