

本指南說明如何使用 Google 文件 API,將一或多個外部資料來源的資訊合併至現有範本文件。
範本是一種文件,內含固定文字和動態內容的預留位置。舉例來說,合約範本可能包含固定文字,以及收件者姓名和地址的預留位置。接著,應用程式會將使用者專屬資料併入範本,建立完成的文件。
這種做法有以下幾個優點:
設計師可以使用 Google 文件微調文件設計。相較於在應用程式中調整參數來設定算繪的版面配置,這種做法更簡單。
將內容與呈現方式分開是眾所皆知的設計原則,可帶來許多好處。
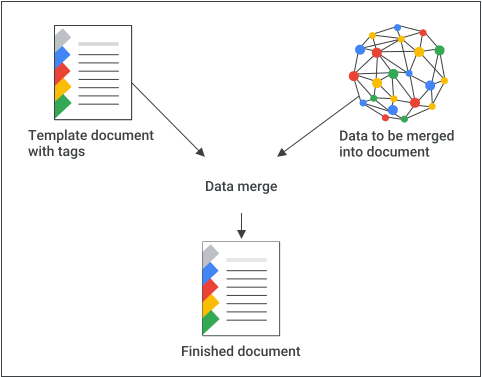
文件合併的運作方式
以下範例說明如何使用 Google Docs API 將資料合併至文件中:
使用預留位置內容建立文件,有助於設計和格式設定。系統會保留要取代的文字格式。
針對要插入的每個元素,請將預留位置內容替換為標記。請務必使用正常情況下不太可能出現的字串。舉例來說,
{{account-holder-name}}可能是不錯的標記。在程式碼中,使用 Google Drive API 複製文件。
在程式碼中,使用 Docs API 的
batchUpdate方法和文件名稱,並加入ReplaceAllTextRequest。
文件 ID 是指文件的參照,可從網址衍生而來:
https://docs.google.com/document/d/DOCUMENT_ID/edit
管理範本
如果是應用程式定義及擁有的範本文件,請使用代表應用程式的專屬帳戶建立範本。服務帳戶是不錯的選擇,可避免 Google Workspace 政策限制共用,導致發生問題。
從範本建立文件執行個體時,請一律使用使用者憑證。這樣一來,使用者就能完全掌控產生的文件,並避免 Google 雲端硬碟中與使用者限制相關的擴充問題。
如要使用服務帳戶建立範本,請使用應用程式憑證執行下列步驟:
- 使用 Docs API 中的
documents.create建立文件。 - 更新權限,允許文件收件者使用 Drive API 中的
permissions.create讀取文件。 - 更新權限,允許範本作者使用 Drive API 中的
permissions.create寫入範本。 - 視需要編輯範本。
如要建立文件執行個體,請使用使用者憑證執行下列步驟:
- 使用 Drive API 中的
files.copy建立範本副本。 - 使用 Docs API 中的
documents.batchUpdate替換值。
範例:將資料併入範本
下列程式碼範例說明如何將範本所有索引標籤中的兩個欄位,替換為實際值,以產生完成的文件:
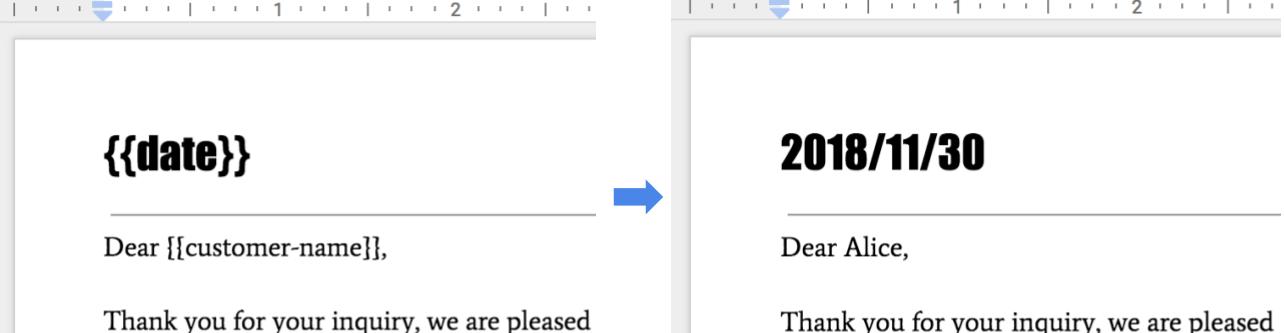
如要執行這項合併作業,請使用下列程式碼:
Java
String customerName = "Alice"; DateTimeFormatter formatter = DateTimeFormatter.ofPattern("yyyy/MM/dd"); String date = formatter.format(LocalDate.now()); // Make a copy of the template document using the Drive API. String copyTitle = "Merged Document"; File copyMetadata = new File().setName(copyTitle); File documentCopyFile = driveService.files().copy(DOCUMENT_ID, copyMetadata).execute(); String documentCopyId = documentCopyFile.getId(); Listrequests = new ArrayList<>(); // One option for replacing all text is to specify all tab IDs. requests.add(new Request() .setReplaceAllText(new ReplaceAllTextRequest() .setContainsText(new SubstringMatchCriteria() .setText("{{customer-name}}") .setMatchCase(true)) .setReplaceText(customerName) .setTabsCriteria(new TabsCriteria() .addTabIds(TAB_ID_1) .addTabIds(TAB_ID_2) .addTabIds(TAB_ID_3)))); // Another option is to omit TabsCriteria if you are replacing across all tabs. requests.add(new Request() .setReplaceAllText(new ReplaceAllTextRequest() .setContainsText(new SubstringMatchCriteria() .setText("{{date}}") .setMatchCase(true)) .setReplaceText(date))); BatchUpdateDocumentRequest body = new BatchUpdateDocumentRequest(); service.documents().batchUpdate(documentCopyId, body.setRequests(requests)).execute();
Node.js
  let customerName = 'Alice';
  let date = yyyymmdd()
  let requests = [
    // One option for replacing all text is to specify all tab IDs.
    {
      replaceAllText: {
        containsText: {
          text: '{{customer-name}}',
          matchCase: true,
        },
        replaceText: customerName,
        tabsCriteria: {
          tabIds: [TAB_ID_1, TAB_ID_2, TAB_ID_3],
        },
      },
    },
    // Another option is to omit TabsCriteria if you are replacing across all tabs.
    {
      replaceAllText: {
        containsText: {
          text: '{{date}}',
          matchCase: true,
        },
        replaceText: date,
      },
    },
  ];

  // Make a copy of the template document using the Drive API.
  let copyTitle = 'Merged Document';
  driveService.files.copy({
    fileId: '1yBx6HSnu_gbV2sk1nChJOFo_g3AizBhr-PpkyKAwcTg',
    resource: {
      name: copyTitle,
    },
  }, (err, driveResponse) => {
    if (err) return console.log('The Drive API returned an error: ' + err);
    let documentCopyId = driveResponse.data.id;

    google.options({auth: auth});
    google
        .discoverAPI(
            'https://docs.googleapis.com/$discovery/rest?version=v1&key={YOUR_API_KEY}')
        .then(function(docs) {
          docs.documents.batchUpdate(
              {
                documentId: documentCopyId,
                resource: {
                  requests,
                },
              },
              (err, {data}) => {
                if (err) return console.log('The API returned an error: ' + err);
                console.log(data);
              });
        });
  });
Python
customer_name = 'Alice'
date = datetime.datetime.now().strftime("%y/%m/%d")

# Make a copy of the template document using the Drive API.
copy_title = 'Merged Document'
body = {
    'name': copy_title
}
drive_response = drive_service.files().copy(
    fileId=DOCUMENT_ID, body=body).execute()
document_copy_id = drive_response.get('id')

requests = [
        # One option for replacing all text is to specify all tab IDs.
        {
        'replaceAllText': {
            'containsText': {
                'text': '{{customer-name}}',
                'matchCase':  'true'
            },
            'replaceText': customer_name,
            'tabsCriteria': {
                'tabIds': [TAB_ID_1, TAB_ID_2, TAB_ID_3],
            },
        }},
        # Another option is to omit TabsCriteria if you are replacing across all tabs.
        {
        'replaceAllText': {
            'containsText': {
                'text': '{{date}}',
                'matchCase':  'true'
            },
            'replaceText': str(date),
        }
    }
]

result = service.documents().batchUpdate(
    documentId=document_copy_id, body={'requests': requests}).execute()
處理動態清單和表格
標準文件合併作業會使用 ReplaceAllTextRequest 取代個別一次性預留位置 (例如 {{customer-name}} 或 {{date}})。不過,如果資料包含動態項目清單 (例如發票上的明細、訂購產品清單或動態表格),您就無法使用標準文字取代功能,因為系統在設計範本時不知道項目數量。
如要處理動態清單內容,請使用下列其中一種策略。
方法 1:將資料列附加至範本表格
如果範本文件已包含格式化表格 (例如含有標題列和單一預留位置列),您可以動態複製及填入清單中每個項目的資料列:
- 讀取範本結構:使用
documents.get方法找出資料表,並識別範本列的索引。 - 插入新列:針對您的資料名單中的每個項目 (第一個項目除外,因為可以重複使用現有的範本列),呼叫
InsertTableRowRequest,在範本列下方插入新列。 - 填入儲存格資料:取代範本列中的預留位置,填入儲存格資料。針對新建立的資料列,請使用
InsertTextRequest將相應文字插入每個儲存格的座標位置。
如需插入資料表列的範例,請參閱「使用資料表」。
選項 2:以產生的表格取代代碼
如要以程式輔助方式從頭建構資料表:
- 放置預留位置標記:在範本文件中使用單一標記 (例如
{{invoice-table}}),標示清單應放置的位置。 - 找出預留位置:使用搜尋作業找出標記的起始索引。
- 刪除預留位置:使用
DeleteContentRangeRequest移除{{invoice-table}}文字。 - 插入表格:在該起始索引處傳送
InsertTableRequest,並根據資料來源指定列數和欄數。 - 寫入值:依序填入每個表格儲存格。
如需以程式輔助方式插入表格的範例,請參閱「使用表格」。