Google Chat で連絡先を収集、管理する

このチュートリアルでは、Google Chat ユーザーが個人用とビジネス用の連絡先を管理できるようにする Google Chat アプリを作成する方法について説明します。収集 完了すると、Chat アプリはユーザーに カードメッセージとダイアログで お問い合わせフォームを作成します

Chat アプリの使用例:

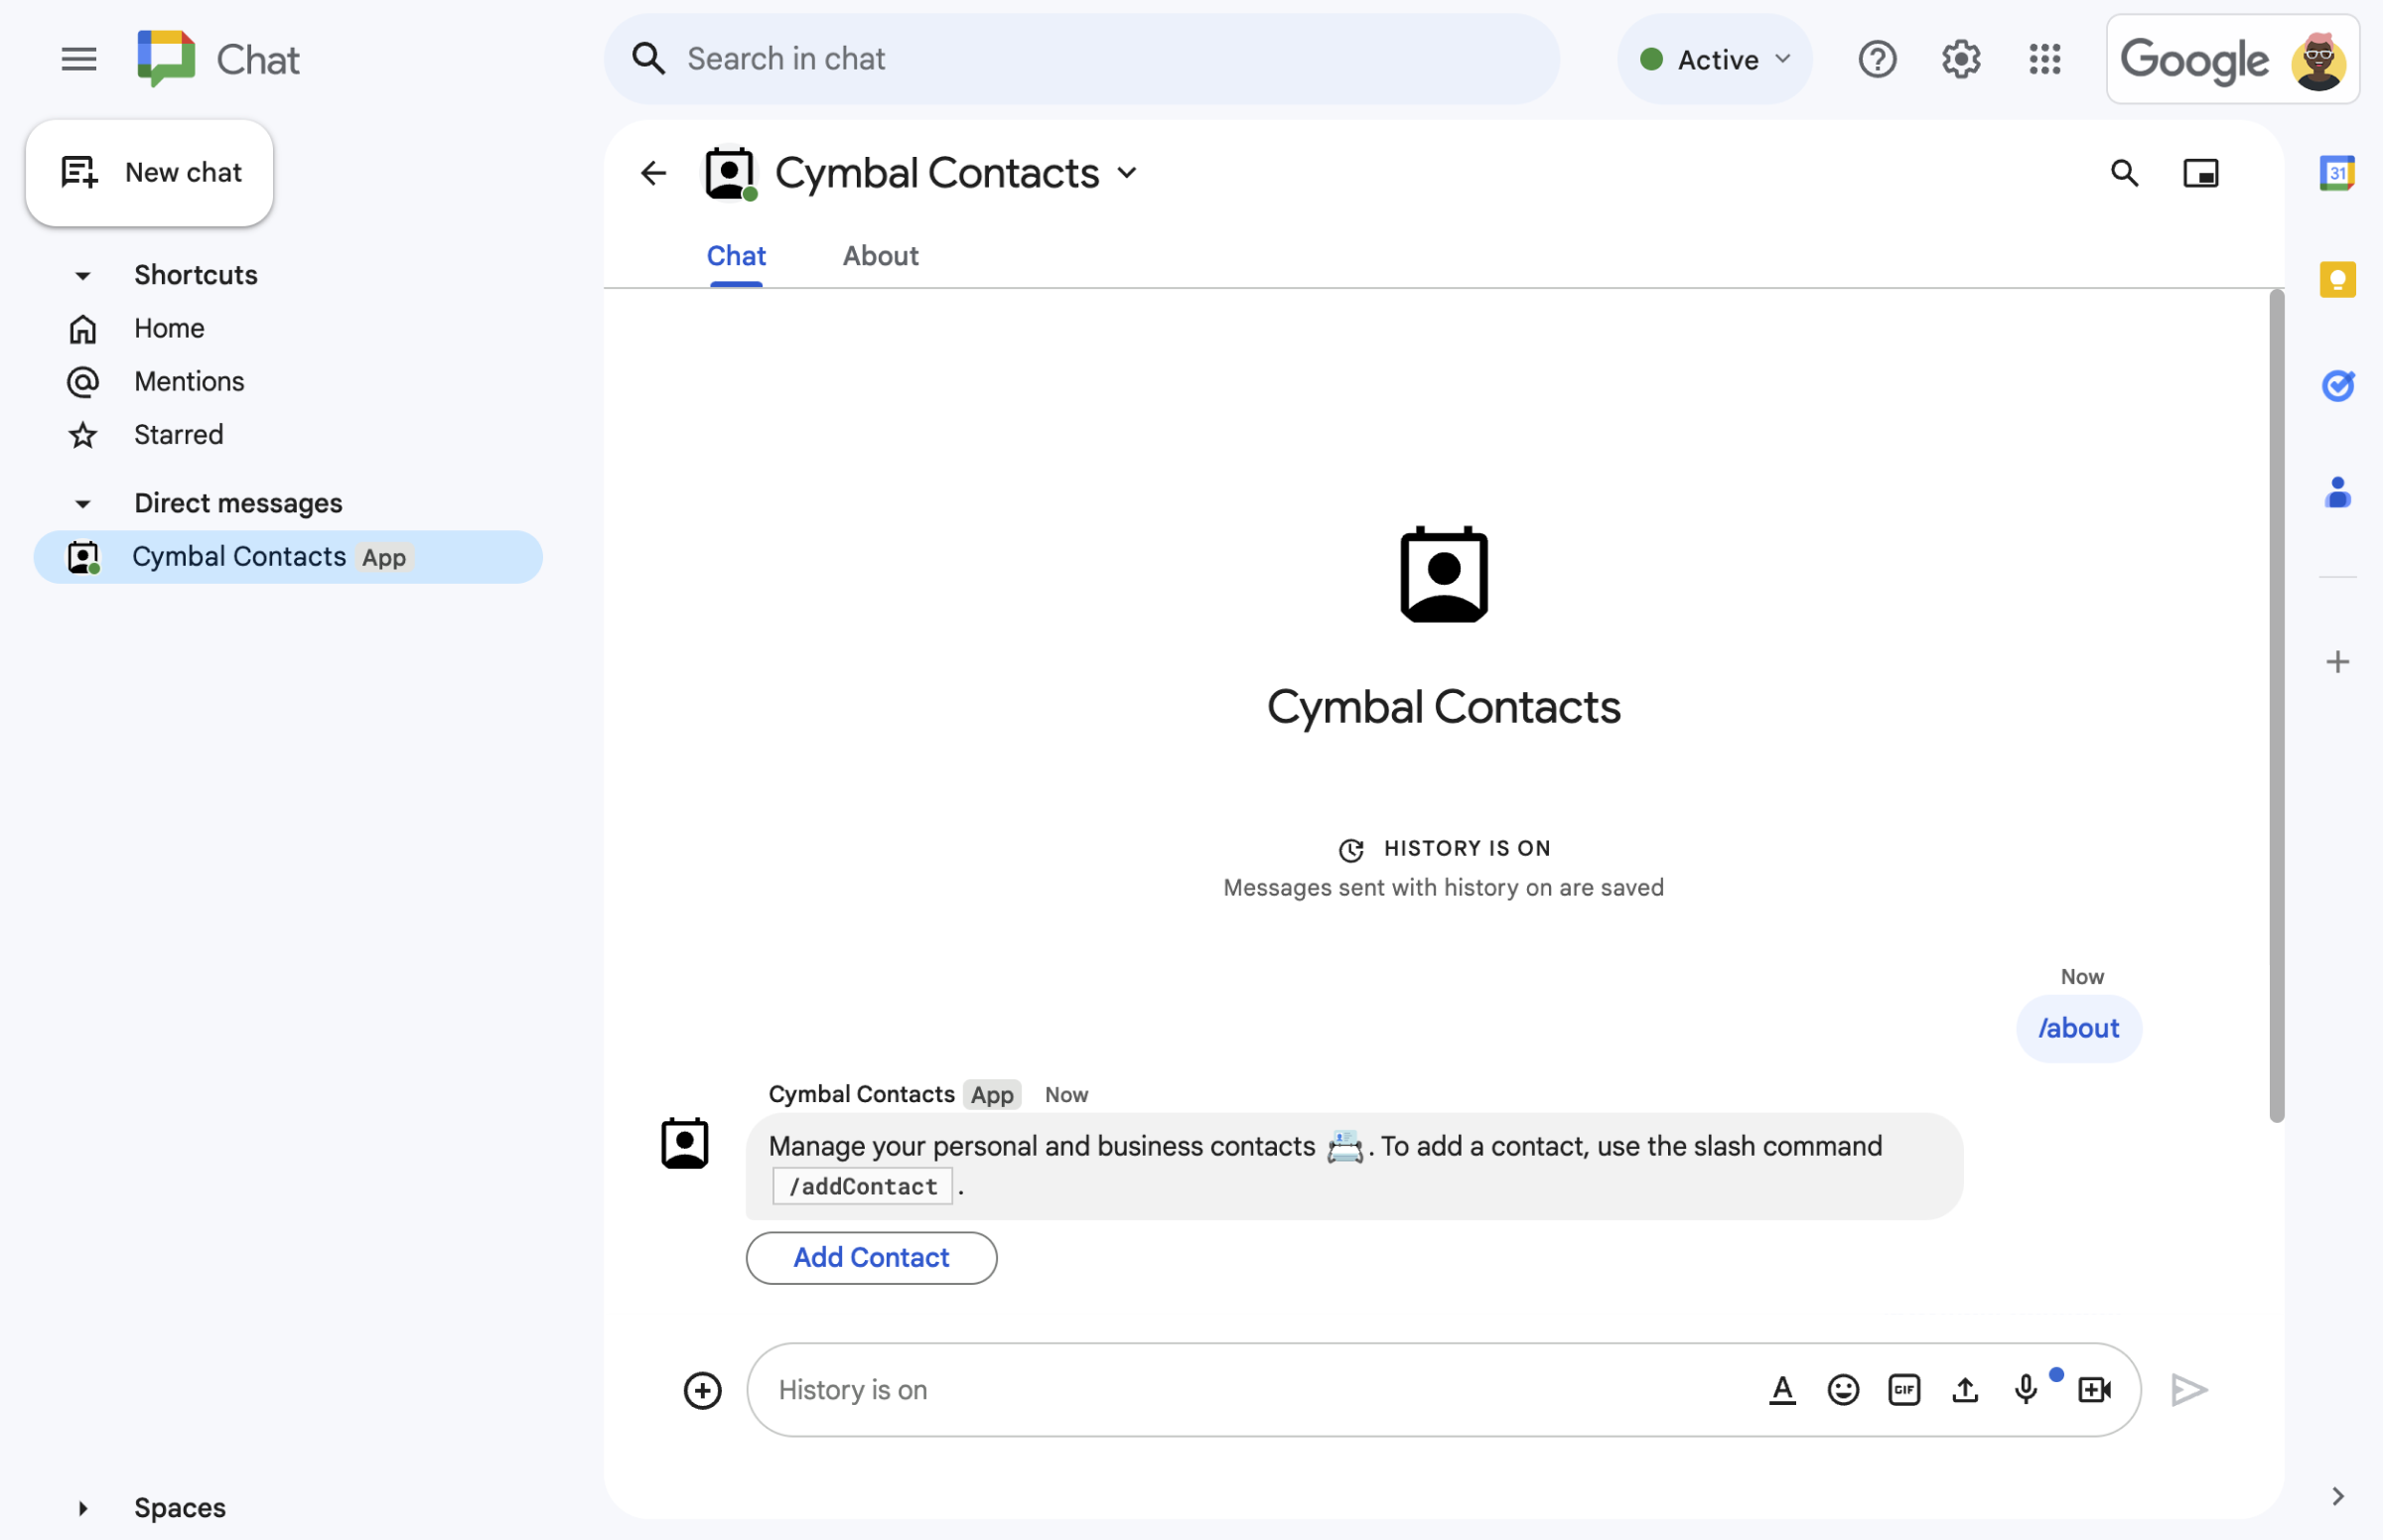
  • スラッシュ コマンドからお問い合わせフォーム。
    図 1: 「 Chat アプリは スラッシュ コマンド /about で、テキスト メッセージとボタン お問い合わせフォームが開きます
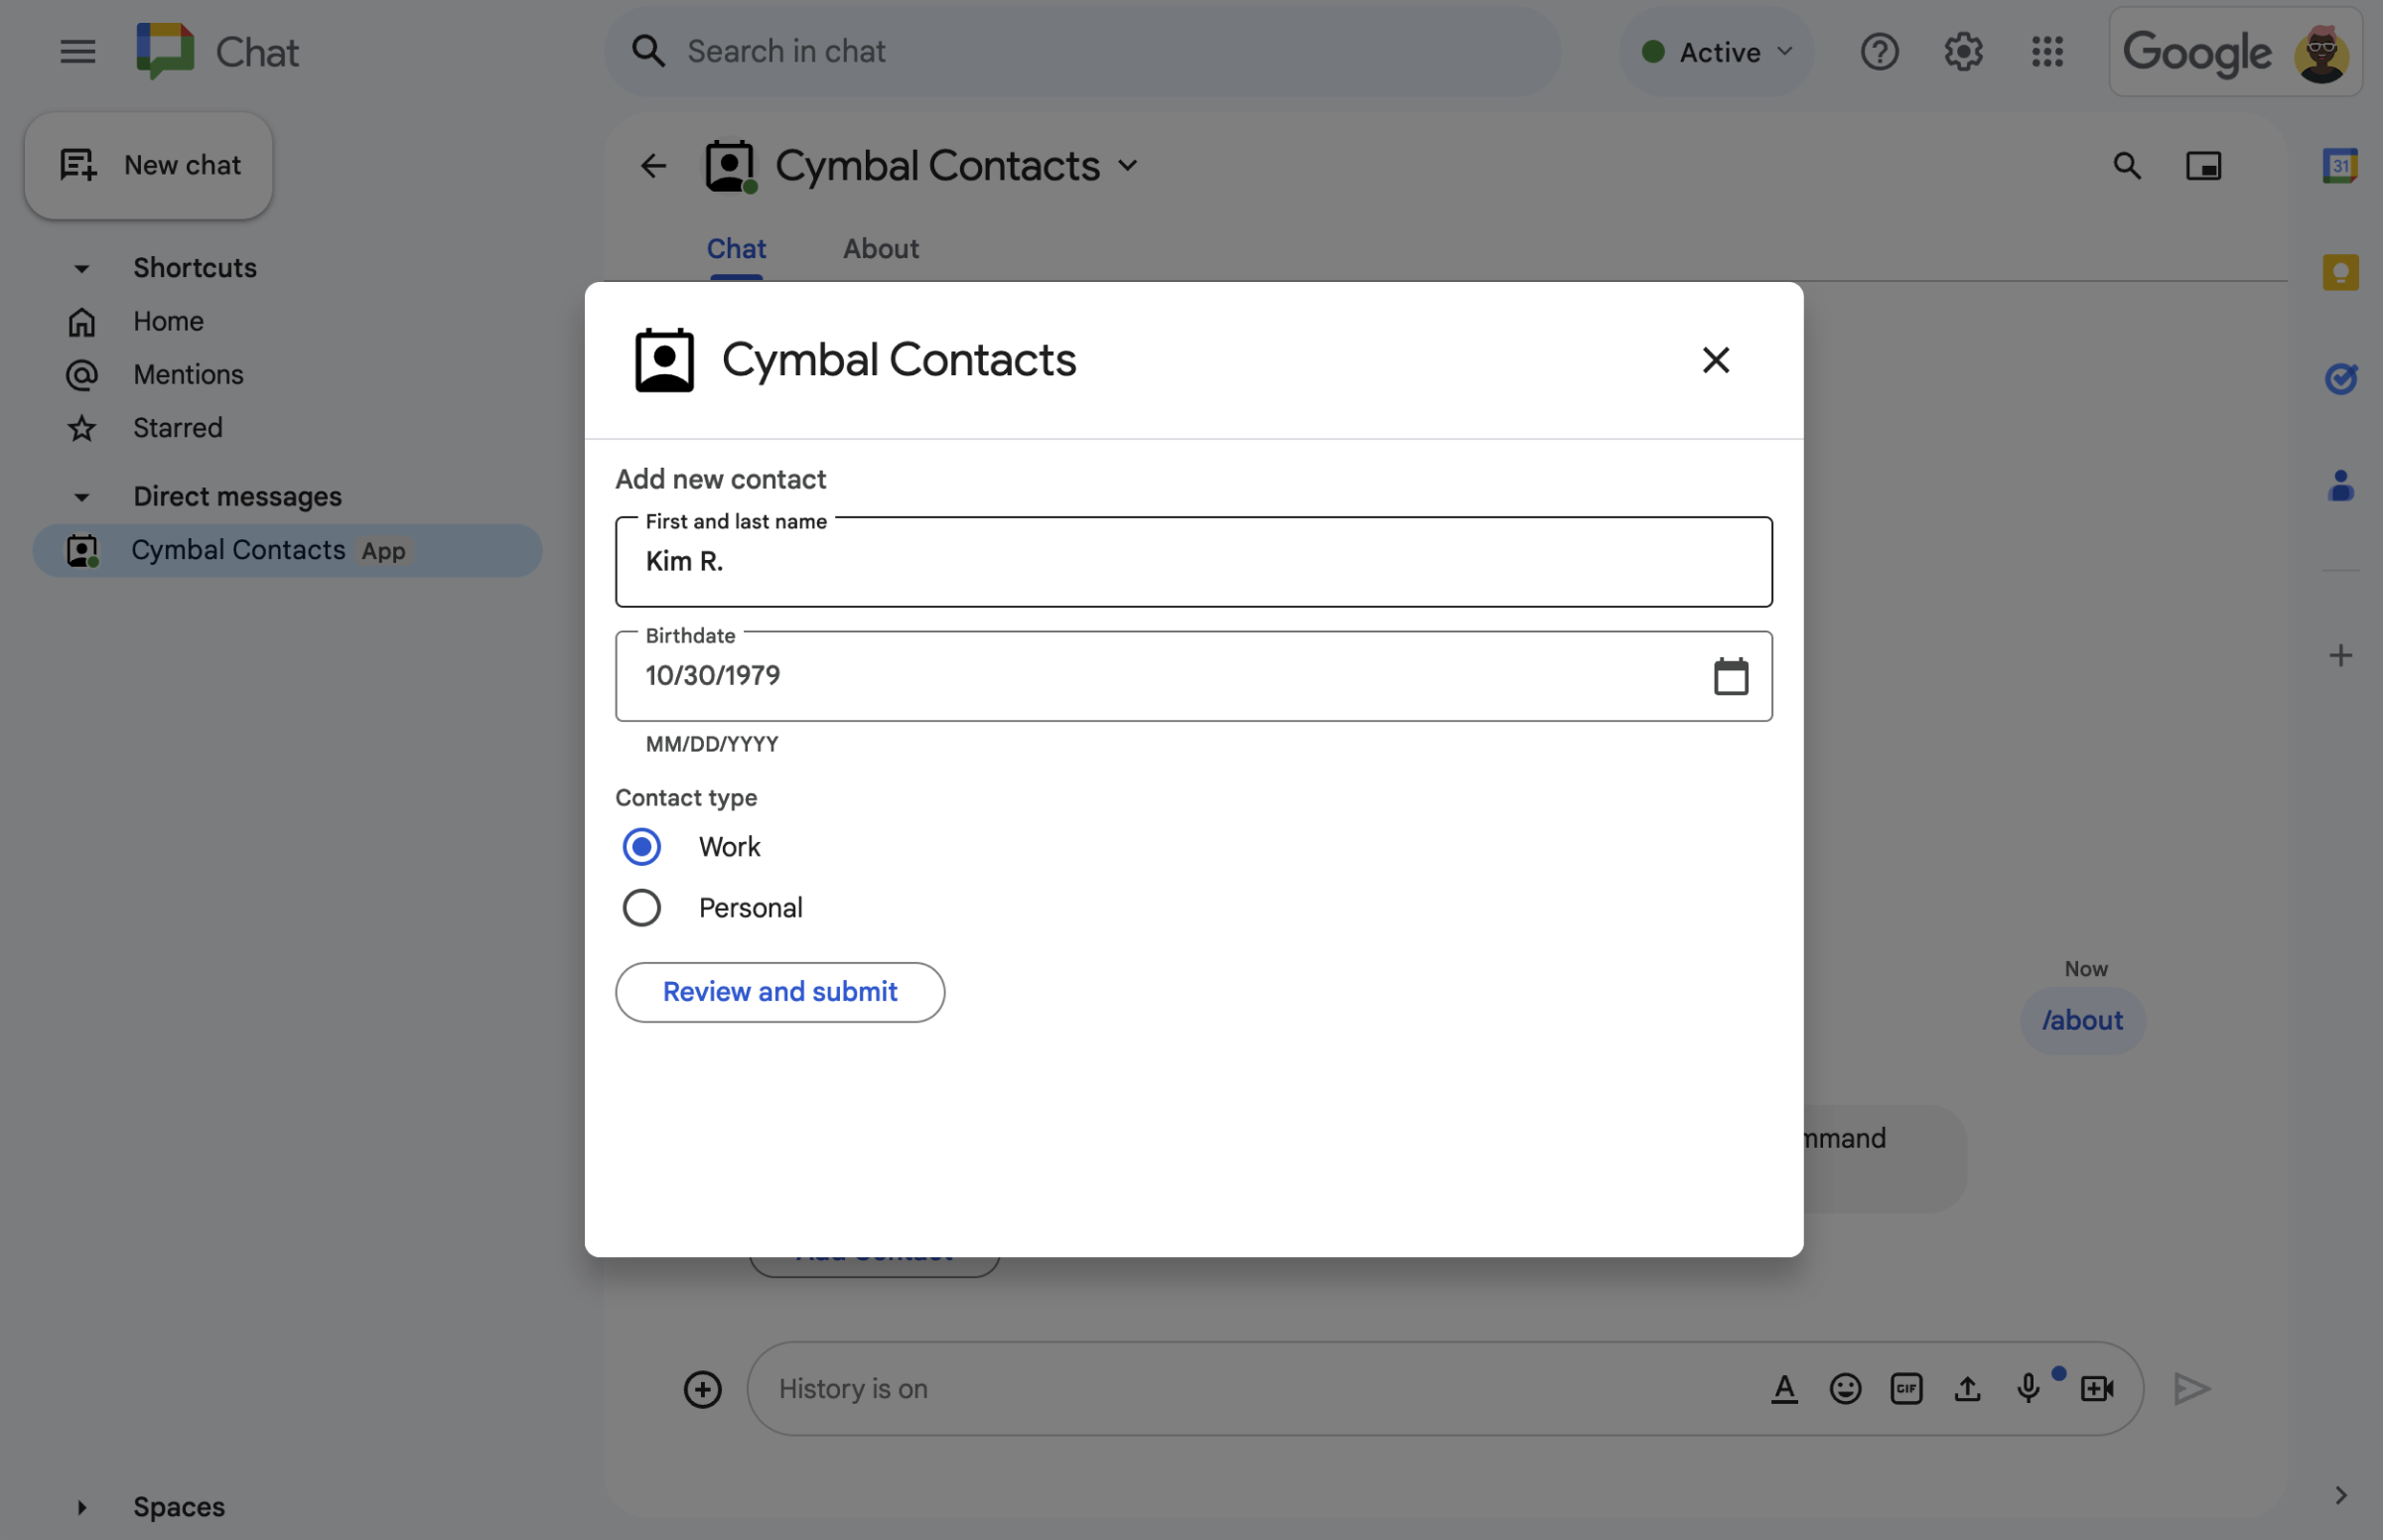
  • ダイアログのお問い合わせフォーム。
    図 2.「 Chat アプリでダイアログが開き、ユーザーは 連絡先に関する情報を入力する。
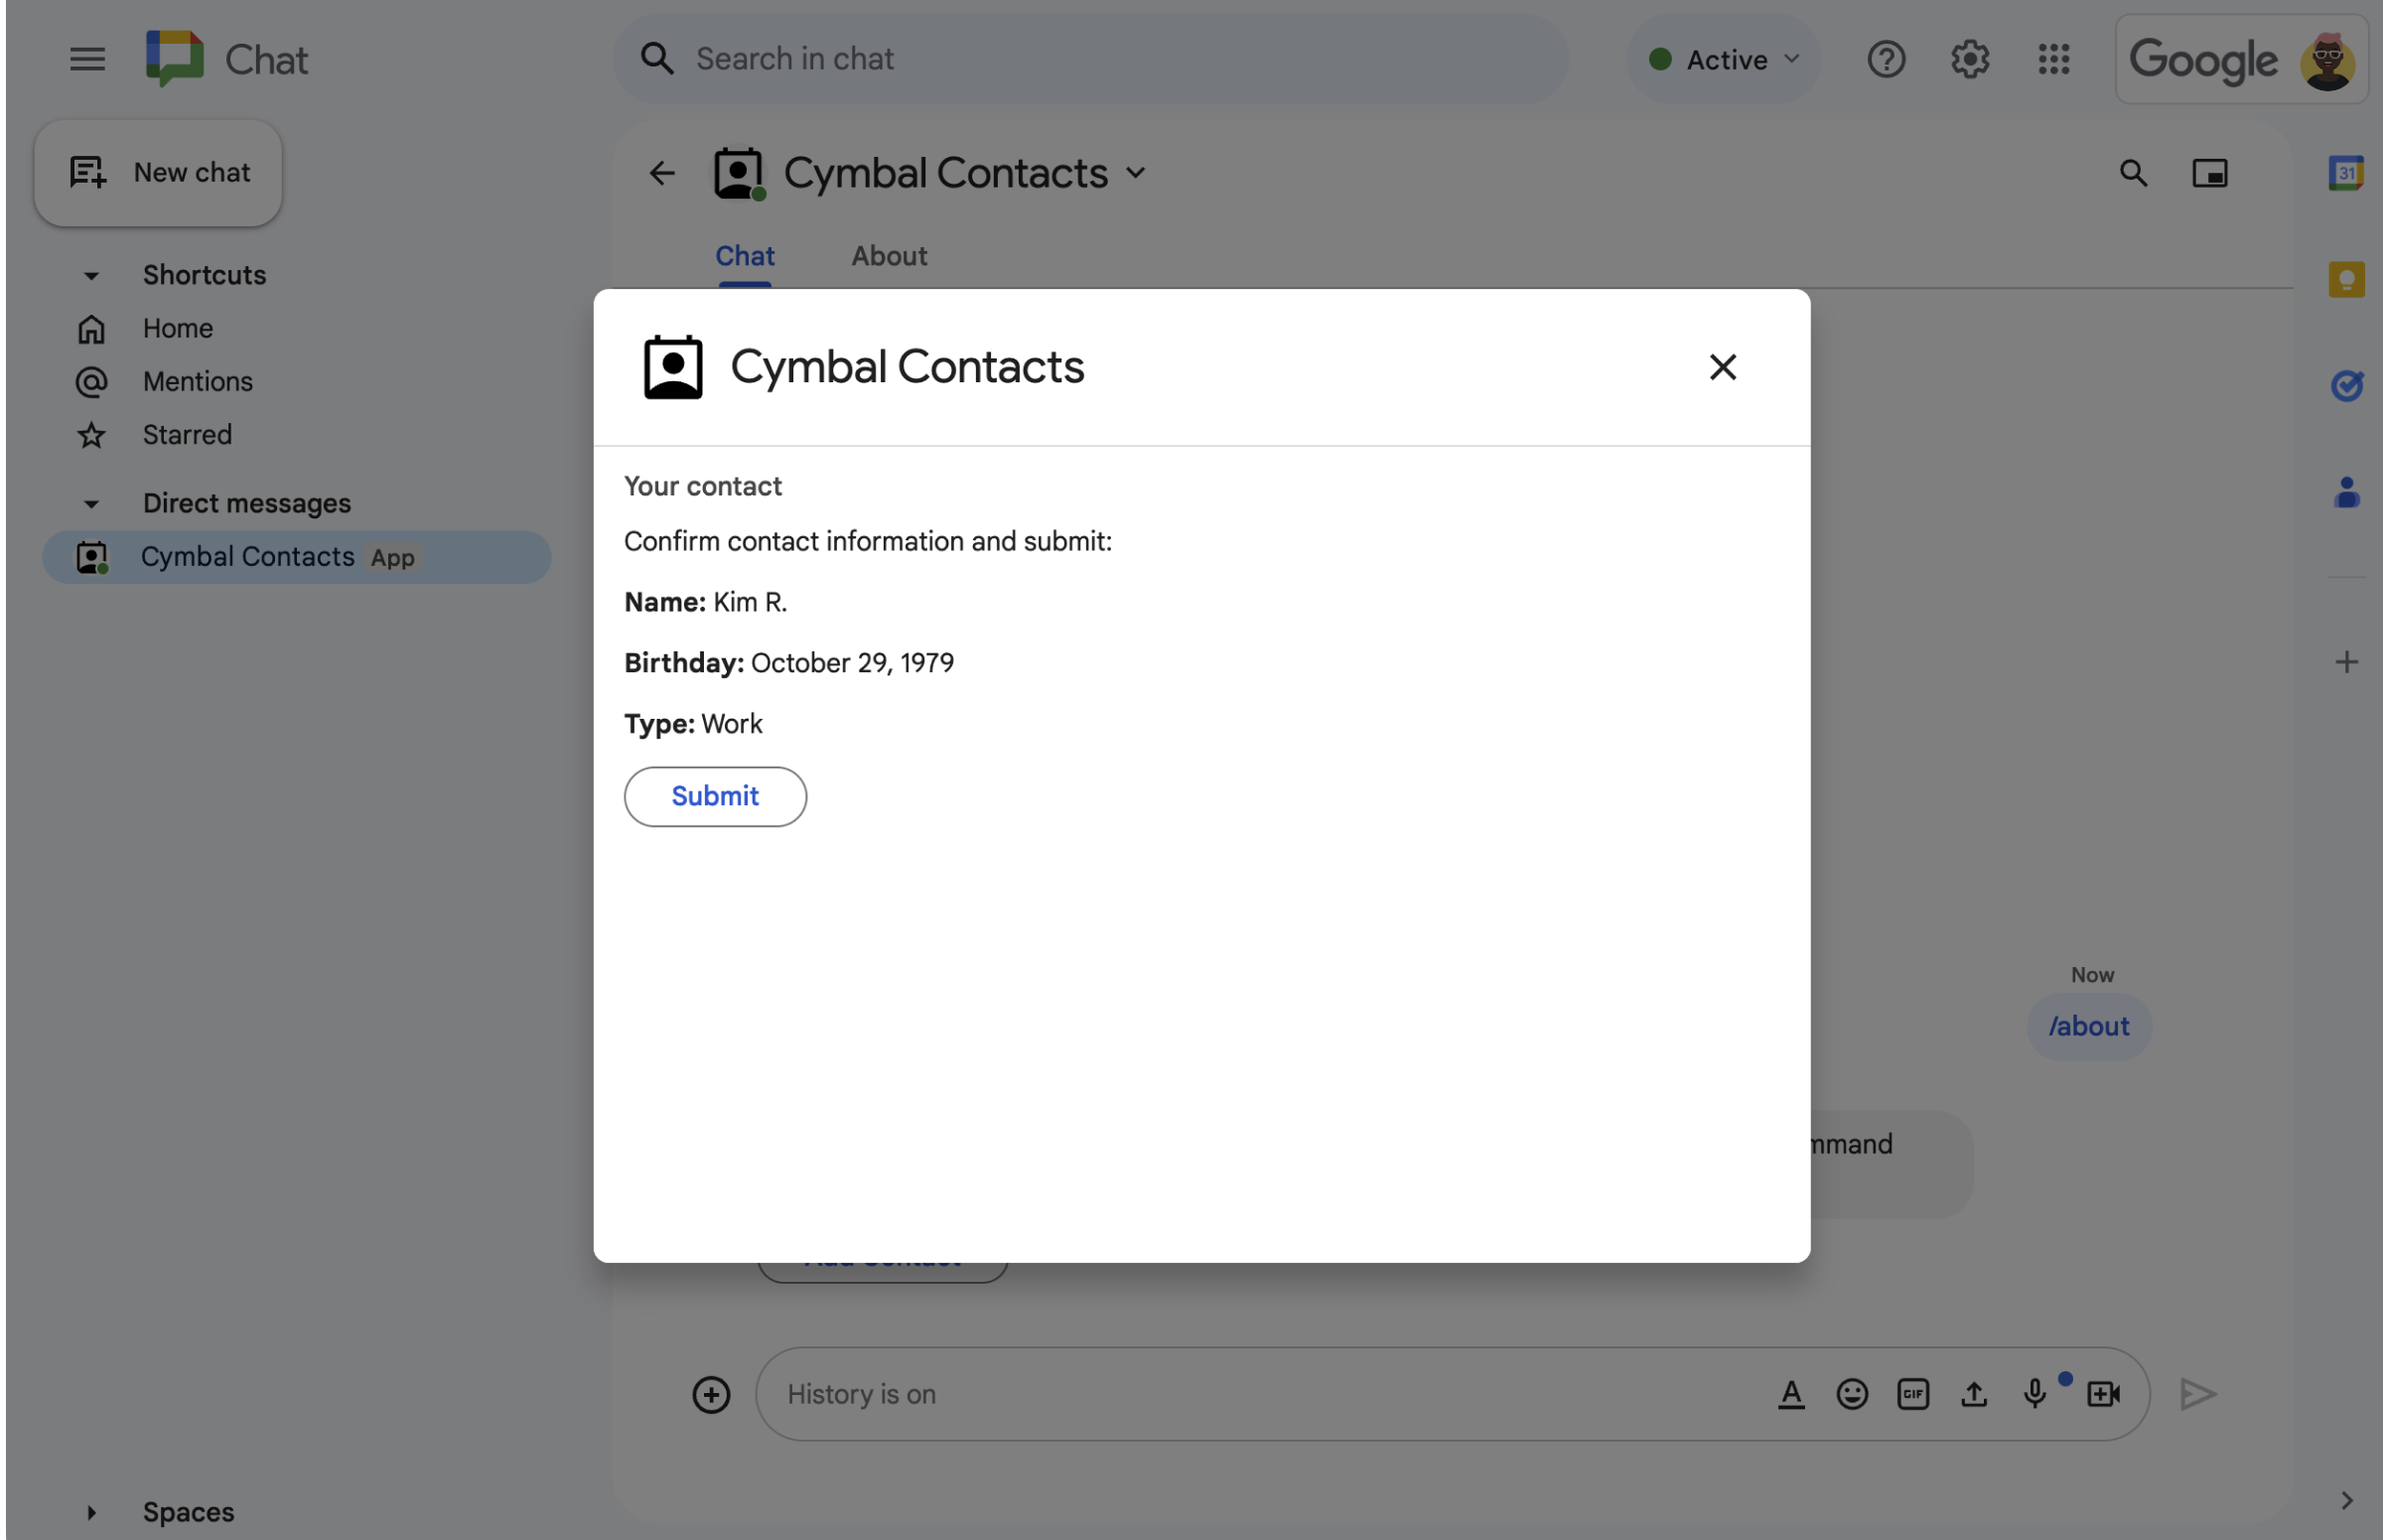
  • ダイアログを確認して確認します。
    図 3. Chat アプリは確認ダイアログを返します。これにより、ユーザーは送信する前に情報を確認して確認できます。
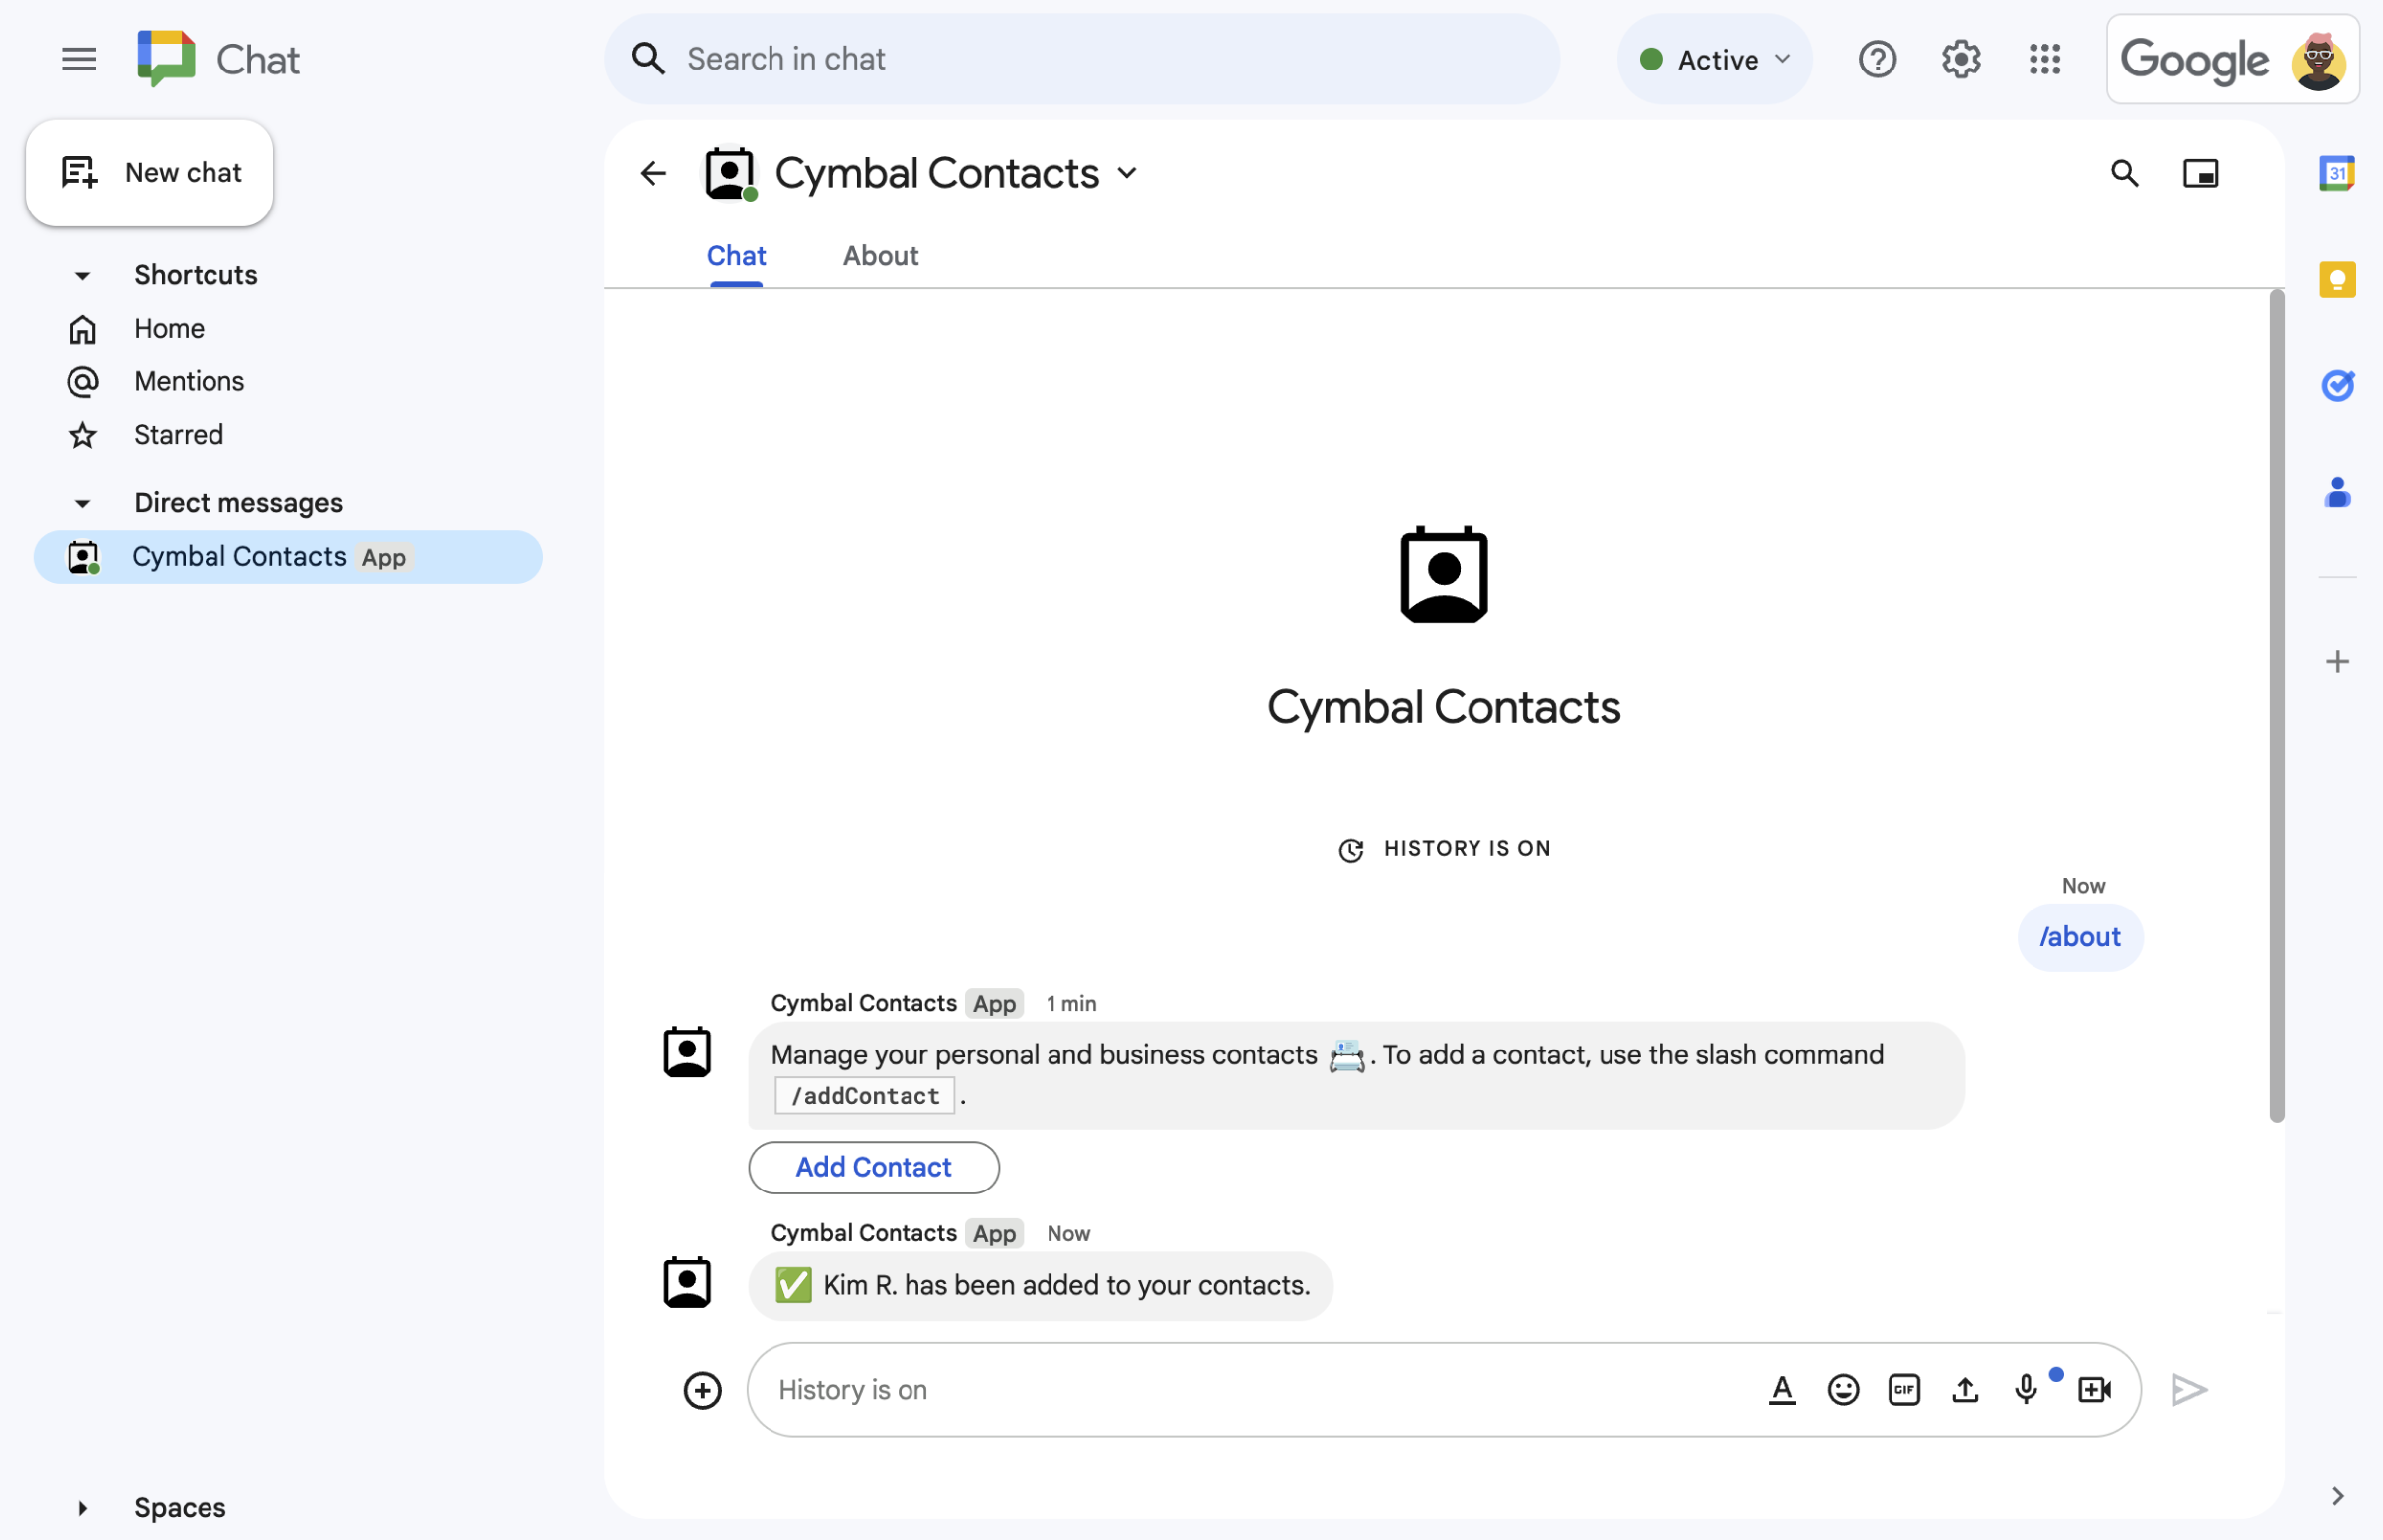
  • 新しい連絡先を確認するテキスト メッセージ。
    図 4.ユーザーがフォームを送信すると、Chat アプリから送信を確認する非公開のテキスト メッセージが送信されます。
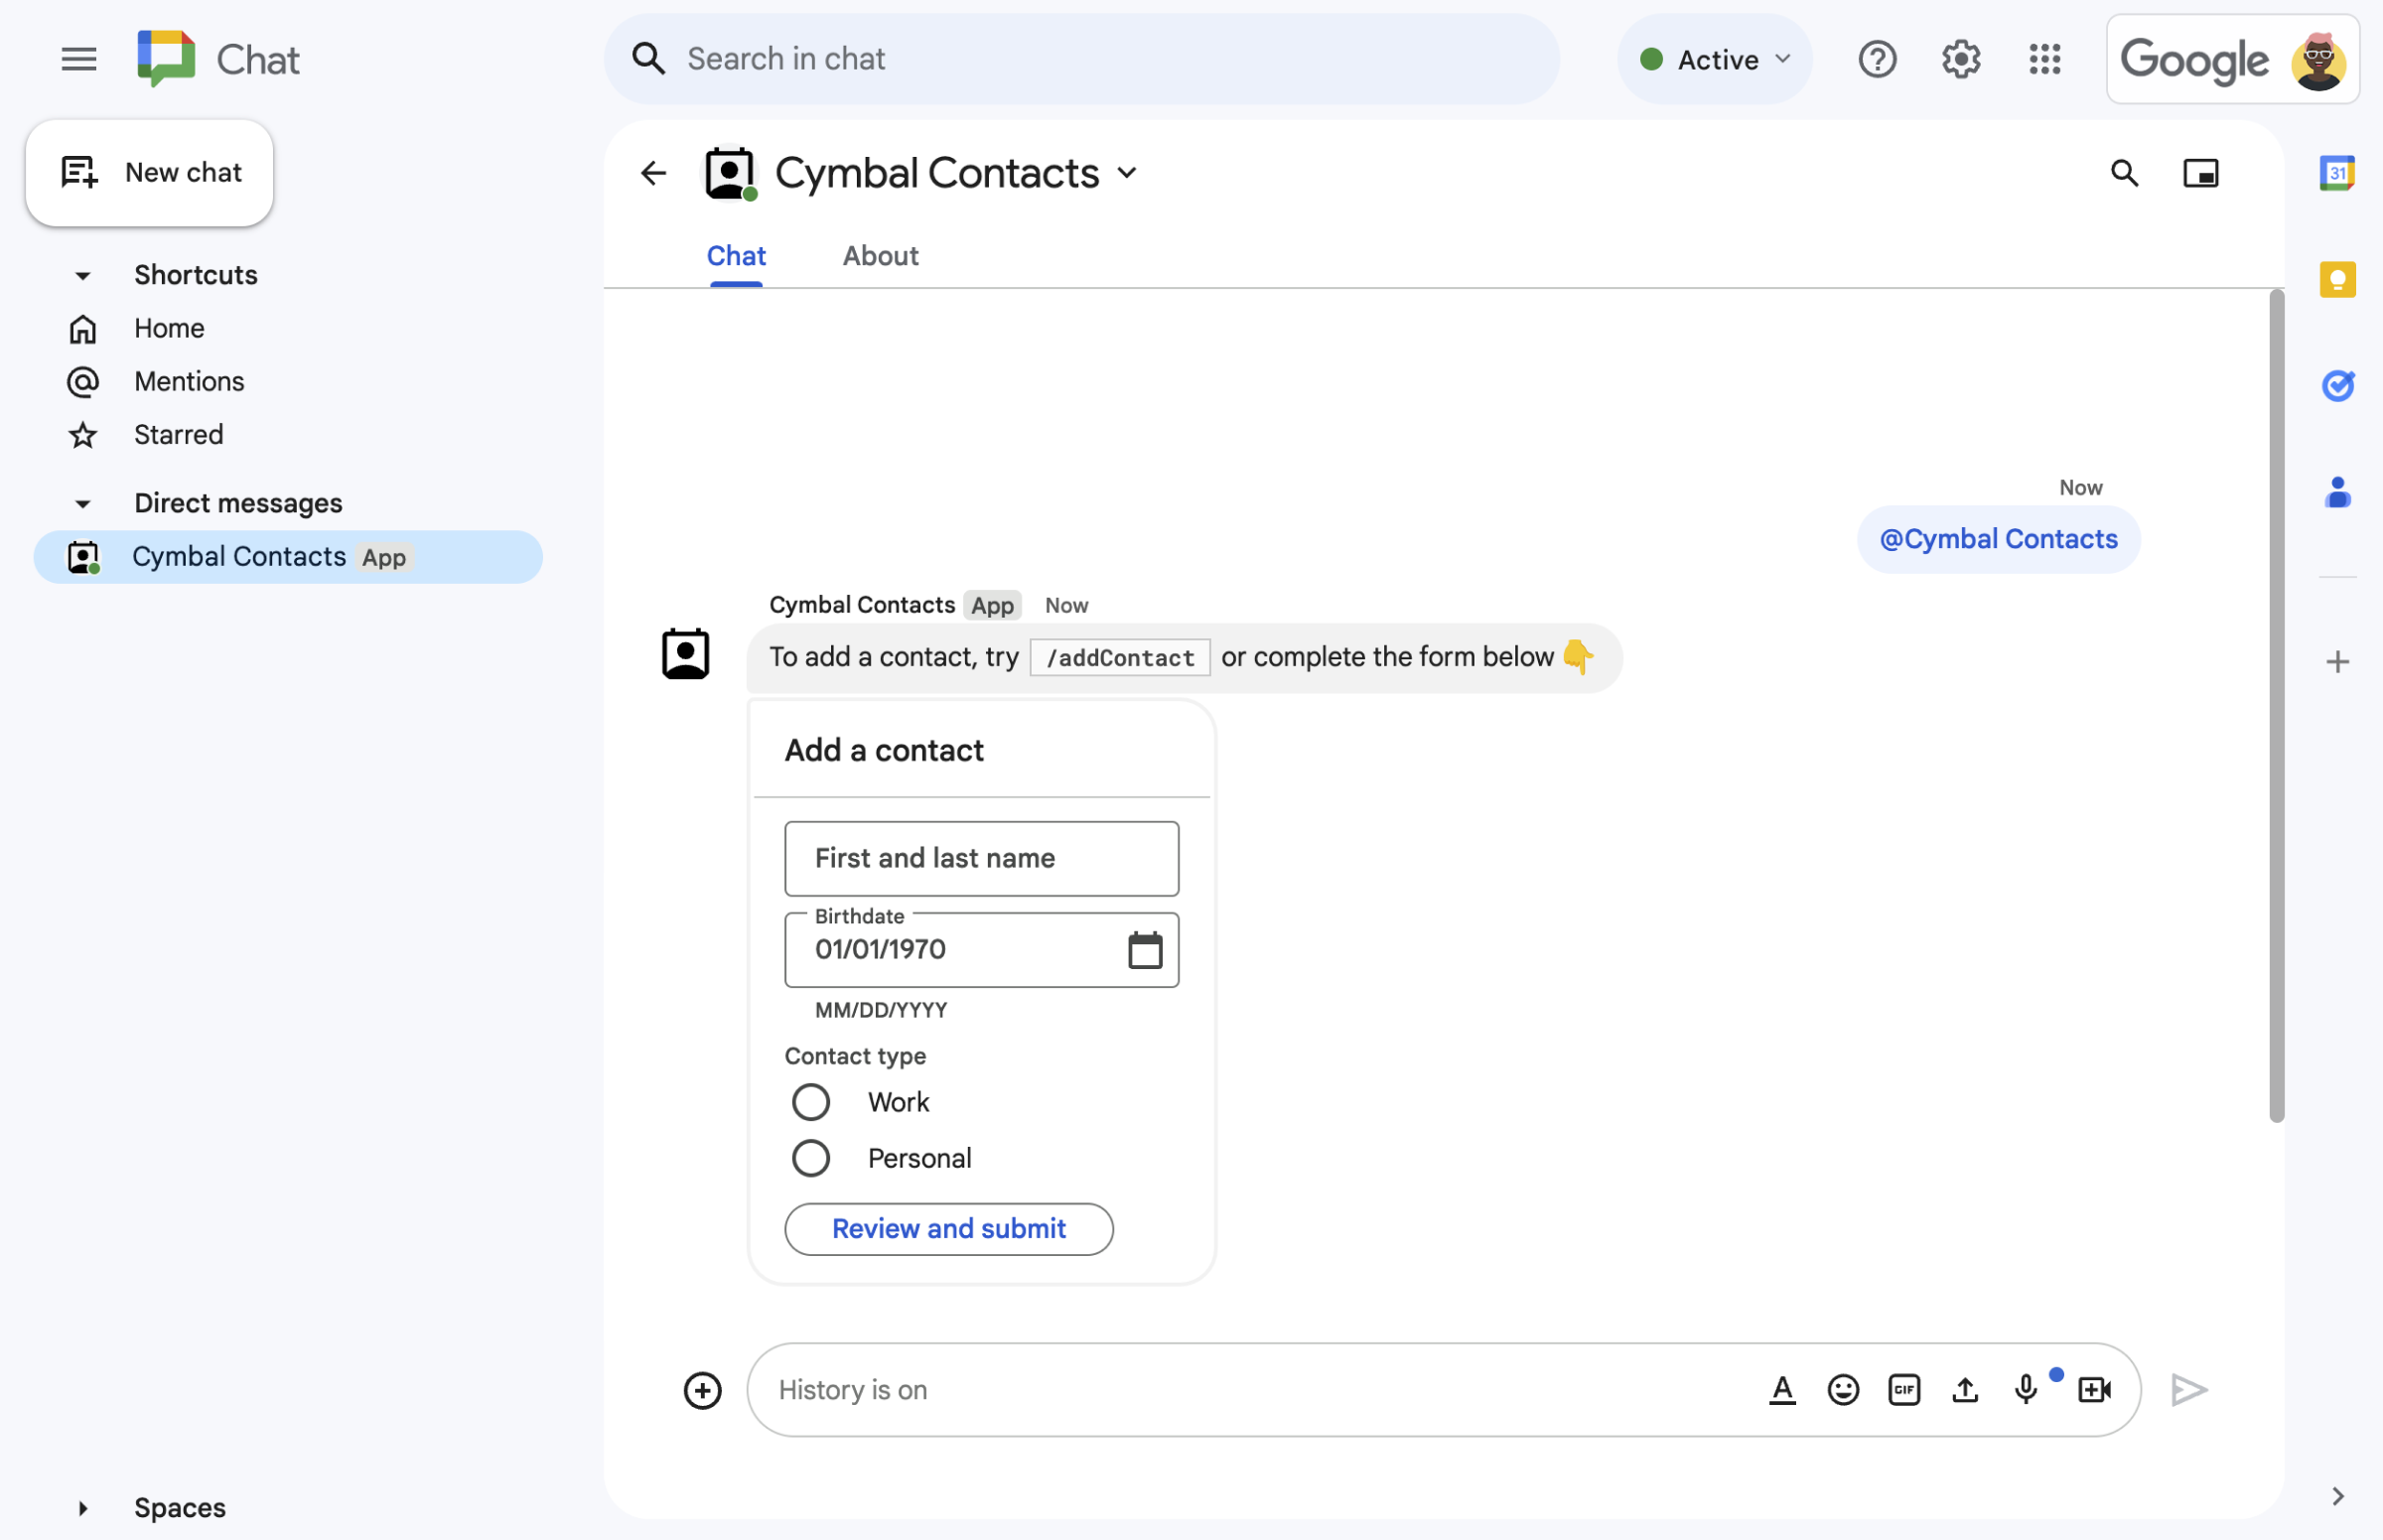
  • カード メッセージからのお問い合わせフォーム。
    図 5.「 Chat アプリは、ユーザーに連絡先を追加するよう求めるメッセージも表示する 。

前提条件

目標

アーキテクチャ

Chat アプリは組み込みの Google Apps Script を使用し、 インタラクションイベントを処理する ユーザーに返信する方法を学びました。

以下は、ユーザーが通常使用する Chat アプリ:

  1. ユーザーが Chat アプリでダイレクト メッセージを開いた場合、または 既存のスペースに Chat アプリが追加されます。

  2. Chat アプリは、Google Chat で連絡先を追加するように お問い合わせフォームを card 渡されます。お問い合わせフォームを表示するには、Chat 用アプリで 以下のようにユーザーに対応します。

    • 名前リンク付きメッセージとダイレクト メッセージに、次のカード メッセージで応答します。 問い合わせフォームが含まれています。
    • スラッシュ コマンド /addContact に応答して、連絡先フォームを含むダイアログを開きます。
    • スラッシュ コマンド /about に対して、次を含むテキスト メッセージで応答します。 ユーザーが [連絡先を追加] ボタンをクリックすると、ダイアログが開き、 お問い合わせフォーム
  3. お問い合わせフォームが表示されると、ユーザーは次のフィールドとウィジェットに連絡先情報を入力します。

    • 氏名: textInput 作成します。
    • 生年月日: dateTimePicker 日付のみを受け取るウィジェットも 用意されています
    • 連絡先の種類: selectionInput ユーザーが 1 つの文字列を選択して送信できるラジオボタンのウィジェット 値(Personal または Work のいずれか)を指定できます。
    • [確認して送信] ボタン: buttonList ユーザーがクリックして送信する button ウィジェットを含む配列 予測します。
  4. Google Chat アプリは CARD_CLICKED インタラクション イベントを処理して、ユーザーが入力した値を処理し、確認カードに値を表示します。

  5. ユーザーは確認カードを確認し、[送信] ボタンをクリックして連絡先情報を確定します。

  6. Google Chat アプリから、プライベートなテキスト メッセージが 送信を確定します

環境を準備する

このセクションでは、Google Cloud プロジェクトを作成して構成する方法について説明します。 Chat アプリ。

Google Cloud プロジェクトを作成する

Google Cloud コンソール

  1. Google Cloud コンソールで、メニュー に移動します。 > IAM と管理 > [プロジェクトを作成] をクリックします。

    [プロジェクトの作成] に移動

  2. [プロジェクト名] フィールドに、プロジェクト用のわかりやすい名前を入力します。

    省略可: プロジェクト ID を編集するには、[編集] をクリックします。プロジェクト ID は変更できません そのため、有効期間中にニーズを満たす ID を選択してください。 できます。

  3. [ロケーション] フィールドで [参照] をクリックして、プロジェクトの候補となるロケーションを表示します。[選択] をクリックします。 <ph type="x-smartling-placeholder">
  4. [作成] をクリックします。Google Cloud コンソールで [ダッシュボード] ページに移動し、プロジェクトが作成される 示されます

gcloud CLI

次のいずれかの開発環境で、Google Cloud コンソールに CLI(gcloud):

  • Cloud Shell: gcloud CLI でオンライン ターミナルを使用する Cloud Shell をアクティブにします。
    Cloud Shell をアクティブにする
  • ローカルシェル: ローカル開発環境を使用するには、 インストール初期化 使用できます。
    Cloud プロジェクトを作成するには、gcloud projects create コマンドを使用します。
    gcloud projects create PROJECT_ID
    作成するプロジェクトの ID を設定して、PROJECT_ID を置き換えます。

認証と権限付与の設定

Google Chat アプリでは、ユーザーが Google Chat などの Google Workspace アプリケーションでアプリを承認できるように、OAuth 同意画面を構成する必要があります。

このチュートリアルでは、テストと内部使用のみを目的とした Chat アプリをデプロイするため、同意画面にプレースホルダ情報を使用できます。Chat 用アプリを公開する前に、 実際の情報を含むプレースホルダの情報を除外します。

  1. Google Cloud コンソールで メニュー &gt; API とサービス &gt; OAuth 同意画面

    [OAuth 同意画面] に移動

  2. [ユーザーの種類] で [内部] を選択し、[作成] をクリックします。

  3. [アプリ名] に「Contact Manager」と入力します。

  4. [User support email] で、自分のメールアドレスまたは適切な できます。

  5. [デベロッパーの連絡先情報] にメールアドレスを入力します。

  6. [保存して次へ] をクリックします。

  7. [スコープ] ページで、[保存して次へ] をクリックします。(Chat アプリでは OAuth スコープは必要ありません)。

  8. 概要を確認し、[ダッシュボードに戻る] をクリックします。

Chat アプリを作成してデプロイする

次のセクションでは、Terraform Registry の 必要なアプリケーションをすべて含む Apps Script プロジェクト 作成されるため、コードをコピーして使用する必要はありません。 各ファイルを貼り付けます。

必要に応じて、GitHub でプロジェクト全体を確認できます。

GitHub で表示

各ファイルの概要は次のとおりです。

main.gs

ユーザーが Chat アプリにメッセージを送信したとき、Chat アプリのメッセージからボタンをクリックしたとき、ダイアログを開いたり閉じたりしたときのインタラクション イベントなど、すべてのアプリロジックを処理します。

main.gs コードを表示

apps-script/contact-form-app/main.gs
/**
 * Copyright 2024 Google Inc.
 *
 * Licensed under the Apache License, Version 2.0 (the "License");
 * you may not use this file except in compliance with the License.
 * You may obtain a copy of the License at
 *
 * http://www.apache.org/licenses/LICENSE-2.0
 *
 * Unless required by applicable law or agreed to in writing, software
 * distributed under the License is distributed on an "AS IS" BASIS,
 * WITHOUT WARRANTIES OR CONDITIONS OF ANY KIND, either express or implied.
 * See the License for the specific language governing permissions and
 * limitations under the License.
 */

/**
 * Responds to a MESSAGE interaction event in Google Chat.
 *
 * @param {Object} event the MESSAGE interaction event from Chat API.
 * @return {Object} message response that opens a dialog or sends private
 *                          message with text and card.
 */
function onMessage(event) {
  if (event.message.slashCommand) {
    switch (event.message.slashCommand.commandId) {
      case 1:
        // If the slash command is "/about", responds with a text message and button
        // that opens a dialog.
        return {
          text: "Manage your personal and business contacts 📇. To add a " +
                  "contact, use the slash command `/addContact`.",
          accessoryWidgets: [{ buttonList: { buttons: [{
            text: "Add Contact",
            onClick: { action: {
              function: "openDialog",
              interaction: "OPEN_DIALOG"
            }}
          }]}}]
        }
      case 2:
        // If the slash command is "/addContact", opens a dialog.
        return openDialog(event);
    }
  }

  // If user sends the Chat app a message without a slash command, the app responds
  // privately with a text and card to add a contact.
  return {
    privateMessageViewer: event.user,
    text: "To add a contact, try `/addContact` or complete the form below:",
    cardsV2: [{
      cardId: "addContactForm",
      card: {
        header: { title: "Add a contact" },
        sections:[{ widgets: CONTACT_FORM_WIDGETS.concat([{
          buttonList: { buttons: [{
            text: "Review and submit",
            onClick: { action: { function : "openNextCard" }}
          }]}
        }])}]
      }
    }]
  };
}

/**
 * Responds to CARD_CLICKED interaction events in Google Chat.
 *
 * @param {Object} event the CARD_CLICKED interaction event from Google Chat.
 * @return {Object} message responses specific to the dialog handling.
 */
function onCardClick(event) {
  // Initial dialog form page
  if (event.common.invokedFunction === "openDialog") {
    return openDialog(event);
  // Second dialog form page
  } else if (event.common.invokedFunction === "openNextCard") {
    return openNextCard(
      event.user,
      fetchFormValue(event, "contactName"),
      fetchFormValue(event, "contactBirthdate"),
      fetchFormValue(event, "contactType"),
      event.isDialogEvent
    );
  // Dialog form submission
  } else if (event.common.invokedFunction === "submitForm") {
    const userInputs = event.common.parameters;
    return submitForm(event.user, userInputs, event.dialogEventType);
  }
}

/**
 * Extracts form input value for a given widget.
 *
 * @param {Object} event the CARD_CLICKED interaction event from Google Chat.
 * @param {String} widgetName a unique ID for the widget, specified in the widget's name field.
 * @returns the value inputted by the user, null if no value can be found.
 */
function fetchFormValue(event, widgetName) {
  const formItem = event.common.formInputs[widgetName][""];
  // For widgets that receive StringInputs data, the value input by the user.
  if (formItem.hasOwnProperty("stringInputs")) {
    const stringInput = event.common.formInputs[widgetName][""].stringInputs.value[0];
    if (stringInput != null) {
      return stringInput;
    }
  // For widgets that receive dateInput data, the value input by the user.
  } else if (formItem.hasOwnProperty("dateInput")) {
    const dateInput = event.common.formInputs[widgetName][""].dateInput.msSinceEpoch;
     if (dateInput != null) {
       return dateInput;
     }
  }

  return null;
}

/**
 * Opens a dialog that prompts users to add details about a contact.
 *
 * @return {Object} a message with an action response to open a dialog.
 */
function openDialog() {
  return { actionResponse: {
    type: "DIALOG",
    dialogAction: { dialog: { body: { sections: [{
      header: "Add new contact",
      widgets: CONTACT_FORM_WIDGETS.concat([{
        buttonList: { buttons: [{
          text: "Review and submit",
          onClick: { action: { function: "openNextCard" }}
        }]}
      }])
    }]}}}
  }};
}

/**
 * Returns a dialog or card message that displays a confirmation of contact
 * details before users submit.
 *
 * @param {String} user the user who submitted the information.
 * @param {String} contactName the contact name from the previous dialog or card.
 * @param {String} contactBirthdate the birthdate from the previous dialog or card.
 * @param {String} contactType the contact type from the previous dialog or card.
 * @param {boolean} fromDialog whether the information was submitted from a dialog.
 *
 * @return {Object} returns a dialog or private card message.
 */
function openNextCard(user, contactName, contactBirthdate, contactType, fromDialog) {
  const name = contactName ?? "<i>Not provided</i>";
  const birthdate = contactBirthdate ?? "<i>Not provided</i>";
  const type = contactType ?? "<i>Not provided</i>";
  const cardConfirmation = {
    header: "Your contact",
    widgets: [{
      textParagraph: { text: "Confirm contact information and submit:" }}, {
      textParagraph: { text: "<b>Name:</b> " + name }}, {
      textParagraph: {
        text: "<b>Birthday:</b> " + convertMillisToDateString(birthdate)
      }}, {
      textParagraph: { text: "<b>Type:</b> " + type }}, {
      buttonList: { buttons: [{
        text: "Submit",
        onClick: { action: {
          function: "submitForm",
          parameters: [{
            key: "contactName", value: name }, {
            key: "contactBirthdate", value: birthdate }, {
            key: "contactType", value: type
          }]
        }}
      }]}
    }]
  };

  // Returns a dialog with contact information that the user input.
  if (fromDialog) {
    return { action_response: {
      type: "DIALOG",
      dialogAction: { dialog: { body: { sections: [ cardConfirmation ]}}}
    }};
  }

  // Updates existing card message with contact information that the user input.
  return {
    actionResponse: { type: "UPDATE_MESSAGE" },
    privateMessageViewer: user,
    cardsV2: [{
      card: { sections: [cardConfirmation]}
    }]
  }
}

/**
  * Submits information from a dialog or card message.
  *
  * @param {Object} user the person who submitted the information.
  * @param {Object} userInputs the form input values from event parameters.
  * @param {boolean} dialogEventType "SUBMIT_DIALOG" if from a dialog.
  * @return {Object} a message response that opens a dialog or posts a private
  *                  message.
  */
function submitForm(user, userInputs, dialogEventType) {
  const contactName = userInputs["contactName"];
  // Checks to make sure the user entered a contact name.
  // If no name value detected, returns an error message.
  if (!contactName) {
    const errorMessage = "Don't forget to name your new contact!";
    if (dialogEventType === "SUBMIT_DIALOG") {
      return { actionResponse: {
        type: "DIALOG",
        dialogAction: { actionStatus: {
          statusCode: "INVALID_ARGUMENT",
          userFacingMessage: errorMessage
        }}
      }};
    } else {
      return {
        privateMessageViewer: user,
        text: errorMessage
      };
    }
  }

  // The Chat app indicates that it received form data from the dialog or card.
  // Sends private text message that confirms submission.
  const confirmationMessage = "✅ " + contactName + " has been added to your contacts.";
  if (dialogEventType === "SUBMIT_DIALOG") {
    return {
      actionResponse: {
        type: "NEW_MESSAGE",
        dialogAction: { actionStatus: {
          statusCode: "OK",
          userFacingMessage: "Success " + JSON.stringify(contactName)
        }}
      },
      privateMessageViewer: user,
      text: confirmationMessage
    }
  } else {
    return {
      actionResponse: { type: "NEW_MESSAGE" },
      privateMessageViewer: user,
      text: confirmationMessage
    };
  }
}

/**
 * Converts date in milliseconds since epoch to user-friendly string.
 *
 * @param {Object} millis the milliseconds since epoch time.
 * @return {string} Display-friend date (English US).
 */
function convertMillisToDateString(millis) {
  const date = new Date(millis);
  const options = { year: 'numeric', month: 'long', day: 'numeric' };
  return date.toLocaleDateString('en-US', options);
}
contactForm.gs

ユーザーからフォームデータを受け取るウィジェットが含まれています。これらのフォーム入力は ウィジェットは、メッセージやダイアログ内のカードに表示されます。

contactForm.gs コードを表示

apps-script/contact-form-app/contactForm.gs
/**
 * Copyright 2024 Google Inc.
 *
 * Licensed under the Apache License, Version 2.0 (the "License");
 * you may not use this file except in compliance with the License.
 * You may obtain a copy of the License at
 *
 * http://www.apache.org/licenses/LICENSE-2.0
 *
 * Unless required by applicable law or agreed to in writing, software
 * distributed under the License is distributed on an "AS IS" BASIS,
 * WITHOUT WARRANTIES OR CONDITIONS OF ANY KIND, either express or implied.
 * See the License for the specific language governing permissions and
 * limitations under the License.
 */

/**
 * The section of the contact card that contains the form input widgets. Used in a dialog and card message.
 * To add and preview widgets, use the Card Builder: https://addons.gsuite.google.com/uikit/builder
 */
const CONTACT_FORM_WIDGETS = [
  {
    "textInput": {
      "name": "contactName",
      "label": "First and last name",
      "type": "SINGLE_LINE"
    }
  },
  {
    "dateTimePicker": {
      "name": "contactBirthdate",
      "label": "Birthdate",
      "type": "DATE_ONLY"
    }
  },
  {
    "selectionInput": {
      "name": "contactType",
      "label": "Contact type",
      "type": "RADIO_BUTTON",
      "items": [
        {
          "text": "Work",
          "value": "Work",
          "selected": false
        },
        {
          "text": "Personal",
          "value": "Personal",
          "selected": false
        }
      ]
    }
  }
];
appsscript.json

Apps Script マニフェスト アプリケーションの Apps Script プロジェクトを定義、構成する Chat アプリ。

appsscript.json コードを表示

apps-script/contact-form-app/appsscript.json
{
  "timeZone": "America/Los_Angeles",
  "dependencies": {},
  "exceptionLogging": "STACKDRIVER",
  "runtimeVersion": "V8",
  "chat": {}
}

Cloud プロジェクト番号と ID を確認する

  1. Google Cloud コンソールで、Cloud プロジェクトに移動します。

    Google Cloud コンソールに移動

  2. [設定とユーティリティ] をクリックします。 &gt; [プロジェクト設定]。

  3. [プロジェクト番号] フィールドと [プロジェクト ID] フィールドの値をメモします。これらは、次のセクションで使用します。

Apps Script プロジェクトを作成する

Apps Script プロジェクトを作成して、 Cloud プロジェクト:

  1. 次のボタンをクリックして、Apps Script プロジェクト「Manage contacts in Google Chat」を開きます。
    プロジェクトを開く
  2. [概要] をクリックします。
  3. 概要ページで コピーを作成するアイコン [コピーを作成] をクリックします。
  4. Apps Script プロジェクトのコピーに名前を付けます。

    1. [Google Chat での連絡先の管理のコピー] をクリックします。

    2. [プロジェクト タイトル] に「Contact Manager - Google Chat app」と入力します。

    3. [名前を変更] をクリックします。

Apps Script プロジェクトの Cloud プロジェクトを設定する

  1. Apps Script プロジェクトで、プロジェクト設定のアイコン [プロジェクトの設定] をクリックします。
  2. [Google Cloud Platform(GCP)プロジェクト] で、[プロジェクトを変更] をクリックします。
  3. [GCP プロジェクト番号] に、Cloud プロジェクトのプロジェクト番号を貼り付けます。
  4. [プロジェクトを設定] をクリックします。Cloud プロジェクトと Apps Script プロジェクトが接続されました。

Apps Script デプロイメントを作成する

すべてのコードが配置されたので、Apps Script をデプロイします。 できます。デプロイ ID は、Google Cloud で Chat アプリを構成するときに使用します。

  1. Apps Script で、Chat アプリのプロジェクトを開きます。

    Apps Script に移動

  2. [デプロイ] >新しいデプロイ

  3. [アドオン] がまだ選択されていない場合は、 [タイプを選択] でデプロイタイプ プロジェクト設定のアイコン をクリックし、[アドオン] を選択します。

  4. [説明] に、このバージョンの説明を入力します(例: Test of Contact Manager

  5. [デプロイ] をクリックします。Apps Script レポートが正常に作成されました Deployment ID を指定します。

  6. [コピー] をクリックしてデプロイ ID をコピーし、[完了] をクリックします。

Google Cloud コンソールで Chat 用アプリを構成する

このセクションでは、Google Cloud コンソールで Google Chat API を構成する方法について説明します。 Chat 用アプリに関する情報が表示されます。 Apps Script から作成したデプロイの ID できます。

  1. Google Cloud コンソールで、メニュー > [その他のプロダクト] > [Google Workspace] > [プロダクト ライブラリ] > [Google Chat API] > [管理] > [構成] をクリックします。

    Chat API の構成に移動

  2. [アプリ名] に「Contact Manager」と入力します。

  3. [アバターの URL] に「https://developers.google.com/chat/images/contact-icon.png」と入力します。

  4. [説明] に「Manage your personal and business contacts」と入力します。

  5. [インタラクティブ機能を有効にする] をクリックしてオンにします。

  6. [機能] で、[1:1 のメッセージを受信する] と [スペースとグループの会話に参加する] のチェックボックスをオンにします。

  7. [Connection settings] で [Apps Script] を選択します。

  8. [Deployment ID] に、前のセクションで Apps Script デプロイメントを作成するときにコピーした Apps Script デプロイ ID を貼り付けます。

  9. [スラッシュ コマンド] で、スラッシュ コマンド /about/addContact:

    1. [スラッシュ コマンドを追加] をクリックして、最初のスラッシュ コマンドを設定します。
    2. [名前] に「/about」と入力します。
    3. [コマンド ID] に「1」と入力します。
    4. [説明] に「Learn how to use this Chat app to manage your contacts」と入力します。
    5. [ダイアログを開く] を選択します。
    6. [完了] をクリックします。
    7. [スラッシュ コマンドを追加] をクリックして、別のスラッシュ コマンドを設定します。
    8. [名前] に「/addContact」と入力します。
    9. [コマンド ID] に「2」と入力します。
    10. [説明] に次のように入力します。 Submit information about a contact
    11. [ダイアログを開く] を選択します。
    12. [完了] をクリックします。
  10. [公開設定] で、 [YOUR DOMAIN 内の特定のユーザーやグループにこの Chat 用アプリの利用を許可する] チェックボックスをオンにして、メールアドレスを入力します。

  11. [ログ] で、[エラーを Logging にロギング] を選択します。

  12. [保存] をクリックします。構成が保存されたことを示すメッセージが表示されます。

Chat アプリをインストールして Chat でテストする準備が整いました。

Chat アプリをテストする

Chat 用アプリをテストするには、スペースを開いてダイレクト メッセージ スペースを開き、 メッセージを送信します。

  1. 信頼できるテスターとして自分自身を追加したときに指定した Google Workspace アカウントを使用して Google Chat を開きます。

    Google Chat に移動

  2. [ チャットを新規作成] をクリックします。
  3. [1 人以上のユーザーを追加] フィールドに、招待する Chat アプリ。
  4. 検索結果から Chat アプリを選択します。ダイレクト メッセージが開きます。

  1. Chat 用アプリの新しいダイレクト メッセージで、 「/addContact」と入力して Enter キーを押します。

  2. 表示されたダイアログで、連絡先情報を入力します。

    1. [名前] テキスト フィールドに名前を入力します。
    2. [生年月日] 日付選択ツールで日付を選択します。
    3. [Contact type] で、[Work] または [Personal] のラジオボタンを選択します。
  3. [確認して送信] をクリックします。

  4. 確認ダイアログで、送信した情報を確認し、 [送信] をクリックします。Chat アプリからテキスト メッセージが返されます。 次のようなメッセージが表示されます。 CONTACT NAME has been added to your contacts.

  5. 必要に応じて、次の URL のお問い合わせフォームをテストして送信することもできます。 方法:

    • /about スラッシュ コマンドを使用します。Chat アプリの返信 というテキスト メッセージと、 Add a contact。ボタンをクリックすると お問い合わせフォーム
    • Chat アプリにダイレクト メッセージを スラッシュ コマンド(Hello など)。Chat アプリ フォームを含むテキストとカードで返信する。

クリーンアップ

サービス アカウントに対する Google Cloud アカウントへの課金を回避するために、 リソースがある場合は、その Terraform Registry に できます。

  1. Google Cloud コンソールで、[リソースの管理] ページに移動します。メニュー > [IAM と管理] > [リソースを管理] をクリックします。

    <ph type="x-smartling-placeholder"></ph> Resource Manager に移動

  2. プロジェクト リストで、削除するプロジェクトを選択し、[削除] をクリックします。
  3. ダイアログでプロジェクト ID を入力し、[シャットダウン] をクリックして削除します。 できます。