Оптимизируйте свои подборки
Сохраняйте и классифицируйте контент в соответствии со своими настройками.
На этой странице показано, как создать задачу в Google Issue Tracker.
Чтобы создать задачу, необходимо войти в учётную запись Google. Также необходимо иметь разрешение«Создавать задачи» или «Администрировать компоненты» для компонента, в котором будет создана задача. Если у вас есть разрешение «Комментировать задачи» , вы можете указать только название и описание задачи. Если у вас есть разрешение «Редактировать задачи» , вы можете указать другие поля.
Шаблоны
Шаблоны в Google Issue Tracker задают значения по умолчанию для полей в новых задачах компонента . Каждый компонент имеет шаблон по умолчанию, но может иметь дополнительные шаблоны, настроенные сотрудником Google, ответственным за управление компонентом. Публичные пользователи и партнеры не могут создавать или изменять шаблоны, связанные с компонентом.
Выберите шаблон
При создании задачи в системе отслеживания задач автоматически выбирается шаблон компонента по умолчанию. Если доступны дополнительные шаблоны, вы можете выбрать их в раскрывающемся списке «Шаблон» на странице «Создать задачу» .
При выборе шаблона поля на странице автоматически заполняются значениями по умолчанию.
В трекере задач открывается страница «Создать задачу» с выбранным полем «Компонент» . В этом поле отображается раскрывающийся список компонентов.
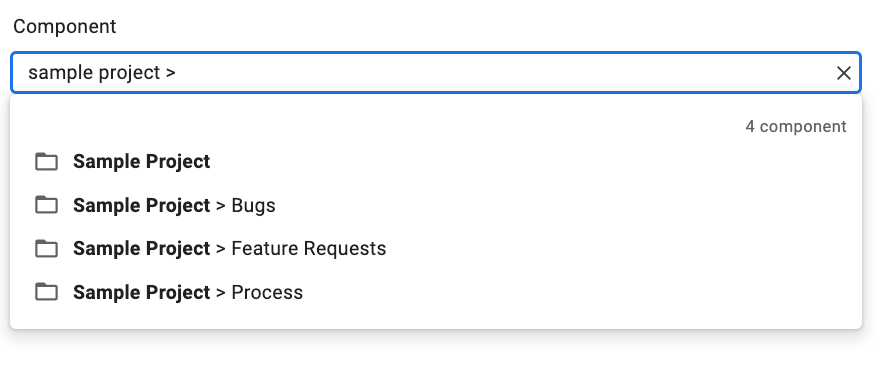
Используйте раскрывающийся список, чтобы найти компонент , для которого вы хотите создать задачу. Вы можете найти только те компоненты, для которых у вас есть разрешение «Создавать задачи» или «Администрировать компоненты» .
(Необязательно) Выберите шаблон , который лучше всего подходит для решения проблемы, о которой вы сообщаете. Для некоторых компонентов предусмотрен только шаблон по умолчанию.
Введите заголовок в поле «Заголовок» . Заголовок будет отображаться при просмотре сведений о проблеме, а также в результатах поиска, хотлистах и других местах, где вы просматриваете списки проблем.
Выберите приоритет в раскрывающемся списке «Приоритет» . Поле «Приоритет» отображается только при наличии разрешения на редактирование задач .
Выберите тип проблемы в раскрывающемся списке «Тип» . Поле «Тип» отображается только при наличии разрешения на редактирование проблем .
(Необязательно) Назначьте ответственного или добавьте адреса электронной почты (включая адреса рассылки) в списки «Соавторы» и «Копия» . Эти поля видны только при наличии разрешения на редактирование задач .
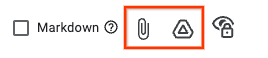
(Рекомендуется) Введите описание проблемы в поле «Описание» . Это поле может быть уже частично заполнено, если текст описания предоставлен выбранным шаблоном. Вы также можете установить флажок «Markdown» , чтобы написать описание в формате Markdown .
(Необязательно) Добавьте вложения со своего компьютера или из папки на Диске.
(Необязательно) Заполните дополнительные поля для описания проблемы.
Вы можете просматривать эти поля, открыв панель «Дополнительные поля» . Панель «Дополнительные поля» отображается только при наличии разрешения «Редактировать задачи» . В большинстве случаев при создании задачи можно пропустить расширенные поля. Однако некоторые компоненты требуют ввода значений. В этом случае раздел «Дополнительные поля» отображается автоматически, а обязательные поля отмечены звёздочкой (*).
Нажмите кнопку «Создать» , чтобы отправить сообщение о проблеме, или нажмите «Создать и начать еще одну» , чтобы отправить сообщение о проблеме и открыть новую страницу «Создать проблему», предварительно заполненную значениями, использованными для только что созданной вами проблемы.
Создать проблему на основе существующей
Вы также можете создать задачу на основе существующей. Этот метод сэкономит вам время, поскольку вы можете использовать существующую задачу для предварительного заполнения некоторых полей.
Чтобы создать проблему на основе существующей:
Откройте существующую проблему.
Нажмите кнопку рядом с надписью Создать .
Выберите способ создания новой проблемы из раскрывающегося списка. Варианты в раскрывающемся списке зависят от просматриваемой страницы. Кнопка становится видимой только при наличии хотя бы одного варианта.
Возможны 7 вариантов.
Вариант
Описание
Появляется, когда
В том же компоненте
Начинает новую проблему с компонентом, установленным на текущий компонент.
(1) Управление компонентом, (2) Просмотр проблем в компоненте, (3) Просмотр проблемы
Похоже на текущий выпуск
Начинает новый выпуск, копируя в него поля текущего выпуска.
Просмотр выпуска
Заблокировано текущей проблемой
Начинает новую проблему, при этом текущая проблема становится блокирующей.
Просмотр выпуска
Блокирование текущей проблемы
Начинает новую проблему, при этом текущая проблема заблокирована.
Просмотр выпуска
Родитель текущего выпуска
Начинает новый выпуск, при этом текущий выпуск становится дочерним.
Просмотр выпуска
Ребенок текущего выпуска
Начинает новый выпуск, используя текущий выпуск в качестве родительского.
Просмотр выпуска
В том же списке
Начинает новый выпуск с добавлением в него текущего избранного.
(1) Управление горячим списком, (2) Просмотр проблем в горячем списке
Java – это зарегистрированный товарный знак корпорации Oracle и ее аффилированных лиц.
Последнее обновление: 2025-09-08 UTC.
[[["Прост для понимания","easyToUnderstand","thumb-up"],["Помог мне решить мою проблему","solvedMyProblem","thumb-up"],["Другое","otherUp","thumb-up"]],[["Отсутствует нужная мне информация","missingTheInformationINeed","thumb-down"],["Слишком сложен/слишком много шагов","tooComplicatedTooManySteps","thumb-down"],["Устарел","outOfDate","thumb-down"],["Проблема с переводом текста","translationIssue","thumb-down"],["Проблемы образцов/кода","samplesCodeIssue","thumb-down"],["Другое","otherDown","thumb-down"]],["Последнее обновление: 2025-09-08 UTC."],[[["\u003cp\u003eIssue creation in Google Issue Tracker requires a Google account and specific permissions (Create Issue, Admin, Comment on Issues, or Edit Issues) depending on the desired actions.\u003c/p\u003e\n"],["\u003cp\u003eTemplates, defined by Google employees, provide default field values for new issues within a component and can be selected during issue creation to streamline the process.\u003c/p\u003e\n"],["\u003cp\u003eThe process of creating an issue involves selecting a component, entering details such as title, priority, type, and description, and optionally adding attachments and configuring advanced fields.\u003c/p\u003e\n"],["\u003cp\u003eIssue Tracker provides options to create new issues based on existing ones, leveraging information like component, hotlist, or even copying field values for efficiency.\u003c/p\u003e\n"],["\u003cp\u003eUsers can explore further information regarding issues, components, and managing issues through provided links.\u003c/p\u003e\n"]]],[],null,["This page shows how to create an [issue](../concepts/issues) in Google Issue\nTracker.\n\nTo create an issue, you must be signed in to a Google Account. You also must\nhave **Create Issues** or **Admin Components**\n[permission](../concepts/access-control) for the component where the issue will\nbe created. If you have **Comment on Issues** permission, you may set the issue\ntitle and description only. If you have **Edit Issues** permission, you can set\nother fields.\n\nTemplates\n\nTemplates in Google Issue Tracker specify default values for fields in new\nissues in a [component](../concepts/components). Each component has a default\ntemplate but may have additional templates as configured by the Google employee\nwho is responsible for managing it. Public and partner users cannot create or\nmodify the templates associated with a component.\n\nChoose a template\n\nWhen you [create an issue](../guides/create-issue-ui) in Issue Tracker, the\ndefault template for the component is automatically selected. If additional\ntemplates are available, you can select them from the **Template** drop-down\nlist on the **Create Issue** page.\n\nWhen you select a template, the fields in the page are automatically populated\nwith the default values defined.\n\nCreate an issue\n\nTo create an issue:\n\n1. [Open Issue Tracker](../guides/access-ui) in your web browser.\n\n2. Click **Create Issue**.\n\n Issue Tracker opens the **Create Issue** page and has the **Component**\n field selected. This field shows a drop-down list of components.\n\n3. Use the drop-down list to [find the component](/issue-tracker/guides/find-a-component) where you want to create\n the issue. You can only find components where you have **Create Issues** or\n **Admin Components** permission.\n\n4. (Optional) Choose a [template](../concepts/templates) that best applies to\n the issue you are reporting. Some components only have a default template.\n\n5. Enter a [title](../references/glossary-of-fields#title) in the **Title** field. The title is displayed when you\n view the details of the issue, as well as in search results, hotlists and\n other places where you are viewing lists of issues.\n\n6. Select a [priority](../references/glossary-of-fields#priority) from the **Priority** drop-down list. The\n **Priority** field is only visible if you have **Edit Issues** permission.\n\n7. Select the issue [type](../references/glossary-of-fields#type) from the **Type** drop-down list. The **Type**\n field is only visible if you have **Edit Issues** permission.\n\n8. (Optional) Designate an [assignee](../references/glossary-of-fields#assignee) or add email addresses (including\n mailing list addresses) to the [Collaborators](../references/glossary-of-fields#collaborators) and [CC](../references/glossary-of-fields#cc) lists. These\n fields are only visible if you have **Edit Issues** permission.\n\n | Depending on your [email notification settings](/issue-tracker/guides/set-notification-preferences), you might need to add yourself to the CC list to receive notifications.\n9. (Recommended) Enter a [description](../references/glossary-of-fields#description) for the issue in the **Description**\n field. This field might already be partially populated for you if\n description text is provided by the selected template. You can also check\n the **Markdown** option to write the description as\n [markdown](https://commonmark.org) text.\n\n10. (Optional) Add attachments from your computer or from a Drive location.\n\n11. (Optional) Fill in the advanced fields for the issue.\n\n You can view these fields by toggling the **Advanced fields** panel. The\n **Advanced fields** panel is only visible if you have **Edit Issues**\n permission. In most cases, you can skip advanced fields when creating an\n issue. However, some components require you to enter values for them. If\n this is the case, the **Advanced fields** section appears automatically, and\n the required fields are marked with an asterisk (\\*).\n\n12. Click the **Create** button to submit the issue or click **Create \\& Start\n Another** to submit the issue and open a new **Create Issue** page\n pre-populated with the values used for the issue you just created.\n\n| Hover over the name of a field in the Create Issue page to view a field description.\n\nCreate an issue based on an existing one\n\nYou can also create an issue based on an existing one. This method can save you\ntime by using the existing issue to pre-fill certain fields.\n\nTo create an issue based on an existing one:\n\n1. Open the existing issue.\n\n2. Click the button next to **Create**.\n\n3. Choose how you want to create the new issue from the drop-down list. The\n options in the drop-down list vary depending on the page that you are\n viewing. The button only becomes visible if there is at least one option\n available.\n\nThere are 7 possible options.\n\n| Option | Description | Appears when |\n|------------------------------|----------------------------------------------------------------------------------|-----------------------------------------------------------------------------------|\n| **In Same Component** | Starts a new issue with component set to the current component. | (1) Managing a component, (2) Viewing issues in a component, (3) Viewing an issue |\n| **Similar To Current Issue** | Starts a new issue with the fields of the current issue copied to the new issue. | Viewing an issue |\n| **Blocked By Current Issue** | Starts a new issue with the current issue as a blocking issue. | Viewing an issue |\n| **Blocking Current Issue** | Starts a new issue with the current issue as a blocked issue. | Viewing an issue |\n| **Parent Of Current Issue** | Starts a new issue with the current issue as a child issue. | Viewing an issue |\n| **Child Of Current Issue** | Starts a new issue with the current issue as a parent issue. | Viewing an issue |\n| **In Same Hotlist** | Starts a new issue with the current hotlist added to it. | (1) Managing a hotlist, (2) Viewing issues under a hotlist |\n\n| The **Similar To Current Issue** option does not copy the changelist, duplicate issue ID, CC or reporter fields from the original issue.\n\nWhat's next\n\n- [Learn more about issues](../concepts/issues)\n- [Learn more about components](../concepts/components)\n- [View and edit issues](/issue-tracker/guides/edit-issue-ui)"]]