Page Summary
-
Passkey authentication involves defining options, sending them to the client, receiving an authentication assertion, verifying it, and signing in the user.
-
The challenge is a random byte array used to prevent replay attacks and must be unique for each sign-in attempt, cryptographically secure, and saved in the user's session.
-
Server-side libraries like SimpleWebAuthn can simplify the creation of credential request options and the verification of authentication responses.
-
Credential request options, dynamically defined on the server, include the RP ID, challenge, allowed credentials, user verification requirement, and timeout.
-
Verification of the authentication response involves ensuring the RP ID and origin match, checking that the challenge was provided by the device, verifying required user presence/verification flags, and confirming the signature using the public key and signed data.
Overview
Here's a high-level overview of the key steps involved in passkey authentication:
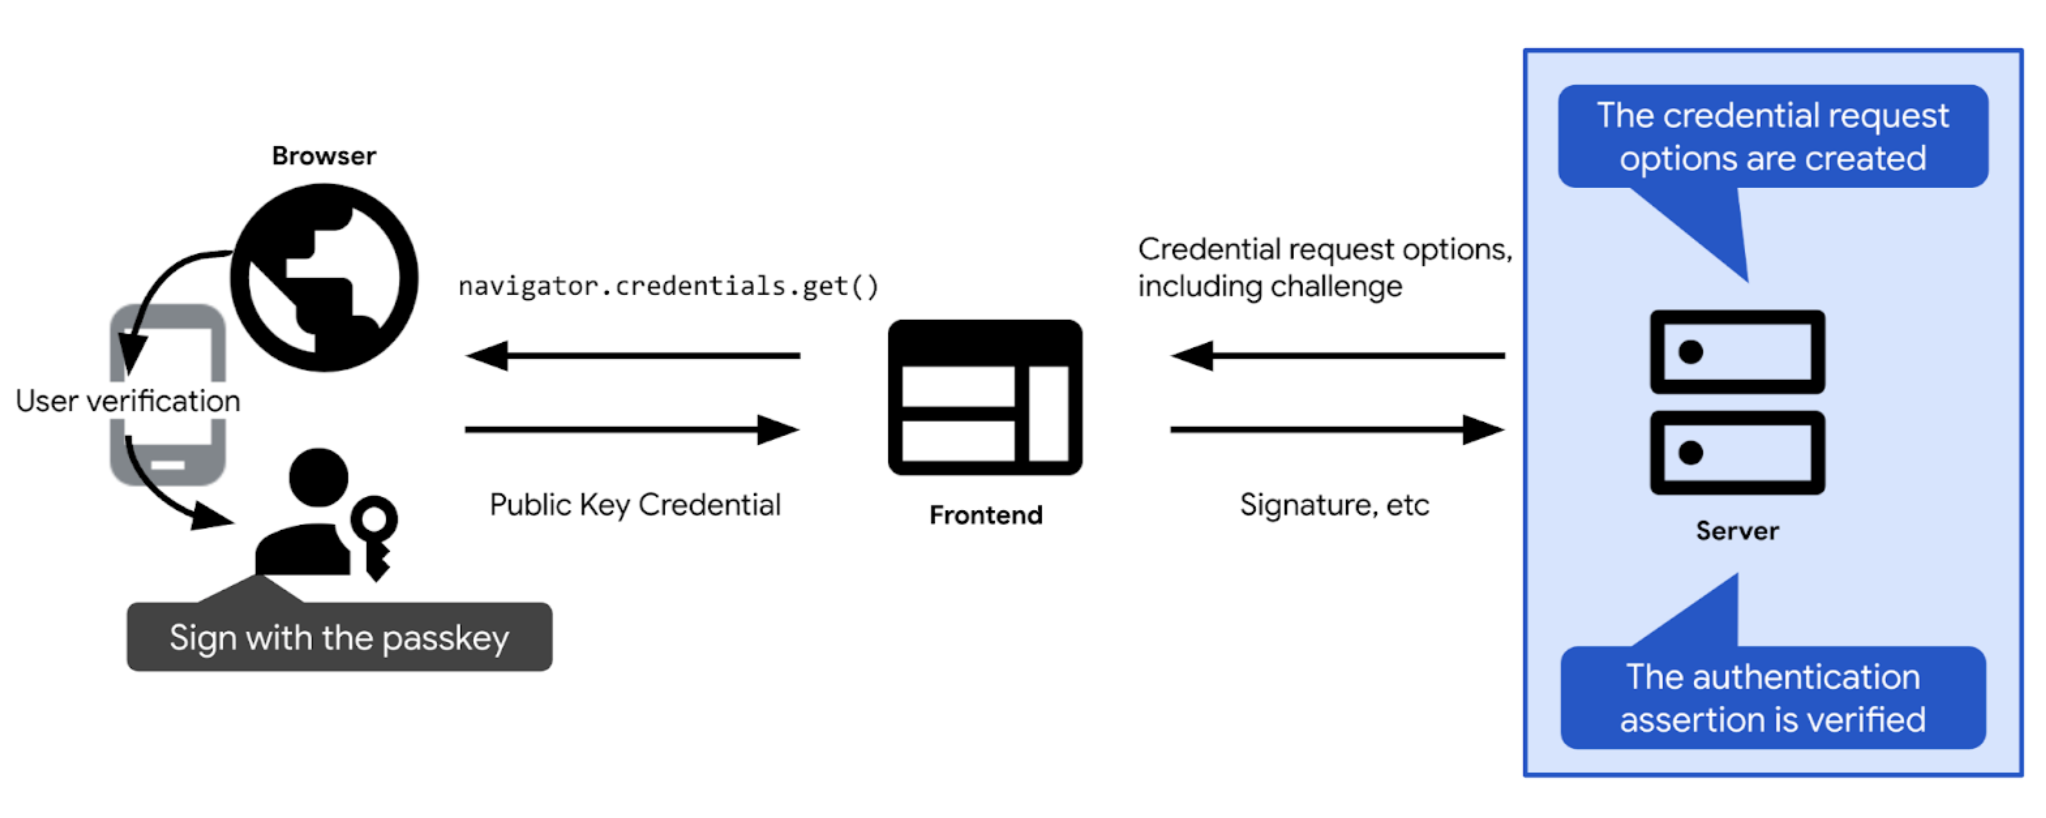
- Define the challenge and other options needed to authenticate with a passkey. Send them to the client, so you can pass them to your passkey authentication call (
navigator.credentials.geton the web). After the user confirms passkey authentication, the passkey authentication call is resolved and returns a credential (PublicKeyCredential). The credential contains an authentication assertion.
- Verify the authentication assertion.
- If the authentication assertion is valid, authenticate the user.
The following sections dive into the specifics of each step.
Create the challenge
In practice, a challenge is an array of random bytes, represented as an ArrayBuffer object.
// Example challenge, base64URL-encoded
weMLPOSx1VfSnMV6uPwDKbjGdKRMaUDGxeDEUTT5VN8
To ensure the challenge fulfills its purpose, you must:
- Ensure the same challenge is never used more than once. Generate a new challenge on every sign-in attempt. Discard the challenge after every sign-in attempt, whether it succeeded or failed. Discard the challenge after a certain duration as well. Never accept the same challenge in a response more than once.
- Ensure the challenge is cryptographically secure. A challenge should be practically impossible to guess. To create a cryptographically secure challenge server-side, it's best to rely on a FIDO server-side library you trust. If you create your own challenges instead, use the built-in cryptographic functionality available in your tech stack, or look for libraries that are designed for cryptographic use cases. Examples include iso-crypto in Node.js, or secrets in Python. Per the specification, the challenge must be at least 16 bytes long in order to be considered secure.
Once you've created a challenge, save it in the user's session to verify it later.
Create credential request options
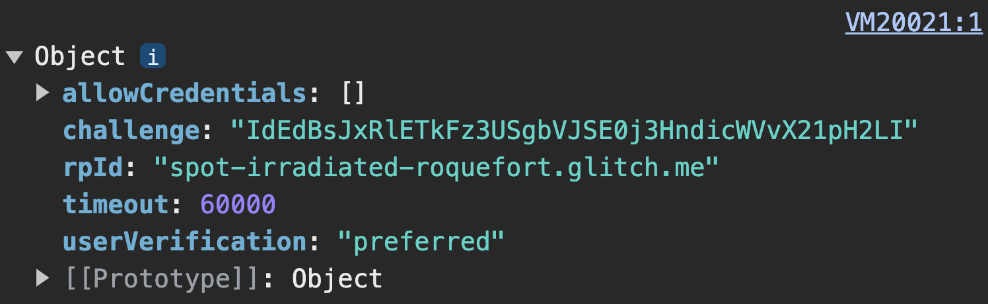
Create credential request options as a publicKeyCredentialRequestOptions object.
To do so, rely on your FIDO server-side library. It will typically offer a utility function that can create these options for you. SimpleWebAuthn offers, for example, generateAuthenticationOptions.
publicKeyCredentialRequestOptions should contain all the information needed for passkey authentication. Pass this information to the function in your FIDO server-side library that's responsible for creating the publicKeyCredentialRequestOptions object.
Some of publicKeyCredentialRequestOptions' fields can be constants. Others should be dynamically defined on the server:
rpId: Which RP ID you expect the credential to be associated with, for exampleexample.com. Authentication will only succeed if the RP ID you provide here matches the RP ID associated with the credential. To populate RP ID, use the same value as the RP ID you set inpublicKeyCredentialCreationOptionsduring credential registration.challenge: A piece of data that the passkey provider will sign to prove the user holds the passkey at the time of the authentication request. Review details in Create the challenge.allowCredentials: An array of acceptable credentials for this authentication. Pass an empty array to let the user select an available passkey from a list shown by the browser. Review Fetch a challenge from the RP server and Discoverable credentials deep dive for details.userVerification: Indicates whether user verification using the device screen lock is "required", "preferred" or "discouraged". Review Fetch a challenge from the RP server.timeout: How long (in milliseconds) the user can take to complete authentication. It should be reasonably generous, and shorter than the lifetime of thechallenge. The recommended default value is 5 minutes, but you can increase it — up to 10 minutes, which is still within the recommended range. Long timeouts make sense if you expect users to use the hybrid workflow, which typically takes a bit longer. If the operation times out, aNotAllowedErrorwill be thrown.
Once you've created publicKeyCredentialRequestOptions, send it to the client.
challenge decoding happens client-side.Example code: create credential request options
We're using the SimpleWebAuthn library in our examples. Here, we hand over the creation of credential request options to its generateAuthenticationOptions function.
import {
  generateRegistrationOptions,
  verifyRegistrationResponse,
  generateAuthenticationOptions,
  verifyAuthenticationResponse
} from '@simplewebauthn/server';

router.post('/signinRequest', csrfCheck, async (req, res) => {

  // Ensure you nest calls in try/catch blocks.
  // If something fails, throw an error with a descriptive error message.
  // Return that message with an appropriate error code to the client.
  try {
    // Use the generateAuthenticationOptions function from SimpleWebAuthn
    const options = await generateAuthenticationOptions({
      rpID: process.env.HOSTNAME,
      allowCredentials: [],
    });
    // Save the challenge in the user session
    req.session.challenge = options.challenge;

    return res.json(options);
  } catch (e) {
    console.error(e);
    return res.status(400).json({ error: e.message });
  }
});
Verify and sign in the user
When navigator.credentials.get resolves successfully on the client, it returns a PublicKeyCredential object.
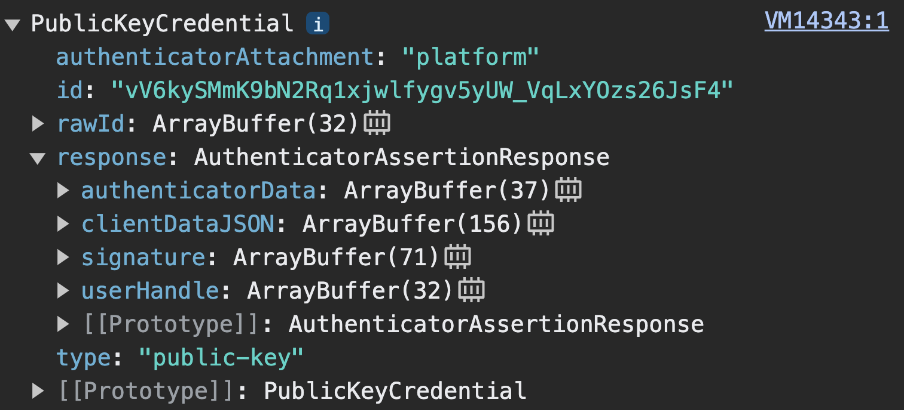
navigator.credentials.get returns a PublicKeyCredential.The response is an AuthenticatorAssertionResponse. It represents the passkey provider's response to the client's instruction to create what's needed to try and authenticate with a passkey on the RP. It contains:
response.authenticatorDataandresponse.clientDataJSON, like at the passkey registration step.response.signaturewhich contains a signature over these values.
Send the PublicKeyCredential object to the server.
On the server, do the following:
- Gather information you'll need to verify the assertion and authenticate the user:
- Get the expected challenge you stored in the session when you generated the authentication options.
- Get the expected origin and RP ID.
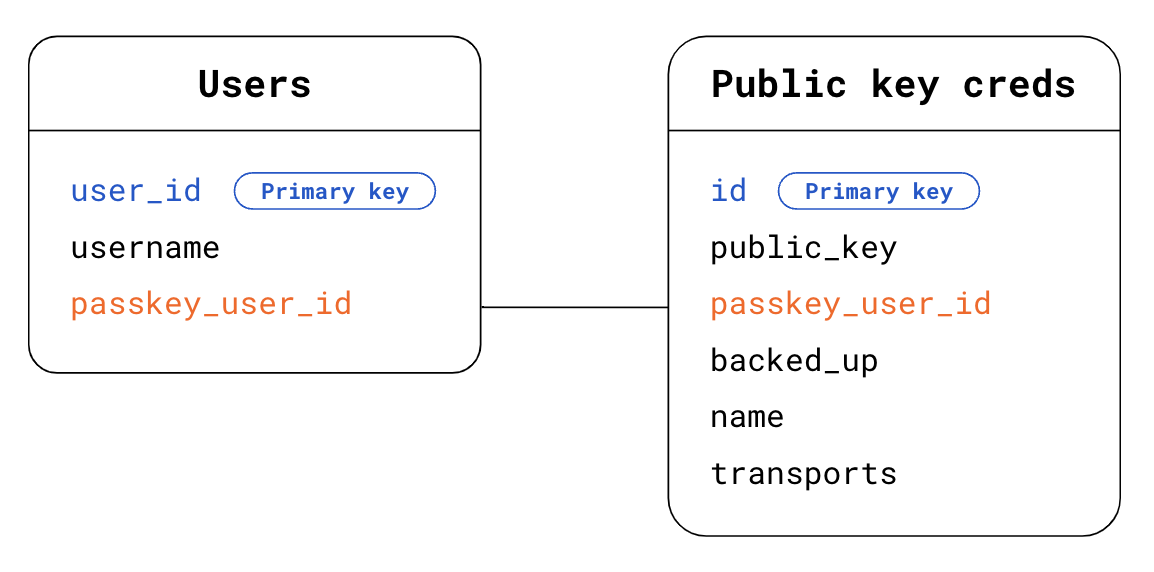
- Find in your database who the user is. In the case of discoverable credentials, you don't know who is the user making an authentication request. To find out, you have two options:
- Option 1: Use the
response.userHandlein thePublicKeyCredentialobject. In the Users table, look for thepasskey_user_idthat matchesuserHandle. - Option 2: Use the credential
idpresent in thePublicKeyCredentialobject. In the Public key credentials table, look for the credentialidthat matches the credentialidpresent in thePublicKeyCredentialobject. Then look for the corresponding user using the foreign keypasskey_user_idto your Users table.
- Option 1: Use the
- Find in your database the public key credential information that matches the authentication assertion you've received. To do so, in the Public key credentials table, look for the credential
idthat matches the credentialidpresent in thePublicKeyCredentialobject.
Verify the authentication assertion. Hand over this verification step to your FIDO server-side library, which will typically offer a utility function for this purpose. SimpleWebAuthn offers, for example,
verifyAuthenticationResponse. Learn what's happening under the hood in Appendix: verification of the authentication response.Delete the challenge whether verification is successful or not, to prevent replay attacks.
Sign in the user. If the verification was successful, update session information to mark the user as signed-in. You may also want to return a
userobject to the client, so the frontend can use information associated with the newly signed-in user.
Example code: verify and sign in the user
We're using the SimpleWebAuthn library in our examples. Here, we hand over verification of the authentication response to its verifyAuthenticationResponse function.
import {
  generateRegistrationOptions,
  verifyRegistrationResponse,
  generateAuthenticationOptions,
  verifyAuthenticationResponse
} from '@simplewebauthn/server';
import { isoBase64URL } from '@simplewebauthn/server/helpers';

router.post('/signinResponse', csrfCheck, async (req, res) => {
  const response = req.body;
  const expectedChallenge = req.session.challenge;
  const expectedOrigin = getOrigin(req.get('User-Agent'));
  const expectedRPID = process.env.HOSTNAME;

  // Ensure you nest verification function calls in try/catch blocks.
  // If something fails, throw an error with a descriptive error message.
  // Return that message with an appropriate error code to the client.
  try {
    // Find the credential stored to the database by the credential ID
    const cred = Credentials.findById(response.id);
    if (!cred) {
      throw new Error('Credential not found.');
    }
    // Find the user - Here alternatively we could look up the user directly
    // in the Users table via userHandle
    const user = Users.findByPasskeyUserId(cred.passkey_user_id);
    if (!user) {
      throw new Error('User not found.');
    }
    // Base64URL decode some values
    const authenticator = {
      credentialPublicKey: isoBase64URL.toBuffer(cred.publicKey),
      credentialID: isoBase64URL.toBuffer(cred.id),
      transports: cred.transports,
    };

    // Verify the credential
    const { verified, authenticationInfo } = await verifyAuthenticationResponse({
      response,
      expectedChallenge,
      expectedOrigin,
      expectedRPID,
      authenticator,
      requireUserVerification: false,
    });

    if (!verified) {
      throw new Error('User verification failed.');
    }

    // Kill the challenge for this session.
    delete req.session.challenge;

    req.session.username = user.username;
    req.session['signed-in'] = 'yes';

    return res.json(user);
  } catch (e) {
    delete req.session.challenge;

    console.error(e);
    return res.status(400).json({ error: e.message });
  }
});
Appendix: verification of the authentication response
Verifying the authentication response consists of the following checks:
- Ensure that the RP ID matches your site.
- Ensure that the request's origin matches your site's sign-in origin. For Android apps, review Verify origin.
- Check that the device was able to provide the challenge you gave it.
- Verify that during authentication, the user has followed the requirements you mandate as an RP. If you require user verification, ensure that the
uv(user verified) flag inauthenticatorDataistrue. Check that theup(user present) flag inauthenticatorDataistrue, since user presence is always required for passkeys. - Verify the signature. To verify the signature, you need:
- The signature, which is the signed challenge:
response.signature - The public key, to verify the signature with.
- The original signed data. This is the data whose signature is to be verified.
- The cryptographic algorithm that was used to create the signature.
- The signature, which is the signed challenge:
To learn more about these steps, check SimpleWebAuthn's source code for verifyAuthenticationResponse or dive into the complete list of verifications in the specification.