برای افزودن دکمه ورود با گوگل یا دکمه ورود با یک لمس و خودکار به وبسایت خود، ابتدا باید:
- دریافت شناسه کلاینت OAuth 2.0
- پیکربندی برند و تنظیمات OAuth،
- کتابخانه کلاینت سرویسهای هویت گوگل را بارگذاری کنید، و
- به صورت اختیاری، سیاست امنیت محتوا را تنظیم کنید و
- بهروزرسانی خطمشی بازکنندهی بینمنبعی
شناسه کلاینت API گوگل خود را دریافت کنید
برای فعال کردن سرویسهای هویت گوگل در وبسایت خود، ابتدا باید یک شناسه کلاینت API گوگل تنظیم کنید. برای انجام این کار، مراحل زیر را انجام دهید:
- صفحه کلاینتهای کنسول گوگل کلود را باز کنید.
- یک پروژه Cloud Console ایجاد یا انتخاب کنید. اگر از قبل پروژهای برای دکمه ورود با گوگل یا Google One Tap دارید، از پروژه موجود و شناسه کلاینت وب استفاده کنید. هنگام ایجاد برنامههای کاربردی، ممکن است چندین پروژه لازم باشد، مراحل باقیمانده این بخش را برای هر پروژهای که مدیریت میکنید تکرار کنید.
- روی ایجاد کلاینت کلیک کنید و برای نوع برنامه، برنامه وب را انتخاب کنید تا یک شناسه کلاینت جدید ایجاد شود. برای استفاده از شناسه کلاینت موجود، یکی از انواع برنامه وب را انتخاب کنید.
آدرس اینترنتی (URI) وبسایت خود را به Authorized JavaScript origins اضافه کنید. این آدرس اینترنتی فقط شامل طرح و نام میزبان کاملاً واجد شرایط است. برای مثال،
https://www.example.com.به صورت اختیاری، اعتبارنامهها میتوانند با استفاده از یک تغییر مسیر به نقطه پایانی که شما میزبانی میکنید، به جای یک فراخوانی جاوا اسکریپت، بازگردانده شوند. در این صورت، URI های تغییر مسیر خود را به Authorized redirect URI ها اضافه کنید. URI های تغییر مسیر شامل طرح، نام میزبان کاملاً واجد شرایط و مسیر هستند و باید با قوانین اعتبارسنجی Redirect URI مطابقت داشته باشند. به عنوان مثال،
https://www.example.com/auth-receiver.
شناسه کلاینت را با استفاده از فیلدهای data-client_id یا client_id در برنامه وب خود وارد کنید.
صفحه رضایت OAuth خود را پیکربندی کنید
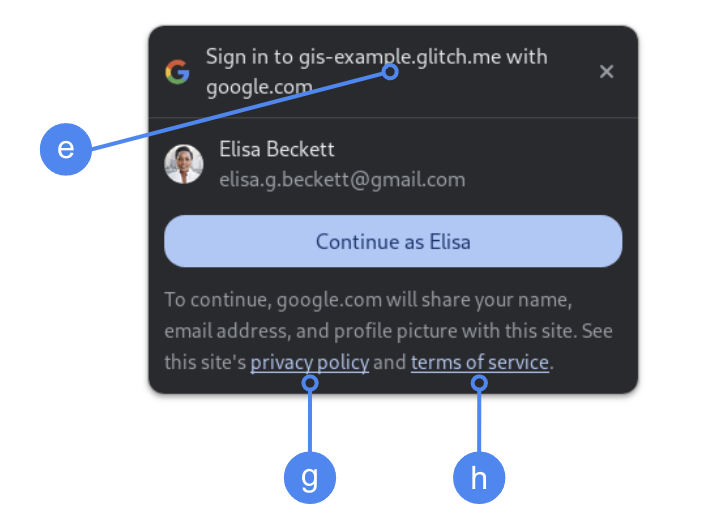
هر دو روش ورود با گوگل و احراز هویت تکضربهای شامل یک صفحه رضایتنامه هستند که به کاربران میگوید برنامهای که درخواست دسترسی به دادههایشان را دارد، چه نوع دادههایی از آنها درخواست شده و شرایط اعمال آن چیست.
- صفحه برندسازی (Branding) بخش پلتفرم احراز هویت گوگل (Google Auth Platform) در کنسول ابری (Cloud Console) را باز کنید.
- در صورت درخواست، پروژهای را که تازه ایجاد کردهاید انتخاب کنید.
در صفحه ثبت برند ، فرم را پر کنید و روی دکمه «ذخیره» کلیک کنید.
نام برنامه: نام برنامهای که درخواست رضایت میکند. این نام باید دقیقاً منعکسکننده برنامه شما باشد و با نام برنامهای که کاربران در جاهای دیگر میبینند، مطابقت داشته باشد.
لوگوی برنامه: این تصویر در صفحه رضایتنامه نمایش داده میشود تا به کاربران در تشخیص برنامه شما کمک کند. این لوگو در صفحه رضایتنامه ورود با گوگل و تنظیمات حساب کاربری نمایش داده میشود، اما در کادر گفتگوی One Tap نمایش داده نمیشود.
ایمیل پشتیبانی: در صفحه رضایت برای پشتیبانی کاربر و برای مدیران Google Workspace که دسترسی به برنامه شما را برای کاربران خود ارزیابی میکنند، نشان داده میشود. این آدرس ایمیل در صفحه رضایت ورود با Google، زمانی که کاربر روی نام برنامه کلیک میکند، به کاربران نشان داده میشود.
دامنههای مجاز: برای محافظت از شما و کاربرانتان، گوگل فقط به برنامههایی که با استفاده از OAuth احراز هویت میشوند، اجازه استفاده از دامنههای مجاز را میدهد. لینکهای برنامههای شما باید در دامنههای مجاز میزبانی شوند. اطلاعات بیشتر .
پیوند صفحه اصلی برنامه: در صفحه «ورود با رضایت گوگل» و اطلاعات سلب مسئولیت سازگار با GDPR با یک ضربه در زیر دکمه «ادامه به عنوان» نشان داده میشود. باید در یک دامنه مجاز میزبانی شود.
پیوند سیاست حفظ حریم خصوصی برنامه: در صفحه «ورود با رضایت گوگل» و اطلاعات سلب مسئولیت سازگار با GDPR با یک ضربه در زیر دکمه «ادامه به عنوان» نشان داده شده است. باید در یک دامنه مجاز میزبانی شود.
پیوند شرایط خدمات برنامه (اختیاری): در صفحه «ورود با رضایت گوگل» و اطلاعات سلب مسئولیت سازگار با GDPR با یک ضربه در زیر دکمه «ادامه به عنوان» نشان داده میشود. باید در یک دامنه مجاز میزبانی شود.
برای پیکربندی محدودههای برنامه خود، به صفحه دسترسی به دادهها بروید.
- حوزههای دسترسی برای APIهای گوگل : حوزهها به برنامه شما اجازه میدهند تا به دادههای خصوصی کاربر دسترسی داشته باشد. برای احراز هویت، حوزه پیشفرض (ایمیل، پروفایل، openid) کافی است و نیازی به اضافه کردن هیچ حوزه حساسی ندارید. به طور کلی، بهترین روش این است که حوزهها را به صورت تدریجی، در زمانی که دسترسی مورد نیاز است، درخواست کنید ، نه اینکه از قبل درخواست دهید.
«وضعیت تأیید» را بررسی کنید، اگر درخواست شما نیاز به تأیید دارد، روی دکمه «ارسال برای تأیید» کلیک کنید تا درخواست شما برای تأیید ارسال شود. برای جزئیات بیشتر به الزامات تأیید OAuth مراجعه کنید.
نمایش تنظیمات OAuth هنگام ورود به سیستم
با یک لمس، از FedCM استفاده کنید
دامنه مجاز سطح بالا در طول رضایت کاربر در کروم نمایش داده میشود. فقط استفاده از One Tap در iframe های cross-origin اما same-site یک روش پشتیبانی شده است.
یک شیر آب بدون FedCM
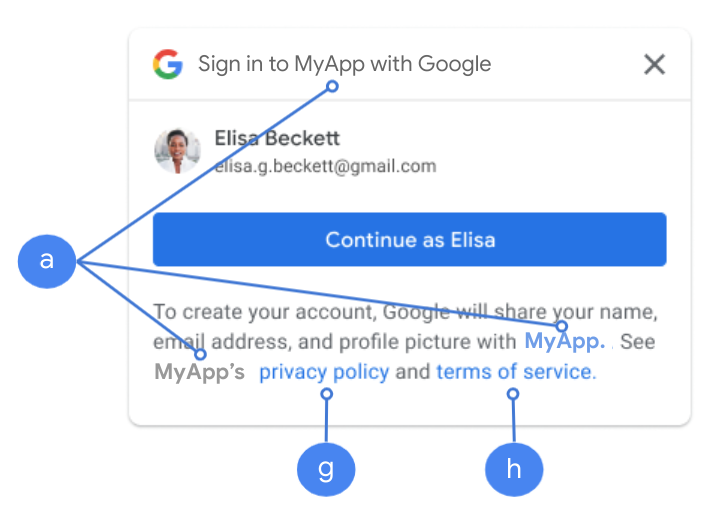
نام برنامه در طول رضایت کاربر نمایش داده میشود.
شکل ۱. تنظیمات رضایت OAuth که با One Tap در کروم نمایش داده میشود.
کتابخانه کلاینت را بارگذاری کنید
مطمئن شوید که کتابخانه کلاینت سرویسهای هویت گوگل را در هر صفحهای که کاربر ممکن است در آن وارد سیستم شود، بارگذاری کردهاید. از قطعه کد زیر استفاده کنید:
<script src="https://accounts.google.com/gsi/client" async></script>
اگر اسکریپت را با ویژگی async بارگذاری کنید، میتوانید سرعت بارگذاری صفحات خود را بهینه کنید.
برای مشاهدهی فهرست متدها و ویژگیهایی که کتابخانه پشتیبانی میکند، به منابع API مربوط به HTML و JavaScript مراجعه کنید.
سیاست امنیت محتوا
اگرچه اختیاری است، اما برای ایمنسازی برنامه شما و جلوگیری از حملات اسکریپتنویسی بینسایتی (XSS)، استفاده از سیاست امنیت محتوا (CSP) توصیه میشود. برای کسب اطلاعات بیشتر، به مقدمهای بر CSP و CSP و XSS مراجعه کنید.
سیاست امنیت محتوای شما ممکن است شامل یک یا چند دستورالعمل مانند connect-src ، frame-src ، script-src ، style-src یا default-src باشد.
اگر CSP شما شامل موارد زیر باشد:
- دستورالعمل
connect-src،https://accounts.google.com/gsi/را اضافه کنید تا به یک صفحه اجازه دهید URL والد را برای نقاط پایانی سمت سرور سرویسهای هویت گوگل بارگذاری کند. - دستورالعمل
frame-src، آدرسhttps://accounts.google.com/gsi/را اضافه کنید تا امکان درج آدرس اینترنتی (URL) والدِ دکمههای «یک ضربه بزنید و با گوگل وارد شوید» (One Tap and Sign In With Google) فراهم شود. - دستورالعمل
script-src، آدرسhttps://accounts.google.com/gsi/clientرا اضافه کنید تا آدرس اینترنتی کتابخانه جاوا اسکریپت Google Identity Services مجاز باشد. - برای فعال کردن URL مربوط به شیوهنامههای خدمات هویت گوگل، در دستورالعمل
style-src، عبارتhttps://accounts.google.com/gsi/styleرا اضافه کنید. - دستورالعمل
default-src، در صورت استفاده، یک جایگزین است اگر هر یک از دستورالعملهای قبلی (connect-src،frame-src،script-srcیاstyle-src) مشخص نشده باشد،https://accounts.google.com/gsi/اضافه کنید تا به یک صفحه اجازه دهید URL والد را برای نقاط پایانی سمت سرور سرویسهای هویت گوگل بارگذاری کند.
هنگام استفاده از connect-src از فهرست کردن آدرسهای اینترنتی GIS به صورت جداگانه خودداری کنید. این کار به کاهش خطاها هنگام بهروزرسانی GIS کمک میکند. برای مثال، به جای اضافه کردن https://accounts.google.com/gsi/status از آدرس اینترنتی والد GIS به نام https://accounts.google.com/gsi/ استفاده کنید.
این هدر پاسخ نمونه به سرویسهای هویت گوگل اجازه میدهد تا با موفقیت بارگیری و اجرا شوند:
Content-Security-Policy-Report-Only: script-src
https://accounts.google.com/gsi/client; frame-src
https://accounts.google.com/gsi/; connect-src https://accounts.google.com/gsi/;
سیاست افتتاحیه کراس اوریجین
دکمههای «ورود با گوگل» و «گوگل وان تپ» ممکن است برای ایجاد موفقیتآمیز پنجرههای بازشو، نیاز به تغییراتی در Cross-Origin-Opener-Policy » (COOP) شما داشته باشند.
وقتی FedCM فعال باشد، مرورگر مستقیماً پنجرههای بازشو را نمایش میدهد و نیازی به تغییر نیست.
با این حال، هنگامی که FedCM غیرفعال است، هدر COOP را تنظیم کنید:
- به
same-originو - شامل
same-origin-allow-popupsباشد.
عدم تنظیم صحیح هدر، ارتباط بین پنجرهها را قطع میکند و منجر به یک پنجره پاپآپ خالی یا اشکالات مشابه میشود.