لإضافة زر "تسجيل الدخول باستخدام حساب Google" أو إشعارات "بنقرة واحدة" و"تسجيل الدخول تلقائيًا" إلى موقعك الإلكتروني، عليك أولاً اتّباع الخطوات التالية:
- الحصول على معرّف عميل OAuth 2.0
- ضبط إعدادات وهوية العلامة التجارية لبروتوكول OAuth
- حمِّل مكتبة برامج Google Identity Services،
- يمكنك اختياريًا إعداد "سياسة أمان المحتوى" و
- تعديل "السياسة المحدّدة لفتح المستندات المشتركة المصدر"
الحصول على معرّف عميل Google API
لتفعيل "خدمات Google لتحديد الهوية" على موقعك الإلكتروني، عليك أولاً إعداد معرّف عميل لواجهة Google API. لإجراء ذلك، يُرجى إكمال الخطوات التالية:
- افتح صفحة "العملاء" في Google Cloud Console.
- أنشئ مشروعًا على Cloud Console أو اختَر مشروعًا حاليًا. إذا كان لديك مشروع حالي لزر "تسجيل الدخول باستخدام حساب Google" أو Google One Tap، استخدِم المشروع الحالي ومعرّف عميل الويب. عند إنشاء تطبيقات إنتاج، قد يكون من الضروري إنشاء مشاريع متعددة، لذا كرِّر الخطوات المتبقية في هذا القسم لكل مشروع تديره.
- انقر على إنشاء عميل، ثم اختَر تطبيق الويب في حقل نوع التطبيق لإنشاء معرّف عميل جديد. لاستخدام معرّف عميل حالي، اختَر معرّفًا من النوع تطبيق ويب.
أضِف معرّف الموارد المنتظم (URI) لموقعك الإلكتروني إلى مصادر JavaScript المسموح بها. يتضمّن معرّف الموارد الموحّد المخطط واسم المضيف المؤهَّل بالكامل فقط. على سبيل المثال،
https://www.example.com.يمكنك بدلاً من ذلك عرض بيانات الاعتماد باستخدام عملية إعادة توجيه إلى نقطة نهاية تستضيفها بدلاً من استخدام دالة ردّ JavaScript. في هذه الحالة، أضِف معرّفات الموارد المنتظمة (URI) الخاصة بعمليات إعادة التوجيه إلى معرّفات الموارد المنتظمة (URI) المعتمَدة لإعادة التوجيه. تتضمّن معرّفات الموارد المنتظمة (URI) الخاصة بإعادة التوجيه المخطط واسم المضيف المؤهّل بالكامل والمسار، ويجب أن تتوافق مع قواعد التحقّق من صحة معرّف الموارد المنتظم الخاص بإعادة التوجيه. على سبيل المثال،
https://www.example.com/auth-receiver.
أدرِج معرّف العميل في تطبيق الويب باستخدام الحقلَين data-client_id أو client_id.
ضبط شاشة طلب الموافقة المتعلّقة ببروتوكول OAuth
يتضمّن كلّ من ميزة "تسجيل الدخول باستخدام Google" وميزة المصادقة بنقرة واحدة شاشة موافقة تُعلم المستخدمين بالتطبيق الذي يطلب الوصول إلى بياناتهم، ونوع البيانات المطلوبة والشروط السارية.
- افتح صفحة "العلامة التجارية" في قسم "منصة Google للمصادقة" ضمن Cloud Console.
- إذا طُلب منك ذلك، اختَر المشروع الذي أنشأته للتو.
في صفحة "العلامة التجارية"، املأ النموذج وانقر على الزر "حفظ".
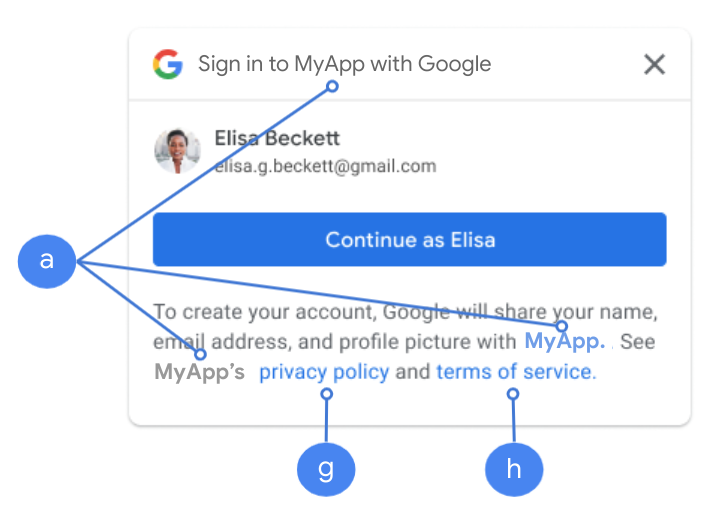
اسم التطبيق: اسم التطبيق الذي يطلب الموافقة. يجب أن يعبّر الاسم بدقّة عن تطبيقك وأن يكون متوافقًا مع اسم التطبيق الذي يظهر للمستخدمين في أماكن أخرى.
شعار التطبيق: تظهر هذه الصورة على شاشة الموافقة لمساعدة المستخدمين في التعرّف على تطبيقك. يظهر الشعار على شاشة الموافقة الخاصة بخدمة "تسجيل الدخول باستخدام حساب Google" وعلى إعدادات الحساب، ولكنّه لا يظهر في مربّع الحوار "نقرة واحدة".
عنوان البريد الإلكتروني المخصّص للدعم: يظهر على شاشة الموافقة المخصّصة لدعم المستخدمين، ويظهر أيضًا لمشرفي Google Workspace الذين يقيّمون إمكانية وصول المستخدمين إلى تطبيقك. يظهر عنوان البريد الإلكتروني هذا للمستخدمين على شاشة طلب الموافقة "تسجيل الدخول باستخدام حساب Google" عندما ينقر المستخدم على اسم التطبيق.
النطاقات المعتمَدة: لحمايتك وحماية المستخدمين، لا تسمح Google إلا للتطبيقات التي تتم مصادقتها باستخدام OAuth باستخدام النطاقات المعتمَدة. يجب أن تكون روابط تطبيقاتك مستضافة على نطاقات معتمَدة. مزيد من المعلومات
رابط الصفحة الرئيسية للتطبيق: يظهر على شاشة طلب الموافقة "تسجيل الدخول باستخدام حساب Google" ومعلومات إخلاء المسؤولية المتوافقة مع اللائحة العامة لحماية البيانات (GDPR) في ميزة "نقرة واحدة" ضمن الزر "المتابعة باسم". يجب أن تتم استضافته على نطاق معتمَد.
رابط سياسة الخصوصية للتطبيق: يظهر على شاشة الموافقة في ميزة "تسجيل الدخول باستخدام Google"، كما يظهر ضمن معلومات بيان إخلاء المسؤولية المتوافق مع اللائحة العامة لحماية البيانات في ميزة "نقرة واحدة" أسفل الزر "المتابعة باسم". يجب أن تتم استضافته على نطاق معتمَد.
رابط بنود خدمة التطبيق (اختياري): يظهر على شاشة الموافقة على خدمة "تسجيل الدخول باستخدام Google" ومعلومات إخلاء المسؤولية المتوافقة مع اللائحة العامة لحماية البيانات (GDPR) في ميزة "نقرة واحدة" ضمن الزر "المتابعة باسم". يجب أن تتم استضافته على نطاق معتمَد.
انتقِل إلى صفحة "الوصول إلى البيانات" لإعداد نطاقات تطبيقك.
- نطاقات واجهات Google API: تتيح النطاقات لتطبيقك الوصول إلى بيانات المستخدم الخاصة. لإجراء المصادقة، يكون النطاق التلقائي (البريد الإلكتروني، الملف الشخصي، openid) كافيًا، ولا تحتاج إلى إضافة أي نطاقات حساسة. من أفضل الممارسات بشكل عام طلب النطاقات بشكل تدريجي عند الحاجة إلى إذن الوصول، بدلاً من طلبها مسبقًا.
تحقَّق من "حالة التحقّق"، وإذا كان طلبك بحاجة إلى التحقّق، انقر على الزر "إرسال طلب التحقّق" لإرسال طلبك. يُرجى الاطّلاع على متطلبات إثبات الأهلية في OAuth للحصول على التفاصيل.
عرض إعدادات OAuth أثناء تسجيل الدخول
ميزة "نقرة واحدة" باستخدام FedCM
يتم عرض النطاق المعتمَد ذي المستوى الأعلى أثناء طلب موافقة المستخدم في Chrome. إنّ استخدام نقرة واحدة في إطارات iframe للموقع الإلكتروني نفسه ولكن من مصادر متعددة هو طريقة متاحة.
ميزة "نقرة واحدة" بدون FedCM
يتم عرض اسم التطبيق أثناء طلب موافقة المستخدم.
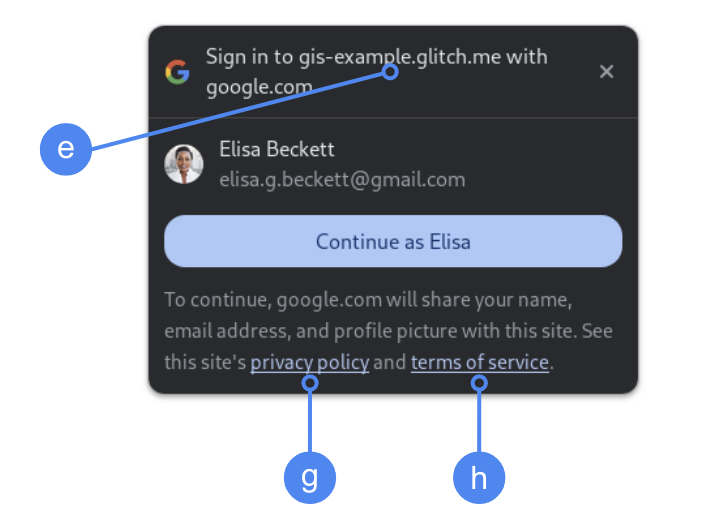
الشكل 1: إعدادات الموافقة على OAuth التي تعرضها ميزة "نقرة واحدة" في Chrome
تحميل مكتبة البرامج
احرص على تحميل مكتبة برامج "خدمات هوية Google" على أي صفحة قد يسجّل المستخدم الدخول إليها. استخدِم مقتطف الرمز التالي:
<script src="https://accounts.google.com/gsi/client" async></script>
يمكنك تحسين سرعة تحميل صفحاتك إذا حمّلت النص البرمجي باستخدام السمة async.
راجِع مراجع واجهة برمجة التطبيقات HTML وJavaScript للاطّلاع على قائمة بالطرق والسمات التي تتوافق معها المكتبة.
سياسة أمان المحتوى
على الرغم من أنّ سياسة أمان المحتوى اختيارية، ننصحك باستخدامها لتأمين تطبيقك ومنع الهجمات التي تستخدم النصوص البرمجية على المواقع الإلكترونية (XSS). لمزيد من المعلومات، يمكنك الاطّلاع على مقدمة عن سياسة أمان المحتوى وسياسة أمان المحتوى والهجمات التي تستخدم النصوص البرمجية على المواقع الإلكترونية (XSS).
قد تتضمّن "سياسة أمان المحتوى" توجيهًا واحدًا أو أكثر، مثل connect-src أو frame-src أو script-src أو style-src أو default-src.
إذا كان موفّر خدمة السحابة الإلكترونية يتضمّن ما يلي:
connect-srcتوجيه، أضِفhttps://accounts.google.com/gsi/للسماح للصفحة بتحميل عنوان URL الرئيسي لنقاط نهاية من جهة الخادم في "خدمات هوية Google".frame-srcتوجيه، أضِفhttps://accounts.google.com/gsi/للسماح بعنوان URL الرئيسي لإطارات iframe الخاصة بزرّي نقرة واحدة و"تسجيل الدخول باستخدام حساب Google".script-src، أضِفhttps://accounts.google.com/gsi/clientللسماح بعنوان URL الخاص بمكتبة JavaScript الخاصة بخدمات Google Identity.- في توجيه
style-src، أضِفhttps://accounts.google.com/gsi/styleللسماح بعنوان URL الخاص بأوراق أنماط "خدمات هوية Google". - في حال استخدام التوجيه
default-src، يكون هذا التوجيه بديلاً في حال عدم تحديد أي من التوجيهات السابقة (connect-srcأوframe-srcأوscript-srcأوstyle-src)، ويجب إضافةhttps://accounts.google.com/gsi/للسماح للصفحة بتحميل عنوان URL الرئيسي لنقاط نهاية من جهة الخادم في "خدمات هوية Google".
تجنَّب إدراج عناوين URL فردية لنظام المعلومات الجغرافية عند استخدام connect-src. يساعد ذلك في تقليل حالات الفشل عند تعديل نظام المعلومات الجغرافية. على سبيل المثال، بدلاً من إضافة
https://accounts.google.com/gsi/status استخدِم عنوان URL الرئيسي لنظام GIS
https://accounts.google.com/gsi/.
يسمح عنوان الاستجابة المثال هذا لخدمات Google Identity Services بالتحميل والتنفيذ بنجاح:
Content-Security-Policy-Report-Only: script-src
https://accounts.google.com/gsi/client; frame-src
https://accounts.google.com/gsi/; connect-src https://accounts.google.com/gsi/;
السياسة المحدّدة لفتح المستندات المشتركة المصدر
قد يتطلّب زرّ "تسجيل الدخول باستخدام حساب Google" وGoogle One Tap إجراء تغييرات على Cross-Origin-Opener-Policy (COOP) من أجل إنشاء النوافذ المنبثقة بنجاح.
عند تفعيل FedCM، يعرض المتصفّح النوافذ المنبثقة مباشرةً، ولا يلزم إجراء أي تغييرات.
ومع ذلك، عند إيقاف FedCM، اضبط عنوان COOP على النحو التالي:
- إلى
same-originو - تضمين
same-origin-allow-popups
يؤدي عدم ضبط العنوان المناسب إلى تعذُّر التواصل بين النوافذ، ما يؤدي إلى ظهور نافذة منبثقة فارغة أو أخطاء مشابهة.