您可以讓使用者在輸入功能有限的裝置 (例如連上網路的電視) 上,使用 Google 帳戶登入應用程式。
應用程式會向使用者顯示簡碼和登入網址。接著,使用者會在網頁瀏覽器中開啟登入網址、輸入程式碼,並授予應用程式存取使用者登入資訊的權限。最後,應用程式會收到確認訊息,並讓使用者登入。
如要使用這個登入流程,應用程式必須在符合下列條件的裝置上執行:
- 裝置必須能顯示 40 個字元的網址和 15 個字元的使用者代碼,以及使用者的操作說明。
- 裝置必須連上網際網路。
取得用戶端 ID 和密鑰
您的應用程式需要 OAuth 2.0 用戶端 ID 和用戶端密碼,才能向 Google 的登入端點提出要求。
如要找出專案的用戶端 ID 和用戶端密碼,請按照下列步驟操作:
- 選取現有的 OAuth 2.0 憑證或開啟「憑證」頁面。
- 如果您尚未建立專案的 OAuth 2.0 憑證,請依序點選「Create credentials」>「OAuth client ID」,然後提供建立憑證所需的資訊。
- 在「OAuth 2.0 用戶端 ID」部分中找出「用戶端 ID」。如需詳細資訊,請按一下用戶端 ID。
如果您要建立新的用戶端 ID,請選取「電視和受限制的輸入裝置」應用程式類型。
取得使用者代碼和驗證網址
使用者要求使用 Google 帳戶登入後,您可以傳送 HTTP POST 要求至 OAuth 2.0 裝置端點 https://oauth2.googleapis.com/device/code,取得使用者代碼和驗證網址。請在要求中加入用戶端 ID 和所需的權限清單。如果您只想讓使用者透過 Google 帳戶登入,請只要求 profile 和 email 範圍;如果您想要求代表使用者呼叫支援的 API,請除了 profile 和 email 範圍外,也要求必要範圍。
以下是要求使用者代碼的範例:
POST /device/code HTTP/1.1
Host: oauth2.googleapis.com
Content-Type: application/x-www-form-urlencoded

client_id=YOUR_GOOGLE_CLIENT_ID&scope=email%20profile
使用 curl:
curl -d "client_id=YOUR_GOOGLE_CLIENT_ID&scope=email profile" https://oauth2.googleapis.com/device/code回應會以 JSON 物件的形式傳回:
 {
  "device_code" : "4/4-GMMhmHCXhWEzkobqIHGG_EnNYYsAkukHspeYUk9E8",
  "user_code" : "GQVQ-JKEC",
  "verification_url" : "https://www.google.com/device",
  "expires_in" : 1800,
  "interval" : 5
}
應用程式會向使用者顯示 user_code 和 verification_url 值,同時會在指定的 interval 輪詢登入端點,直到使用者登入或 expires_in 指定的時間已過為止。
顯示使用者代碼和驗證網址
從裝置端點收到使用者代碼和驗證網址後,請顯示這些資訊,並指示使用者開啟網址並輸入使用者代碼。
verification_url 和 user_code 的值可能會變更。請以可處理下列限制的方式設計 UI:
user_code必須顯示在足以處理 15 個W大小的字元寬度的欄位中。verification_url必須顯示在足以處理長度為 40 個字元的網址字串的欄位中。
這兩個字串可包含 US-ASCII 字元集的任何可列印字元。
顯示 user_code 字串時,請勿以任何方式修改字串 (例如變更大小寫或插入其他格式化字元),因為如果日後程式碼格式有所變更,應用程式可能會中斷。
如要修改 verification_url 字串,您可以將網址中的配置移除,以便選擇顯示。如果您這麼做,請務必確保應用程式能夠同時處理「http」和「https」變體。請勿以其他方式修改 verification_url 字串。
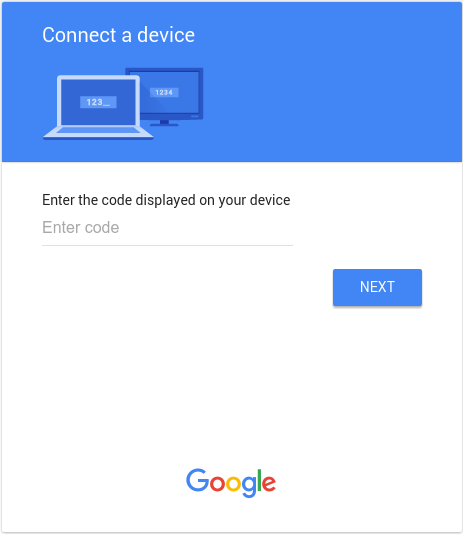
使用者前往驗證網址時,會看到類似下方的頁面:
使用者輸入使用者程式碼後,Google 登入網站會顯示類似下方的同意畫面:
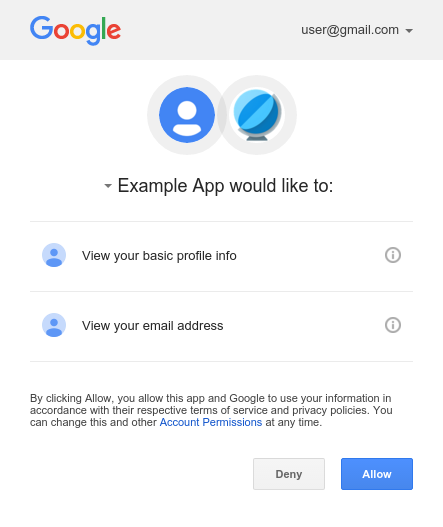
如果使用者按一下「Allow」,應用程式就會取得 ID 權杖,用於識別使用者、呼叫 Google API 的存取權杖,以及用來取得新權杖的更新權杖。
取得 ID 權杖和重新整理權杖
應用程式顯示使用者代碼和驗證網址後,請使用從裝置端點收到的裝置代碼,開始輪詢權杖端點 (https://oauth2.googleapis.com/token)。按照 interval 值指定的間隔 (以秒為單位) 輪詢權杖端點。
以下是要求範例:
POST /token HTTP/1.1
Host: oauth2.googleapis.com
Content-Type: application/x-www-form-urlencoded

client_id=YOUR_GOOGLE_CLIENT_ID&client_secret=YOUR_CLIENT_SECRET&code=DEVICE_CODE&grant_type=http://oauth.net/grant_type/device/1.0
使用 curl:
curl -d "client_id=YOUR_CLIENT_ID&client_secret=YOUR_CLIENT_SECRET&code=YOUR_DEVICE_CODE&grant_type=http://oauth.net/grant_type/device/1.0" https://oauth2.googleapis.com/token如果使用者尚未核准要求,則回應如下:
{
  "error" : "authorization_pending"
}
應用程式應以不超過 interval 的頻率重複這些要求。如果應用程式輪詢的速度過快,回應會如下所示:
{
  "error" : "slow_down"
}
使用者登入並授予應用程式存取您要求範圍的權限後,應用程式下一個要求的回應就會包含 ID 權杖、存取權杖和更新權杖:
{
  "access_token": "ya29.AHES6ZSuY8f6WFLswSv0HZLP2J4cCvFSj-8GiZM0Pr6cgXU",
  "token_type": "Bearer",
  "expires_in": 3600,
  "refresh_token": "1/551G1yXUqgkDGnkfFk6ZbjMMMDIMxo3JFc8lY8CAR-Q",
  "id_token": "eyJhbGciOiJSUzI..."
}
收到這項回應後,應用程式可以解碼 ID 權杖,取得已登入使用者的基本個人資料資訊,或是將 ID 權杖傳送至應用程式的後端伺服器,以便安全地與伺服器進行驗證。此外,應用程式也可以使用存取權杖,呼叫使用者授權的 Google API。
ID 和存取權存證的有效期限有限。如要讓使用者在權杖的有效期限過後繼續登入,請儲存更新權杖,並使用該權杖要求新的權杖。
從 ID 權杖取得使用者個人資料資訊
您可以利用任何 JWT 解碼程式庫將 ID 權杖解碼,以取得登入使用者的個人資訊。例如,使用 Auth0 的 jwt-decode JavaScript 程式庫:
var user_profile = jwt_decode(<var>id_token</var>);

// The "sub" field is available on all ID tokens. This value is unique for each
// Google account and can be used to identify the user. (But do not send this
// value to your server; instead, send the whole ID token so its authenticity
// can be verified.)
var user_id = user_profile["sub"];

// These values are available when you request the "profile" and "email" scopes.
var user_email = user_profile["email"];
var email_verified = user_profile["email_verified"];
var user_name = user_profile["name"];
var user_photo_url = user_profile["picture"];
var user_given_name = user_profile["given_name"];
var user_family_name = user_profile["family_name"];
var user_locale = user_profile["locale"];