Page Summary
-
Google APIs Explorer provides dynamically generated code samples in various languages, including cURL, JavaScript, Java, Node.js, PHP, Python, and Ruby, which can be copied and run locally.
-
Running these code samples locally requires generating and using your own authorization credentials, such as an API key for public data or OAuth 2.0 credentials for private data.
-
The process for setting up and executing code samples varies depending on the programming language chosen, involving steps like project creation, enabling the API, generating credentials, and configuring the code sample or environment.
-
Common issues encountered when running samples include authorization problems, such as popups being blocked or incorrect credentials/scopes being used, and warnings related to mixed content when testing locally hosted APIs.
The Google APIs Explorer dynamically generates code samples. These code samples are designed to be copied and run locally. To view the samples, click Full screen in the APIs Explorer side panel. The figure below shows the expanded full-screen APIs Explorer:
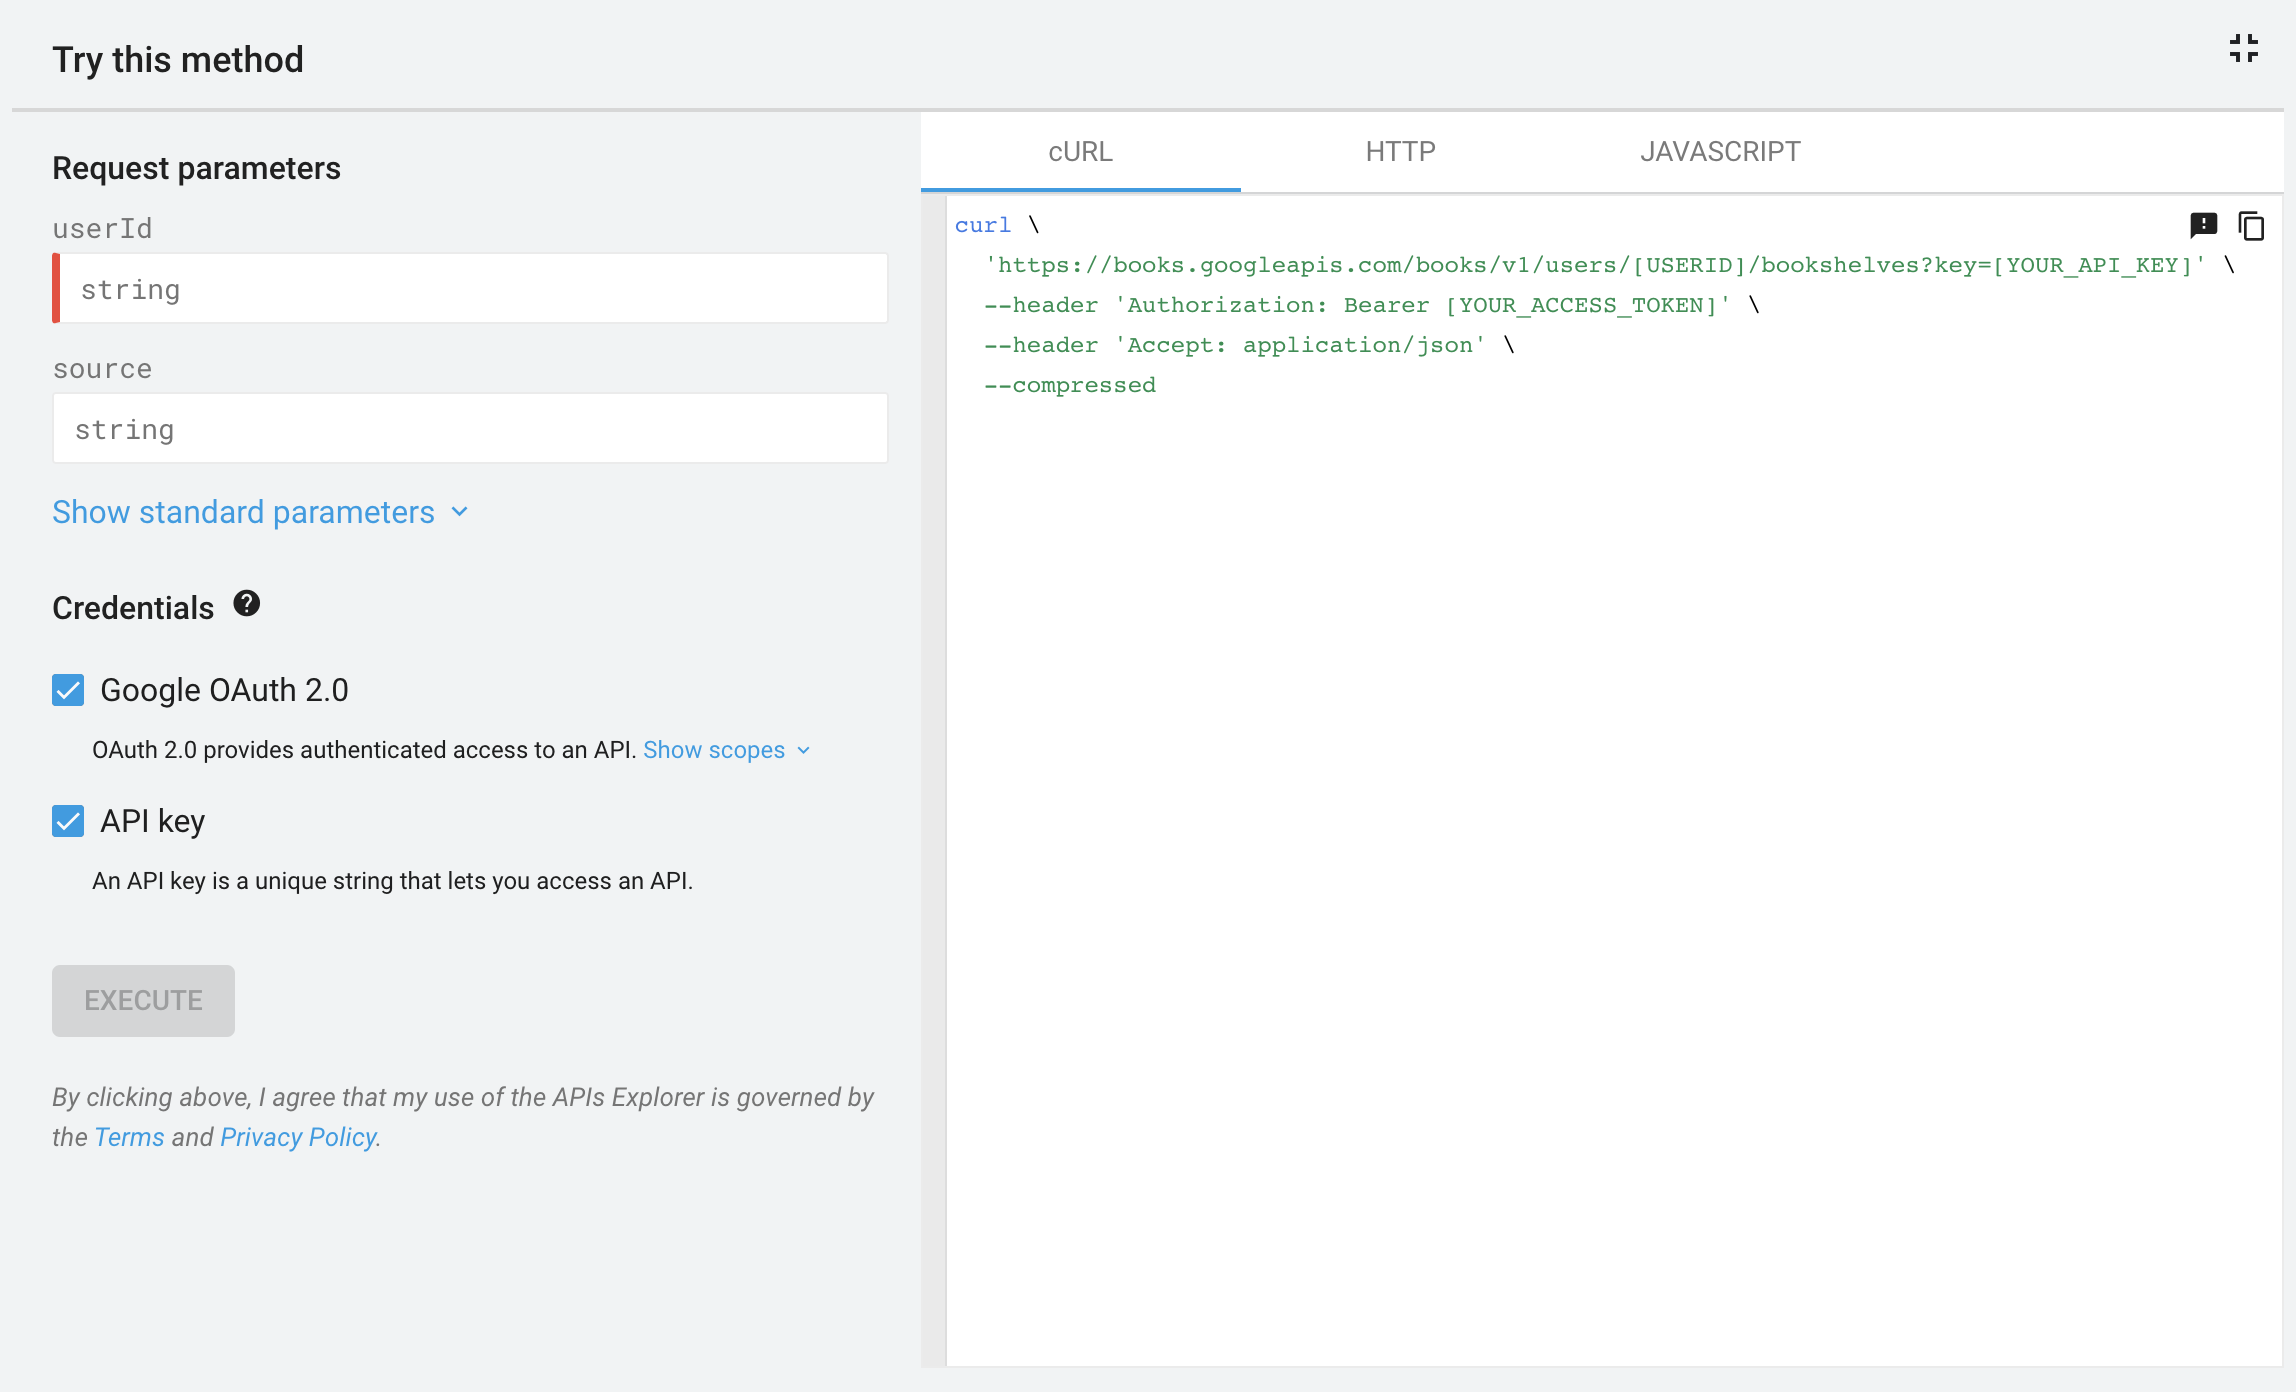
By default, the APIs Explorer shows how to use cURL to execute your request. Some APIs might also show samples for other languages, such as JavaScript, Java, and Python.
Run code samples locally
The following tabs explain the prerequisites and steps for running code samples. To run the code samples, you must generate and use your own authorization credentials. For an explanation of how to create a project and generate credentials, refer to your specific Google API's documentation.
Credentials are one of the following, depending on the type of data (public or private) the method is accessing:
- For public data, the credential is an API key.
For private data, the credential is either a
client_secret.jsonfile containing your OAuth 2.0 client ID and client secret or an OAuth 2.0 access token.
cURL
Set up
- Follow instructions in the API documentation to create or select a project for your app and enable the API.
- In the cloud console, create an API key.
- In the cloud console, create an OAuth client ID credential for a Web
application and use
https://developers.google.com/oauthplaygroundas the redirect URI. - In the OAuth 2.0 Playground, click OAuth 2.0 Configuration .
- Check Use your own credentials.
- Enter the client ID and client secret generated in step 3.
- In the scopes field, type the scope to use with your method and click Authorize APIs.
- (optional) If presented with a Sign in screen, select the account to use.
- (optional) If presented with an authorization screen, click Accept.
- Click Exchange authorization code for tokens. A token is returned.
- In the cURL code sample, replace
[YOUR_API_KEY]with the API key generated in step 2:'https://www.googleapis.com/drive/v3/files?key=[YOUR_API_KEY]' \ - In the cURL code sample, replace
[YOUR_ACCESS_TOKEN]with the access token generated in step 10:--header 'Authorization: Bearer [YOUR_ACCESS_TOKEN]' \
Execute code sample
From the command line, execute the cURL command. The command should be similar to this:
curl \
'https://www.googleapis.com/drive/v3/files?key=AIzaSyBiKcaoXmVApwnT24hitQG_dwjGvAj6Ddw' \
--header 'Authorization: Bearer ya29.a0ARrdaM_yQn9MWBpJgKPx880BSnRYIizRYIDz0JN9e66nSliIYpqNXmPsvv2ccfplCTG_U4b1' \
--header 'Accept: application/json' \
--compressed
JavaScript
Set up
- Follow instructions in the API documentation to create or select a project for your app and enable the API.
- In the cloud console, create an API key.
- In the cloud console, create an OAuth client ID credential for a "Web
application" and set the authorized JavaScript origins to identify the URL
from which you'll be sending requests, such as
http://localhost. - Copy the full code sample to a local file accessible to your web server,
such as
/var/www/html/example.html. Find the line in the code sample that sets the API key or client ID and replace the value with the values generated in step 2 and 3:
- API key:
gapi.client.setApiKey(YOUR_API_KEY); - OAuth 2.0 client ID:
gapi.client.init({
'clientId': 'YOUR_CLIENT_ID',
- API key:
Execute code sample
- Open the file in your browser, such as
http://localhost/example.html. We recommend using a browser with a debugging console, such as Google Chrome. - (optional) If presented with a Sign in screen, select the account to use.
- (optional) If presented with an authorization screen, click Accept. The debugging console should display the method response as a JSON object.
Java
Prerequisites
- Java 1.7 or greater.
- Gradle 7 or greater.
Set up
- Follow instructions in the API documentation to create or select a project for your app and enable the API.
- Depending on the type of data the method is accessing, create an API key (public data) or create an OAuth 2.0 client ID (private data).
- Set the application type to Desktop app.
- If you created an OAuth 2.0 client ID, download the JSON file containing
your OAuth 2.0 credentials. This file is named something similar to
client_secret_CLIENTID.json, whereCLIENTIDis the client ID for your project. In your working directory, run the following commands to create a new project structure:
$ gradle init --type basic
$ mkdir -p src/main/java src/main/resources
If you created an OAuth 2.0 client ID in step 2, rename the JSON file that you downloaded to
client_secret.json.Save the renamed file in the
src/main/resourcesdirectory that you created in step 5.In your working directory, open the
build.gradlefile and replace its contents with the following:apply plugin: 'java' apply plugin: 'application' mainClassName = 'ApiExample' sourceCompatibility = 1.7 targetCompatibility = 1.7 version = '1.0' repositories { mavenCentral() } dependencies { compile 'com.google.api-client:google-api-client:1.23.0' compile 'com.google.oauth-client:google-oauth-client-jetty:1.23.0' API_SPECIFIC_DEPENDENCY }In the
build.gradlefile, replace the line that saysAPI_SPECIFIC_DEPENDENCYwith an instruction to compile code for the API you're calling. Here is a sample for the YouTube Analytics API:compile 'com.google.apis:google-api-services-youtubeAnalytics:v2-rev16-1.23.0'The instruction follows this template:
compile 'com.google.apis:google-api-services-API_NAME:API_VERSION- revREVISION-CL_VERSION'
Where:
API_NAMEis the API name listed on GitHub for the API. To find the name, click on the version link next to your API on the Supported Google APIs page. The version link navigates to GitHub. The API name is in the upper-middle of the page and is preceded bygoogleapis/google-apis-services-. For example, for the v3 of the Drive API, theAPI_NAMEisdrive.API_VERSIONis the API version listed for the API below the API name on the Supported Google APIs page.REVISIONis the revision number listed in the JavaDoc reference for the API. The JavaDoc reference can be found athttps://googleapis.dev/java/google-api-services-API_NAME/latest/index.htmlCL_VERSIONis the client library version. This value also appears in the JavaDoc reference.- From your working directory, copy the code sample from APIs Explorer to
src/main/java/ApiExample.java. (The class name in each sample isApiExampleso that you do not need to modify thebuild.gradlefile to run different samples.
Execute code sample
Use the following command to run the example:
gradle -q run
The sample should execute your API request and print the response to STDOUT.
You can also check the service you are calling to see the effects of requests
that write data.
Node.js
Prerequisites
- Node.js
The Google APIs Client Library for Node.js:
- If you have not previously installed the client library, run the command:
npm install googleapis --save- If you previously installed the client library, we recommend updating it to ensure that you have the most up-to-date classes for the library you are testing. To update the client library, run the command:
npm update googleapis --save
Set up
- Follow instructions in the API documentation to create or select a project for your app and enable the API.
- Depending on the type of data the method is accessing, create an API key (public data) or create an OAuth 2.0 client ID (private data).
- Set the application type to Desktop app.
- If you created an OAuth 2.0 client ID, download the JSON file containing
your OAuth 2.0 credentials. This file is named something similar to
client_secret_CLIENTID.json, whereCLIENTIDis the client ID for your project. - Copy the code sample to a local file and modify the sample to correctly
identify your API key or client secrets file. In the sample, the API key
value is
YOUR_API_KEY, and the client secrets file location isYOUR_CLIENT_SECRET_FILE.json.
Execute code sample
Use the following command to run the example:
node sample.js
Most samples print an API response (or something else) to STDOUT.
PHP
Prerequisites
- PHP 5.4 or greater with the command-line interface (CLI) and JSON extension.
- The Composer dependency management tool installed globally.
The Google APIs Client Library for PHP:
If you have not previously installed the client library, run the command:
composer require google/apiclient:^2.0If you previously installed the client library, we recommend updating it to ensure that you have the most up-to-date classes for the library you're testing. To update the client library, run the command:
composer update google/apiclient --with-dependencies
Execute code sample
Use the following command to run the example:
php sample.php
Most samples print an API response (or something else) to STDOUT.
Python
Prerequisites
- Python 2.7 or Python 3.5+
- The pip package management tool
The Google APIs Client Library for Python:
pip install --upgrade google-api-python-clientThe
google-auth-oauthlibandgoogle-auth-httplib2libraries for user authorization:pip install --upgrade google-auth-oauthlib google-auth-httplib2
Set up
- Follow instructions in the API documentation to create or select a project for your app and enable the API.
- Depending on the type of data the method is accessing, create an API key (public data) or create an OAuth 2.0 client ID (private data).
- Set the application type to Desktop app.
- If you created an OAuth 2.0 client ID, download the JSON file containing
your OAuth 2.0 credentials. This file is named something similar to
client_secret_CLIENTID.json, whereCLIENTIDis the client ID for your project. - Copy the code sample to a local file and modify the sample to correctly
identify your API key or client secrets file. In the sample, the API key
value is
YOUR_API_KEY, and the client secrets file location isYOUR_CLIENT_SECRET_FILE.json.
Execute code sample
Use the following command to run the example:
python sample.py
Most samples print an API response (or something else) to STDOUT.
Ruby
Prerequisites
- Ruby 2.0 or greater
The Google APIs Client Library for Ruby:
gem install google-api-client`
Set up
- Follow instructions in the API documentation to create or select a project for your app and enable the API.
- Depending on the type of data the method is accessing, create an API key (public data) or create an OAuth 2.0 client ID (private data).
- Set the application type to Desktop app.
- If you created an OAuth 2.0 client ID, download the JSON file containing
your OAuth 2.0 credentials. This file is named something similar to
client_secret_CLIENTID.json, whereCLIENTIDis the client ID for your project. - Copy the code sample to a local file and modify the sample to correctly
identify your API key or client secrets file. In the sample, the API key
value is
YOUR_API_KEY, and the client secrets file location isYOUR_CLIENT_SECRET_FILE.json.
Execute code sample
Use the following command to run the example:
ruby sample.rb
Most samples print an API response (or something else) to STDOUT.
Troubleshoot sample issues
Authorization dialog doesn't appear
The APIs Explorer uses a popup to grant access to your private data. If your browser blocks popups, this popup won't appear and you won't be able to grant access.
If you click "Allow" in the authorization screen and nothing happens, try changing your browser's popup settings to enable popups.
Received a 401 or 403 error
If you're getting a 401 or 403 error when testing a sample, it's likely due to a problem with one of the following:
- The API isn't enabled for your project. Review instructions for your API on how to create a project and enable an API.
- You're using the wrong authorization type (API key instead of OAuth 2.0).
- You're using OAuth 2.0, but with too narrow a scope.
- When you set up your API key, you set up restrictions to prevent unauthorized use of your credentials. However, the request isn't meeting those restrictions. For further information, refer to Using API key restrictions.
Received a warning about mixed content
If you use Google Cloud Endpoints and you are running your endpoint in a develoment server, your browser might give a warning about mixed content. This warning occurs because APIs Explorer is loaded over HTTPS, but when your API runs locally, it is hosted on HTTP.
To hide this warning using Chrome, start a Chrome session with special flags as follows:
path/to/chrome --user-data-dir=test --unsafely-treat-insecure-origin-as-secure=http://localhost:port
For example:
/usr/bin/google-chrome-stable --user-data-dir=test --unsafely-treat-insecure-origin-as-secure=http://localhost:8080
You should only hide this warning for local testing purposes.
JavaScript-only: gapi is not defined
A "gapi is not defined" error occurs when the JavaScript code tries to call
the Google API Client Library for JavaScript before the library has loaded. Make
sure that your code that references the gapi variable isn't called until after
the client library has loaded.