
ประเภทการลิงก์ OAuth รองรับขั้นตอน OAuth 2.0 มาตรฐานอุตสาหกรรม 2 ขั้นตอน ซึ่งเรียกว่า implicit และขั้นตอนของรหัสการให้สิทธิ์
ในขั้นตอนการเขียนโค้ดแบบโดยนัย Google จะเปิดปลายทางการให้สิทธิ์ในเบราว์เซอร์ของผู้ใช้ เมื่อลงชื่อเข้าใช้สําเร็จ คุณจะส่งคืนโทเค็นเพื่อการเข้าถึงที่ใช้ได้นานแก่ Google ตอนนี้โทเค็นเพื่อการเข้าถึงนี้รวมอยู่ในคําขอทุกรายการที่ส่งจาก Assistant ไปยังการดําเนินการของคุณแล้ว
ในกระบวนการรหัสการให้สิทธิ์ คุณต้องมีปลายทาง 2 จุด ได้แก่
- ปลายทางการให้สิทธิ์ ซึ่งมีหน้าที่นําเสนอ UI การลงชื่อเข้าใช้แก่ผู้ใช้ที่ไม่ได้ลงชื่อเข้าใช้ และยินยอมให้มีการเข้าถึงการเข้าถึงที่ขอในรูปของรหัสการให้สิทธิ์ระยะสั้น
- ปลายทางของการแลกเปลี่ยนโทเค็นที่มีหน้าที่รับผิดชอบการแลกเปลี่ยน 2 ประเภท ได้แก่
- แลกเปลี่ยนรหัสการให้สิทธิ์สําหรับโทเค็นการรีเฟรชที่ใช้ได้นานและโทเค็นเพื่อการเข้าถึงที่ใช้ได้นาน การแลกเปลี่ยนนี้จะเกิดขึ้นเมื่อผู้ใช้เข้าสู่ กระบวนการเชื่อมโยงบัญชี
- แลกเปลี่ยนโทเค็นการรีเฟรชที่ใช้ได้นานกับโทเค็นเพื่อการเข้าถึงที่ใช้ได้ในระยะสั้น Exchange นี้จะเกิดขึ้นเมื่อ Google ต้องการโทเค็นเพื่อการเข้าถึงใหม่เนื่องจากโทเค็นหมดอายุ
แม้ว่าขั้นตอนการใช้รหัสโดยนัยจะง่ายกว่า Google ขอแนะนําว่าโทเค็นเพื่อการเข้าถึงที่ออกโดยใช้โฟลว์โดยนัยไม่มีวันหมดอายุ เนื่องจากการใช้การหมดอายุของโทเค็นด้วยขั้นตอนโดยนัยบังคับให้ผู้ใช้ลิงก์บัญชีอีกครั้ง หากคุณต้องการใช้การหมดอายุของโทเค็นด้วยเหตุผลด้านความปลอดภัย คุณควรพิจารณาการใช้ขั้นตอนการตรวจสอบสิทธิ์แทน
ใช้การลิงก์บัญชี OAuth
กำหนดค่าโปรเจ็กต์
หากต้องการกำหนดค่าโปรเจ็กต์ให้ใช้การลิงก์บัญชี OAuth ให้ทำตามขั้นตอนต่อไปนี้
- เปิดคอนโซล Actions และเลือกโปรเจ็กต์ที่ต้องการใช้
- คลิกแท็บพัฒนา แล้วเลือกการลิงก์บัญชี
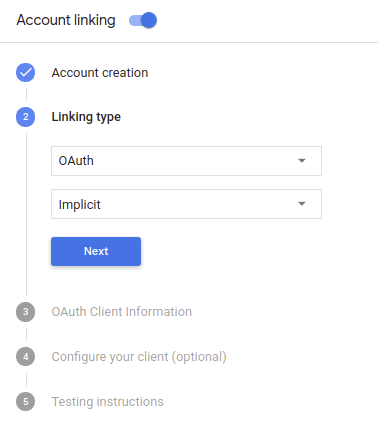
- เปิดใช้สวิตช์ข้างการลิงก์บัญชี
- ในส่วนการสร้างบัญชี ให้เลือกไม่ ฉันต้องการอนุญาตให้สร้างบัญชีบนเว็บไซต์ของฉันเท่านั้น
ในส่วนประเภทการลิงก์ ให้เลือก OAuth และ Implicit
ในส่วนข้อมูลลูกค้า ให้ทำดังนี้
- กำหนดค่าให้กับรหัสไคลเอ็นต์ที่ออกโดย Actions to Google เพื่อระบุ คำขอที่มาจาก Google
- แทรก URL สำหรับปลายทาง Authorization และ Token Exchange
- คลิกบันทึก
ใช้เซิร์ฟเวอร์ OAuth
To support the OAuth 2.0 implicit flow, your service makes an authorization endpoint available by HTTPS. This endpoint is responsible for authenticating and obtaining consent from users for data access. The authorization endpoint presents a sign-in UI to your users that aren't already signed in and records consent to the requested access.
When your Action needs to call one of your service's authorized APIs, Google uses this endpoint to get permission from your users to call these APIs on their behalf.
A typical OAuth 2.0 implicit flow session initiated by Google has the following flow:
- Google opens your authorization endpoint in the user's browser. The user signs in if not signed in already, and grants Google permission to access their data with your API if they haven't already granted permission.
- Your service creates an access token and returns it to Google by redirecting the user's browser back to Google with the access token attached to the request.
- Google calls your service's APIs, and attaches the access token with each request. Your service verifies that the access token grants Google authorization to access the API and then completes the API call.
Handle authorization requests
When your Action needs to perform account linking via an OAuth2 implicit flow, Google sends the user to your authorization endpoint with a request that includes the following parameters:
| Authorization endpoint parameters | |
|---|---|
client_id |
The client ID you assigned to Google. |
redirect_uri |
The URL to which you send the response to this request. |
state |
A bookkeeping value that is passed back to Google unchanged in the redirect URI. |
response_type |
The type of value to return in the response. For the OAuth 2.0 implicit
flow, the response type is always token. |
For example, if your authorization endpoint is available at https://myservice.example.com/auth,
a request might look like:
GET https://myservice.example.com/auth?client_id=GOOGLE_CLIENT_ID&redirect_uri=REDIRECT_URI&state=STATE_STRING&response_type=token
For your authorization endpoint to handle sign-in requests, do the following steps:
Verify the
client_idandredirect_urivalues to prevent granting access to unintended or misconfigured client apps:- Confirm that the
client_idmatches the client ID you assigned to Google. - Confirm that the URL specified by the
redirect_uriparameter has the following form:https://oauth-redirect.googleusercontent.com/r/YOUR_PROJECT_ID
- Confirm that the
Check if the user is signed in to your service. If the user isn't signed in, complete your service's sign-in or sign-up flow.
Generate an access token that Google will use to access your API. The access token can be any string value, but it must uniquely represent the user and the client the token is for and must not be guessable.
Send an HTTP response that redirects the user's browser to the URL specified by the
redirect_uriparameter. Include all of the following parameters in the URL fragment:access_token: the access token you just generatedtoken_type: the stringbearerstate: the unmodified state value from the original request The following is an example of the resulting URL:https://oauth-redirect.googleusercontent.com/r/YOUR_PROJECT_ID#access_token=ACCESS_TOKEN&token_type=bearer&state=STATE_STRING
Google's OAuth 2.0 redirect handler will receive the access token and confirm
that the state value hasn't changed. After Google has obtained an
access token for your service, Google will attach the token to subsequent calls
to your Action as part of the AppRequest.
เริ่มขั้นตอนการตรวจสอบสิทธิ์
ใช้จุดประสงค์ของตัวช่วยในการลงชื่อเข้าใช้บัญชี เพื่อเริ่มขั้นตอนการตรวจสอบสิทธิ์ ข้อมูลโค้ดต่อไปนี้อธิบายวิธี ส่งคำตอบใน Dialogflow และ Actions SDK เพื่อใช้ตัวช่วยนี้
Dialogflow
const {dialogflow, SignIn} = require('actions-on-google');
const app = dialogflow({
  // REPLACE THE PLACEHOLDER WITH THE CLIENT_ID OF YOUR ACTIONS PROJECT
  clientId: CLIENT_ID,
});
// Intent that starts the account linking flow.
app.intent('Start Signin', (conv) => {
  conv.ask(new SignIn('To get your account details'));
});
@ForIntent("Start Signin")
public ActionResponse text(ActionRequest request) {
  ResponseBuilder rb = getResponseBuilder(request);
  return rb.add(new SignIn().setContext("To get your account details")).build();
}
{
  "payload": {
    "google": {
      "expectUserResponse": true,
      "richResponse": {
        "items": [
          {
            "simpleResponse": {
              "textToSpeech": "PLACEHOLDER"
            }
          }
        ]
      },
      "userStorage": "{\"data\":{}}",
      "systemIntent": {
        "intent": "actions.intent.SIGN_IN",
        "data": {
          "@type": "type.googleapis.com/google.actions.v2.SignInValueSpec",
          "optContext": "To get your account details"
        }
      }
    }
  },
  "outputContexts": [
    {
      "name": "/contexts/_actions_on_google",
      "lifespanCount": 99,
      "parameters": {
        "data": "{}"
      }
    }
  ]
}
Actions SDK:
const {actionssdk, SignIn} = require('actions-on-google');
const app = actionssdk({
  // REPLACE THE PLACEHOLDER WITH THE CLIENT_ID OF YOUR ACTIONS PROJECT
  clientId: CLIENT_ID,
});
// Intent that starts the account linking flow.
app.intent('actions.intent.TEXT', (conv) => {
  conv.ask(new SignIn('To get your account details'));
});
@ForIntent("actions.intent.TEXT")
public ActionResponse text(ActionRequest request) {
  ResponseBuilder rb = getResponseBuilder(request);
  return rb.add(new SignIn().setContext("To get your account details")).build();
}
{
  "expectUserResponse": true,
  "expectedInputs": [
    {
      "inputPrompt": {
        "richInitialPrompt": {
          "items": [
            {
              "simpleResponse": {
                "textToSpeech": "PLACEHOLDER"
              }
            }
          ]
        }
      },
      "possibleIntents": [
        {
          "intent": "actions.intent.SIGN_IN",
          "inputValueData": {
            "@type": "type.googleapis.com/google.actions.v2.SignInValueSpec",
            "optContext": "To get your account details"
          }
        }
      ]
    }
  ],
  "conversationToken": "{\"data\":{}}",
  "userStorage": "{\"data\":{}}"
}
จัดการคำขอเข้าถึงข้อมูล
หากคําขอ Assistant มีโทเค็นเพื่อการเข้าถึง ก่อนอื่นให้ตรวจสอบว่าโทเค็นเพื่อการเข้าถึงถูกต้อง (และไม่หมดอายุ) แล้วเรียกข้อมูลบัญชีผู้ใช้ที่เชื่อมโยงจากฐานข้อมูล