

「OAuth 與 Google 登入」連結類型除了 OAuth 以外,還可以添加 Google 登入功能 帳戶連結。讓 Google 使用者能夠順暢使用語音連結 也可以為已註冊服務的使用者啟用帳戶連結 以非 Google 身分登入
這種連結類型開頭為 Google 登入,可讓您檢查 您的系統中已有 Google 個人資料。如果使用者資訊 在您的系統中找不到,將啟動標準 OAuth 流程。使用者也可以 選擇以 Google 個人資料建立新的帳戶。
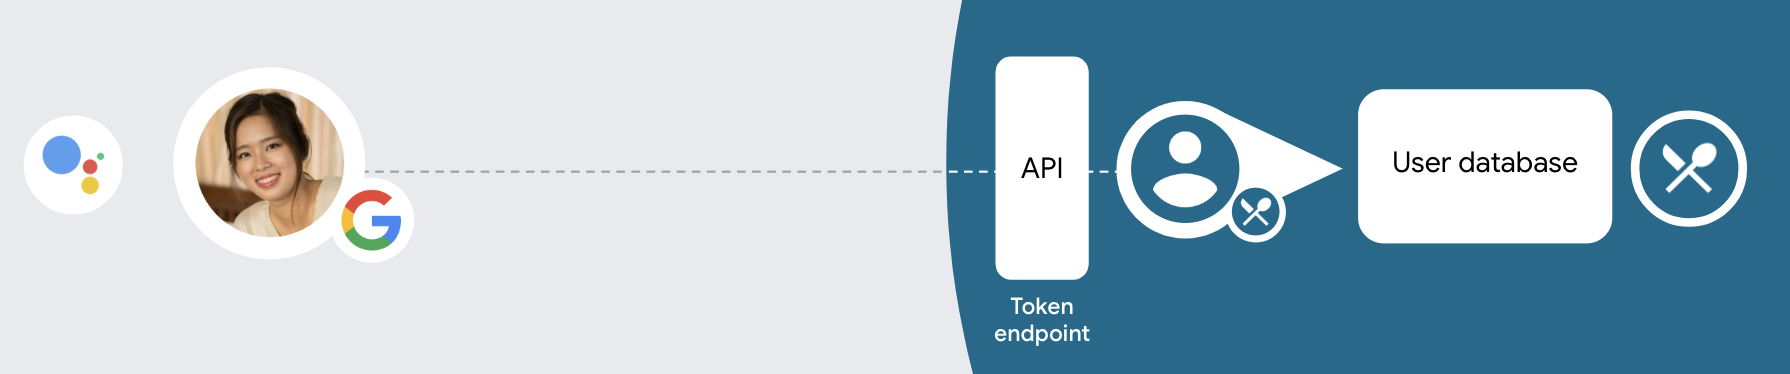
如要使用 OAuth 和 Google 登入功能進行帳戶連結,請遵循下列一般做法 步驟:
- 請先徵得使用者同意,允許存取自己的 Google 個人資料。
- 使用個人資料中的資訊來辨別使用者。
- 如果在驗證系統中找不到對應的 Google 使用者,
將如何繼續流程,取決於您是否已設定 Actions 專案
以便允許使用者透過語音建立使用者帳戶
你的網站
- 如果允許透過語音建立帳戶,請驗證身分證件 產生憑證接著,您就能根據 儲存在 ID 權杖中的設定檔資訊
- 如果您不允許透過語音建立帳戶,系統會將使用者轉移至 瀏覽器,可在其中載入您的授權頁面並完成使用者作業 建立流程
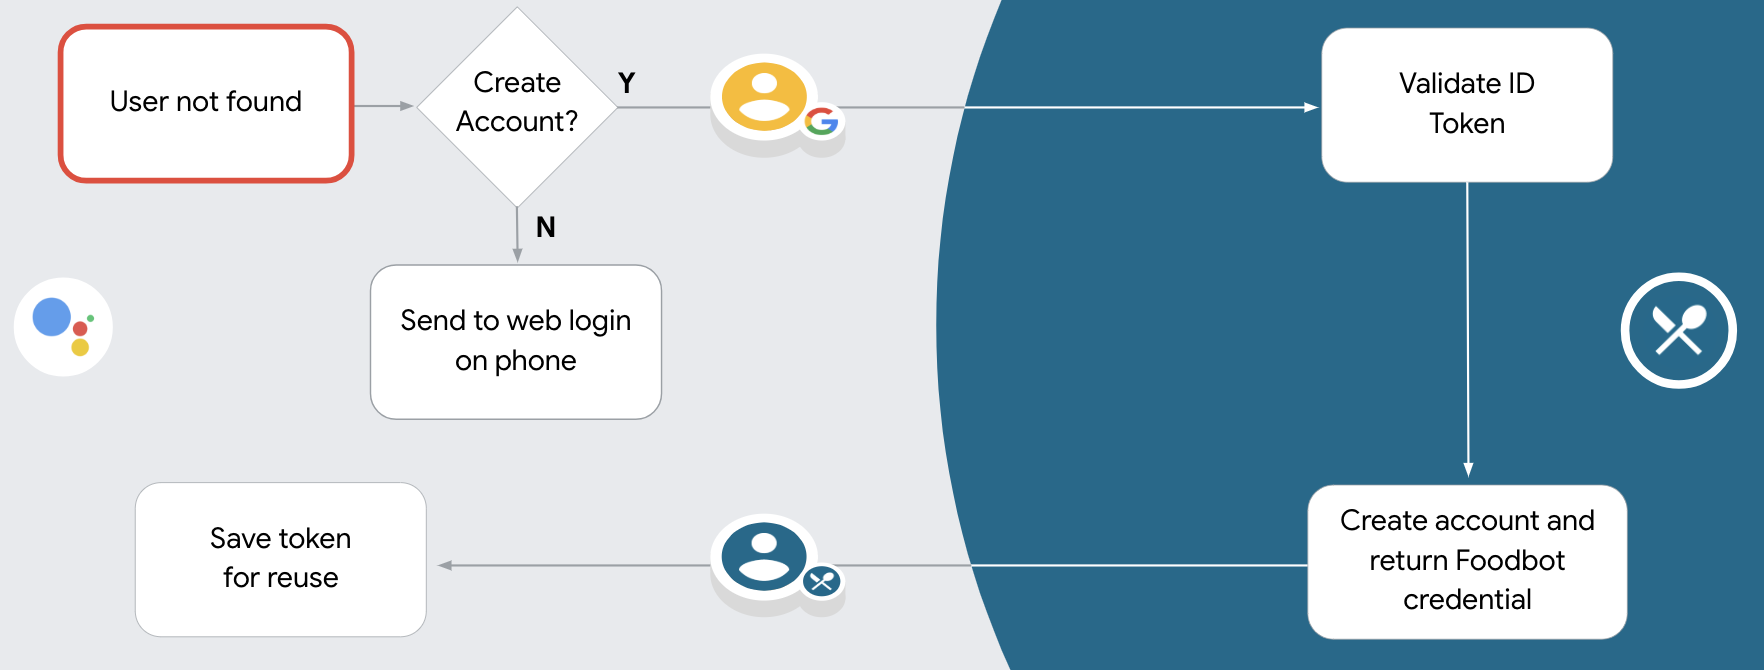
支援透過語音建立帳戶
如果您允許透過語音建立使用者帳戶,Google 助理會詢問使用者是否要 他們想要採取下列行動:
- 使用他人的 Google 帳戶資訊在您的系統中建立新帳戶,或
- 使用其他帳戶登入驗證系統 現有的非 Google 帳戶。
如果您希望盡量減少透過語音建立帳戶,建議允許透過語音建立帳戶 帳戶建立流程也會更加順暢使用者只需要離開語音流程 如果他們想使用現有的非 Google 帳戶登入。
不允許透過語音建立帳戶
如果您不允許透過語音建立使用者帳戶,Google 助理會開啟 您提供給使用者驗證的網站。如果互動是發生 使用者如果裝置沒有螢幕,Google 助理會將使用者導向手機 ,繼續進行帳戶連結流程。
在下列情況下,建議您禁止建立:
您不想開放非 Google 帳戶的使用者建立新的 使用者帳戶,並希望他們 將他們現有的使用者帳戶連結至 驗證系統。舉例來說,假設你提供會員方案 則希望確保使用者不會失去 自己在網站上累積的點數 現有帳戶。
您需要完全掌控帳戶建立流程。例如,您可以 如果需要在期間內向使用者顯示服務條款,則禁止建立 建立帳戶。
實作 OAuth 和 Google 登入帳戶連結
帳戶採用業界標準的 OAuth 2.0 流程連結。 Actions on Google 支援隱式和授權碼流程。
在隱式程式碼流程中,Google 會在使用者的瀏覽器中開啟您的授權端點。成功登入後,系統會將長期存取權杖傳回 Google。從現在起,每次透過 Google 助理傳送給您動作的要求中,都會包含這個存取權杖。
在授權碼流程中,您需要兩個端點:
- 授權端點,該端點負責將登入 UI 提供給未登入的使用者,並以簡碼授權代碼的形式,記錄使用者要求的存取權。
- 權杖交換端點,負責以下兩種交換類型:
- 交換長期更新權杖的授權碼和短期存取權杖。這項交換作業會在使用者完成帳戶連結流程時進行。
- 對短期存取權杖交換交換憑證。當 Google 需要新的存取權杖,因為更新權杖已過期時,就會發生此交換行為。
雖然隱含程式碼流程的實作方式較簡單,但 Google 建議使用隱含流程發布的存取權杖不會過期,因為若權杖與隱含流程搭配使用,就會強制使用者重新連結帳戶。如果基於安全考量而需要權杖過期,您應該考慮改用授權碼流程。
設定專案
設定專案以使用 OAuth 和 Google 登入帳戶 連結,請按照下列步驟操作:
- 開啟 Actions 主控台,然後選取您要使用的專案。
- 按一下「開發」分頁標籤,然後選擇「帳戶連結」。
- 啟用「帳戶連結」旁的切換鈕。
- 在「建立帳戶」部分中選取「是」。
在「連結類型」中選取「OAuth 與」Google 登入和隱含。
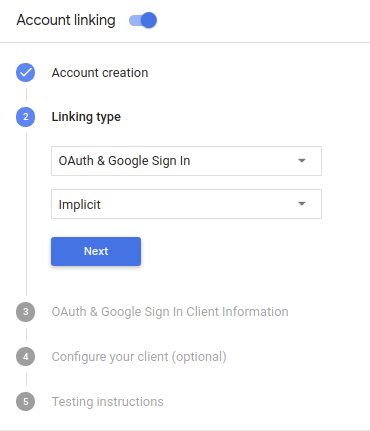
在「Client Information」中,執行下列操作:
- 指派值給「Actions to Google」核發的用戶端 ID,用來識別用戶端 ID 以及來自 Google 的要求
- 插入授權和權杖交換端點的網址。
按一下 [儲存]。
實作 OAuth 伺服器
為支援 OAuth 2.0 隱含流程,您的服務會進行授權 並可透過 HTTPS 存取端點這個端點會負責驗證 徵得使用者同意,才能存取資料。授權端點 為使用者提供未登入並記錄登入的登入使用者介面 同意授予請求的存取權。
當您的動作需要呼叫服務的其中一個已授權 API 時,Google 會使用 以取得使用者授權,讓他們能在自己的
由 Google 發起的一般 OAuth 2.0 隱含流程工作階段,是 下列流程:
- Google 會在使用者的瀏覽器中開啟授權端點。 使用者登入後,並授權 Google 存取 並透過您的 API 取得資料。
- 您的服務會建立存取權杖,並傳回給 將使用者的瀏覽器重新導向回 Google,取得存取權杖 附加在要求中
- Google 會呼叫服務的 API,並將存取權杖附加至 每個要求您的服務會確認存取權杖是否已授予 Google 授權存取 API,然後完成 API 呼叫。
處理授權要求
當您的動作需要透過 OAuth2 隱含流程進行帳戶連結時, Google 會在要求中附加以下內容,將使用者傳送到您的授權端點 分別是
| 授權端點參數 | |
|---|---|
client_id |
您指派給 Google 的用戶端 ID。 |
redirect_uri |
您傳送回應到這項要求的網址。 |
state |
傳回給 Google 的記帳金額,值維持不變 重新導向 URI |
response_type |
要在回應中傳回的值類型。以 OAuth 2.0 隱含
回應類型則一律為 token。 |
舉例來說,如果您的授權端點位於 https://myservice.example.com/auth,
要求看起來可能像這樣:
GET https://myservice.example.com/auth?client_id=GOOGLE_CLIENT_ID&redirect_uri=REDIRECT_URI&state=STATE_STRING&response_type=token
如要讓授權端點處理登入要求,請按照下列步驟操作:
確認
client_id和redirect_uri的值如下: 防止授予非預期或設定錯誤的用戶端應用程式存取權:- 確認
client_id與您用戶端 ID 相符 而是指派給 Google - 確認
redirect_uri指定的網址 參數的格式如下:https://oauth-redirect.googleusercontent.com/r/YOUR_PROJECT_ID
- 確認
檢查使用者是否已登入您的服務。如果使用者未簽署 的登入或申請流程。
產生 Google 將用來存取您的 API 的存取權杖。 存取權杖可以是任何字串值,但必須明確代表 以及該權杖適用的用戶端,且不可猜測。
傳送 HTTP 回應,將使用者的瀏覽器重新導向至網址 由
redirect_uri參數指定。包含所有 網址片段中的下列參數:access_token:您剛剛產生的存取權杖token_type:字串bearerstate:原始資料中未經修改的狀態值 要求 以下是最終網址的範例:https://oauth-redirect.googleusercontent.com/r/YOUR_PROJECT_ID#access_token=ACCESS_TOKEN&token_type=bearer&state=STATE_STRING
Google 的 OAuth 2.0 重新導向處理常式將收到存取權杖並確認
state 值未變更。Google 取得
服務的存取權杖,Google 會在後續的呼叫中附加該權杖
作為 AppRequest 的一部分動作。
處理自動連結
當使用者同意您的動作存取其 Google 個人資料後,Google 傳送的要求包含已簽署的 Google 使用者身分識別資訊。 聲明包含使用者的 Google 帳戶 ID、姓名、 以及電子郵件地址為專案設定的憑證交換端點會處理
如果驗證系統中已有對應的 Google 帳戶,
權杖交換端點會傳回使用者權杖如果 Google 帳戶不是
與現有使用者相符,權杖交換端點會傳回 user_not_found 錯誤。
這項要求的格式如下:
POST /token HTTP/1.1
Host: oauth2.example.com
Content-Type: application/x-www-form-urlencoded

grant_type=urn:ietf:params:oauth:grant-type:jwt-bearer&intent=get&assertion=JWT&consent_code=CONSENT_CODE&scope=SCOPES
您的權杖交換端點必須能處理下列參數:
| 權杖端點參數 | |
|---|---|
grant_type |
要交換的權杖類型。對於這些要求,這個
參數值為 urn:ietf:params:oauth:grant-type:jwt-bearer。 |
intent |
這類要求的參數值為 `get`。 |
assertion |
JSON Web Token (JWT),提供已簽署 識別使用者的身分JWT 包含使用者的 Google 帳戶 ID、名稱和電子郵件地址。 |
consent_code |
選用:出現一次性代碼時,系統會發送一次性代碼, 使用者已同意您的動作存取指定範圍。 |
scope |
選用:您設定 Google 向使用者要求的範圍。 |
當權杖交換端點收到連結要求時,應執行 包括:
驗證並解碼 JWT 斷言
您可以使用適用於您語言的 JWT 解碼程式庫,驗證 JWT 斷言並解碼。 使用 Google 的公開金鑰 (適用於 JWK PEM 格式),用來驗證符記 簽章。
解碼後的 JWT 斷言會如下所示:
{
  "sub": 1234567890,        // The unique ID of the user's Google Account
  "iss": "https://accounts.google.com",        // The assertion's issuer
  "aud": "123-abc.apps.googleusercontent.com", // Your server's client ID
  "iat": 233366400,         // Unix timestamp of the assertion's creation time
  "exp": 233370000,         // Unix timestamp of the assertion's expiration time
  "name": "Jan Jansen",
  "given_name": "Jan",
  "family_name": "Jansen",
  "email": "jan@gmail.com", // If present, the user's email address
  "locale": "en_US"
}
除了驗證權杖的簽章外,也請驗證斷言的核發機構
(iss 欄位) 為「https://accounts.google.com」,而目標對象 (aud 欄位)
是指派給動作的用戶端 ID。
檢查驗證系統是否已有 Google 帳戶
確認是否符合下列任一條件:
- 在斷言的
sub欄位中,Google 帳戶 ID 位於您的使用者資料庫中。 - 斷言中的電子郵件地址與您使用者資料庫中的使用者相符。
如果任一條件為 true,表示使用者已註冊,您可以核發 存取權杖
如果聲明中未提供 Google 帳戶 ID 或電子郵件地址
與您資料庫中的使用者相符,這表示對方尚未註冊。在這種情況下,您的
權杖交換端點應傳回 HTTP 401 錯誤,指定 error=user_not_found。
如以下範例所示:
HTTP/1.1 401 Unauthorized
Content-Type: application/json;charset=UTF-8

{
  "error":"user_not_found",
}
user_not_found 錯誤的 401 錯誤回應時,
使用 intent 參數值來呼叫權杖交換端點
設為 create 並傳送包含使用者個人資訊的 ID 權杖
。
透過 Google 登入功能處理帳戶建立作業
當使用者需要在您的服務上建立帳戶時,Google 會
要求傳送至權杖交換端點
intent=create,如以下範例所示:
POST /token HTTP/1.1
Host: oauth2.example.com
Content-Type: application/x-www-form-urlencoded

response_type=token&grant_type=urn:ietf:params:oauth:grant-type:jwt-bearer&scope=SCOPES&intent=create&consent_code=CONSENT_CODE&assertion=JWT[&NEW_ACCOUNT_INFO]
assertion 參數包含專為您提供的 JSON Web Token (JWT) 提供的
經簽署的 Google 使用者身分識別資訊。JWT 包含
包含使用者的 Google 帳戶 ID、名稱和電子郵件地址,您可以使用
為您的服務建立新帳戶。
如要回應帳戶建立要求,您的權杖交換端點必須 包括:
驗證並解碼 JWT 斷言
您可以使用適用於您語言的 JWT 解碼程式庫,驗證 JWT 斷言並解碼。 使用 Google 的公開金鑰 (適用於 JWK PEM 格式),用來驗證符記 簽章。
解碼後的 JWT 斷言會如下所示:
{
  "sub": 1234567890,        // The unique ID of the user's Google Account
  "iss": "https://accounts.google.com",        // The assertion's issuer
  "aud": "123-abc.apps.googleusercontent.com", // Your server's client ID
  "iat": 233366400,         // Unix timestamp of the assertion's creation time
  "exp": 233370000,         // Unix timestamp of the assertion's expiration time
  "name": "Jan Jansen",
  "given_name": "Jan",
  "family_name": "Jansen",
  "email": "jan@gmail.com", // If present, the user's email address
  "locale": "en_US"
}
除了驗證權杖的簽章外,也請驗證斷言的核發機構
(iss 欄位) 為「https://accounts.google.com」,而目標對象 (aud 欄位)
是指派給動作的用戶端 ID。
驗證使用者資訊並建立新帳戶
確認是否符合下列任一條件:
- 在斷言的
sub欄位中,Google 帳戶 ID 位於您的使用者資料庫中。 - 斷言中的電子郵件地址與您使用者資料庫中的使用者相符。
如果符合任一條件,請提示使用者連結現有帳戶
回應該請求,並傳回 HTTP 401 錯誤,
error=linking_error 和使用者的電子郵件地址為 login_hint,如
範例:
HTTP/1.1 401 Unauthorized
Content-Type: application/json;charset=UTF-8

{
  "error":"linking_error",
  "login_hint":"foo@bar.com"
}
如果兩個條件皆不成立,請使用這項資訊建立新的使用者帳戶 使用這組 API新帳戶通常不會設定密碼。是 建議您在其他平台中加入 Google 登入功能,方便使用者登入 透過 Google 顯示在應用程式各平台上此外,也可以 透過電子郵件,使用可啟動密碼復原流程的連結,讓使用者完成設定 一組密碼登入其他平台
建立完畢後,請核發存取權杖 ,並傳回 JSON 物件中 也就是您的 HTTPS 回應內文,如以下範例所示:
{
  "token_type": "Bearer",
  "access_token": "ACCESS_TOKEN",

  "expires_in": SECONDS_TO_EXPIRATION
}
啟動驗證流程
使用帳戶登入輔助意圖 以啟動驗證流程
const app = dialogflow({
  // REPLACE THE PLACEHOLDER WITH THE CLIENT_ID OF YOUR ACTIONS PROJECT
  clientId: CLIENT_ID,
})

// Intent that starts the account linking flow.
app.intent('Start Signin', conv => {
  conv.ask(new SignIn('To get your account details'))
})
private String clientId = "<your_client_id>";

@ForIntent("Start Signin")
public ActionResponse text(ActionRequest request) {
  ResponseBuilder rb = getResponseBuilder(request);
  return rb.add(new SignIn().setContext("To get your account details")).build();
}
const app = actionssdk({
  clientId: CLIENT_ID,
})

app.intent('Start Signin', conv => {
  conv.ask(new SignIn('To get your account details'))
})
private String clientId = "<your_client_id>";

@ForIntent("actions.intent.TEXT")
public ActionResponse text(ActionRequest request) {
  ResponseBuilder rb = getResponseBuilder(request);
  return rb.add(new SignIn().setContext("To get your account details")).build();
}
處理資料存取要求
如果 Google 助理要求包含存取權杖, 請先檢查存取權杖是否有效且尚未過期,然後再從 使用者帳戶資料庫。