
يضيف نوع الربط OAuth و"تسجيل الدخول باستخدام Google" تسجيل الدخول بحساب Google إلى جانب بروتوكول OAuth المستند إلى ربط الحسابات. يوفّر ذلك إمكانية الربط الصوتي بسلاسة لمستخدمي Google. مع تفعيل إمكانية ربط الحسابات للمستخدمين الذين سجّلوا في خدمتك باستخدام هوية غير تابعة لـ Google
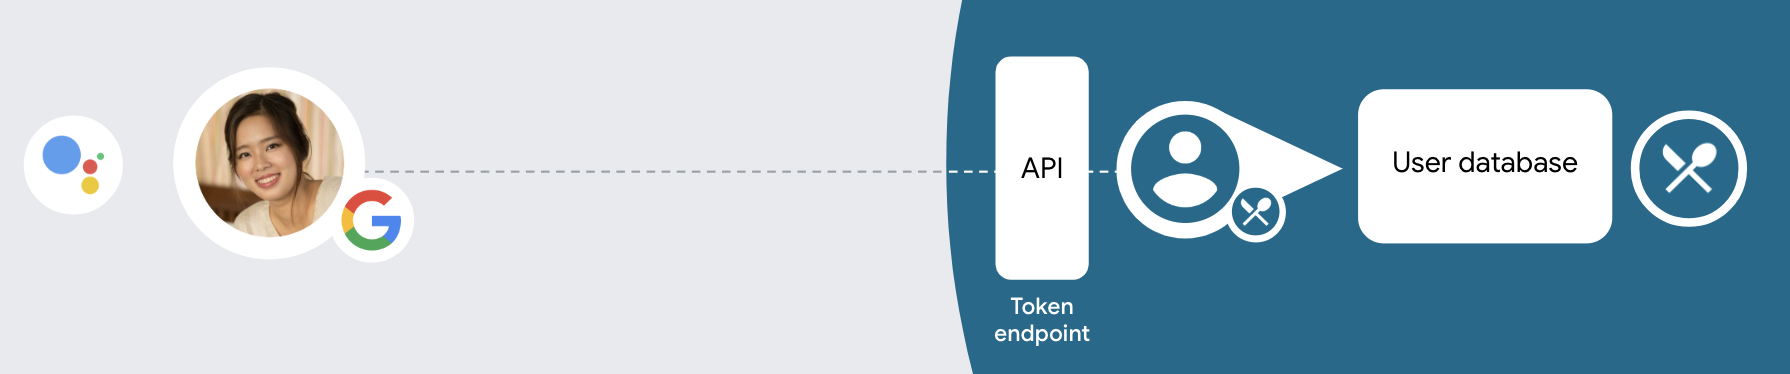
ويبدأ هذا النوع من الربط بتسجيل الدخول بحساب Google، الذي يتيح لك معرفة ما إذا كان تتوفر معلومات الملف الشخصي في حساب Google في نظامك. إذا لم تكن معلومات المستخدم في نظامك، يبدأ تدفق OAuth العادي. يمكن للمستخدم أيضًا اختيار إنشاء حساب جديد باستخدام معلومات الملف الشخصي في Google.
لإجراء عملية ربط للحساب باستخدام OAuth وتسجيل الدخول باستخدام حساب Google، يُرجى اتّباع الخطوات التالية الخطوات:
- أولاً، اطلب من المستخدم منح موافقته على الوصول إلى ملفه الشخصي في Google.
- استخدِم المعلومات الواردة في ملفه الشخصي لتحديد هوية المستخدم.
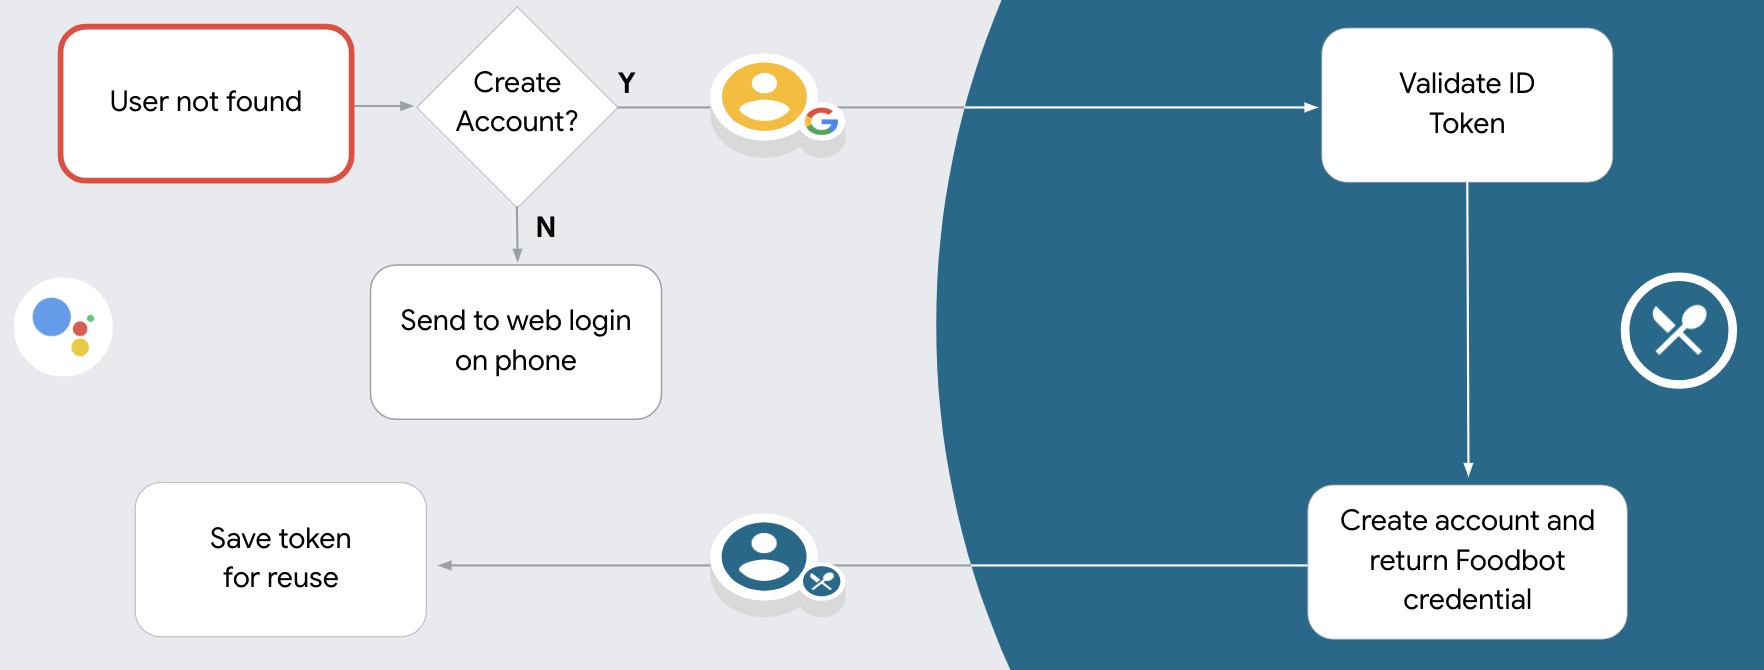
- إذا لم تتمكن من العثور على مطابقة لمستخدم Google في نظام المصادقة لديك،
يعتمد المسار على ما إذا كنت قد ضبطت مشروع الإجراءات
في وحدة تحكم الإجراءات للسماح بإنشاء حسابات المستخدمين عبر الصوت أو فقط
موقعك الإلكتروني.
- إذا سمحت بإنشاء الحساب من خلال الصوت، يجب التحقّق من صحة رقم التعريف. الذي تم استلامه من Google. ويمكنك بعد ذلك إنشاء مستخدم استنادًا إلى معلومات الملف الشخصي المضمنة في الرمز المميز للمعرّف.
- إذا لم تكن تسمح بإنشاء الحساب عبر الصوت، سيتم نقل المستخدم إلى متصفّح يمكنهم من خلاله تحميل صفحة التفويض وإكمال المستخدم عملية صناعة المحتوى
دعم إنشاء الحسابات عبر الصوت
إذا سمحت بإنشاء حسابات المستخدمين من خلال الصوت، سيسأل "مساعد Google" المستخدم ما إذا كان يريد إجراء ما يلي:
- إنشاء حساب جديد على نظامك باستخدام معلومات حسابه على Google، أو
- سجِّل الدخول إلى نظام المصادقة باستخدام حساب مختلف إذا كان لديه حساب حالي غير تابع لـ Google
يوصى بالسماح بإنشاء الحسابات عبر الصوت إذا كنت تريد تقليل مع عملية إنشاء الحساب يحتاج المستخدم فقط إلى مغادرة تدفق الصوت إذا أراد تسجيل الدخول باستخدام حساب حالي غير تابع لـ Google
عدم السماح بإنشاء حسابات عبر الصوت
إذا لم تسمح بإنشاء حسابات المستخدمين عبر الصوت، سيفتح "مساعد Google" عنوان URL على الموقع الإلكتروني الذي قدمته لمصادقة المستخدم. إذا كان التفاعل يحدث على جهاز لا يحتوي على شاشة، يوجّه "مساعد Google" المستخدم إلى هاتف. لمواصلة عملية ربط الحسابات
يُنصح بعدم السماح بإنشاء المحتوى في الحالات التالية:
أنت لا تريد السماح للمستخدمين الذين لديهم حسابات غير تابعة لـ Google بإنشاء حساب حساب مستخدم وتريد أن يتم ربطه بحسابات المستخدمين الحالية في نظام المصادقة بدلاً من ذلك. على سبيل المثال، إذا كنت تقدم برنامج ولاء، التأكد من عدم خسار المستخدم للنقاط التي تم جمعها في حساب حالي.
ستحتاج إلى التحكم الكامل في عملية إنشاء الحساب. على سبيل المثال، يمكنك عدم السماح بالإنشاء إذا كنت بحاجة إلى عرض بنود الخدمة للمستخدم أثناء إنشاء حساب.
تنفيذ عملية ربط بروتوكول OAuth بحساب "تسجيل الدخول بحساب Google"
ترتبط الحسابات بمسارات OAuth 2.0 العادية في المجال. تتوافق "المهام مع مساعد Google" مع تدفّقات الرموز الضمنية ورموز التفويض.
في مسار الرمز الضمني، تفتح Google نقطة نهاية التفويض في متصفّح المستخدم. بعد تسجيل الدخول بنجاح، يمكنك إرجاع رمز الدخول الطويل الأمد إلى Google. يتم الآن تضمين رمز الدخول هذا في كل طلب يتم إرساله من "مساعد Google" إلى الإجراء.
في مسار رمز التفويض، ستحتاج إلى نقطتَي نهاية:
- نقطة نهاية التفويض المسؤولة عن تقديم واجهة مستخدم تسجيل الدخول للمستخدمين الذين لم يسجّلوا الدخول وتسجيل الموافقة على الوصول المطلوب في شكل رمز تفويض قصير الأجل.
- نقطة نهاية تبادل الرموز المسؤولة عن نوعَين من عمليات التبادل:
- تبادل رمز التفويض لرمز مميز لإعادة التحميل طويل الأجل ورمز دخول قصير الأجل وتتم عملية التبادل هذه عندما يجري المستخدم عملية ربط الحساب.
- لتبادل رمز مميز لإعادة التحميل طويل الأمد لرمز دخول قصير الأجل وتتم عملية التبادل هذه عندما تحتاج Google إلى رمز دخول جديد لأنّ الرمز الذي انتهت صلاحيته.
على الرغم من بساطة تنفيذ الرمز الضمني، تنصح Google بعدم انتهاء صلاحية رموز الدخول الضمنية التي تم إصدارها باستخدام التدفّق الضمني، لأنّ انتهاء صلاحية الرمز المميّز مع المسار الضمني يفرض على المستخدم ربط حسابه مرة أخرى. إذا كنت بحاجة إلى انتهاء صلاحية الرمز المميَّز لأسباب تتعلق بالأمان، ننصحك بشدة باستخدام تدفق رمز المصادقة بدلاً من ذلك.
ضبط المشروع
لضبط مشروعك على استخدام OAuth وحساب "تسجيل الدخول بحساب Google" الربط، اتبع الخطوات التالية:
- افتح وحدة تحكّم المهام واختَر المشروع الذي تريد استخدامه.
- انقر على علامة التبويب التطوير واختر ربط الحساب.
- فعِّل مفتاح التبديل بجانب ربط الحساب.
- في القسم إنشاء الحساب، اختَر نعم.
في نوع الربط، اختَر OAuth تسجيل الدخول باستخدام حساب Google والتطبيق الضمني
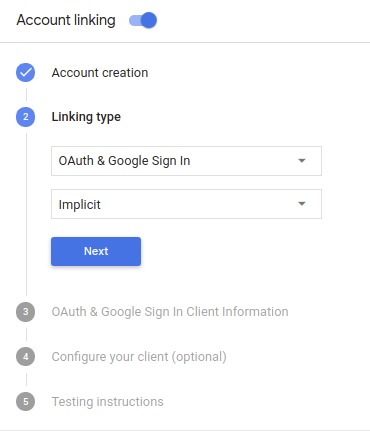
في معلومات العميل، عليك إجراء ما يلي:
- حدِّد قيمةً للرقم التعريفي للعميل الصادر عن خدمة "المهام مع مساعد Google" لتحديد الطلبات الواردة من Google.
- أدرِج عناوين URL لنقاط نهاية التفويض وToken Exchange.
انقر على حفظ.
تنفيذ خادم OAuth
لدعم تدفق OAuth 2.0 الضمني، تُجري خدمتك تفويضًا. نقطة النهاية متوفرة عبر HTTPS. نقطة النهاية هذه مسؤولة عن مصادقة الحصول على موافقة من المستخدمين للوصول إلى البيانات. نقطة نهاية التفويض توفّر واجهة مستخدم لتسجيل الدخول للمستخدمين الذين لم يسجّلوا الدخول إلى حساباتهم الموافقة على الوصول المطلوب.
عندما يحتاج الإجراء الخاص بك إلى استدعاء إحدى واجهات برمجة التطبيقات المعتمَدة لخدمتك، تستخدمها Google. نقطة النهاية هذه للحصول على إذن من المستخدمين بطلب واجهات برمجة التطبيقات هذه على بالنيابة عنك.
تتضمن جلسة مسار OAuth 2.0 الضمني النموذجية التي تبدأها Google التدفق التالي:
- تفتح Google نقطة نهاية التفويض في متصفّح المستخدم. تشير رسالة الأشكال البيانية تسجيل دخول المستخدم إذا لم يكن مسجّلاً الدخول، ويمنح Google إذنًا بالوصول بياناته من خلال واجهة برمجة التطبيقات إذا لم يسبق له منحها الإذن بذلك.
- تنشئ الخدمة رمز دخول وتعيده إلى Google عن طريق إعادة توجيه متصفّح المستخدم إلى Google باستخدام رمز الدخول المرفق بالطلب.
- تستدعي Google واجهات برمجة التطبيقات التابعة لخدمتك، وترفق رمز الدخول المميز لكل طلب. تتحقّق خدمتك من أنّ رمز الدخول يمنح Google. للوصول إلى واجهة برمجة التطبيقات ثم يُكمل طلب البيانات من واجهة برمجة التطبيقات.
التعامل مع طلبات التفويض
عندما يحتاج الإجراء الخاص بك إلى ربط الحساب من خلال تدفق OAuth2 الضمني، ترسل Google المستخدم إلى نقطة نهاية التفويض من خلال طلب يتضمن المعلمات التالية:
| مَعلمات نقطة نهاية التفويض | |
|---|---|
client_id |
معرِّف العميل الذي عيّنته لـ Google. |
redirect_uri |
عنوان URL الذي ترسل إليه الرد على هذا الطلب. |
state |
يشير هذا المصطلح إلى قيمة محاسبة يتم إرسالها إلى Google بدون أي تغيير في معرّف الموارد المنتظم (URI) لإعادة التوجيه. |
response_type |
نوع القيمة المطلوب عرضها في الرد. بالنسبة إلى بروتوكول OAuth 2.0 الضمني
يكون نوع الاستجابة دائمًا token. |
على سبيل المثال، إذا كانت نقطة نهاية التفويض متاحة على https://myservice.example.com/auth،
قد يبدو الطلب كما يلي:
GET https://myservice.example.com/auth?client_id=GOOGLE_CLIENT_ID&redirect_uri=REDIRECT_URI&state=STATE_STRING&response_type=token
لكي تعالج نقطة نهاية التفويض طلبات تسجيل الدخول، عليك اتّباع الخطوات التالية:
يُرجى التحقّق من القيمتَين
client_idوredirect_uriمن أجل: منع منح الوصول إلى تطبيقات العميل غير المقصودة أو التي تم إعدادها بشكلٍ غير صحيح:- تأكَّد من أنّ
client_idيتطابق مع معرّف العميل الذي أدخلته. تعيينه إلى Google. - تأكَّد من أنّ عنوان URL المحدّد من قِبل
redirect_uriعلى النحو التالي:https://oauth-redirect.googleusercontent.com/r/YOUR_PROJECT_ID
- تأكَّد من أنّ
تحقق مما إذا كان المستخدم قد سجّل الدخول إلى خدمتك. في حال لم يكن المستخدم مسجِّلاً الدخول أو أكمل عملية تسجيل الدخول أو الاشتراك في الخدمة.
أنشئ رمز الدخول المميز الذي ستستخدمه Google للوصول إلى واجهة برمجة التطبيقات الخاصة بك. تشير رسالة الأشكال البيانية يمكن أن يكون رمز الدخول أي قيمة سلسلة، ولكن يجب أن يمثل المستخدم والعميل الذي يرتبط به الرمز المميز ويجب ألا يكون من الممكن تخمينه.
إرسال استجابة HTTP تؤدي إلى إعادة توجيه متصفّح المستخدم إلى عنوان URL التي تحددها المعلمة
redirect_uri. تضمين جميع المعلمات التالية في جزء عنوان URL:access_token: رمز الدخول الذي أنشأته للتوtoken_type: السلسلةbearerstate: قيمة الحالة غير المعدَّلة من القيمة الأصلية طلب في ما يلي مثال على عنوان URL الناتج:https://oauth-redirect.googleusercontent.com/r/YOUR_PROJECT_ID#access_token=ACCESS_TOKEN&token_type=bearer&state=STATE_STRING
سيستلم معالج إعادة التوجيه OAuth 2.0 من Google رمز الدخول وسيتأكد من ذلك
أن قيمة state لم تتغير. بعد حصول Google على
رمز الدخول لخدمتك، فستلحق Google الرمز المميز بالمكالمات اللاحقة
إلى الإجراء الخاص بك كجزء من AppRequest.
التعامل مع عمليات الربط التلقائي
بعد أن يمنح المستخدم الإجراء الخاص بك موافقته على الوصول إلى ملفه الشخصي على Google، ستخضع Google يرسل طلبًا يشتمل على تأكيد موقَّع لهوية مستخدم Google. يتضمن التأكيد معلومات تتضمن رقم تعريف حساب المستخدم على Google واسمه وعنوان بريدك الإلكتروني. نقطة نهاية تبادل الرموز المميّزة التي تم ضبطها للتعاملات مع مشروعك هذا الطلب.
إذا كان حساب Google المقابل موجودًا في نظام المصادقة لديك،
بإرجاع نقطة نهاية تبادل الرمز المميز رمزًا مميزًا للمستخدم. إذا لم يكن حساب Google
تطابق مستخدمًا حاليًا، ستعرض نقطة نهاية تبادل الرمز المميز خطأ user_not_found.
يكون الطلب بالشكل التالي:
POST /token HTTP/1.1
Host: oauth2.example.com
Content-Type: application/x-www-form-urlencoded

grant_type=urn:ietf:params:oauth:grant-type:jwt-bearer&intent=get&assertion=JWT&consent_code=CONSENT_CODE&scope=SCOPES
يجب أن تتمكّن نقطة نهاية تبادل الرموز المميّزة من معالجة المَعلمات التالية:
| مَعلمات نقطة نهاية الرمز المميّز | |
|---|---|
grant_type |
تمثّل هذه السمة نوع الرمز المميّز الذي يتم تبادله. بالنسبة لهذه الطلبات، سيتم
المعلَمة urn:ietf:params:oauth:grant-type:jwt-bearer. |
intent |
وبالنسبة إلى هذه الطلبات، تكون قيمة هذه المَعلمة هي `get`. |
assertion |
يشير هذا المصطلح إلى رمز JSON المميّز للويب (JWT) ويقدِّم تأكيدًا موقَّعًا على بيانات وهوية المستخدم. ويحتوي JWT على معلومات تتضمن عنوان البريد الإلكتروني للمستخدم رقم تعريف الحساب والاسم وعنوان البريد الإلكتروني |
consent_code |
اختياري: عند وجود رمز يُستخدم لمرة واحدة، وهو يشير إلى أن منح المستخدم موافقته على وصول الإجراء الخاص بك إلى النطاقات المحدّدة. |
scope |
اختياري: أي نطاقات ضبطتها Google لطلبها من المستخدمين. |
عندما تتلقّى نقطة نهاية تبادل الرموز المميّزة طلب الربط، يجب إجراء ما يلي: التالي:
التحقق من صحة تأكيد JWT وفك ترميزه
يمكنك التحقّق من صحة تأكيد JWT وفك ترميزه باستخدام مكتبة فك ترميز JWT بلغتك. استخدام مفاتيح Google العامة (المتوفّرة في JWK أو PEM) للتحقق من صحة الرمز التوقيع.
عند فك ترميز النص، يظهر تأكيد JWT على النحو التالي:
{
  "sub": 1234567890,        // The unique ID of the user's Google Account
  "iss": "https://accounts.google.com",        // The assertion's issuer
  "aud": "123-abc.apps.googleusercontent.com", // Your server's client ID
  "iat": 233366400,         // Unix timestamp of the assertion's creation time
  "exp": 233370000,         // Unix timestamp of the assertion's expiration time
  "name": "Jan Jansen",
  "given_name": "Jan",
  "family_name": "Jansen",
  "email": "jan@gmail.com", // If present, the user's email address
  "locale": "en_US"
}
بالإضافة إلى التحقّق من توقيع الرمز المميّز، تأكَّد من جهة إصدار التأكيد.
(حقل iss) هو https://accounts.google.com وأن شريحة الجمهور (حقل aud)
هو معرِّف العميل المعيّن للإجراء الخاص بك.
التأكّد من توفّر حساب Google في نظام المصادقة
تحقق مما إذا كان أي من الشروط التالية صحيحًا:
- رقم تعريف حساب Google، الوارد في حقل
subللتأكيد، موجود في قاعدة بيانات المستخدم لديك. - يتطابق عنوان البريد الإلكتروني الوارد في التأكيد مع مستخدم في قاعدة بيانات المستخدم الخاصة بك.
في حال استيفاء أيٌّ من الشروط، يعني هذا أنّ المستخدم قد اشترك من قبل ويمكنك إصدار .
إذا لم يكن رقم تعريف حساب Google أو عنوان البريد الإلكتروني المحدّدين في التأكيد
يطابق مستخدمًا في قاعدة البيانات الخاصة بك، لم يشترك المستخدم بعد. في هذه الحالة،
يجب أن ترد نقطة نهاية تبادل الرمز المميز برسالة الخطأ HTTP 401 التي تحدد error=user_not_found،
كما في المثال التالي:
HTTP/1.1 401 Unauthorized
Content-Type: application/json;charset=UTF-8

{
  "error":"user_not_found",
}
user_not_found، تطلب Google
يستدعي نقطة نهاية تبادل الرمز المميز قيمة المعلمة intent
يتم ضبطها على إنشاء وإرسال رمز مميّز للمعرّف يحتوي على معلومات الملف الشخصي للمستخدم.
مع الطلب.
معالجة عملية إنشاء الحساب عبر تسجيل الدخول بحساب Google
عندما يحتاج مستخدم إلى إنشاء حساب على خدمتك، تنشئ Google
طلب لنقطة نهاية تبادل الرمز المميز التي تحدد
intent=create، كما في المثال التالي:
POST /token HTTP/1.1
Host: oauth2.example.com
Content-Type: application/x-www-form-urlencoded

response_type=token&grant_type=urn:ietf:params:oauth:grant-type:jwt-bearer&scope=SCOPES&intent=create&consent_code=CONSENT_CODE&assertion=JWT[&NEW_ACCOUNT_INFO]
تحتوي المَعلمة assertion على رمز JSON المميّز للويب (JWT) الذي يوفّر.
تأكيد موقَّع على هوية مستخدم Google يحتوي JWT على معلومات
يتضمّن رقم تعريف حساب المستخدِم على Google واسمه وعنوان بريده الإلكتروني، ويمكنك استخدامها
لإنشاء حساب جديد على خدمتك.
للاستجابة لطلبات إنشاء الحساب، يجب أن تفعل نقطة نهاية تبادل الرمز المميز ما يلي:
التحقق من صحة تأكيد JWT وفك ترميزه
يمكنك التحقّق من صحة تأكيد JWT وفك ترميزه باستخدام مكتبة فك ترميز JWT بلغتك. استخدام مفاتيح Google العامة (المتوفّرة في JWK أو PEM) للتحقق من صحة الرمز التوقيع.
عند فك ترميز النص، يظهر تأكيد JWT على النحو التالي:
{
  "sub": 1234567890,        // The unique ID of the user's Google Account
  "iss": "https://accounts.google.com",        // The assertion's issuer
  "aud": "123-abc.apps.googleusercontent.com", // Your server's client ID
  "iat": 233366400,         // Unix timestamp of the assertion's creation time
  "exp": 233370000,         // Unix timestamp of the assertion's expiration time
  "name": "Jan Jansen",
  "given_name": "Jan",
  "family_name": "Jansen",
  "email": "jan@gmail.com", // If present, the user's email address
  "locale": "en_US"
}
بالإضافة إلى التحقّق من توقيع الرمز المميّز، تأكَّد من جهة إصدار التأكيد.
(حقل iss) هو https://accounts.google.com وأن شريحة الجمهور (حقل aud)
هو معرِّف العميل المعيّن للإجراء الخاص بك.
التحقق من صحة معلومات المستخدم وإنشاء حساب جديد
تحقق مما إذا كان أي من الشروط التالية صحيحًا:
- رقم تعريف حساب Google، الوارد في حقل
subللتأكيد، موجود في قاعدة بيانات المستخدم لديك. - يتطابق عنوان البريد الإلكتروني الوارد في التأكيد مع مستخدم في قاعدة بيانات المستخدم الخاصة بك.
إذا كان أيٌّ من الشرطين صحيحًا، اطلب من المستخدم ربط حسابه الحالي بـ
حسابهم على Google عن طريق الاستجابة للطلب برسالة الخطأ HTTP 401، مع تحديد
error=linking_error وعنوان البريد الإلكتروني للمستخدم باعتباره login_hint، كما في
المثال التالي:
HTTP/1.1 401 Unauthorized
Content-Type: application/json;charset=UTF-8

{
  "error":"linking_error",
  "login_hint":"foo@bar.com"
}
إذا لم يكن أي من الشرطين صحيحًا، عليك إنشاء حساب مستخدم جديد باستخدام المعلومات. المقدمة في JWT. لا يتم عادةً ضبط كلمة مرور للحسابات الجديدة. من المهم ننصحك بإضافة حساب Google إلى المنصات الأخرى ليتمكّن المستخدمون من تسجيل الدخول عبر Google عبر مساحات عرض تطبيقك. بدلاً من ذلك، يمكنك إرسال رسالة إلكترونية إلى المستخدم تتضمّن رابطًا يبدأ مسار استرداد كلمة المرور للسماح للمستخدم بضبط كلمة مرور لتسجيل الدخول على الأنظمة الأساسية الأخرى.
عند اكتمال الإنشاء، يمكنك إصدار رمز دخول وعرض القيم في كائن JSON نص استجابة HTTPS، كما في المثال التالي:
{
  "token_type": "Bearer",
  "access_token": "ACCESS_TOKEN",

  "expires_in": SECONDS_TO_EXPIRATION
}
بدء مسار المصادقة
استخدِم هدف المساعدة الخاص بتسجيل الدخول إلى الحساب. لبدء عملية المصادقة
const app = dialogflow({
  // REPLACE THE PLACEHOLDER WITH THE CLIENT_ID OF YOUR ACTIONS PROJECT
  clientId: CLIENT_ID,
})

// Intent that starts the account linking flow.
app.intent('Start Signin', conv => {
  conv.ask(new SignIn('To get your account details'))
})
private String clientId = "<your_client_id>";

@ForIntent("Start Signin")
public ActionResponse text(ActionRequest request) {
  ResponseBuilder rb = getResponseBuilder(request);
  return rb.add(new SignIn().setContext("To get your account details")).build();
}
const app = actionssdk({
  clientId: CLIENT_ID,
})

app.intent('Start Signin', conv => {
  conv.ask(new SignIn('To get your account details'))
})
private String clientId = "<your_client_id>";

@ForIntent("actions.intent.TEXT")
public ActionResponse text(ActionRequest request) {
  ResponseBuilder rb = getResponseBuilder(request);
  return rb.add(new SignIn().setContext("To get your account details")).build();
}
التعامل مع طلبات الوصول إلى البيانات
إذا كان طلب "مساعد Google" يحتوي على رمز دخول، تحقق أولاً من أن رمز الدخول صالح وغير منتهي الصلاحية ثم استرجعه من قاعدة بيانات حساب المستخدم، وحساب المستخدم المرتبط بالرمز المميز.