
|
5분 정도 시간이 있으신가요?
간단한 온라인 설문조사에 참여해 주시면 Google Workspace 문서를 개선하는 데 큰 도움이 됩니다.
|
이 튜토리얼에서는 실시간으로 인시던트에 응답하는 Google Chat 앱을 만드는 방법을 보여줍니다. 인시던트에 응답할 때 앱은 Chat 스페이스를 만들고 채우고, 메시지, 슬래시 명령어, 대화상자로 인시던트 해결을 지원하고, AI를 사용하여 Google Docs 문서에서 인시던트 응답을 요약합니다.
인시던트는 해결을 위해 즉각적인 팀의 관심이 필요한 이벤트입니다. 사고의 예는 다음과 같습니다.
- 고객 관계 관리 (CRM) 플랫폼에서 시간 제약이 있는 케이스가 생성되어 서비스팀이 해결을 위해 협업해야 합니다.
- 시스템이 오프라인 상태가 되면 사이트 안정성 엔지니어 (SRE) 그룹에 알림이 전송되어 함께 온라인 상태로 되돌릴 수 있습니다.
- 규모가 큰 지진이 발생하고 긴급 구조대원이 대응을 조정해야 합니다.
이 튜토리얼에서는 사용자가 웹페이지에서 버튼을 클릭하여 인시던트를 신고할 때 인시던트 알림이 시작됩니다. 웹페이지에서는 사용자에게 기본 인시던트 정보(제목, 설명, 응답자의 이메일 주소)를 입력하도록 요청하여 인시던트를 시뮬레이션합니다.
인시던트 관리 채팅 앱의 작동 방식을 확인하세요.
-
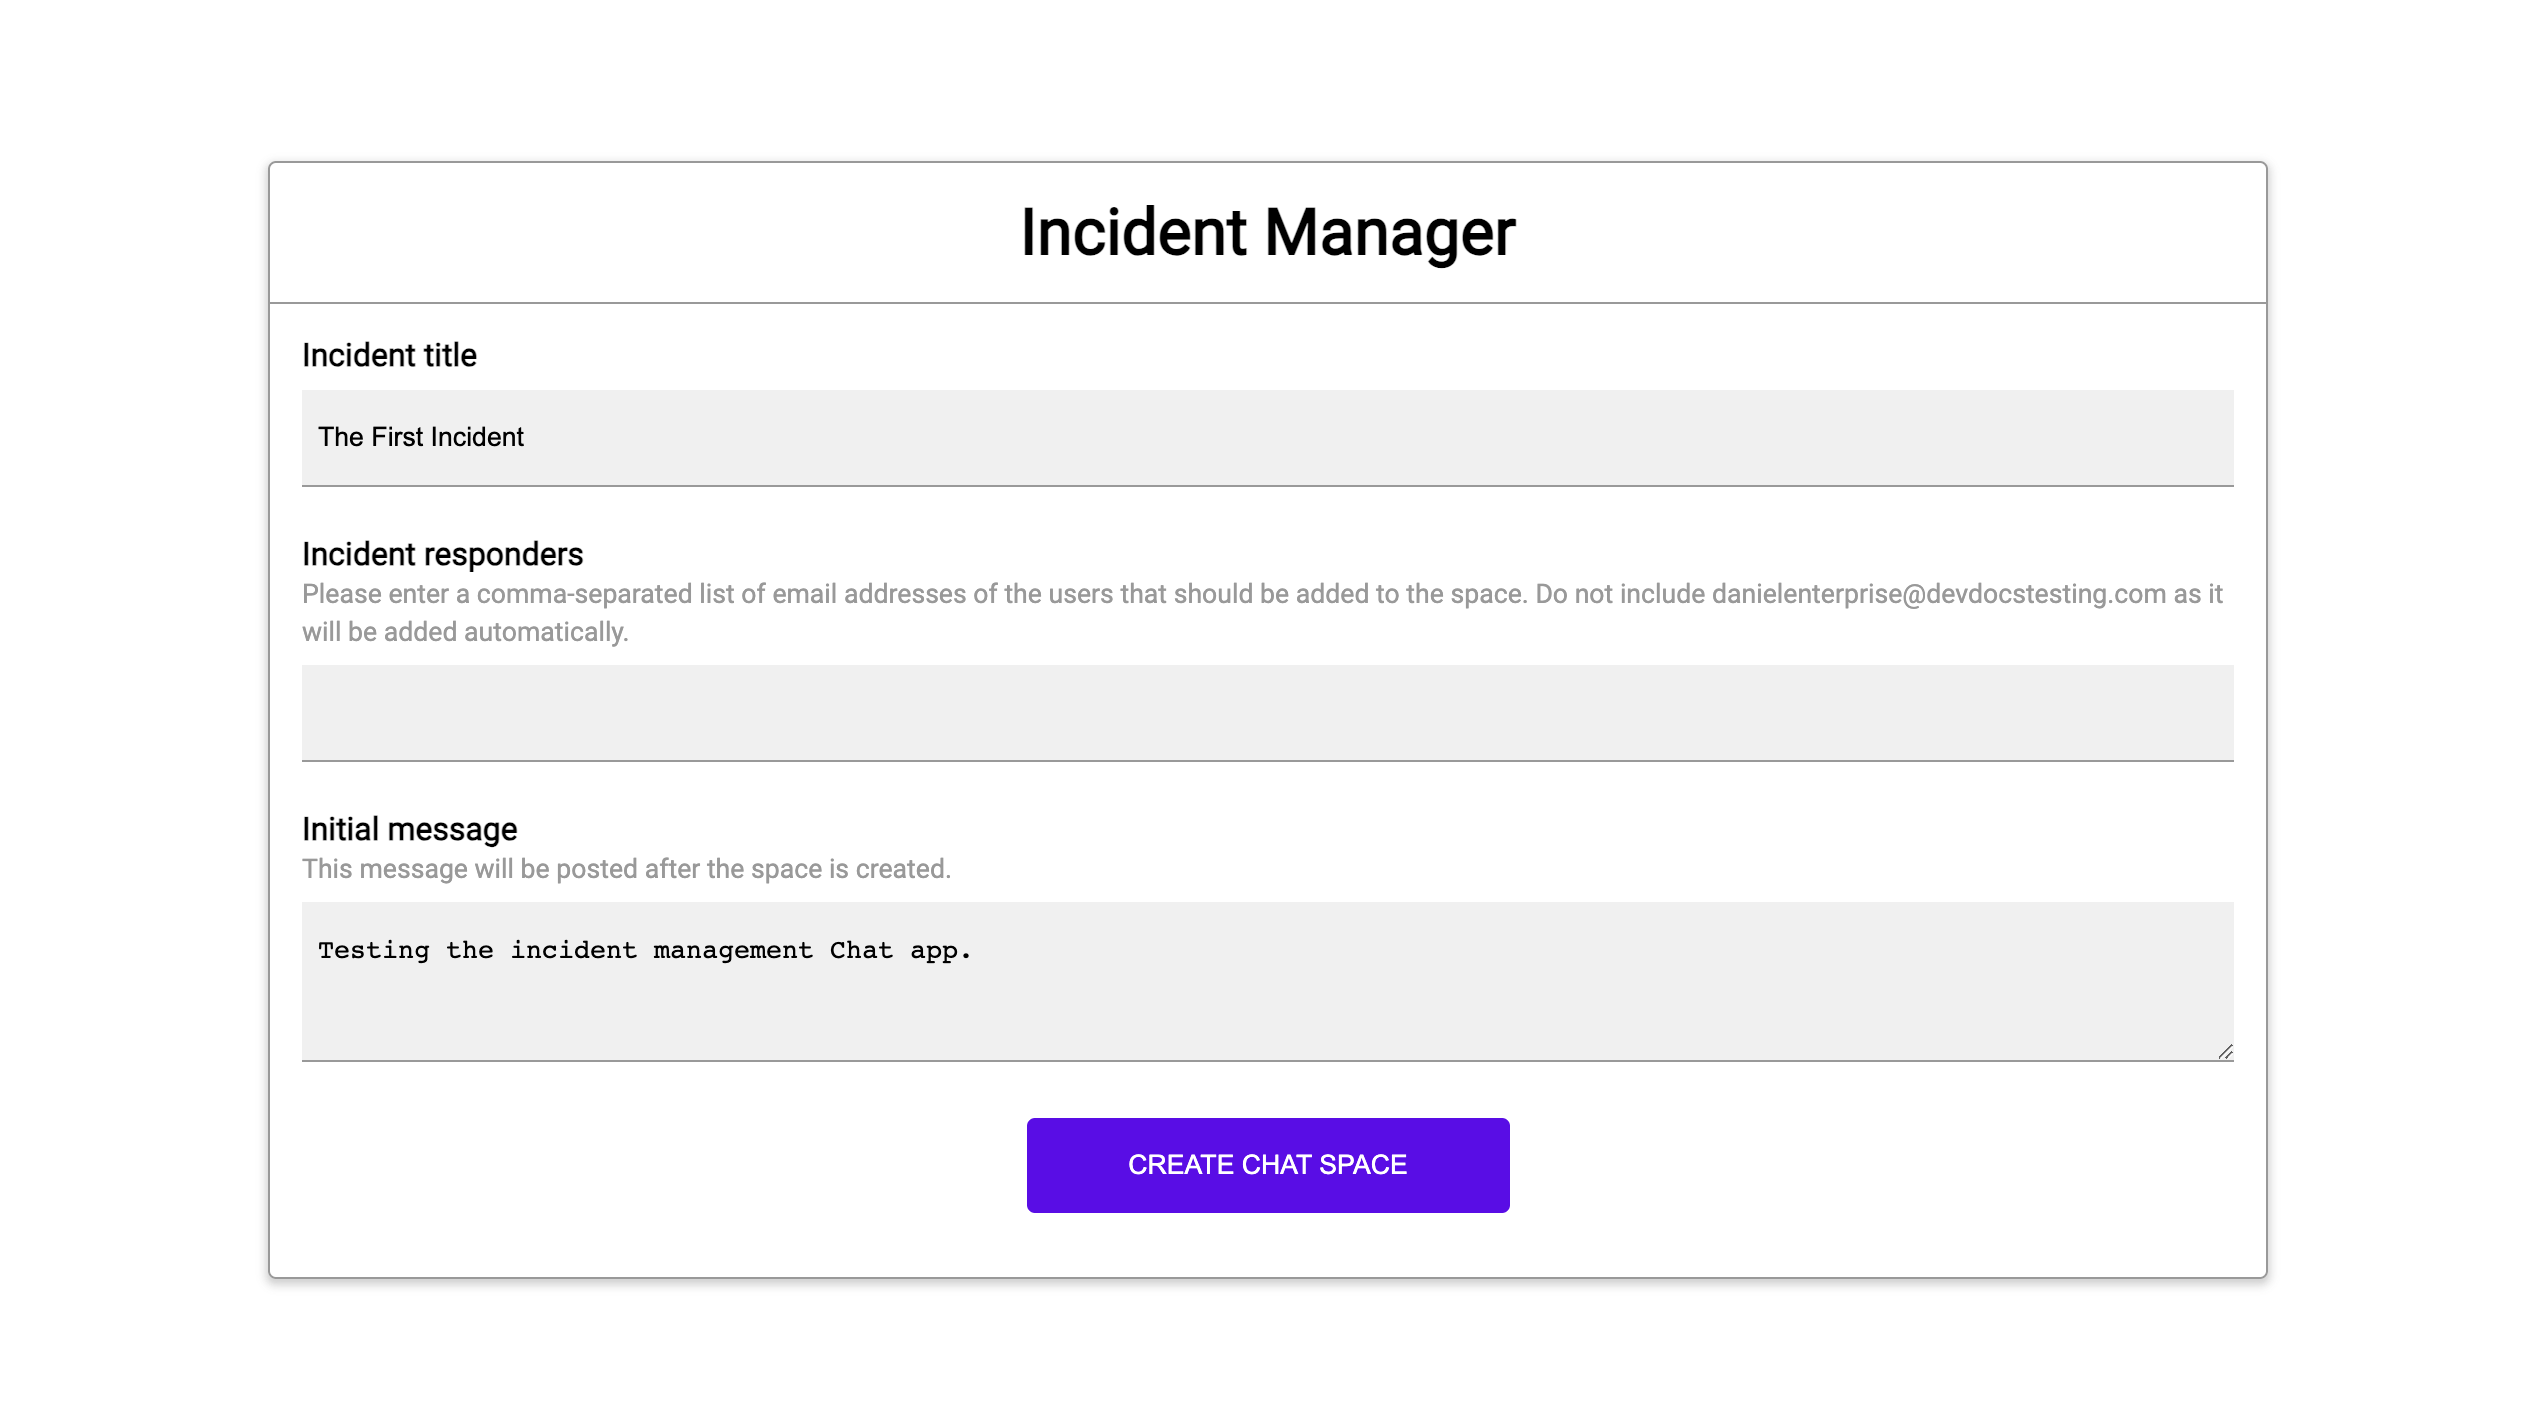
그림 1. 사고를 신고할 수 있는 웹사이트입니다. -
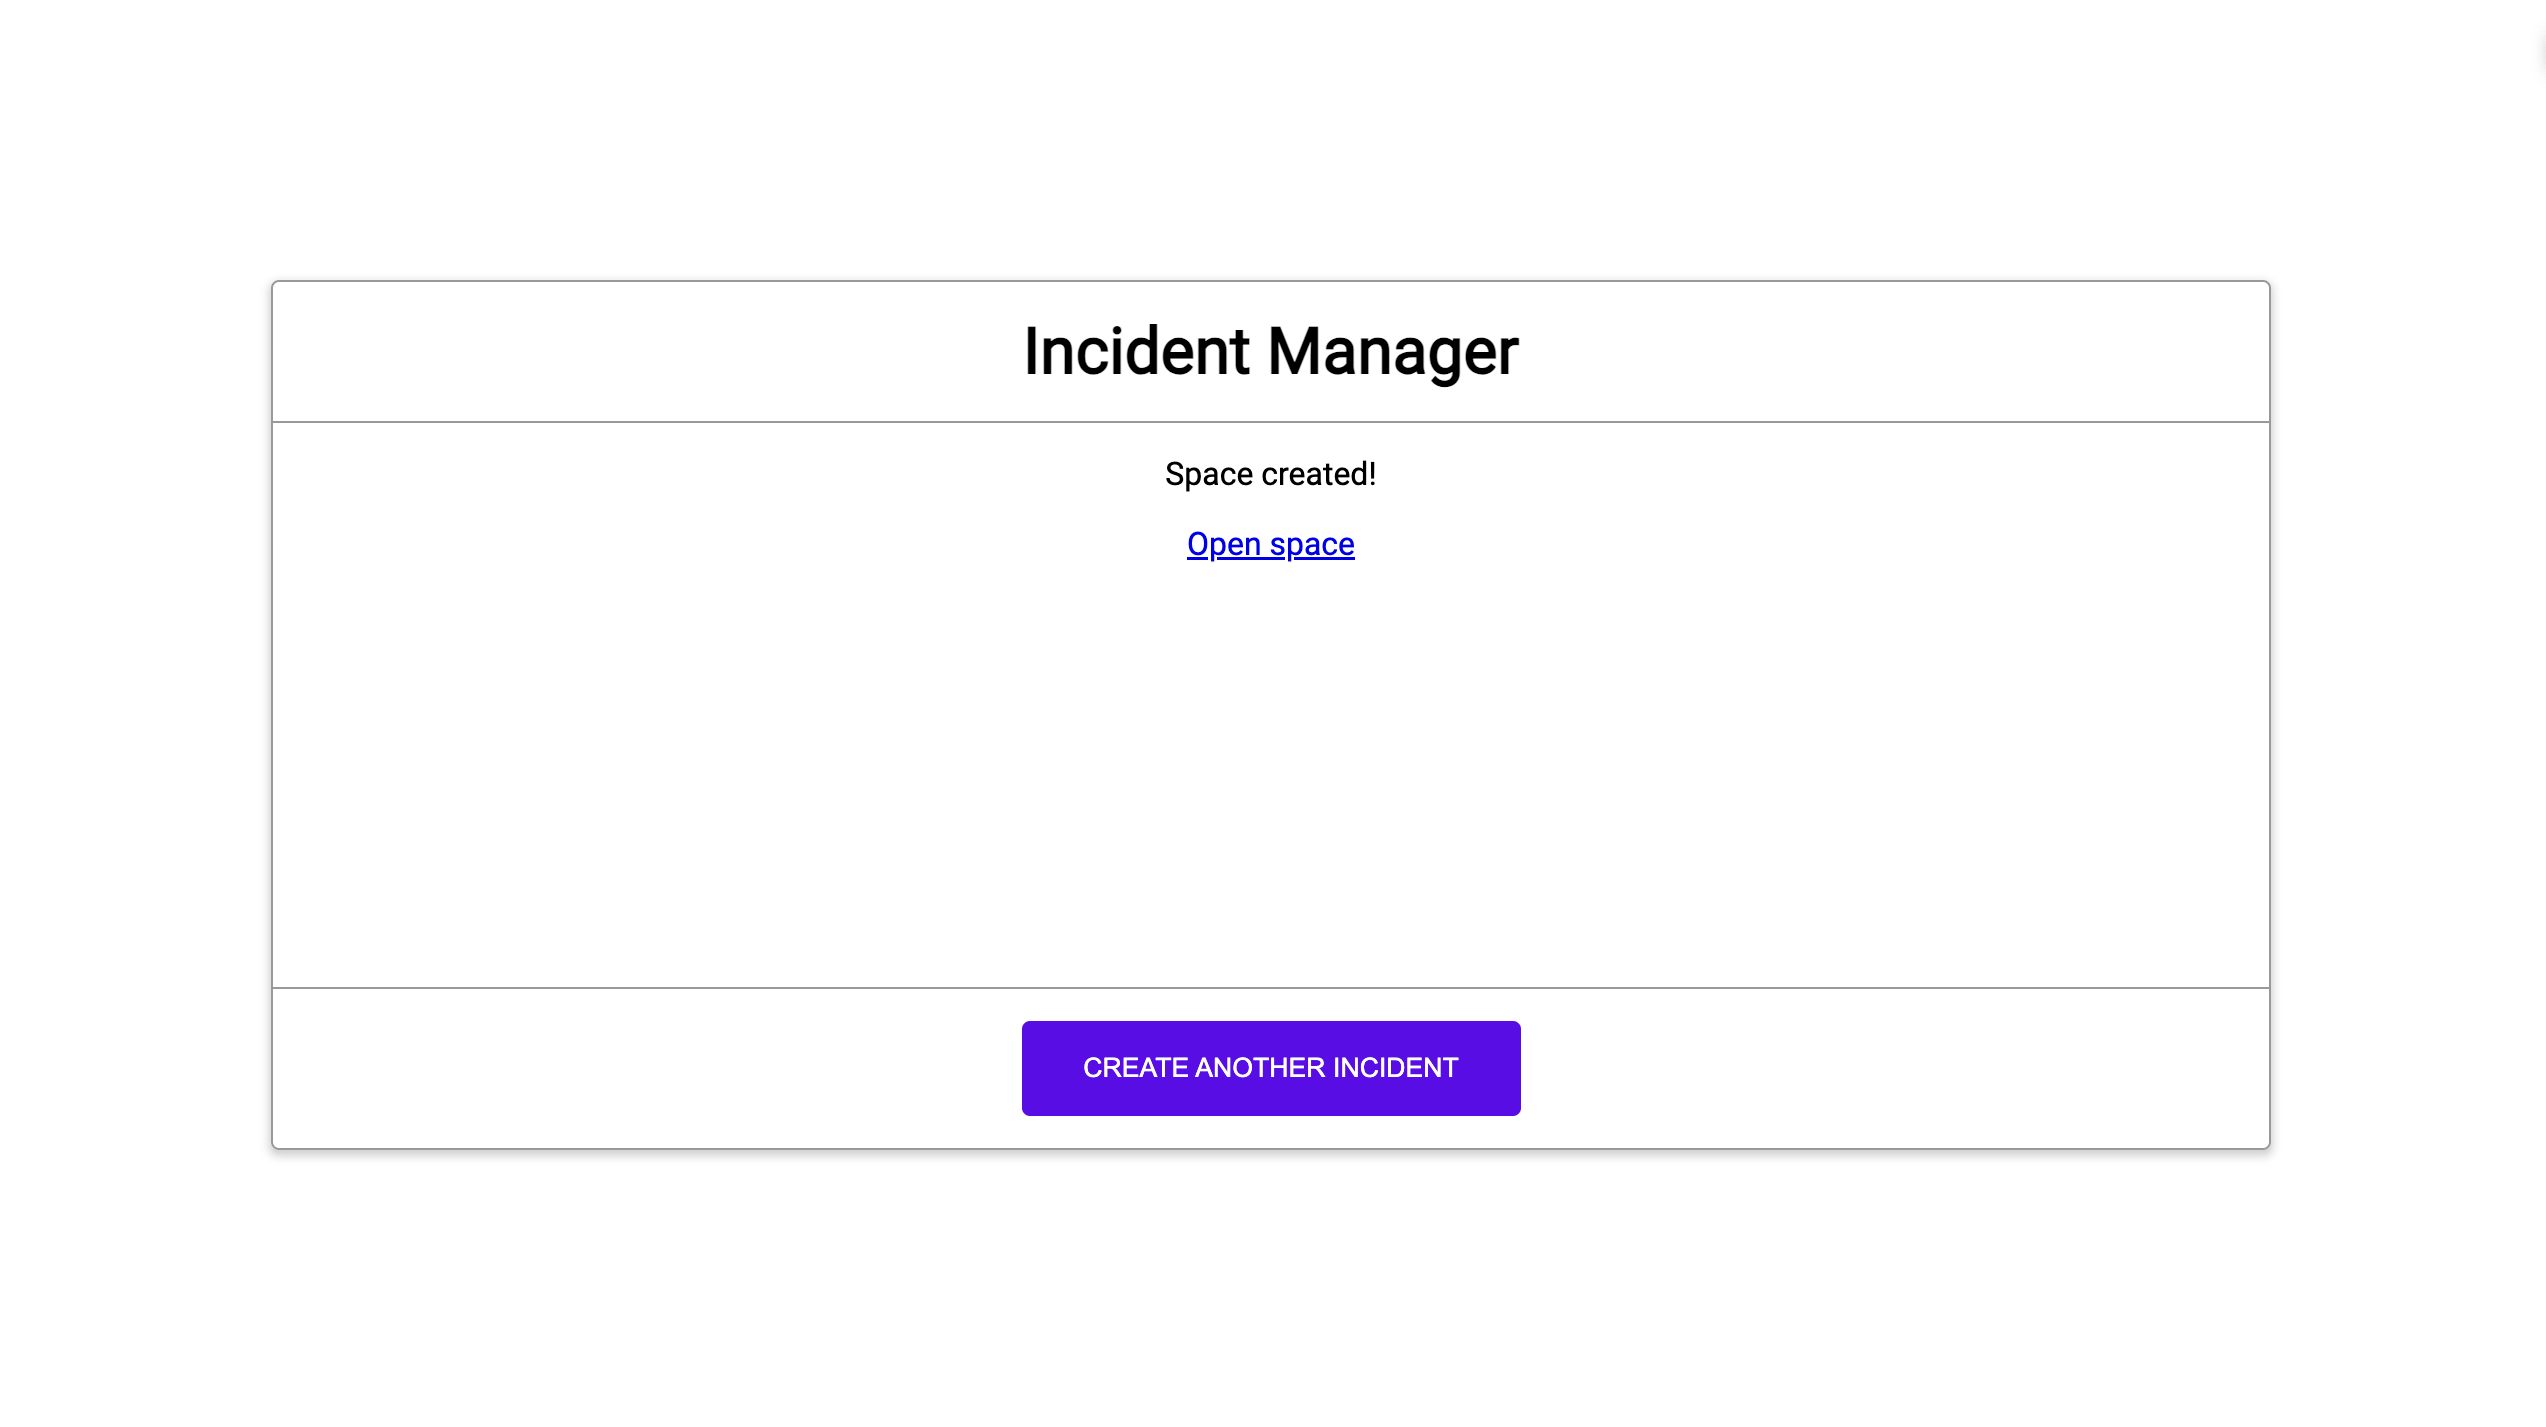
그림 2. 문제 채팅 스페이스가 생성되었다는 알림 -
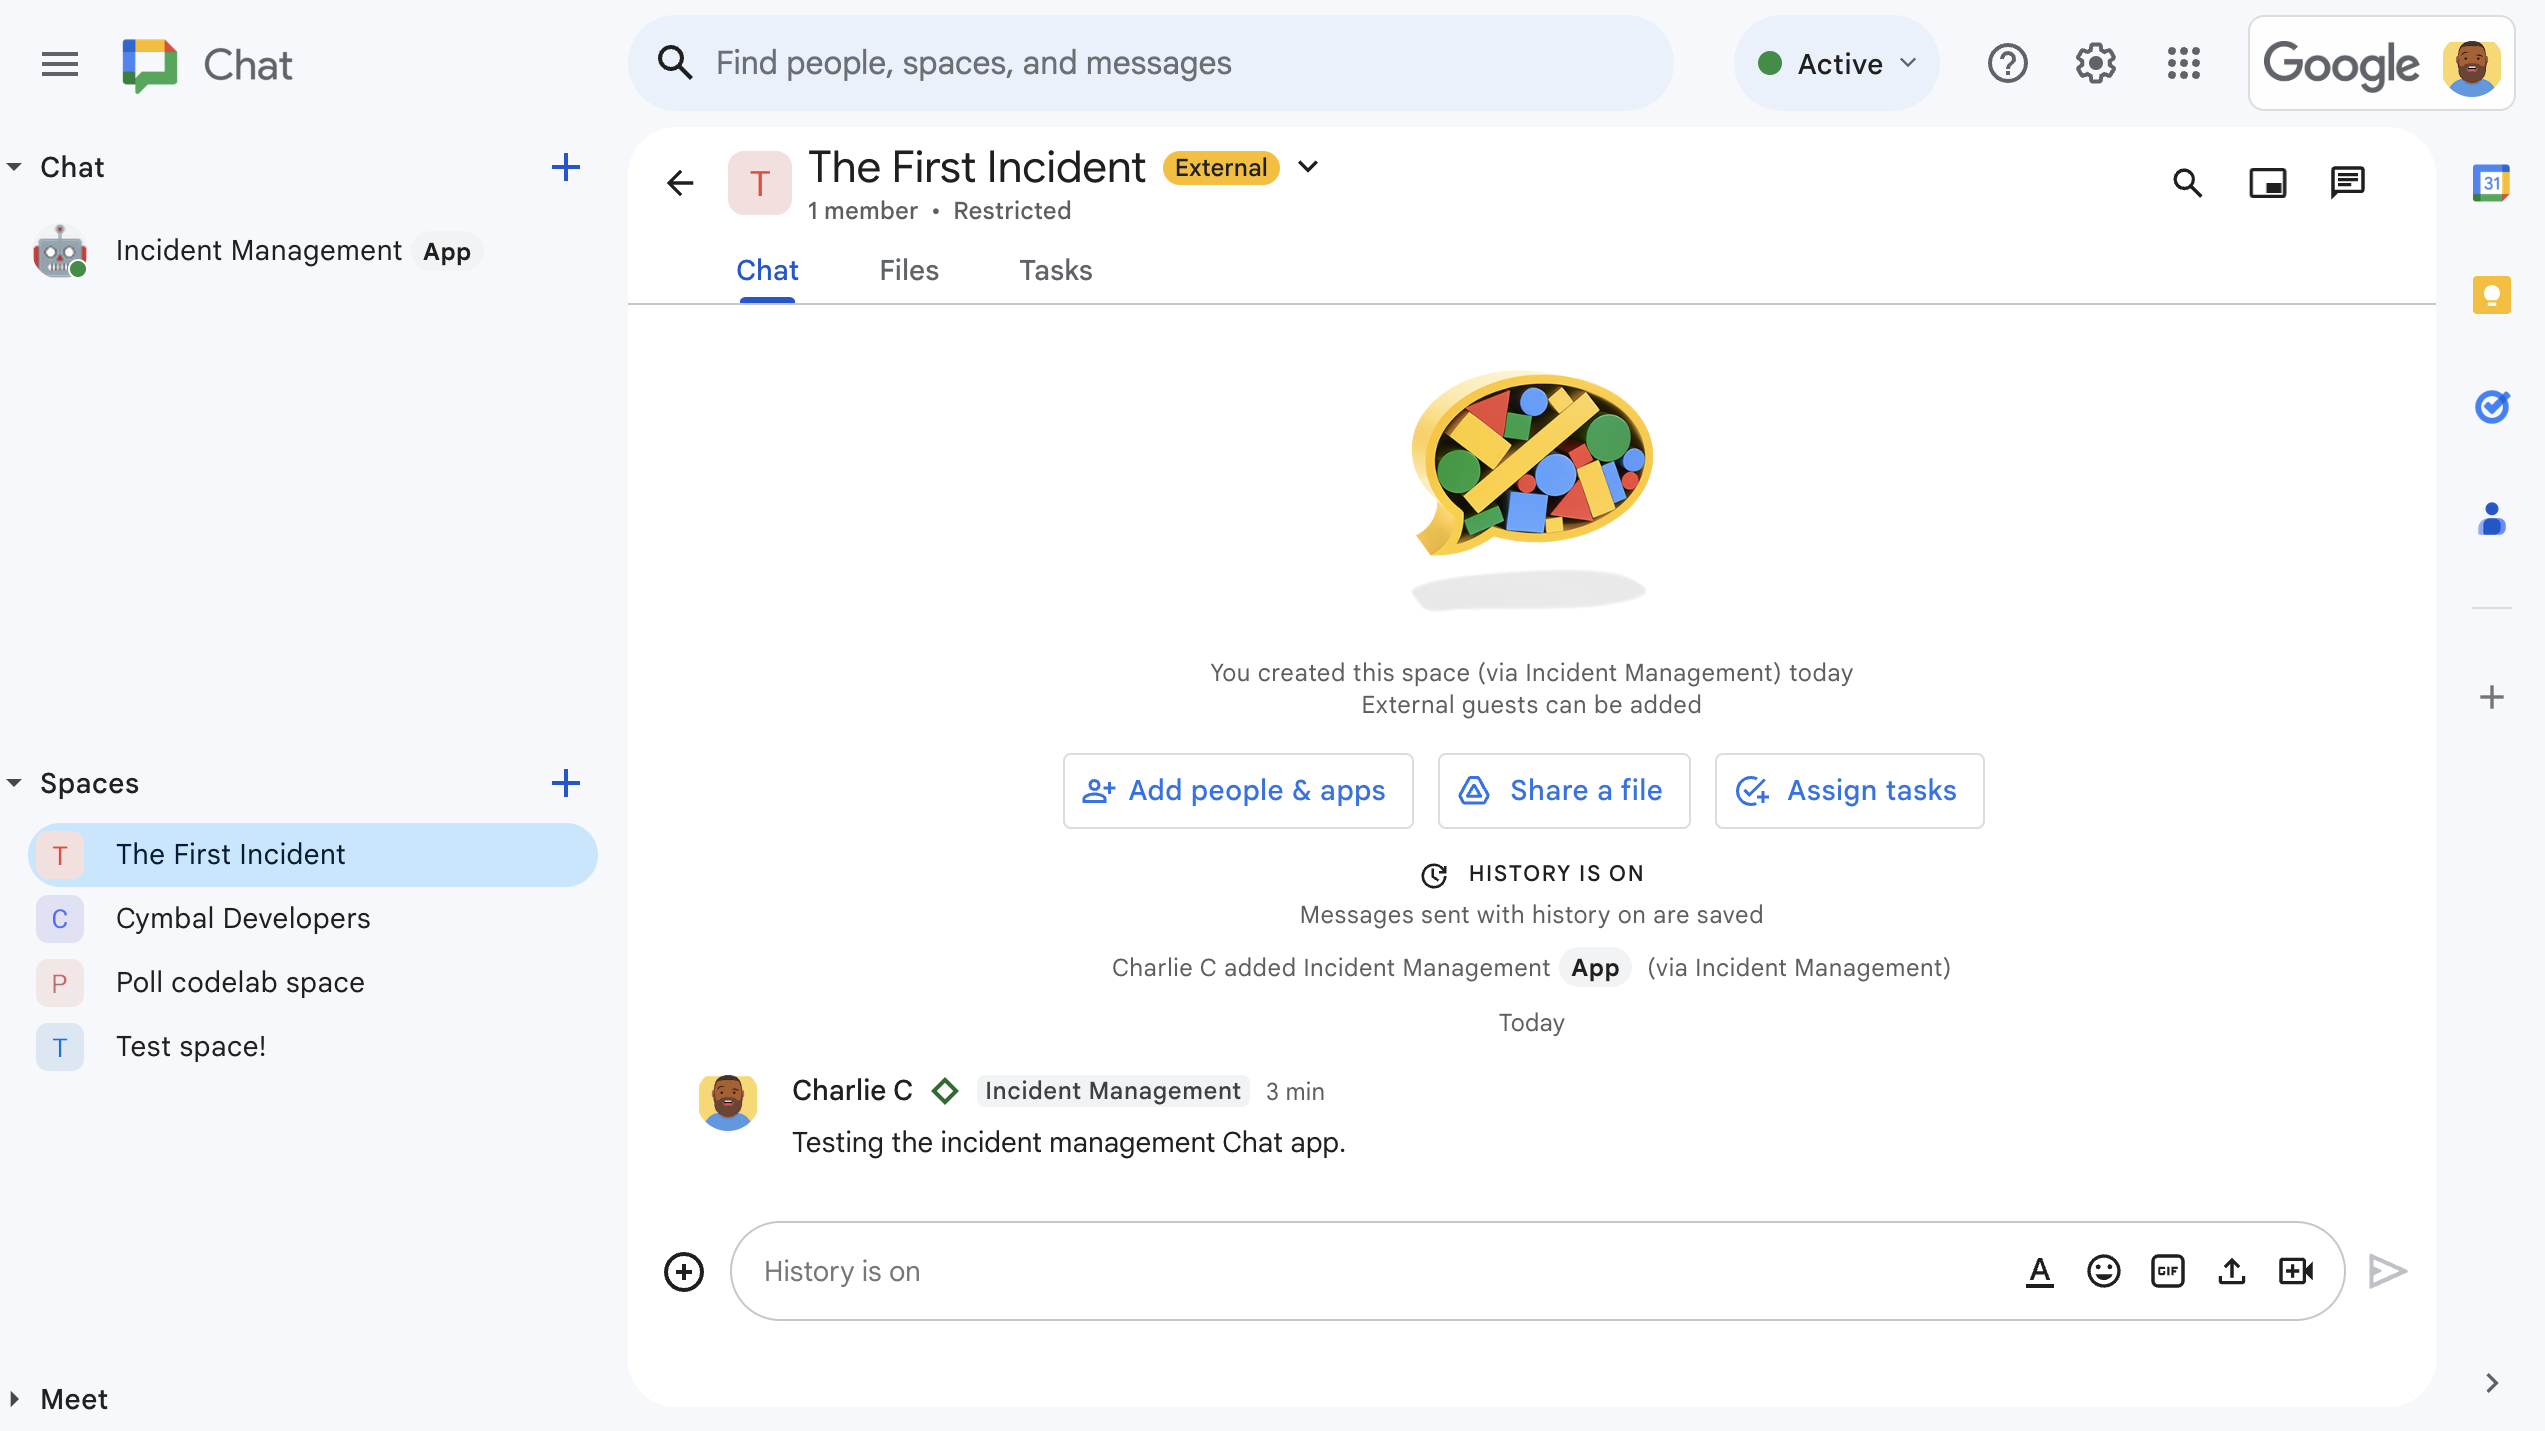
그림 3. 침해 사고 대응 Chat 스페이스입니다. -
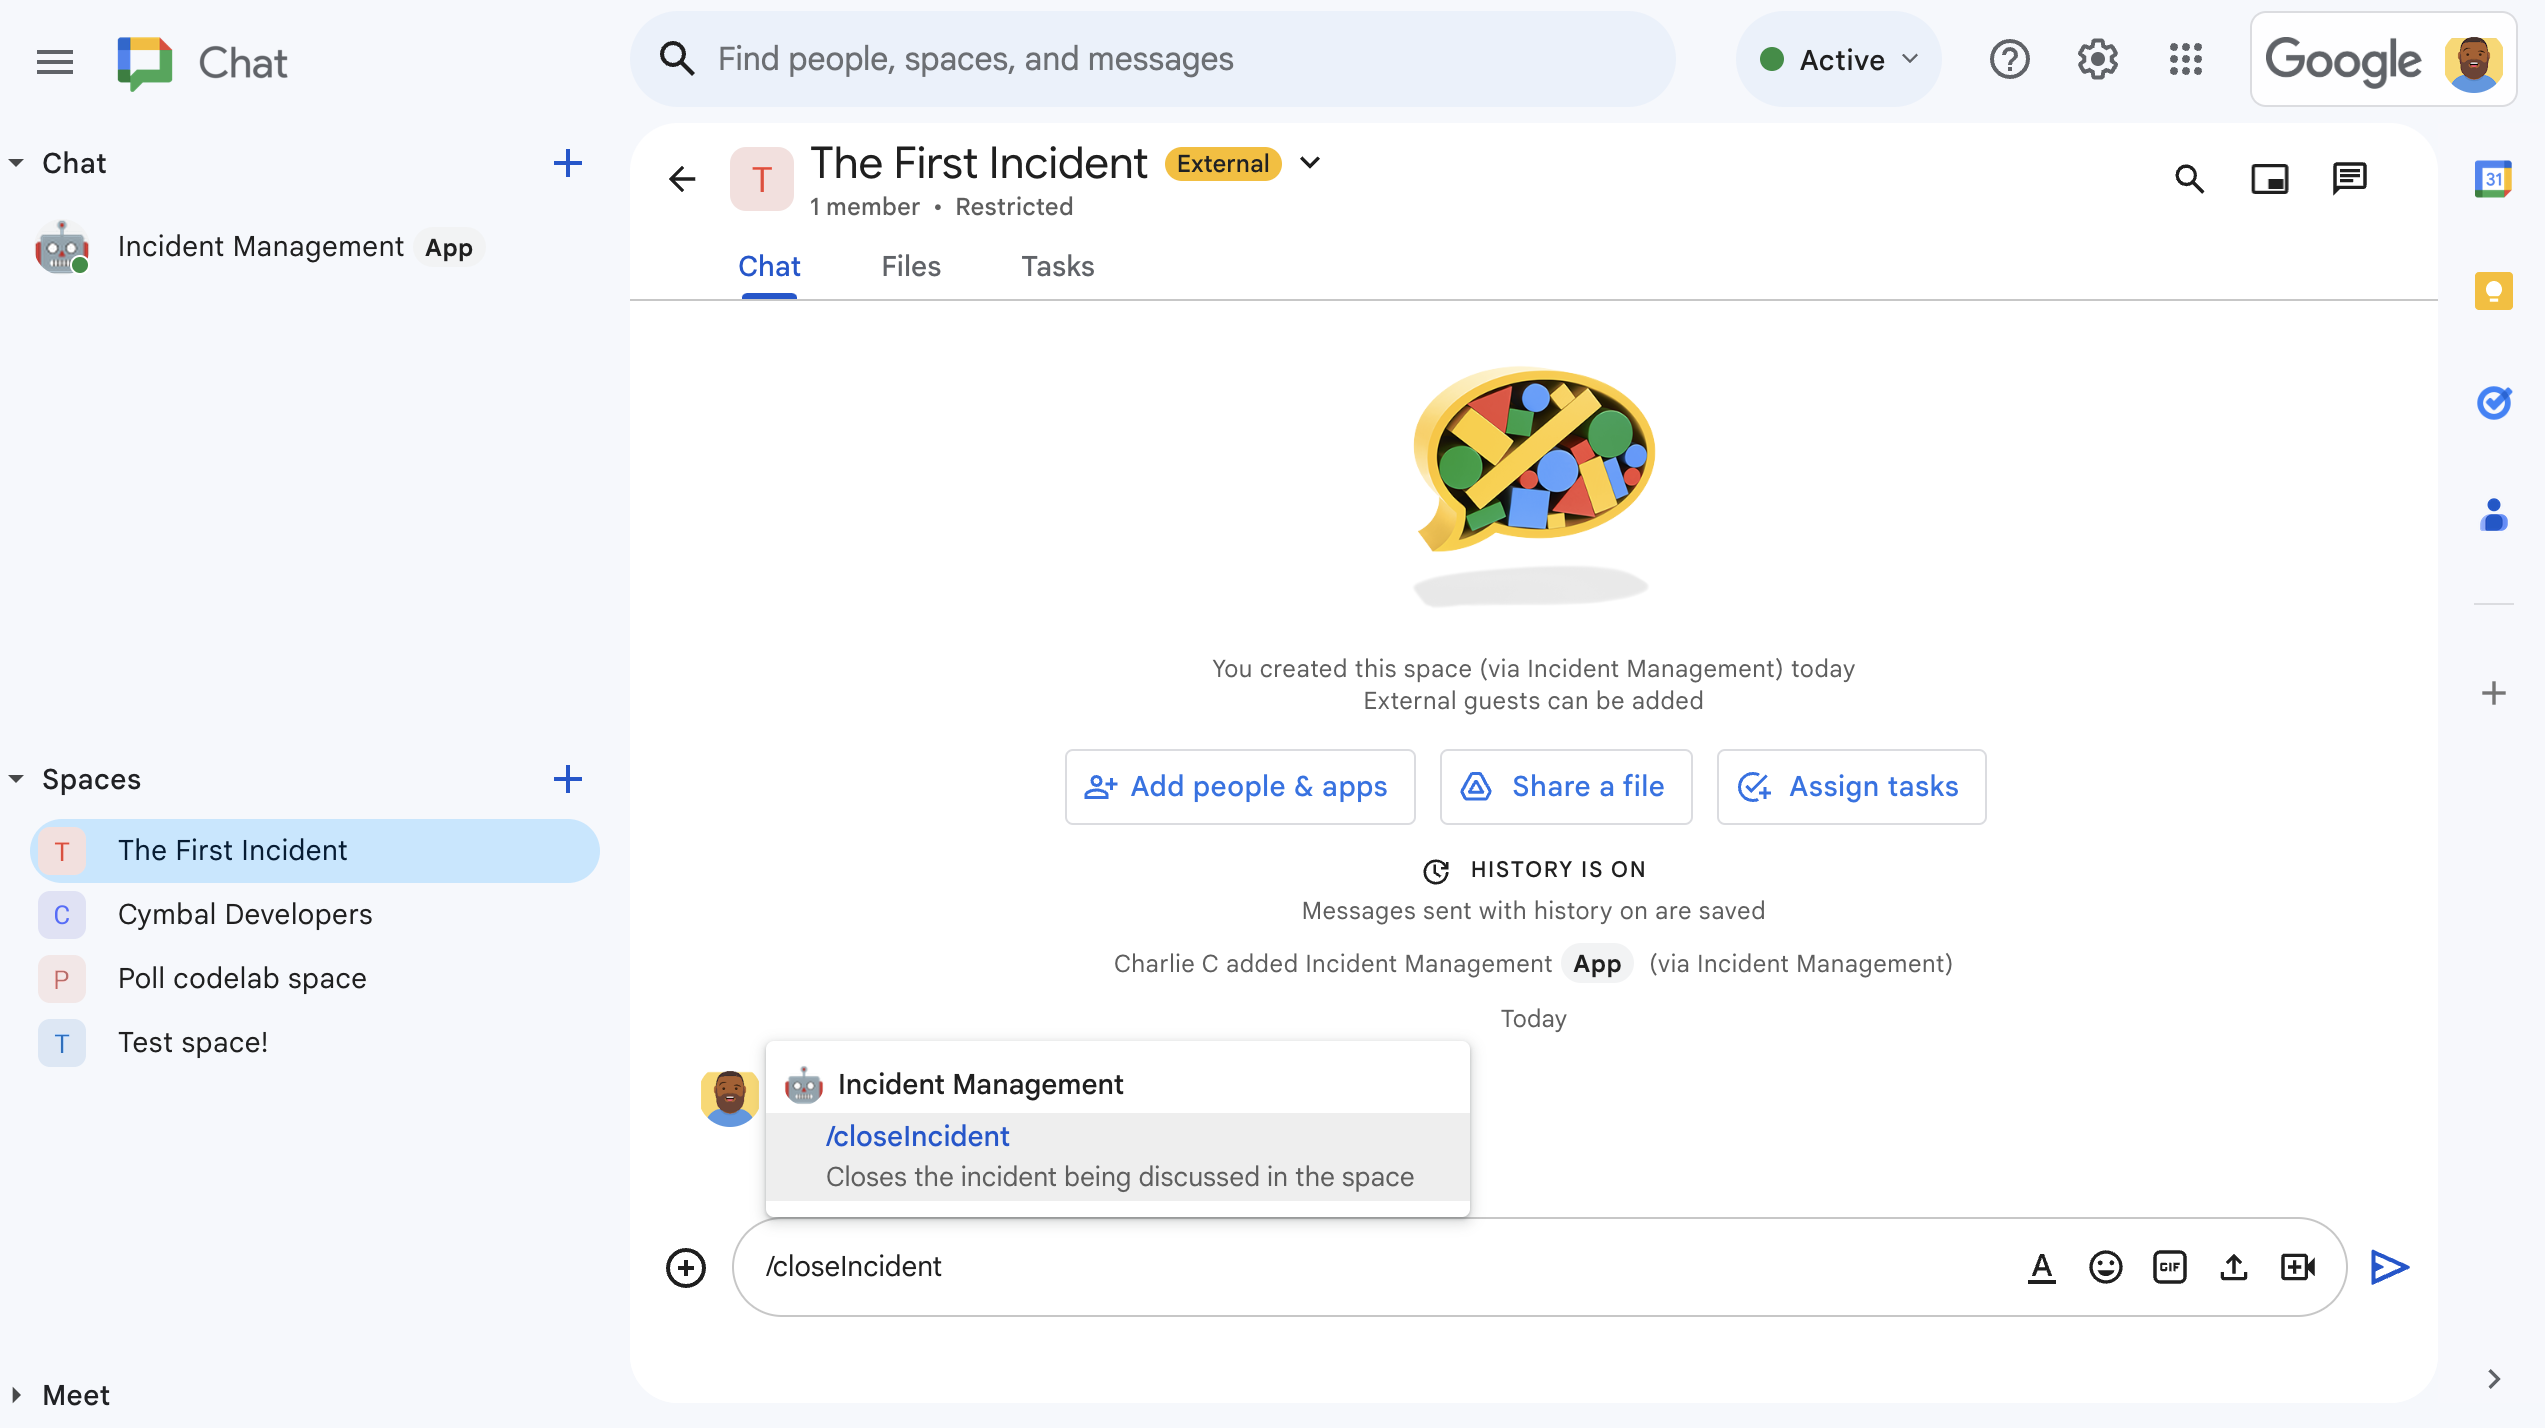
그림 4. 슬래시 명령어를 사용하여 인시던트를 해결합니다. -
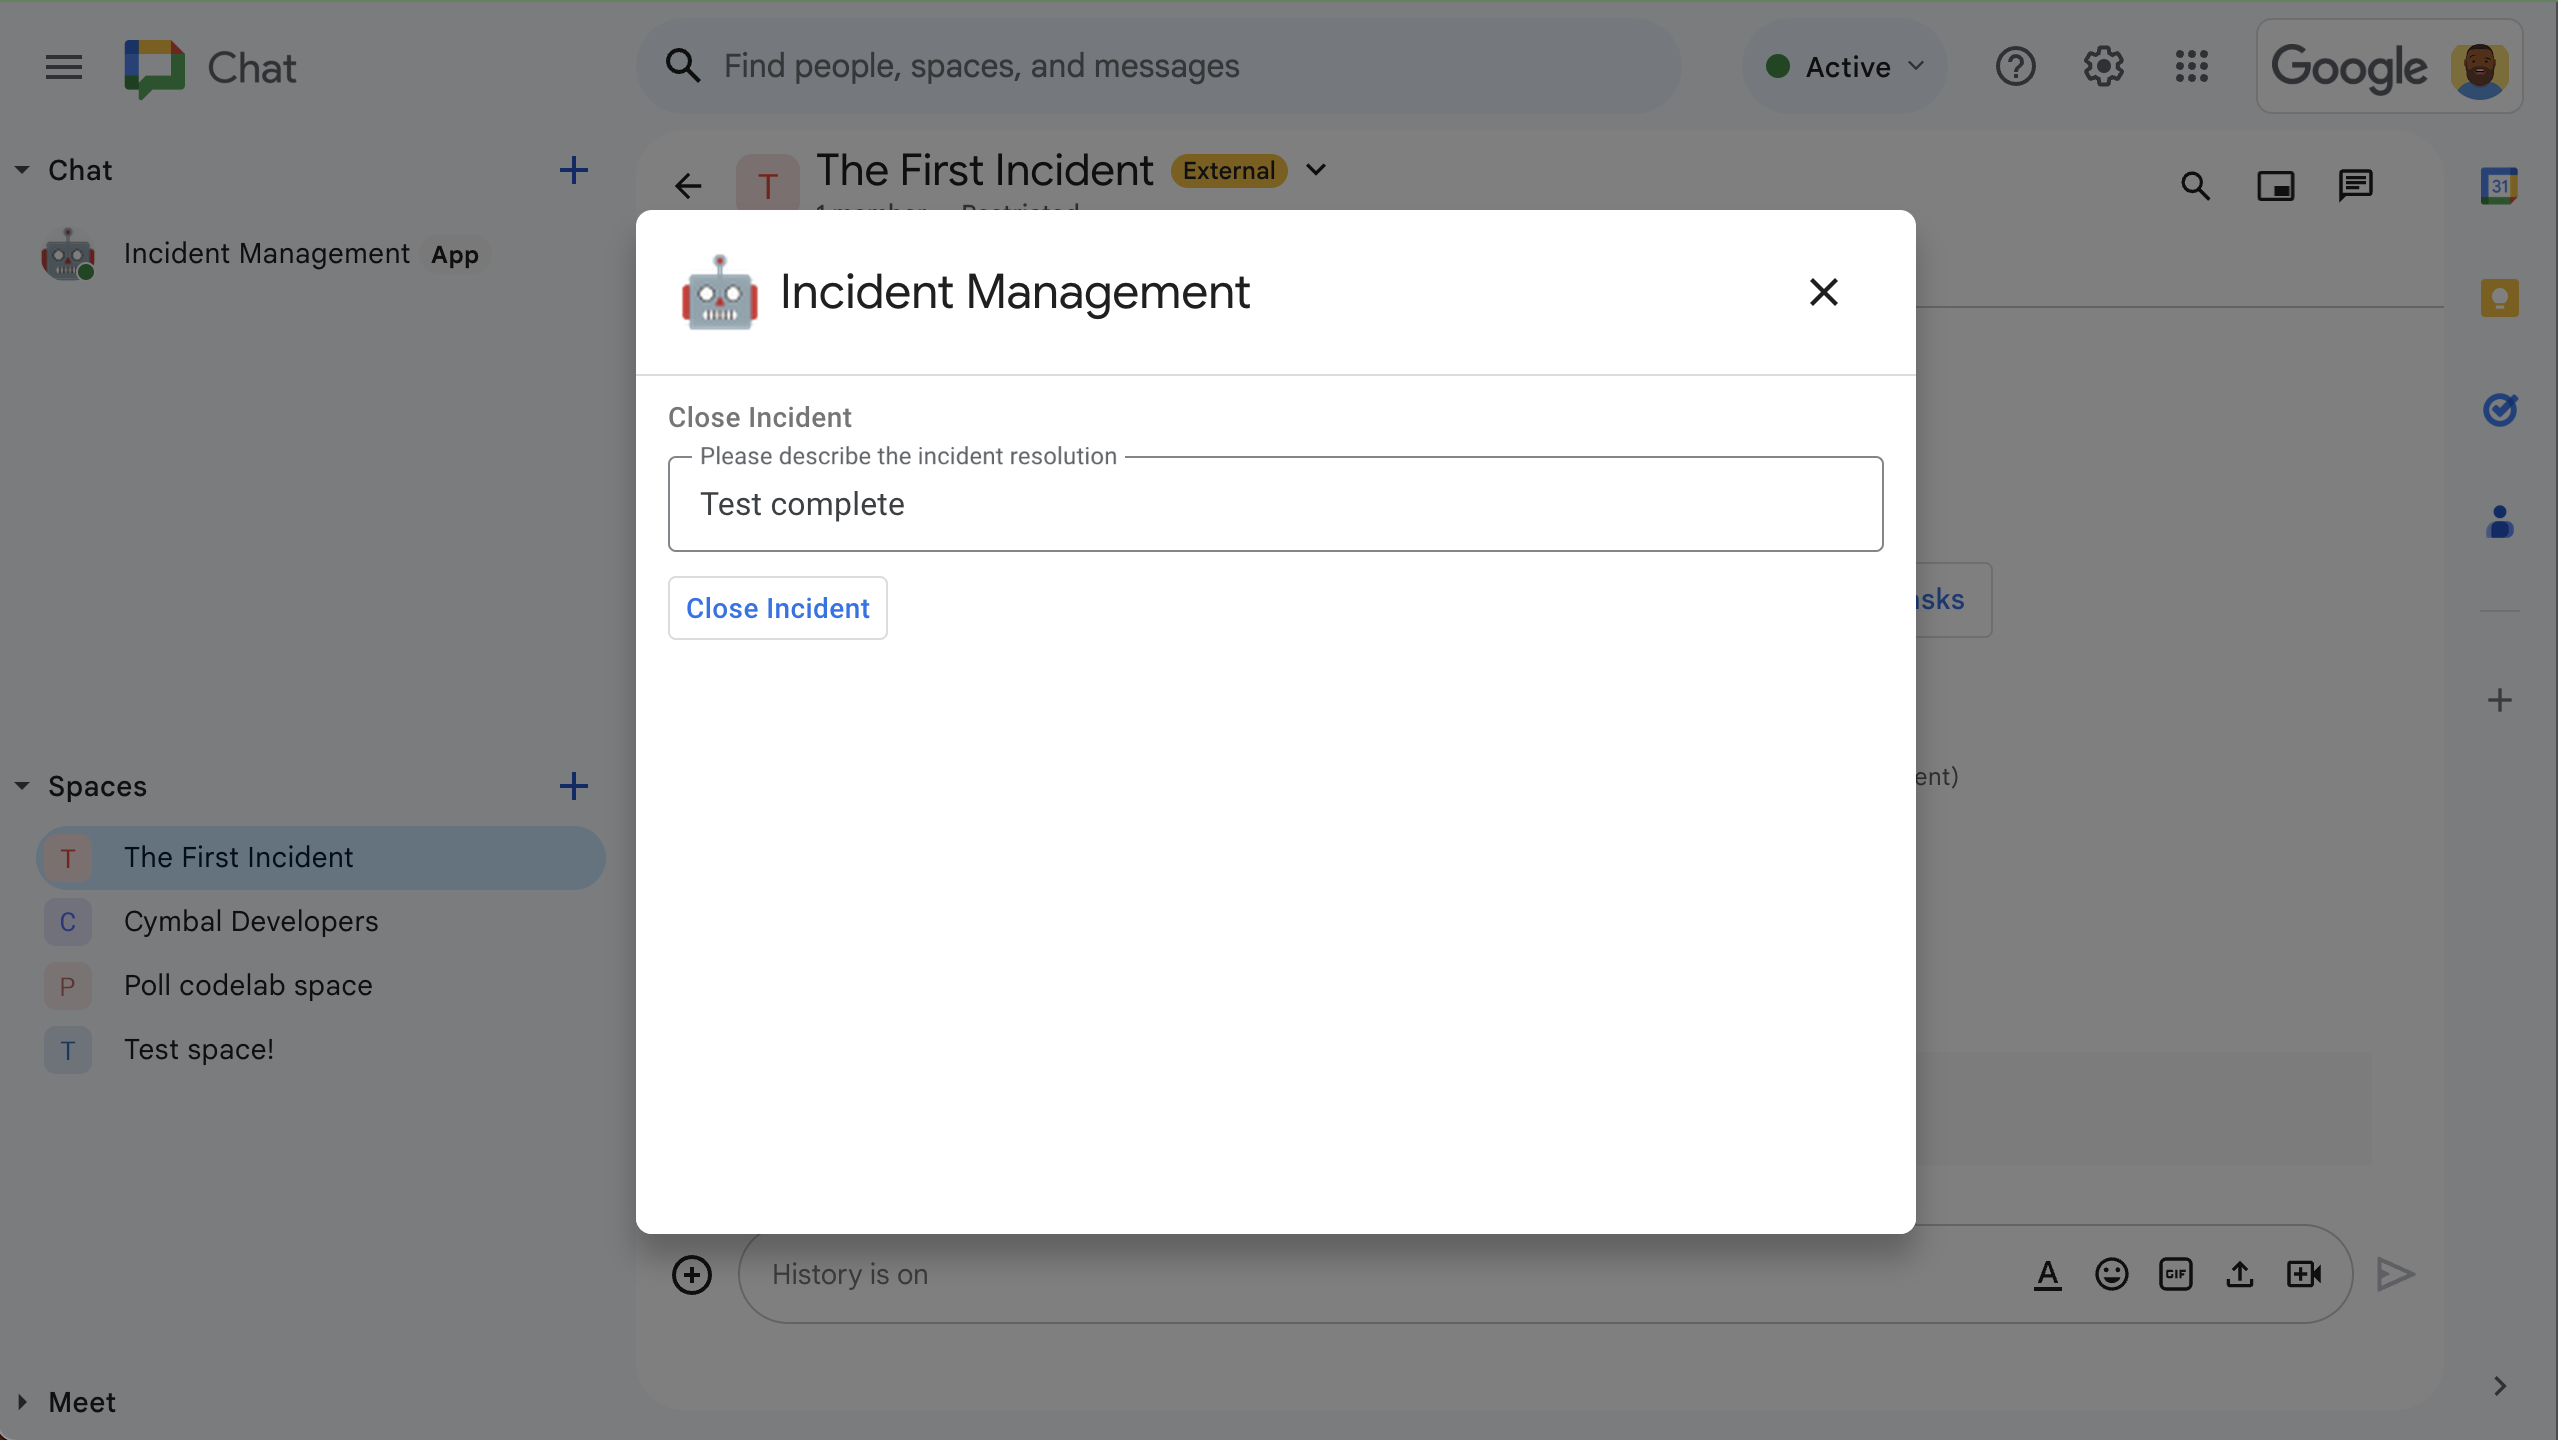
그림 5. 문제 해결 대화상자 -
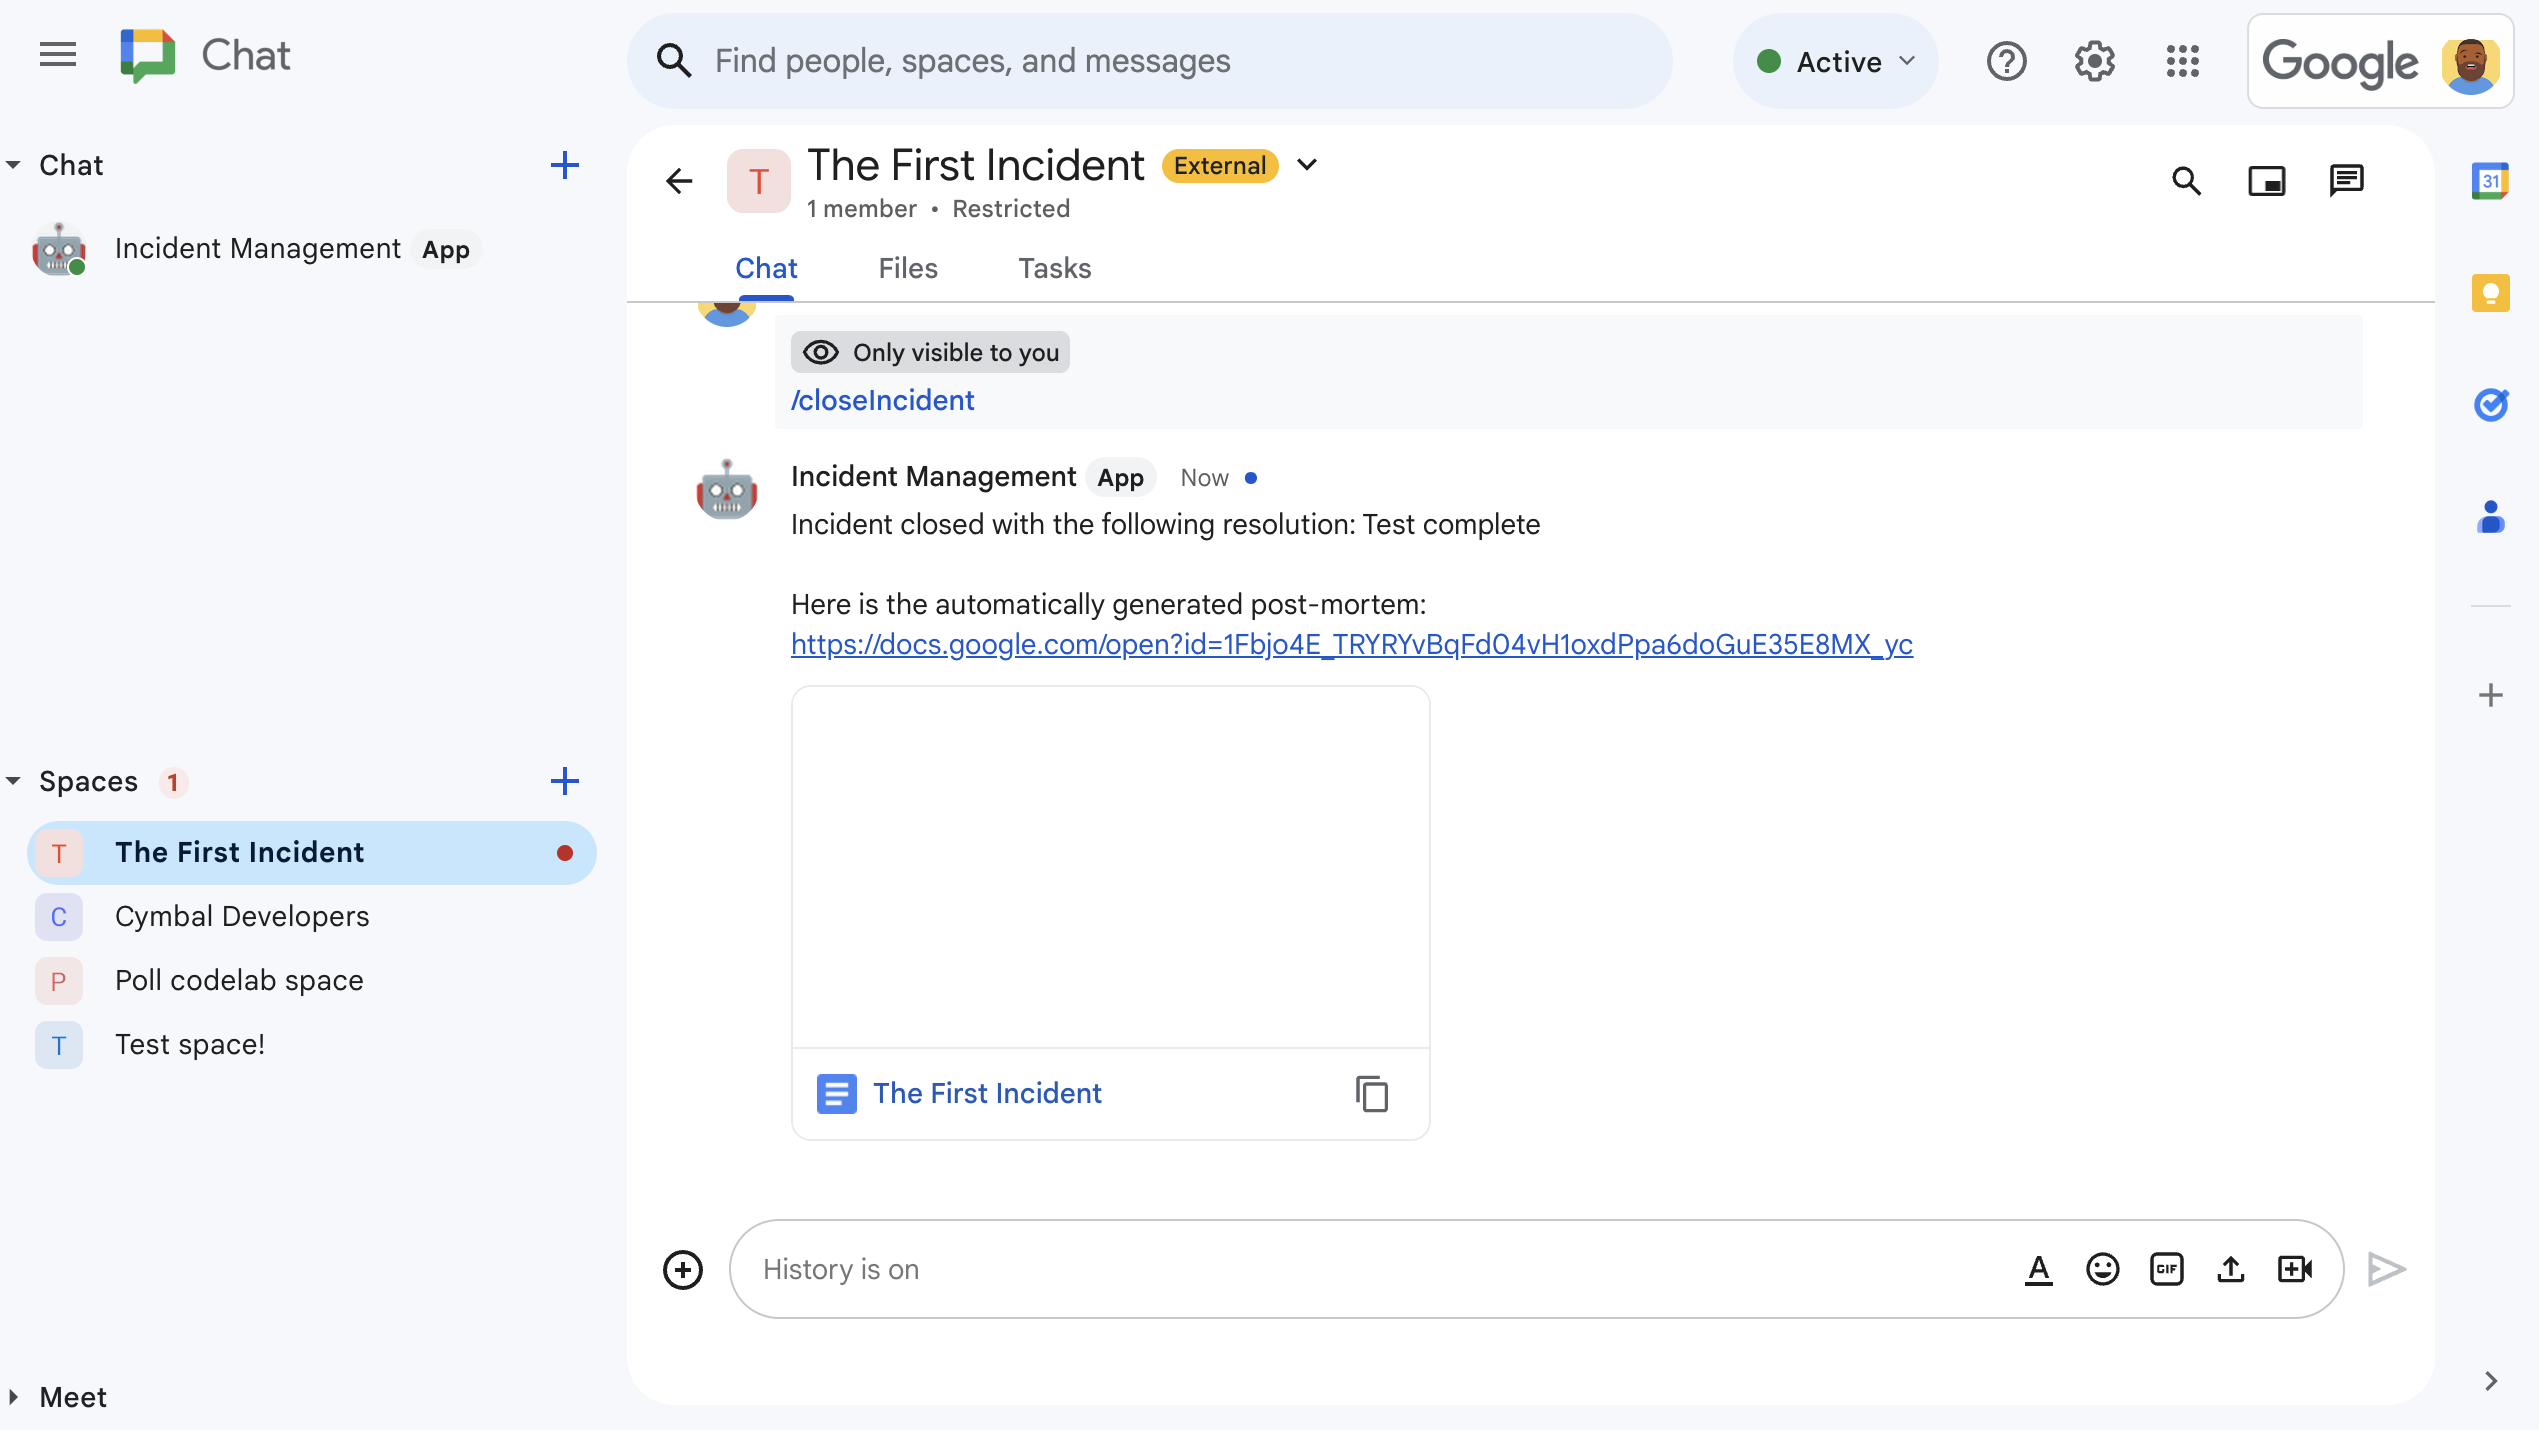
그림 6. 스페이스에 공유된 인시던트 해결 Google Docs 문서 -
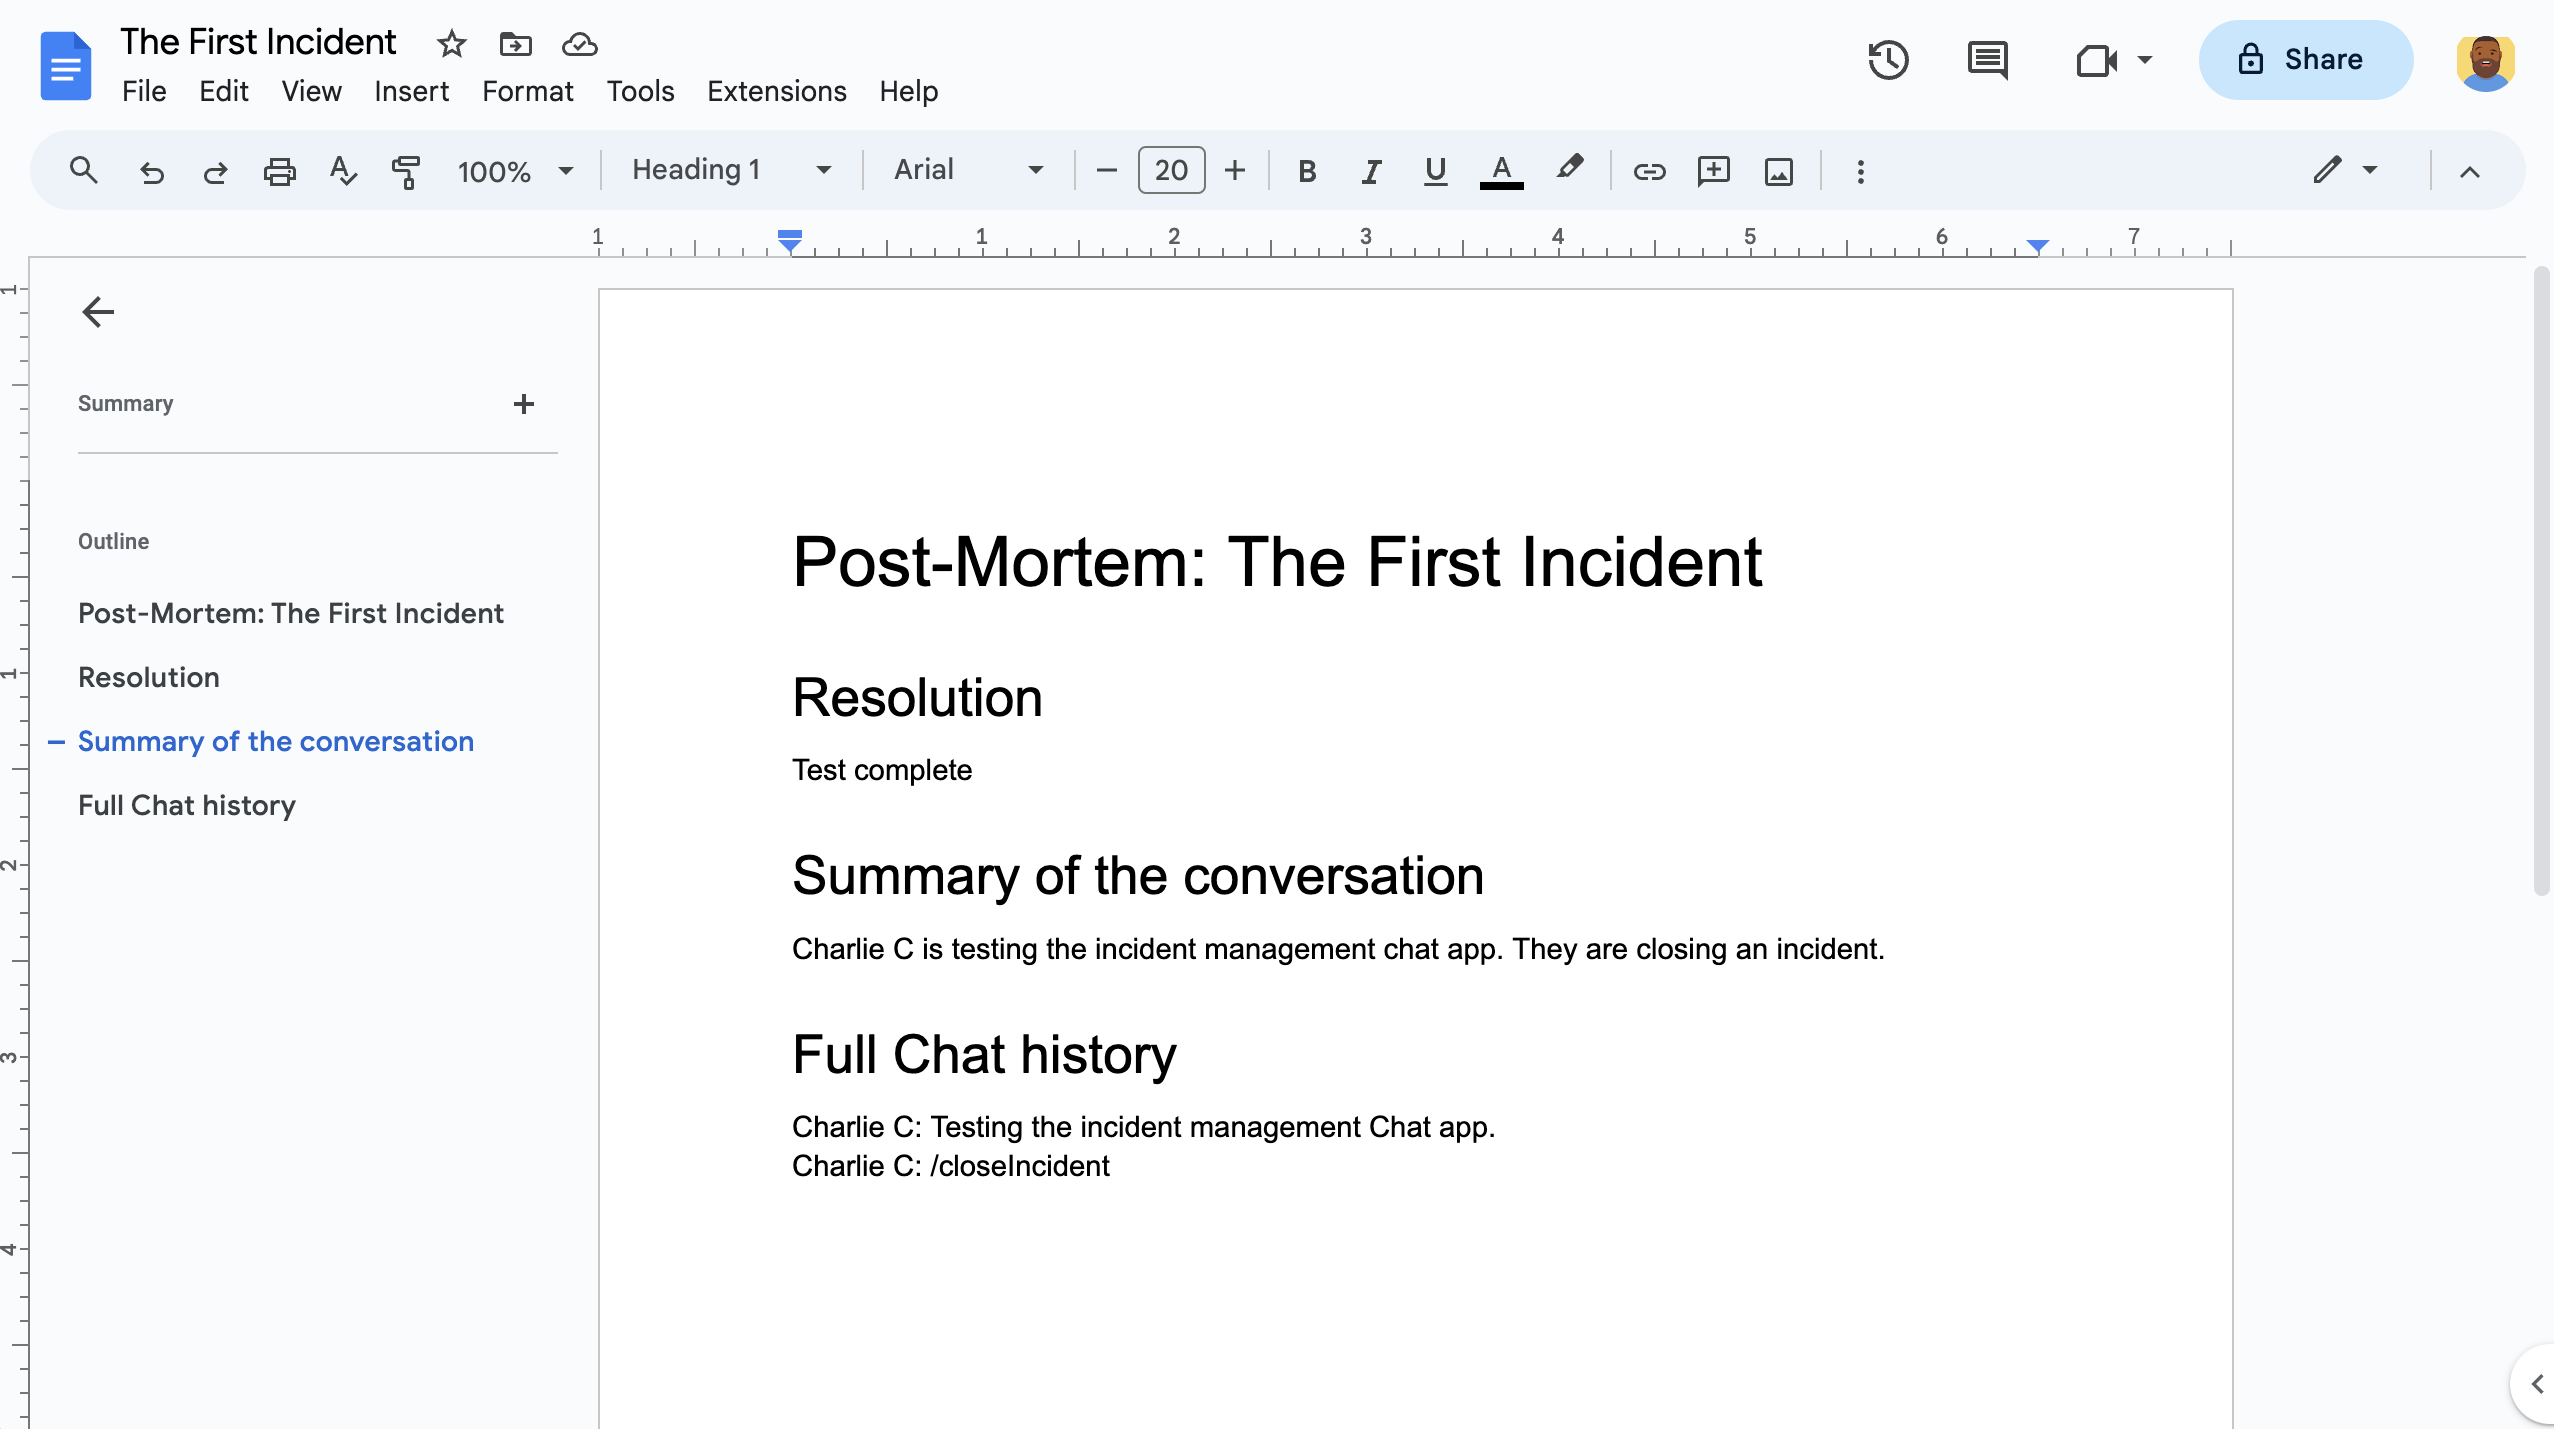
그림 7. AI 요약 인시던트 해결 Google Docs 문서
기본 요건
조직에 이러한 기본 요건이 사용 설정되어 있어야 하는 경우 Google Workspace 관리자에게 사용 설정해 달라고 요청하세요.
- Google Chat에 액세스할 수 있는 Business 또는 Enterprise Google Workspace 계정
- Google Workspace에서 디렉터리(연락처 공유)가 사용 설정되어 있어야 합니다. 인시던트 앱은 디렉터리를 사용하여 이름, 이메일 주소와 같은 인시던트 응답자의 연락처 정보를 조회합니다. 인시던트 대응자는 Google Workspace 조직의 Google Chat 계정이 있는 사용자여야 합니다.
목표
- 인시던트에 응답하는 Chat 앱을 빌드합니다.
- 다음과 같이 사용자가 인시던트에 응답하도록 지원합니다.
- 침해 사고 대응 스페이스 만들기
- 침해 사고 및 대응을 요약하는 메시지를 게시합니다.
- 대화형 채팅 앱 기능으로 공동작업 지원
- Vertex AI로 대화와 해결 방법을 요약합니다.
아키텍처
다음 다이어그램은 사고 대응 Google Chat 앱에서 사용하는 Google Workspace 및 Google Cloud 리소스의 아키텍처를 보여줍니다.
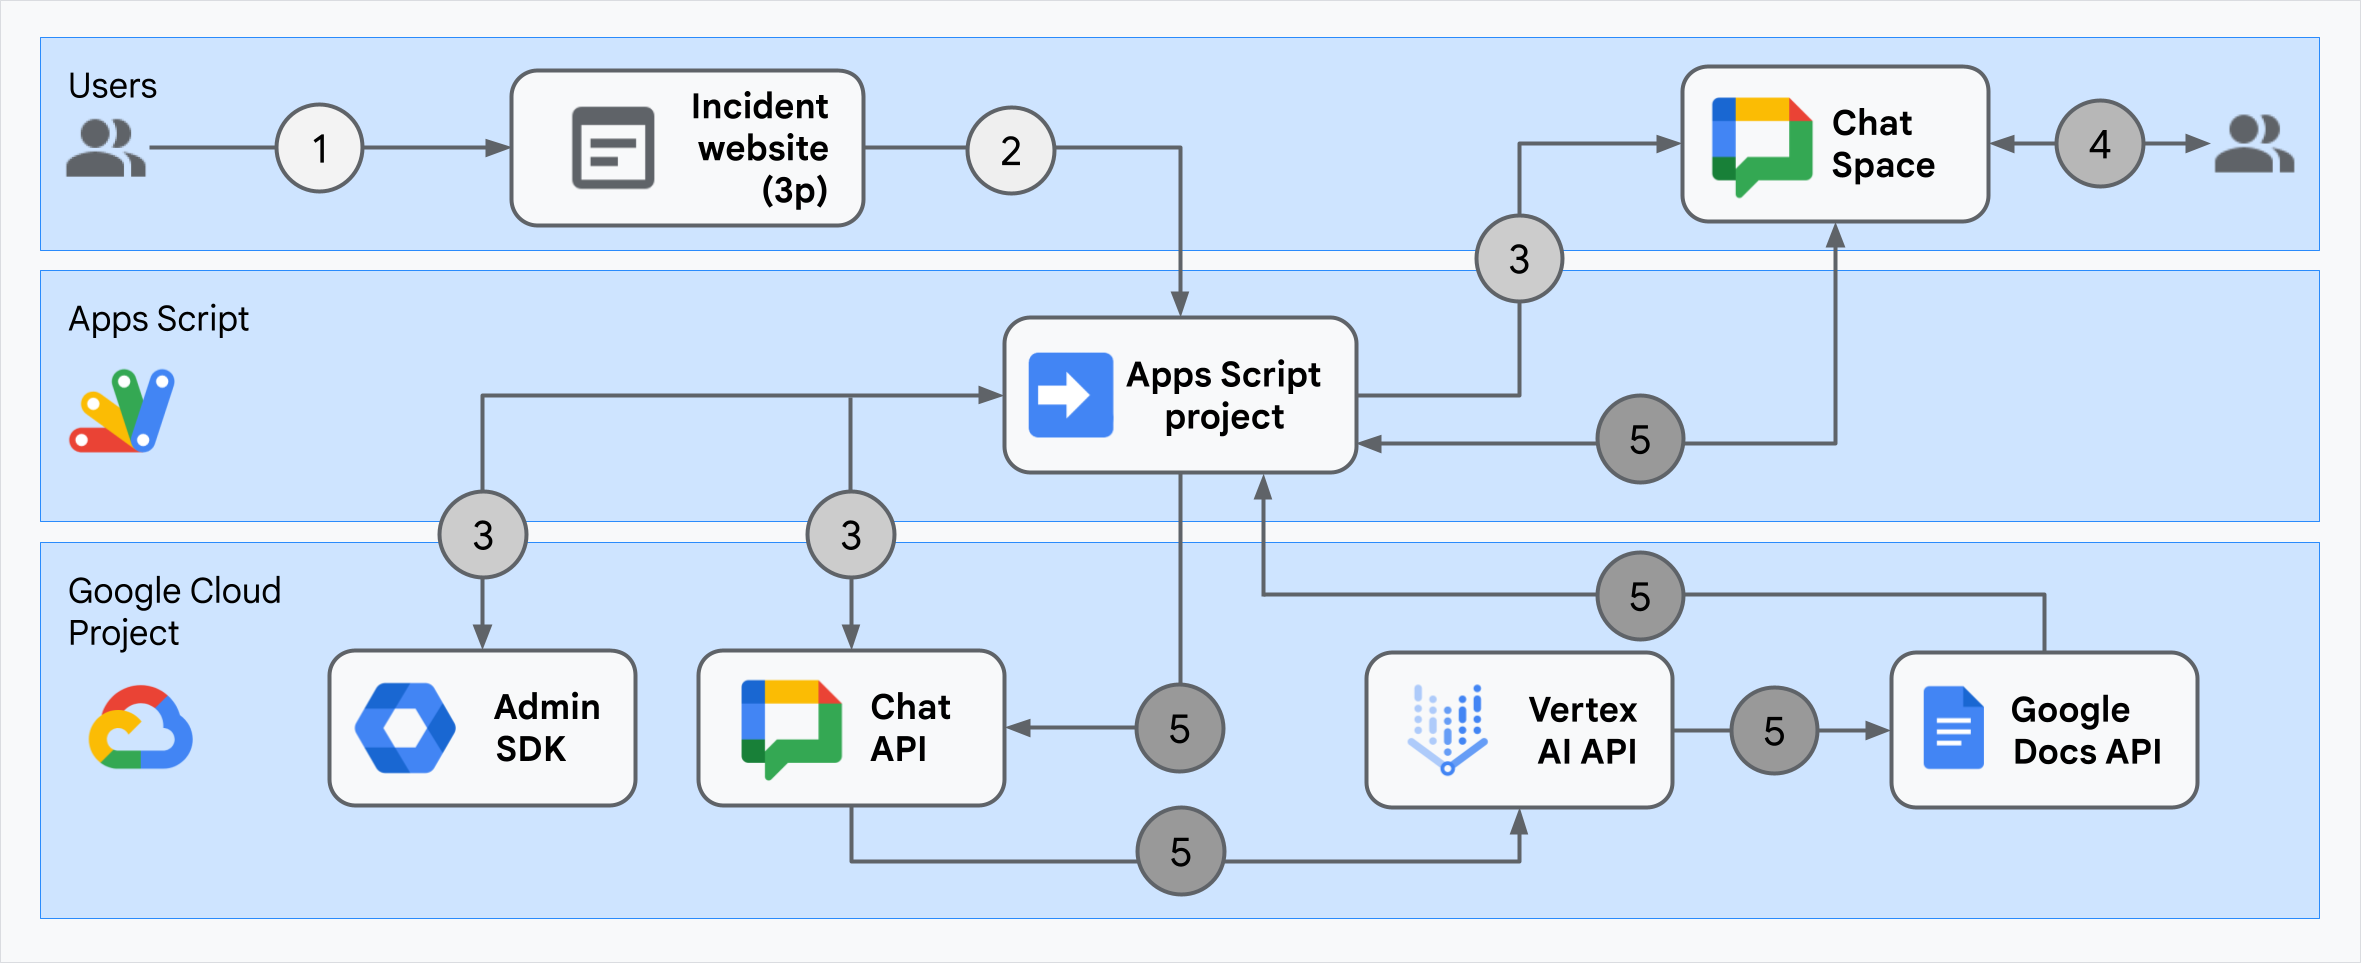
아키텍처는 이슈 대응 Google Chat 앱이 이슈와 해결 방법을 처리하는 방법을 보여줍니다.
사용자가 Apps Script에서 호스팅되는 외부 웹사이트에서 인시던트를 시작합니다.
웹사이트는 Apps Script에서 호스팅되는 Google Chat 앱에 비동기 HTTP 요청을 보냅니다.
인시던트 대응 Google Chat 앱이 요청을 처리합니다.
Apps Script Admin SDK 서비스는 사용자 ID 및 이메일 주소와 같은 팀 구성원 정보를 가져옵니다.
Apps Script 고급 Chat 서비스를 사용하여 Chat API에 대한 HTTP 요청 집합을 통해 인시던트 대응 Google Chat 앱은 인시던트 Chat 스페이스를 만들고, 팀 구성원을 추가하고, 스페이스에 메시지를 보냅니다.
팀 구성원이 Chat 스페이스에서 인시던트에 대해 논의합니다.
팀원이 슬래시 명령어를 호출하여 인시던트 해결을 알립니다.
Apps Script 고급 Chat 서비스를 사용하여 Chat API를 HTTP로 호출하면 모든 Chat 스페이스의 메시지가 나열됩니다.
Vertex AI는 나열된 메시지를 수신하고 요약을 생성합니다.
Apps Script
DocumentApp서비스는 Docs 문서를 만들고 Vertex AI의 요약을 문서에 추가합니다.사고 대응 Google Chat 앱은 Chat API를 호출하여 요약 Docs 문서 링크를 공유하는 메시지를 보냅니다.
환경 준비
이 섹션에서는 Chat 앱의 Google Cloud 프로젝트를 만들고 구성하는 방법을 보여줍니다.
Google Cloud 프로젝트 만들기
Google Cloud 콘솔
- Google Cloud 콘솔에서 메뉴 > IAM 및 관리자 > 프로젝트 만들기로 이동합니다.
-
프로젝트 이름 필드에 프로젝트의 설명이 포함된 이름을 입력합니다.
(선택사항) 프로젝트 ID를 수정하려면 수정을 클릭합니다. 프로젝트가 생성된 후에는 프로젝트 ID를 변경할 수 없으므로 프로젝트의 전체 기간 동안 필요에 맞는 ID를 선택하세요.
- 위치 필드에서 찾아보기를 클릭하여 프로젝트의 잠재적 위치를 표시합니다. 그런 다음 선택을 클릭합니다.
- 만들기를 클릭합니다. Google Cloud 콘솔이 대시보드 페이지로 이동하고 몇 분 이내에 프로젝트가 생성됩니다.
gcloud CLI
다음 개발 환경 중 하나에서 Google Cloud CLI (gcloud)에 액세스합니다.
-
Cloud Shell: gcloud CLI가 이미 설정된 온라인 터미널을 사용하려면 Cloud Shell을 활성화하세요.
Cloud Shell 활성화 -
로컬 셸: 로컬 개발 환경을 사용하려면 gcloud CLI를 설치하고 초기화합니다.
Cloud 프로젝트를 만들려면gcloud projects create명령어를 사용합니다.gcloud projects create PROJECT_ID
Cloud 프로젝트에 결제 사용 설정
Google Cloud 콘솔
- Google Cloud 콘솔에서 결제로 이동합니다. 메뉴 > 결제 > 내 프로젝트를 클릭합니다.
- 조직 선택에서 Google Cloud 프로젝트와 연결된 조직을 선택합니다.
- 프로젝트 행에서 작업 메뉴()를 열고 결제 변경을 클릭한 후 Cloud Billing 계정을 선택합니다.
- 계정 설정을 클릭합니다.
gcloud CLI
- 사용 가능한 결제 계정을 나열하려면 다음을 실행합니다.
gcloud billing accounts list - 결제 계정을 Google Cloud 프로젝트에 연결합니다.
gcloud billing projects link PROJECT_ID --billing-account=BILLING_ACCOUNT_ID다음을 바꿉니다.
PROJECT_ID는 결제를 사용 설정하려는 Cloud 프로젝트의 프로젝트 ID입니다.BILLING_ACCOUNT_ID는 Google Cloud 프로젝트와 연결할 결제 계정 ID입니다.
API 사용 설정
Google Cloud 콘솔
Google Cloud 콘솔에서 Google Chat API, Google Docs API, Admin SDK API, Vertex AI API를 사용 설정합니다.
올바른 Cloud 프로젝트에서 API를 사용 설정하고 있는지 확인한 후 다음을 클릭합니다.
올바른 API를 사용 설정했는지 확인한 후 사용 설정을 클릭합니다.
gcloud CLI
필요한 경우 현재 Cloud 프로젝트를
gcloud config set project명령어로 만든 프로젝트로 설정합니다.gcloud config set project PROJECT_IDPROJECT_ID를 생성한 Cloud 프로젝트의 프로젝트 ID로 바꿉니다.
gcloud services enable명령어를 사용하여 Google Chat API, Google Docs API, Admin SDK API, Vertex AI API를 사용 설정합니다.gcloud services enable chat.googleapis.com docs.googleapis.com admin.googleapis.com aiplatform.googleapis.com
인증 및 승인 설정
인증 및 승인을 통해 Chat 앱은 Google Workspace 및 Google Cloud의 리소스에 액세스하여 인시던트 대응을 처리할 수 있습니다.
이 튜토리얼에서는 앱을 내부적으로 게시하므로 자리표시자 정보를 사용해도 됩니다. 앱을 외부에 게시하기 전에 자리표시자 정보를 동의 화면의 실제 정보로 바꿉니다.
Google Cloud 콘솔에서 메뉴 > > 브랜딩으로 이동합니다.
를 이미 구성한 경우 브랜딩, 잠재고객, 데이터 액세스에서 다음 OAuth 동의 화면 설정을 구성할 수 있습니다. 아직 구성되지 않음이라는 메시지가 표시되면 시작하기를 클릭합니다.
- 앱 정보의 앱 이름에
Incident Management을 입력합니다. - 사용자 지원 이메일에서 이메일 주소 또는 적절한 Google 그룹을 선택합니다.
- 다음을 클릭합니다.
- 시청자층에서 내부를 선택합니다. 내부를 선택할 수 없는 경우 외부를 선택합니다.
- 다음을 클릭합니다.
- 연락처 정보에 프로젝트 변경사항에 대한 알림을 받을 수 있는 이메일 주소를 입력합니다.
- 다음을 클릭합니다.
- 완료에서 Google API 서비스 사용자 데이터 정책을 검토하고 동의하는 경우 Google API 서비스: 사용자 데이터 정책에 동의합니다를 선택합니다.
- 계속을 클릭합니다.
- 만들기를 클릭합니다.
- 사용자 유형으로 외부를 선택한 경우 테스트 사용자를 추가합니다.
- 잠재고객을 클릭합니다.
- 테스트 사용자에서 사용자 추가를 클릭합니다.
- 이메일 주소와 승인된 다른 테스트 사용자를 입력한 다음 저장을 클릭합니다.
- 앱 정보의 앱 이름에
데이터 액세스 > 범위 추가 또는 삭제를 클릭합니다. Google Cloud 프로젝트에서 사용 설정한 각 API의 범위 목록이 패널에 표시됩니다.
직접 범위 추가에서 다음 범위를 붙여넣습니다.
https://www.googleapis.com/auth/chat.spaces.createhttps://www.googleapis.com/auth/chat.membershipshttps://www.googleapis.com/auth/chat.memberships.apphttps://www.googleapis.com/auth/chat.messageshttps://www.googleapis.com/auth/documentshttps://www.googleapis.com/auth/admin.directory.user.readonlyhttps://www.googleapis.com/auth/script.external_requesthttps://www.googleapis.com/auth/userinfo.emailhttps://www.googleapis.com/auth/cloud-platform
표에 추가를 클릭합니다.
업데이트를 클릭합니다.
앱에 필요한 범위를 선택한 후 데이터 액세스 페이지에서 저장을 클릭합니다.
Chat 앱 만들기 및 배포
다음 섹션에서는 Chat 앱에 필요한 모든 애플리케이션 코드가 포함된 전체 Apps Script 프로젝트를 복사하고 업데이트하므로 각 파일을 복사하여 붙여넣을 필요가 없습니다.
일부 함수에는 ChatApp.gs의 processSlashCommand_()와 같이 이름 끝에 밑줄이 포함됩니다. 밑줄은 브라우저에서 열 때 인시던트 초기화 웹페이지에서 함수를 숨깁니다. 자세한 내용은 비공개 함수를 참고하세요.
Apps Script는 두 가지 파일 형식(.gs 스크립트 및 .html 파일)을 지원합니다. 이 지원을 준수하기 위해 앱의 클라이언트 측 JavaScript는 <script /> 태그 내에 포함되고 CSS는 HTML 파일 내의 <style /> 태그 내에 포함됩니다.
원하는 경우 GitHub에서 전체 프로젝트를 확인할 수 있습니다.
다음은 각 파일의 개요입니다.
Consts.gsCloud 프로젝트 ID, Vertex AI 위치 ID, 인시던트 종료를 위한 슬래시 명령 ID 등 다른 코드 파일에서 참조하는 상수를 정의합니다.
Consts.gs코드 보기ChatApp.gs메시지, 카드 클릭, 슬래시 명령어, 대화상자 등 Chat 상호작용 이벤트를 처리합니다. 인시던트 해결 세부정보를 수집하는 대화상자를 열어
/closeIncident슬래시 명령어에 응답합니다. Chat API에서spaces.messages.list메서드를 호출하여 스페이스의 메시지를 읽습니다. Apps Script에서 Admin SDK Directory 서비스를 사용하여 사용자 ID를 가져옵니다.ChatApp.gs코드 보기ChatSpaceCreator.gs사용자가 인시던트 초기화 웹페이지에 입력한 양식 데이터를 수신하고 이를 사용하여 Chat 스페이스를 설정합니다(스페이스를 만들고 채움). 그런 다음 인시던트에 관한 메시지를 게시합니다.
ChatSpaceCreator.gs코드 보기DocsApi.gsGoogle Docs API를 호출하여 사용자의 Google Drive에 Google Docs 문서를 만들고
VertexAiApi.gs에서 생성된 인시던트 정보의 요약을 문서에 작성합니다.DocsApi.gs코드 보기VertexAiApi.gsVertex AI를 사용하여 채팅 스페이스의 대화를 요약합니다. 이 요약은
DocsAPI.gs의 특별히 생성된 문서에 게시됩니다.VertexAiApi.gs코드 보기WebController.gs인시던트 초기화 웹사이트를 제공합니다.
WebController.gs코드 보기Index.html인시던트 초기화 웹사이트를 구성하는 HTML입니다.
Index.html코드 보기JavaScript.html인시던트 초기화 웹사이트의 제출, 오류, 지우기를 비롯한 양식 동작을 처리합니다.
WebController.gs의 맞춤include함수에 의해Index.html에 포함됩니다.JavaScript.html코드 보기Stylesheet.html인시던트 초기화 웹사이트의 CSS입니다.
WebController.gs의 맞춤include함수에 의해Index.html에 포함됩니다.Stylesheet.html코드 보기
Cloud 프로젝트 번호 및 ID 찾기
Google Cloud 콘솔에서 Cloud 프로젝트로 이동합니다.
설정 및 유틸리티 > 프로젝트 설정을 클릭합니다.
프로젝트 번호 및 프로젝트 ID 필드의 값을 확인합니다. 다음 섹션에서 사용합니다.
Apps Script 프로젝트 만들기
Apps Script 프로젝트를 만들고 Cloud 프로젝트에 연결하려면 다음 단계를 따르세요.
- 다음 버튼을 클릭하여 Google Chat으로 인시던트에 응답하기 Apps Script 프로젝트를 엽니다.
프로젝트 열기 - 개요를 클릭합니다.
- 개요 페이지에서
 사본 만들기를 클릭합니다.
 Apps Script 프로젝트 사본의 이름을 지정합니다.
Google Chat으로 인시던트에 응답하기 사본을 클릭합니다.
프로젝트 제목에
Incident Management Chat app을 입력합니다.이름 바꾸기를 클릭합니다.
Apps Script 프로젝트의 사본에서
Consts.gs파일로 이동하여YOUR_PROJECT_ID을 Cloud 프로젝트의 ID로 바꿉니다.
Apps Script 프로젝트의 Cloud 프로젝트 설정
- Apps Script 프로젝트에서
 프로젝트 설정을 클릭합니다.
 - Google Cloud Platform(GCP) 프로젝트에서 프로젝트 변경을 클릭합니다.
- GCP 프로젝트 번호에 Cloud 프로젝트의 프로젝트 번호를 붙여넣습니다.
- 프로젝트 설정을 클릭합니다. 이제 Cloud 프로젝트와 Apps Script 프로젝트가 연결되었습니다.
Apps Script 배포 만들기
이제 모든 코드가 준비되었으므로 Apps Script 프로젝트를 배포합니다. Google Cloud에서 Chat 앱을 구성할 때 배포 ID를 사용합니다.
Apps Script에서 인시던트 대응 앱의 프로젝트를 엽니다.
배포 > 새 배포를 클릭합니다.
부가기능과 웹 앱이 아직 선택되지 않은 경우 유형 선택 옆에 있는 배포 유형
을 클릭하고 부가기능과 웹 앱을 선택합니다.설명에 이 버전에 대한 설명을 입력합니다(예:
Complete version of incident management app).실행 계정에서 웹 앱에 액세스하는 사용자를 선택합니다.
액세스 권한이 있는 사용자에서 내 Workspace 조직의 모든 사용자를 선택합니다. 여기서 '내 Workspace 조직'은 Google Workspace 조직의 이름입니다.
배포를 클릭합니다. Apps Script는 배포가 성공했다고 보고하고 인시던트 초기화 웹페이지의 배포 ID와 URL을 제공합니다.
나중에 인시던트를 시작할 때 방문할 웹 앱 URL을 기록해 둡니다. 배포 ID를 복사합니다. Google Cloud 콘솔에서 Chat 앱을 구성할 때 이 ID를 사용합니다.
완료를 클릭합니다.
Google Cloud 콘솔에서 Chat 앱 구성
이 섹션에서는 Apps Script 프로젝트에서 방금 만든 배포의 ID를 비롯한 Chat 앱에 관한 정보를 사용하여 Google Cloud 콘솔에서 Google Chat API를 구성하는 방법을 보여줍니다.
Google Cloud 콘솔에서 메뉴 > 제품 더보기 > Google Workspace > 제품 라이브러리 > Google Chat API > 관리 > 구성을 클릭합니다.
이 채팅 앱을 Google Workspace 부가기능으로 빌드를 선택 해제합니다. 확인을 요청하는 대화상자가 열립니다. 대화상자에서 사용 중지를 클릭합니다.
앱 이름에
Incident Management를 입력합니다.아바타 URL에
https://developers.google.com/chat/images/quickstart-app-avatar.png를 입력합니다.설명에
Responds to incidents.를 입력합니다.대화형 기능 사용 설정 전환 버튼을 클릭하여 설정 위치로 전환합니다.
기능에서 스페이스 및 그룹 대화 참여를 선택합니다.
연결 설정에서 Apps Script를 선택합니다.
배포 ID에 Apps Script 프로젝트 배포에서 이전에 복사한 Apps Script 배포 ID를 붙여넣습니다.
완전히 구현된 Chat 앱이 사용하는 슬래시 명령어를 등록합니다.
슬래시 명령어에서 슬래시 명령어 추가를 클릭합니다.
이름에
Close incident를 입력합니다.명령어 ID에
1를 입력합니다.설명에
Closes the incident being discussed in the space.를 입력합니다.명령어 유형에서 슬래시 명령어를 선택합니다.
슬래시 명령어 이름에
/closeIncident를 입력합니다.대화상자 열기를 선택합니다.
완료를 클릭합니다. 슬래시 명령어가 등록되고 나열됩니다.
공개 상태에서 내 Workspace 도메인의 특정 사용자 및 그룹에서 이 채팅 앱을 사용할 수 있도록 설정을 선택하고 이메일 주소를 입력합니다.
로그에서 Logging에 오류 로깅을 선택합니다.
저장을 클릭합니다. 구성 저장 메시지가 표시됩니다. 이는 앱을 테스트할 준비가 되었음을 의미합니다.
채팅 앱 테스트
인시던트 관리 Chat 앱을 테스트하려면 웹페이지에서 인시던트를 시작하고 Chat 앱이 예상대로 작동하는지 확인하세요.
Apps Script 배포 웹 앱 URL로 이동합니다.
Apps Script에서 데이터에 액세스할 권한을 요청하면 권한 검토를 클릭하고 Google Workspace 도메인의 적절한 Google 계정으로 로그인한 다음 허용을 클릭합니다.
인시던트 초기화 웹페이지가 열립니다. 테스트 정보를 입력합니다.
- 인시던트 제목에
The First Incident을 입력합니다. - 원하는 경우 침해사고 대응자에 동료 침해사고 대응자의 이메일 주소를 입력합니다. Google Workspace 조직의 Google Chat 계정이 있는 사용자여야 합니다. 그렇지 않으면 스페이스를 만들 수 없습니다. 이메일 주소는 자동으로 포함되므로 직접 입력하지 마세요.
- 초기 메시지에
Testing the incident management Chat app.을 입력합니다.
- 인시던트 제목에
채팅 스페이스 만들기를 클릭합니다.
creating space메시지가 표시됩니다.스페이스가 생성되면
Space created!메시지가 표시됩니다. 스페이스 열기를 클릭하면 새 탭에서 Chat에 스페이스가 열립니다.원하는 경우 나와 다른 인시던트 대응팀은 스페이스에서 메시지를 보낼 수 있습니다. 앱은 Vertex AI를 사용하여 이러한 메시지를 요약하고 회고 문서를 공유합니다.
사고 대응을 종료하고 해결 프로세스를 시작하려면 채팅 스페이스에서
/closeIncident를 입력합니다. 이슈 관리 대화상자가 열립니다.이슈 종료에 이슈 해결에 대한 설명을 입력합니다(예:
Test complete).사고 종료를 클릭합니다.
인시던트 관리 앱은 스페이스의 메시지를 나열하고, Vertex AI로 요약하고, 요약을 Google Docs 문서에 붙여넣고, 스페이스에서 문서를 공유합니다.
삭제
이 튜토리얼에서 사용한 리소스 비용이 Google Cloud 계정에 청구되지 않도록 하려면 Cloud 프로젝트를 삭제하는 것이 좋습니다.
- Google Cloud 콘솔에서 리소스 관리 페이지로 이동합니다. 메뉴 > IAM 및 관리자 > 리소스 관리를 클릭합니다.
- 프로젝트 목록에서 삭제할 프로젝트를 선택하고 삭제 를 클릭합니다.
- 대화상자에서 프로젝트 ID를 입력한 다음 종료를 클릭하여 프로젝트를 삭제합니다.
관련 주제
- Gemini AI Chat 앱과의 채팅 대화를 바탕으로 질의 응답
- Google Chat, Vertex AI, Firestore로 프로젝트 관리하기
- 인시던트 대응 앱은 사용자 인증 정보로 인증하여 API를 호출하고 Chat API 및 Vertex AI API와 같은 Google Cloud 서비스를 호출합니다.
즉, 인시던트를 초기화하는 사용자는 이러한 서비스에 액세스할 수 있어야 합니다. 앱을 더 강력하게 만들려면
/closeIncident슬래시 명령어를 호출하는 사용자의 사용자 인증 정보 대신 서비스 계정으로 Vertex AI API를 호출하는 것이 좋습니다. Vertex AI API용 서비스 계정 구성에 관한 도움말은 커스텀 서비스 계정 사용을 참고하세요.