
このチュートリアルでは、インシデントにリアルタイムで応答する Google Chat 用アプリを作成する方法について説明します。インシデントに対応する際、アプリは Chat スペースを作成して入力し、メッセージ、スラッシュ コマンド、ダイアログを使用してインシデントの解決を促進します。また、AI を使用して Google ドキュメントにインシデント対応の概要をまとめます。
インシデントとは、解決するためにチームのメンバーが直ちに対応する必要があるイベントです。インシデントの例:
- 顧客管理(CRM)プラットフォームで緊急性の高いケースが作成され、サービスチームが解決に向けて連携する必要がある。
- システムがオフラインになり、サイト信頼性エンジニア(SRE)のグループにアラートが送信されます。SRE は協力してシステムをオンラインに戻します。
- 大規模な地震が発生し、緊急対応要員が対応を調整する必要がある。
このチュートリアルでは、ウェブページからボタンをクリックしてインシデントが報告されたときにインシデント アラートが開始されることを前提としています。このウェブページでは、ユーザーにインシデントの基本情報(タイトル、説明、対応者のメールアドレス)の入力を求めることで、インシデントをシミュレートします。
インシデント管理用 Chat 用アプリの動作をご覧ください。
-
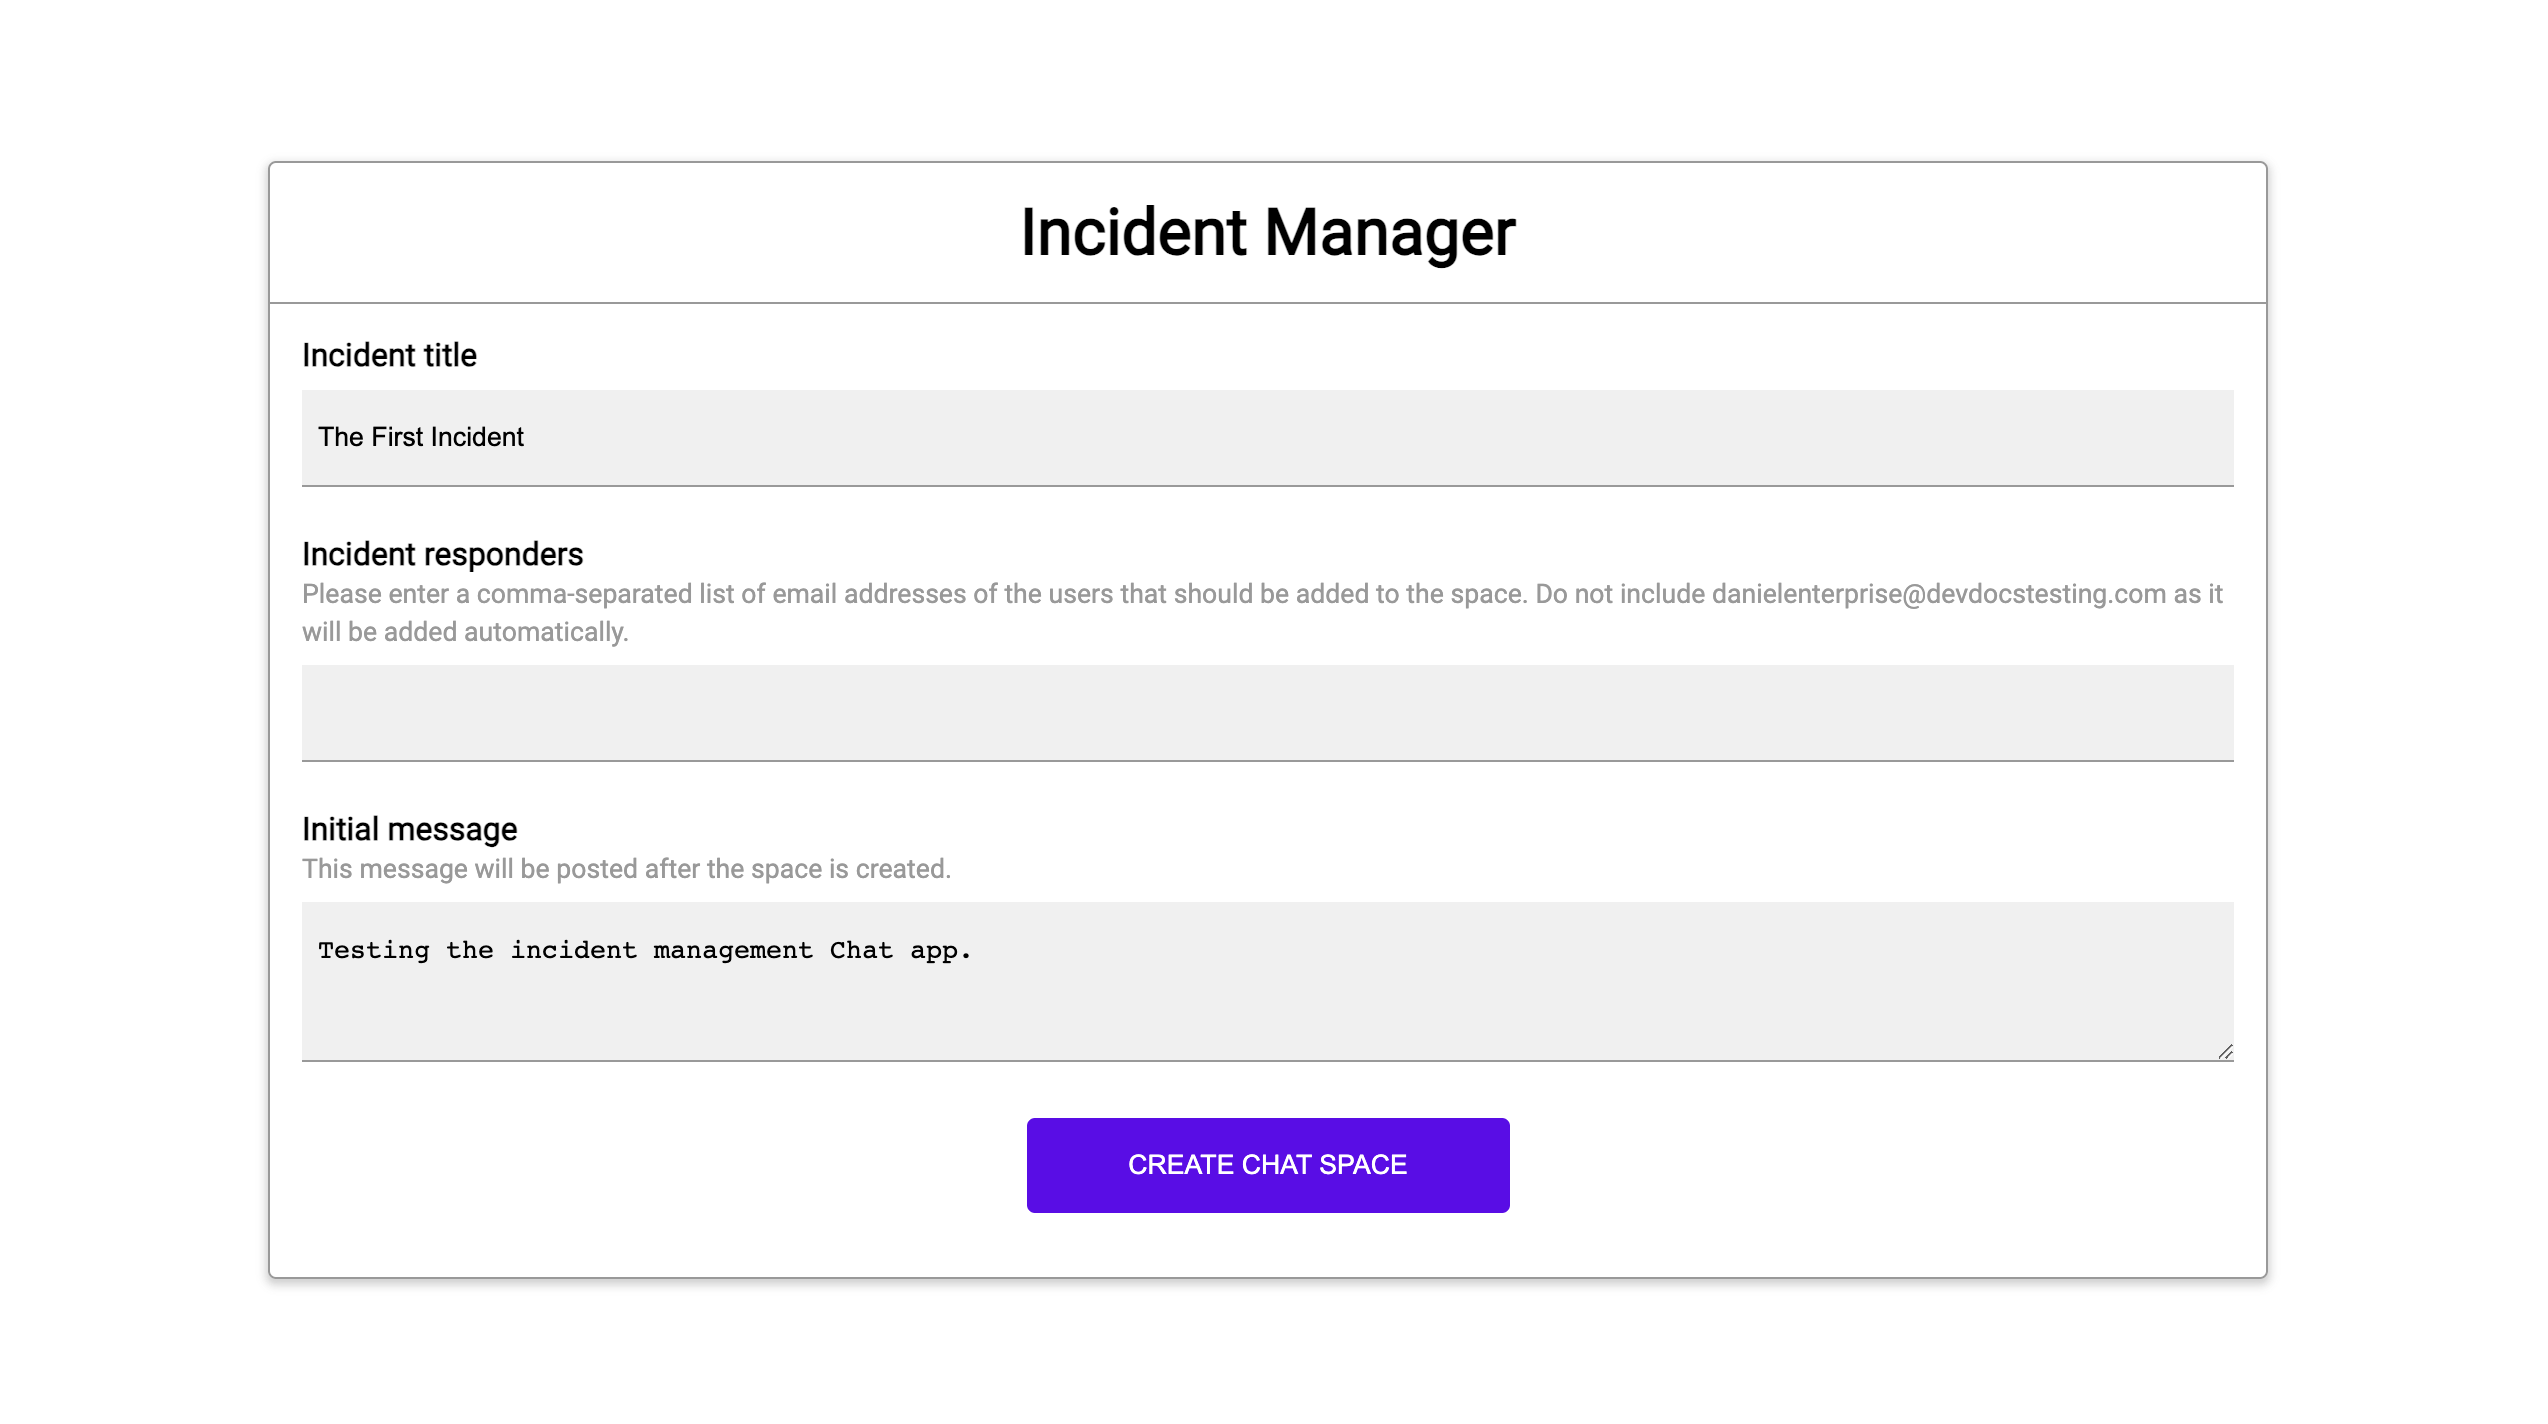
図 1: インシデントを報告できるウェブサイト。 -
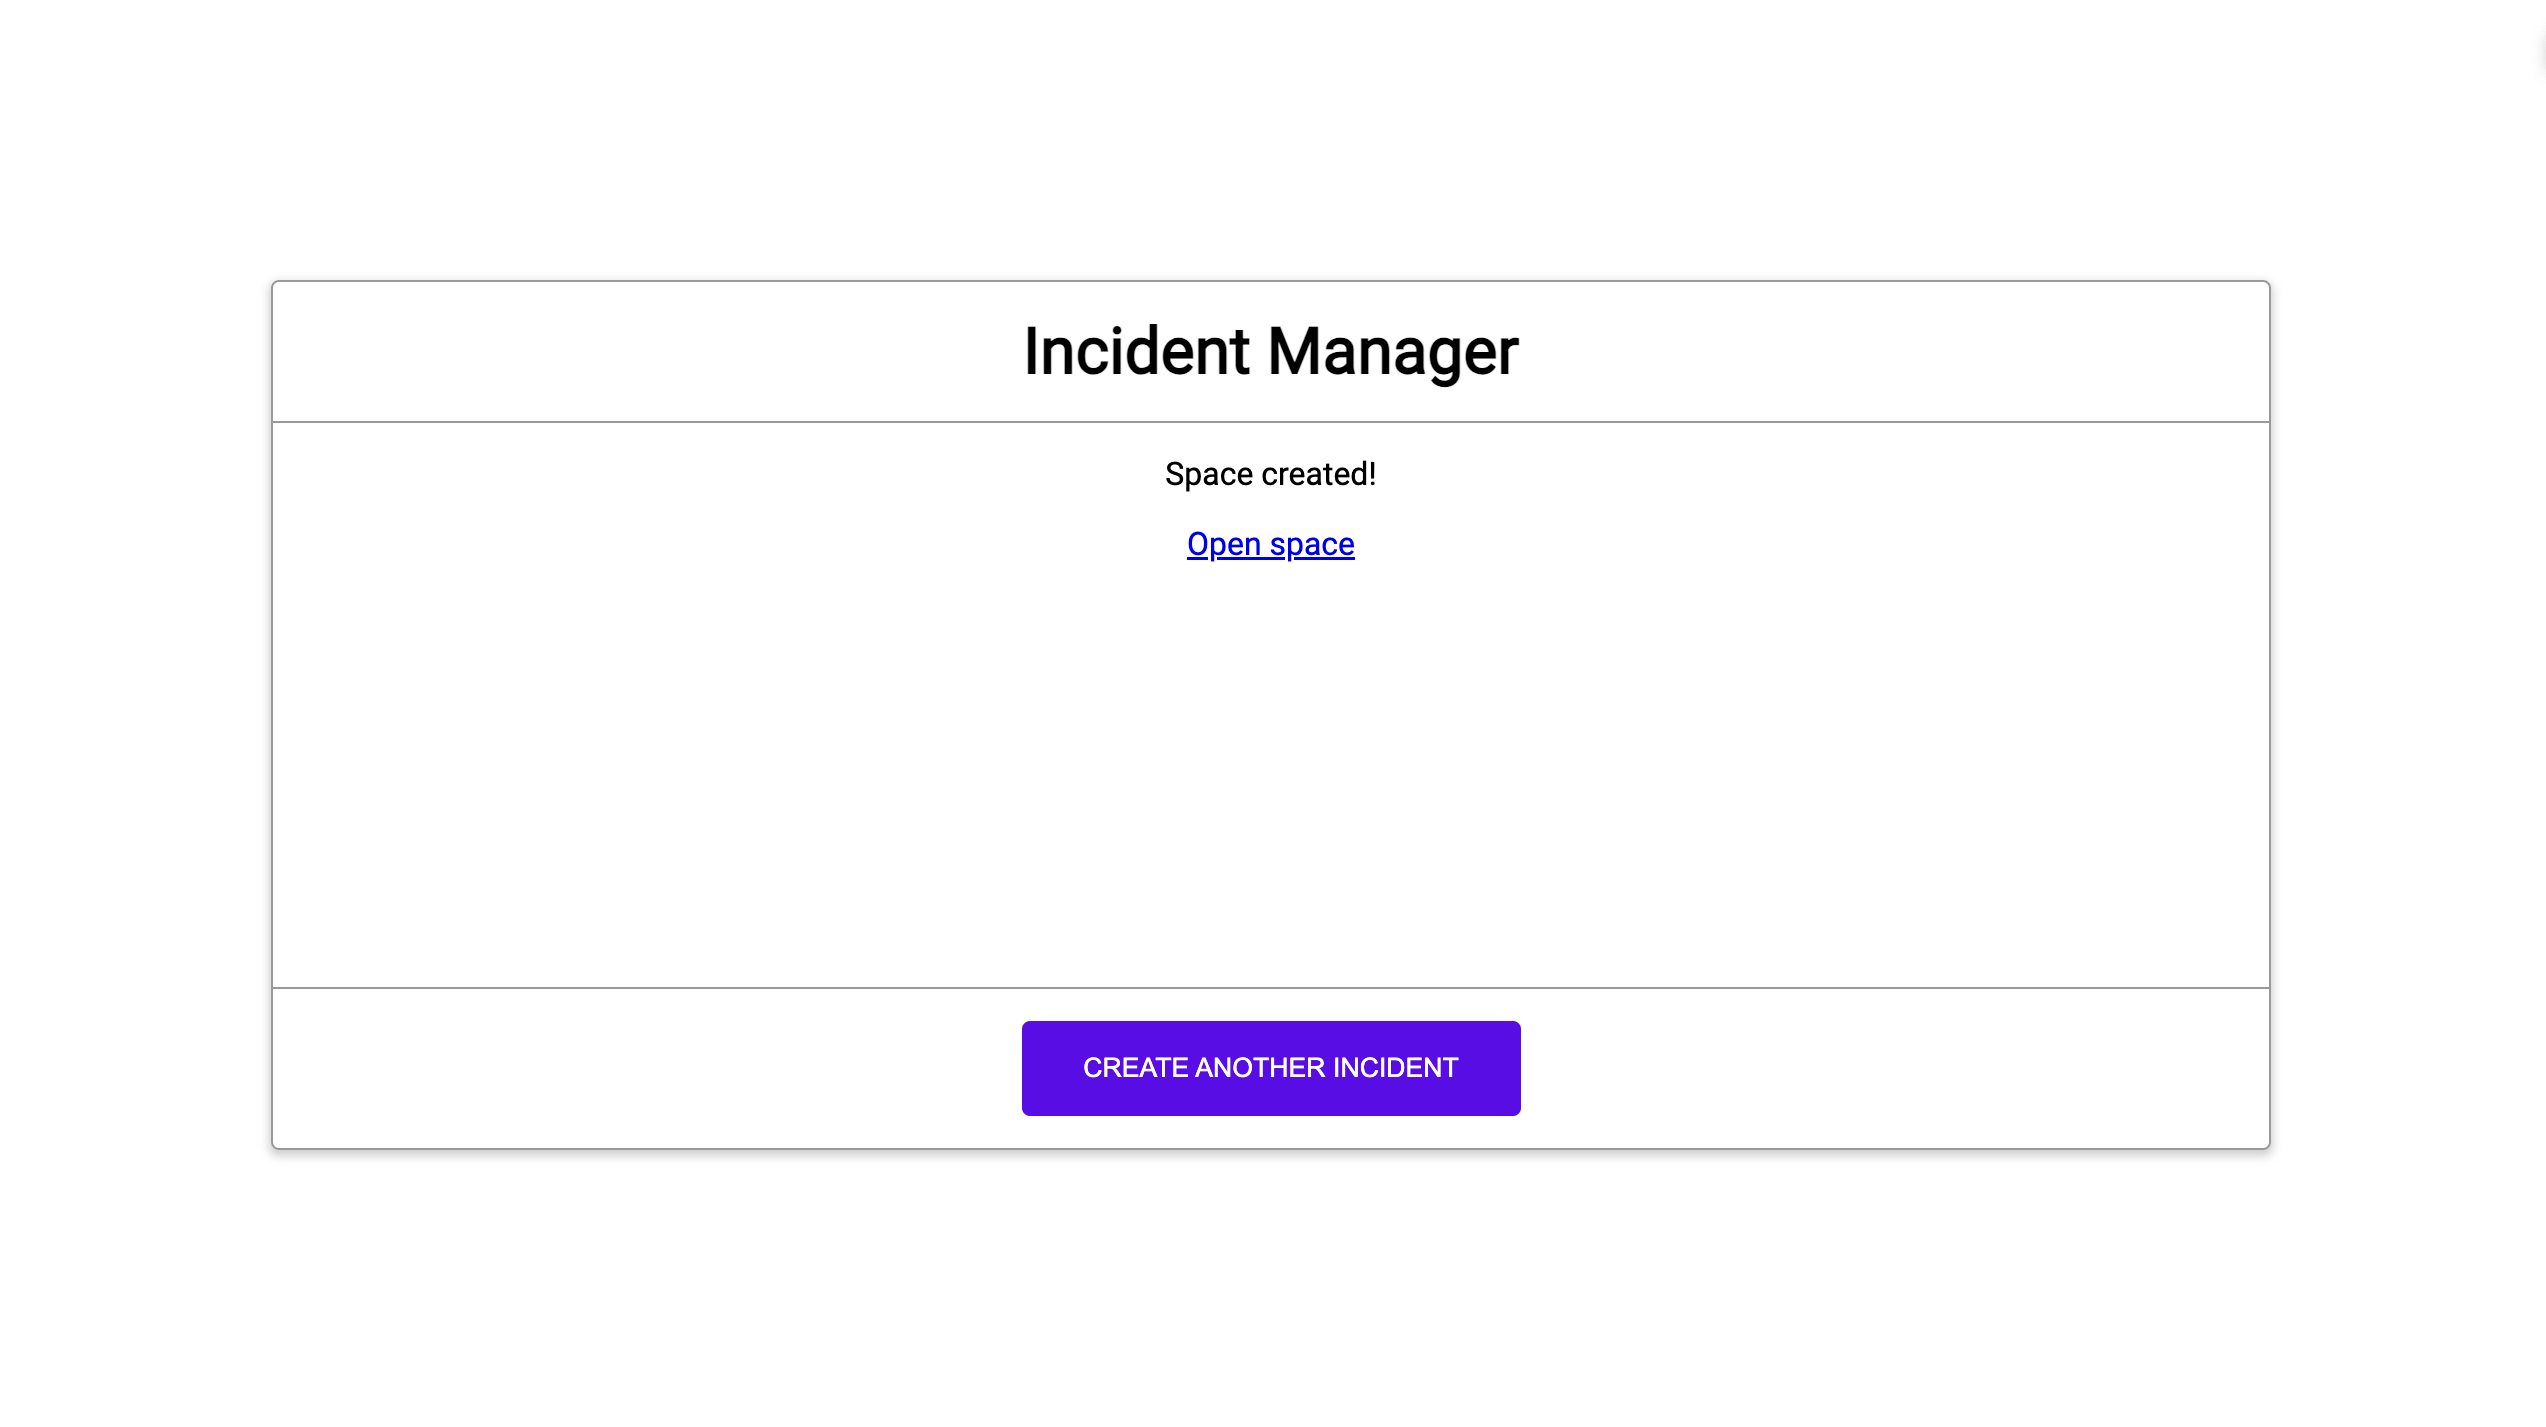
図 2. インシデントの Chat スペースが作成されたことを知らせる通知。 -
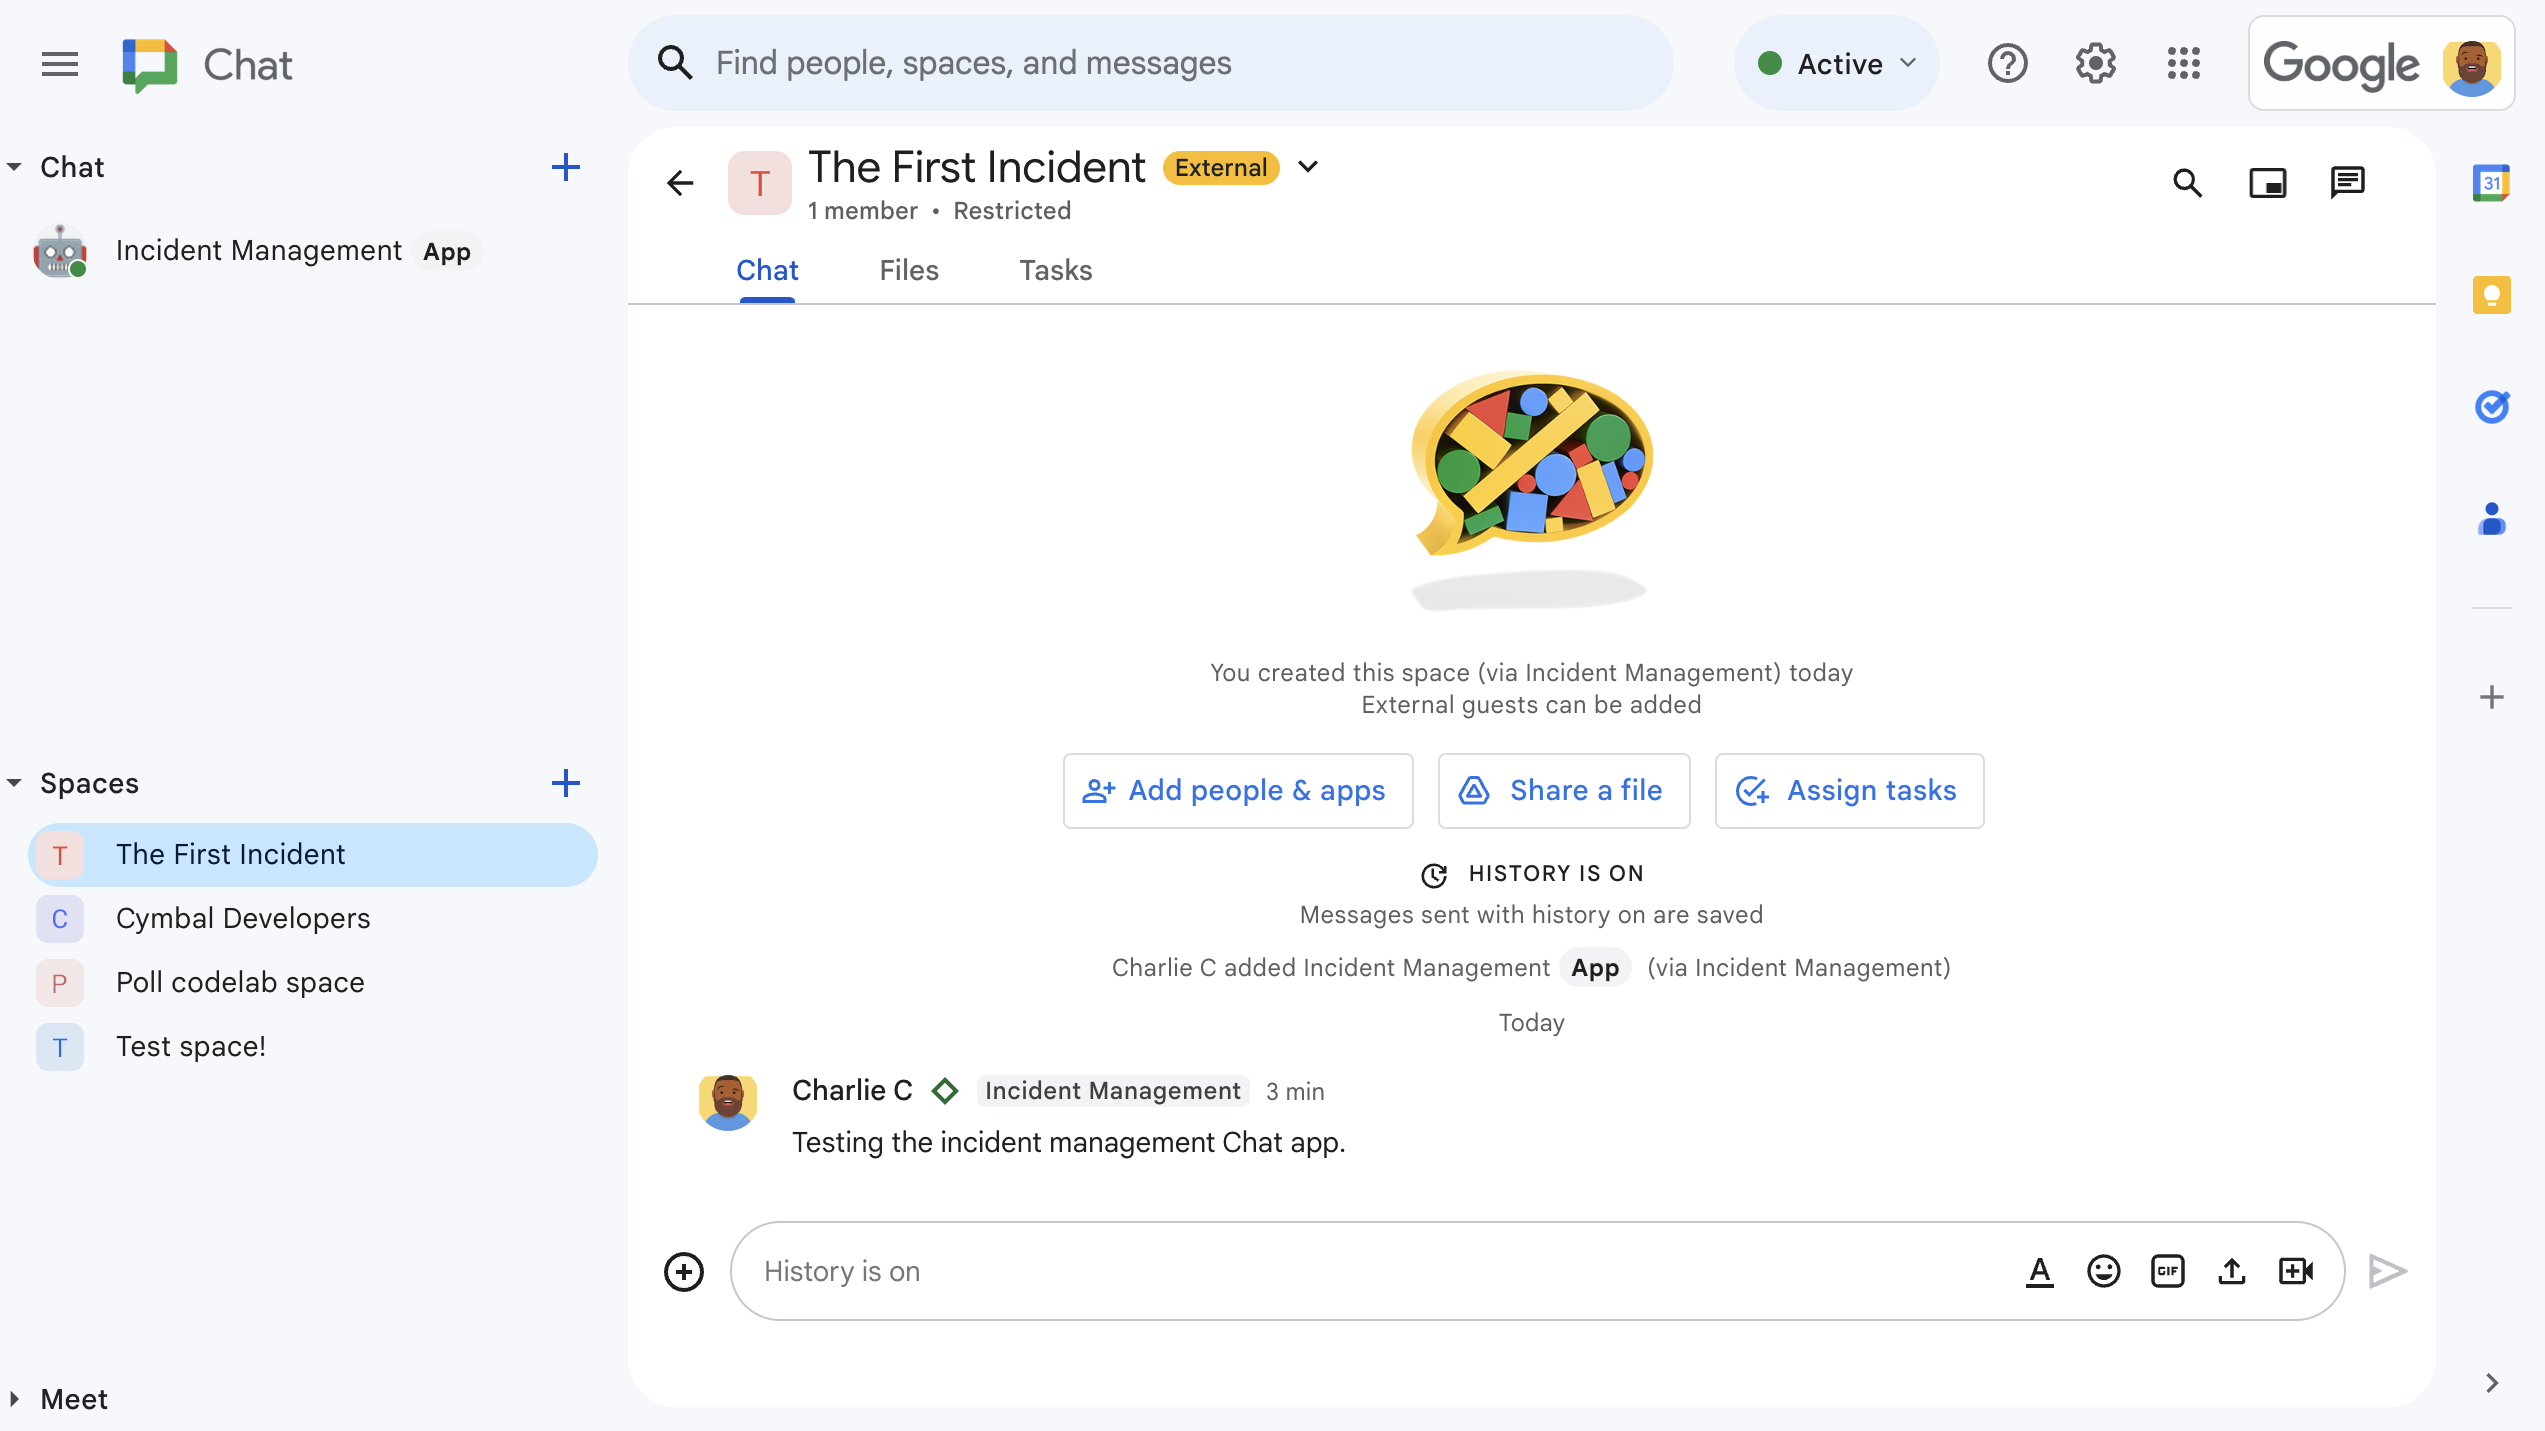
図 3. インシデント対応の Chat スペース。 -
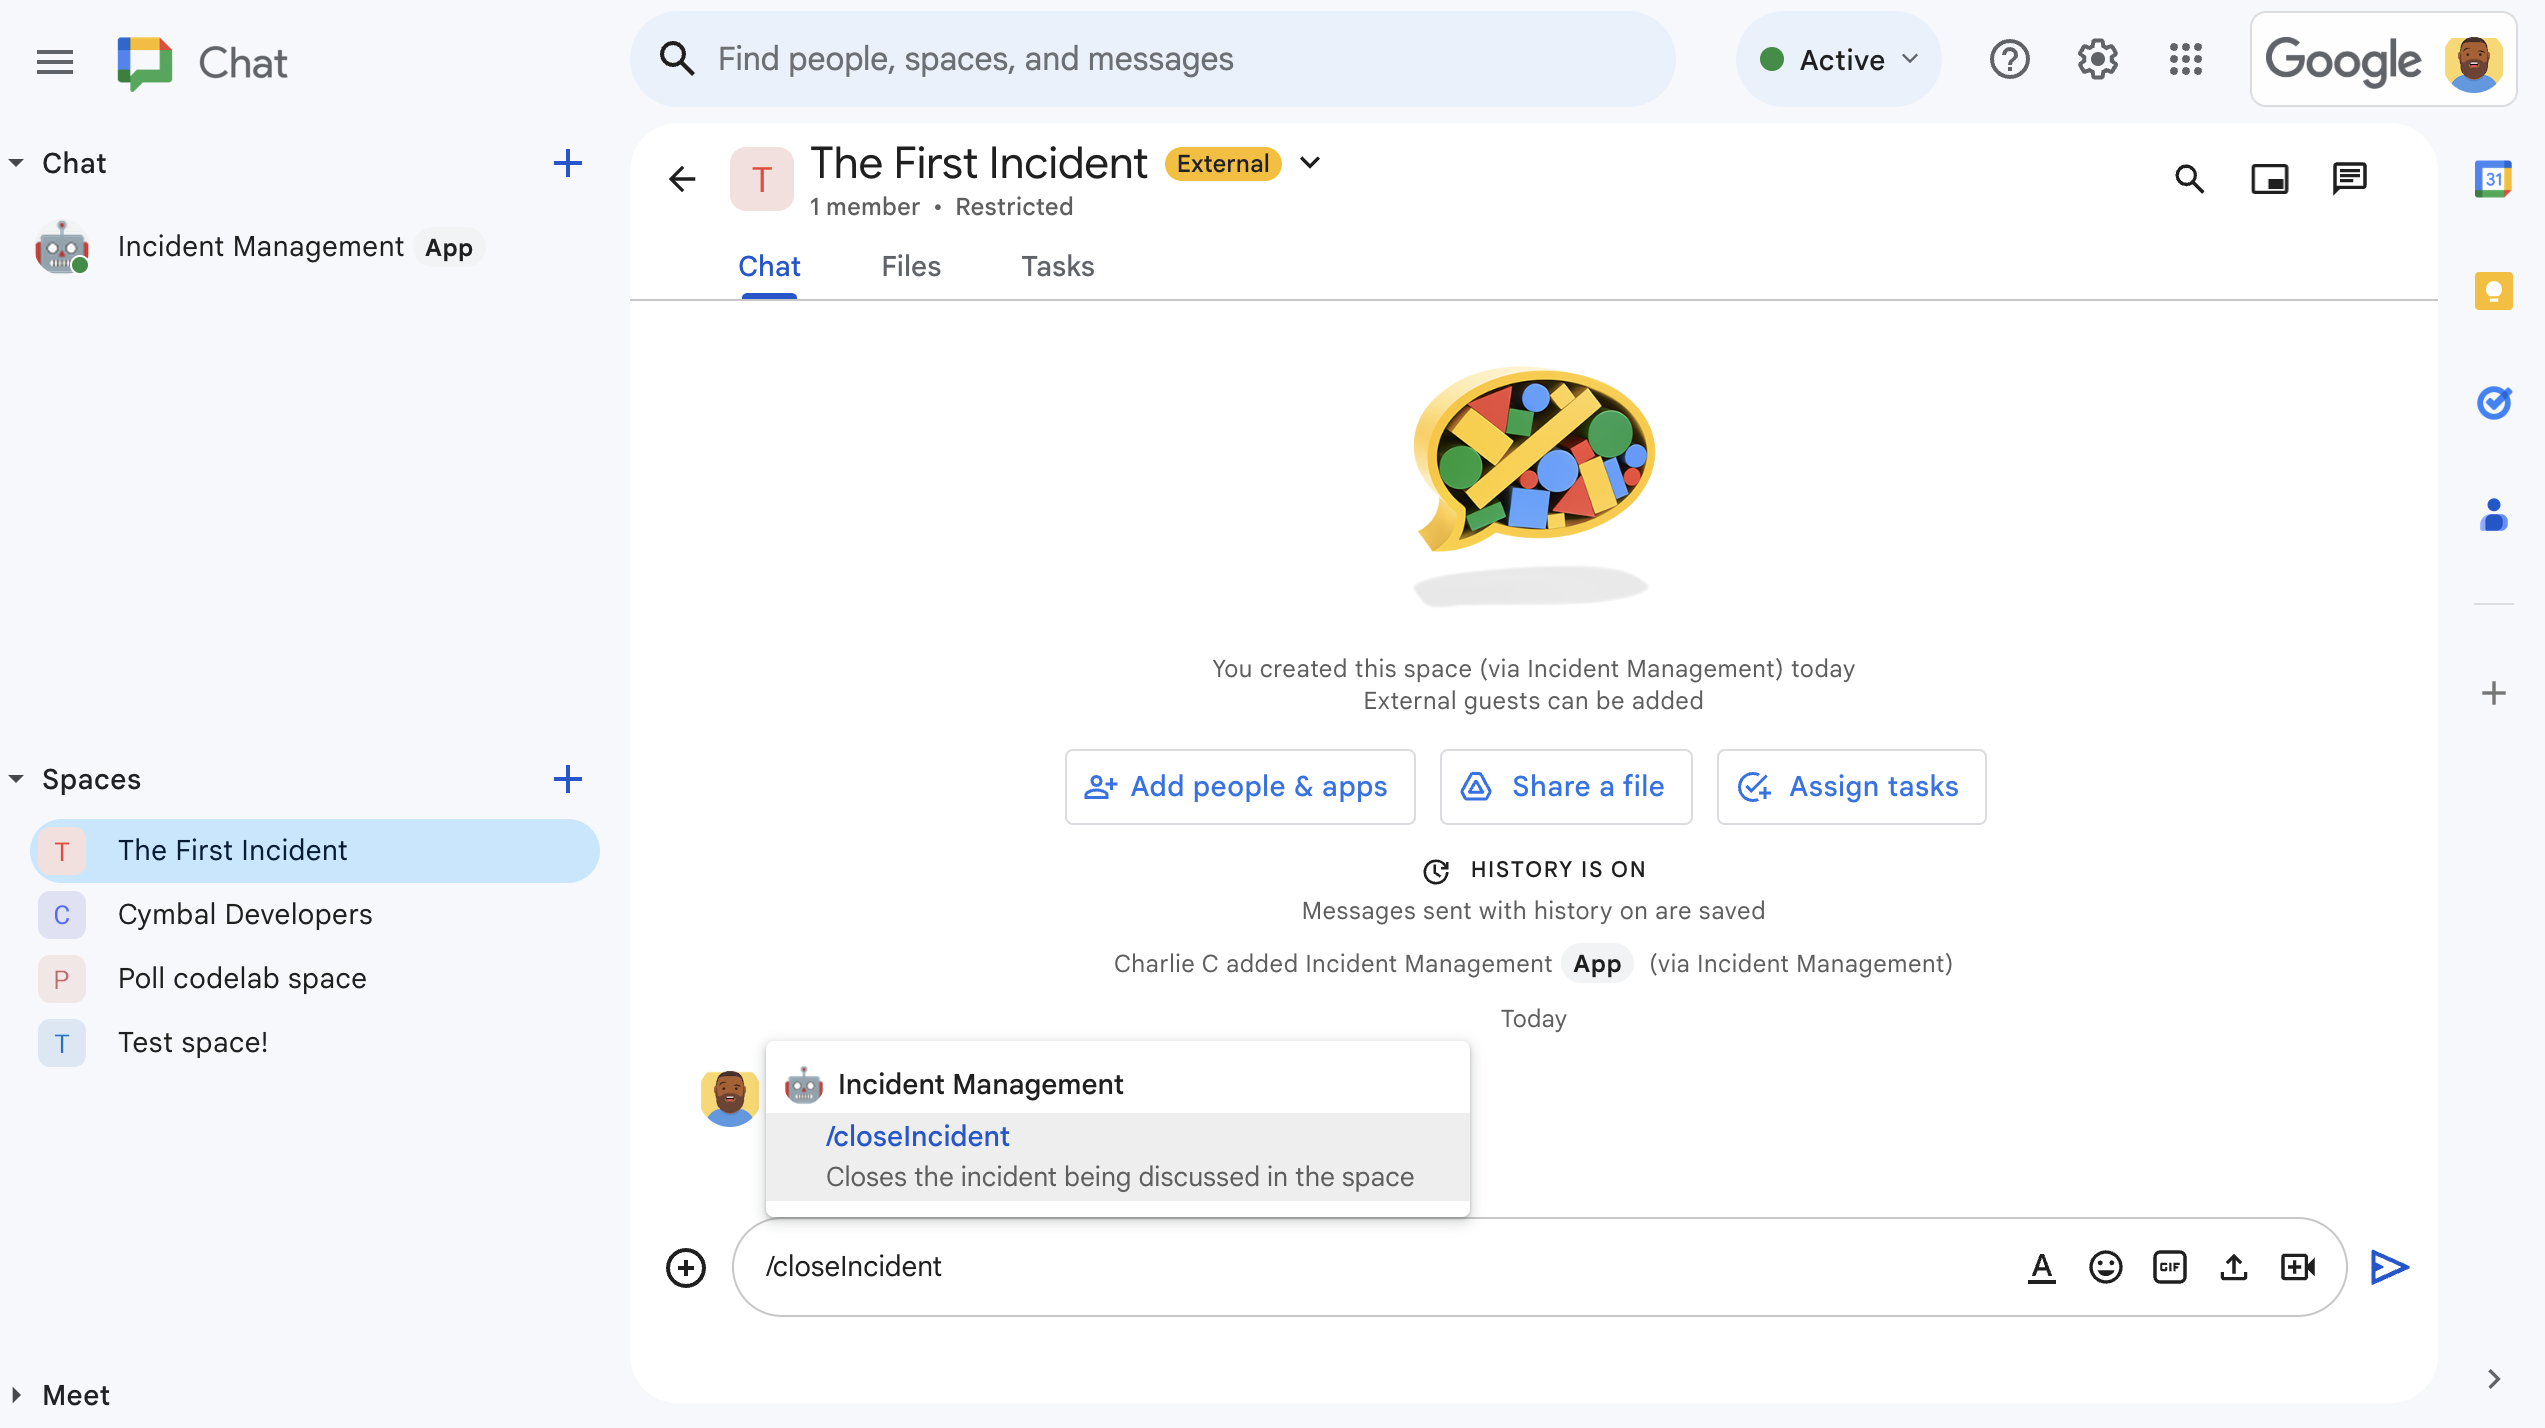
図 4. スラッシュ コマンドを使用してインシデントを解決する。 -
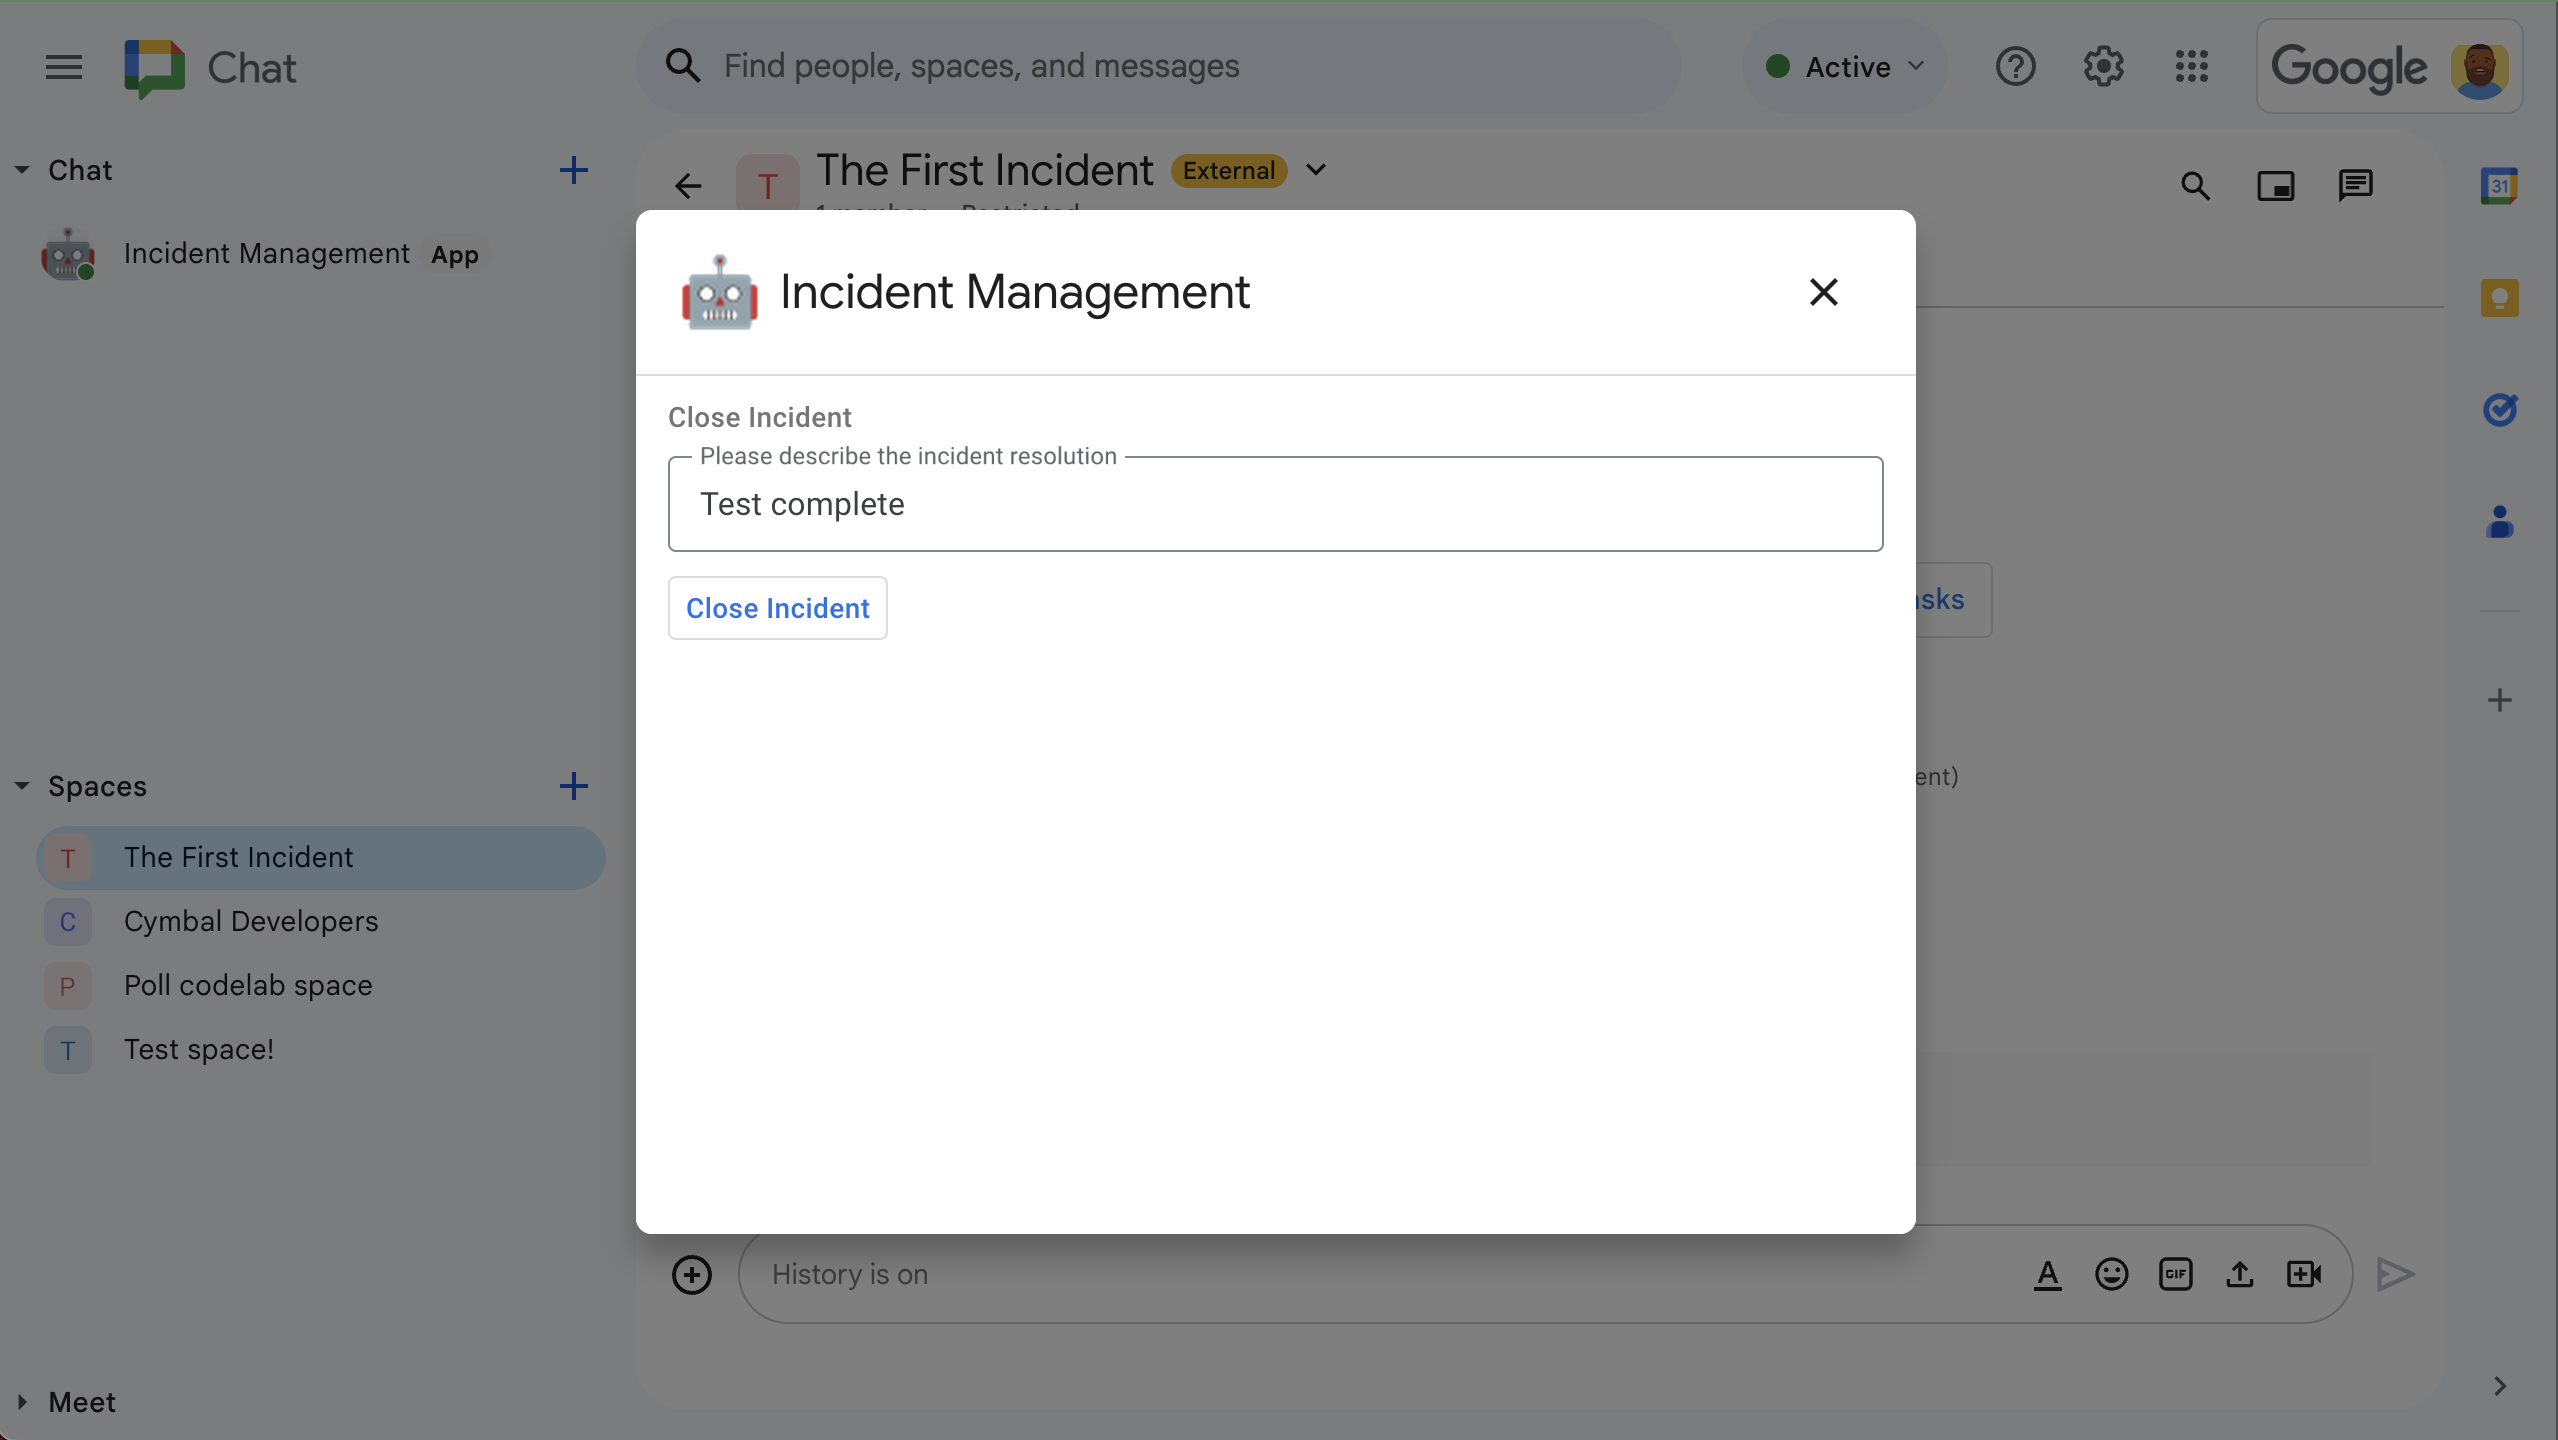
図 5. インシデント解決ダイアログ。 -
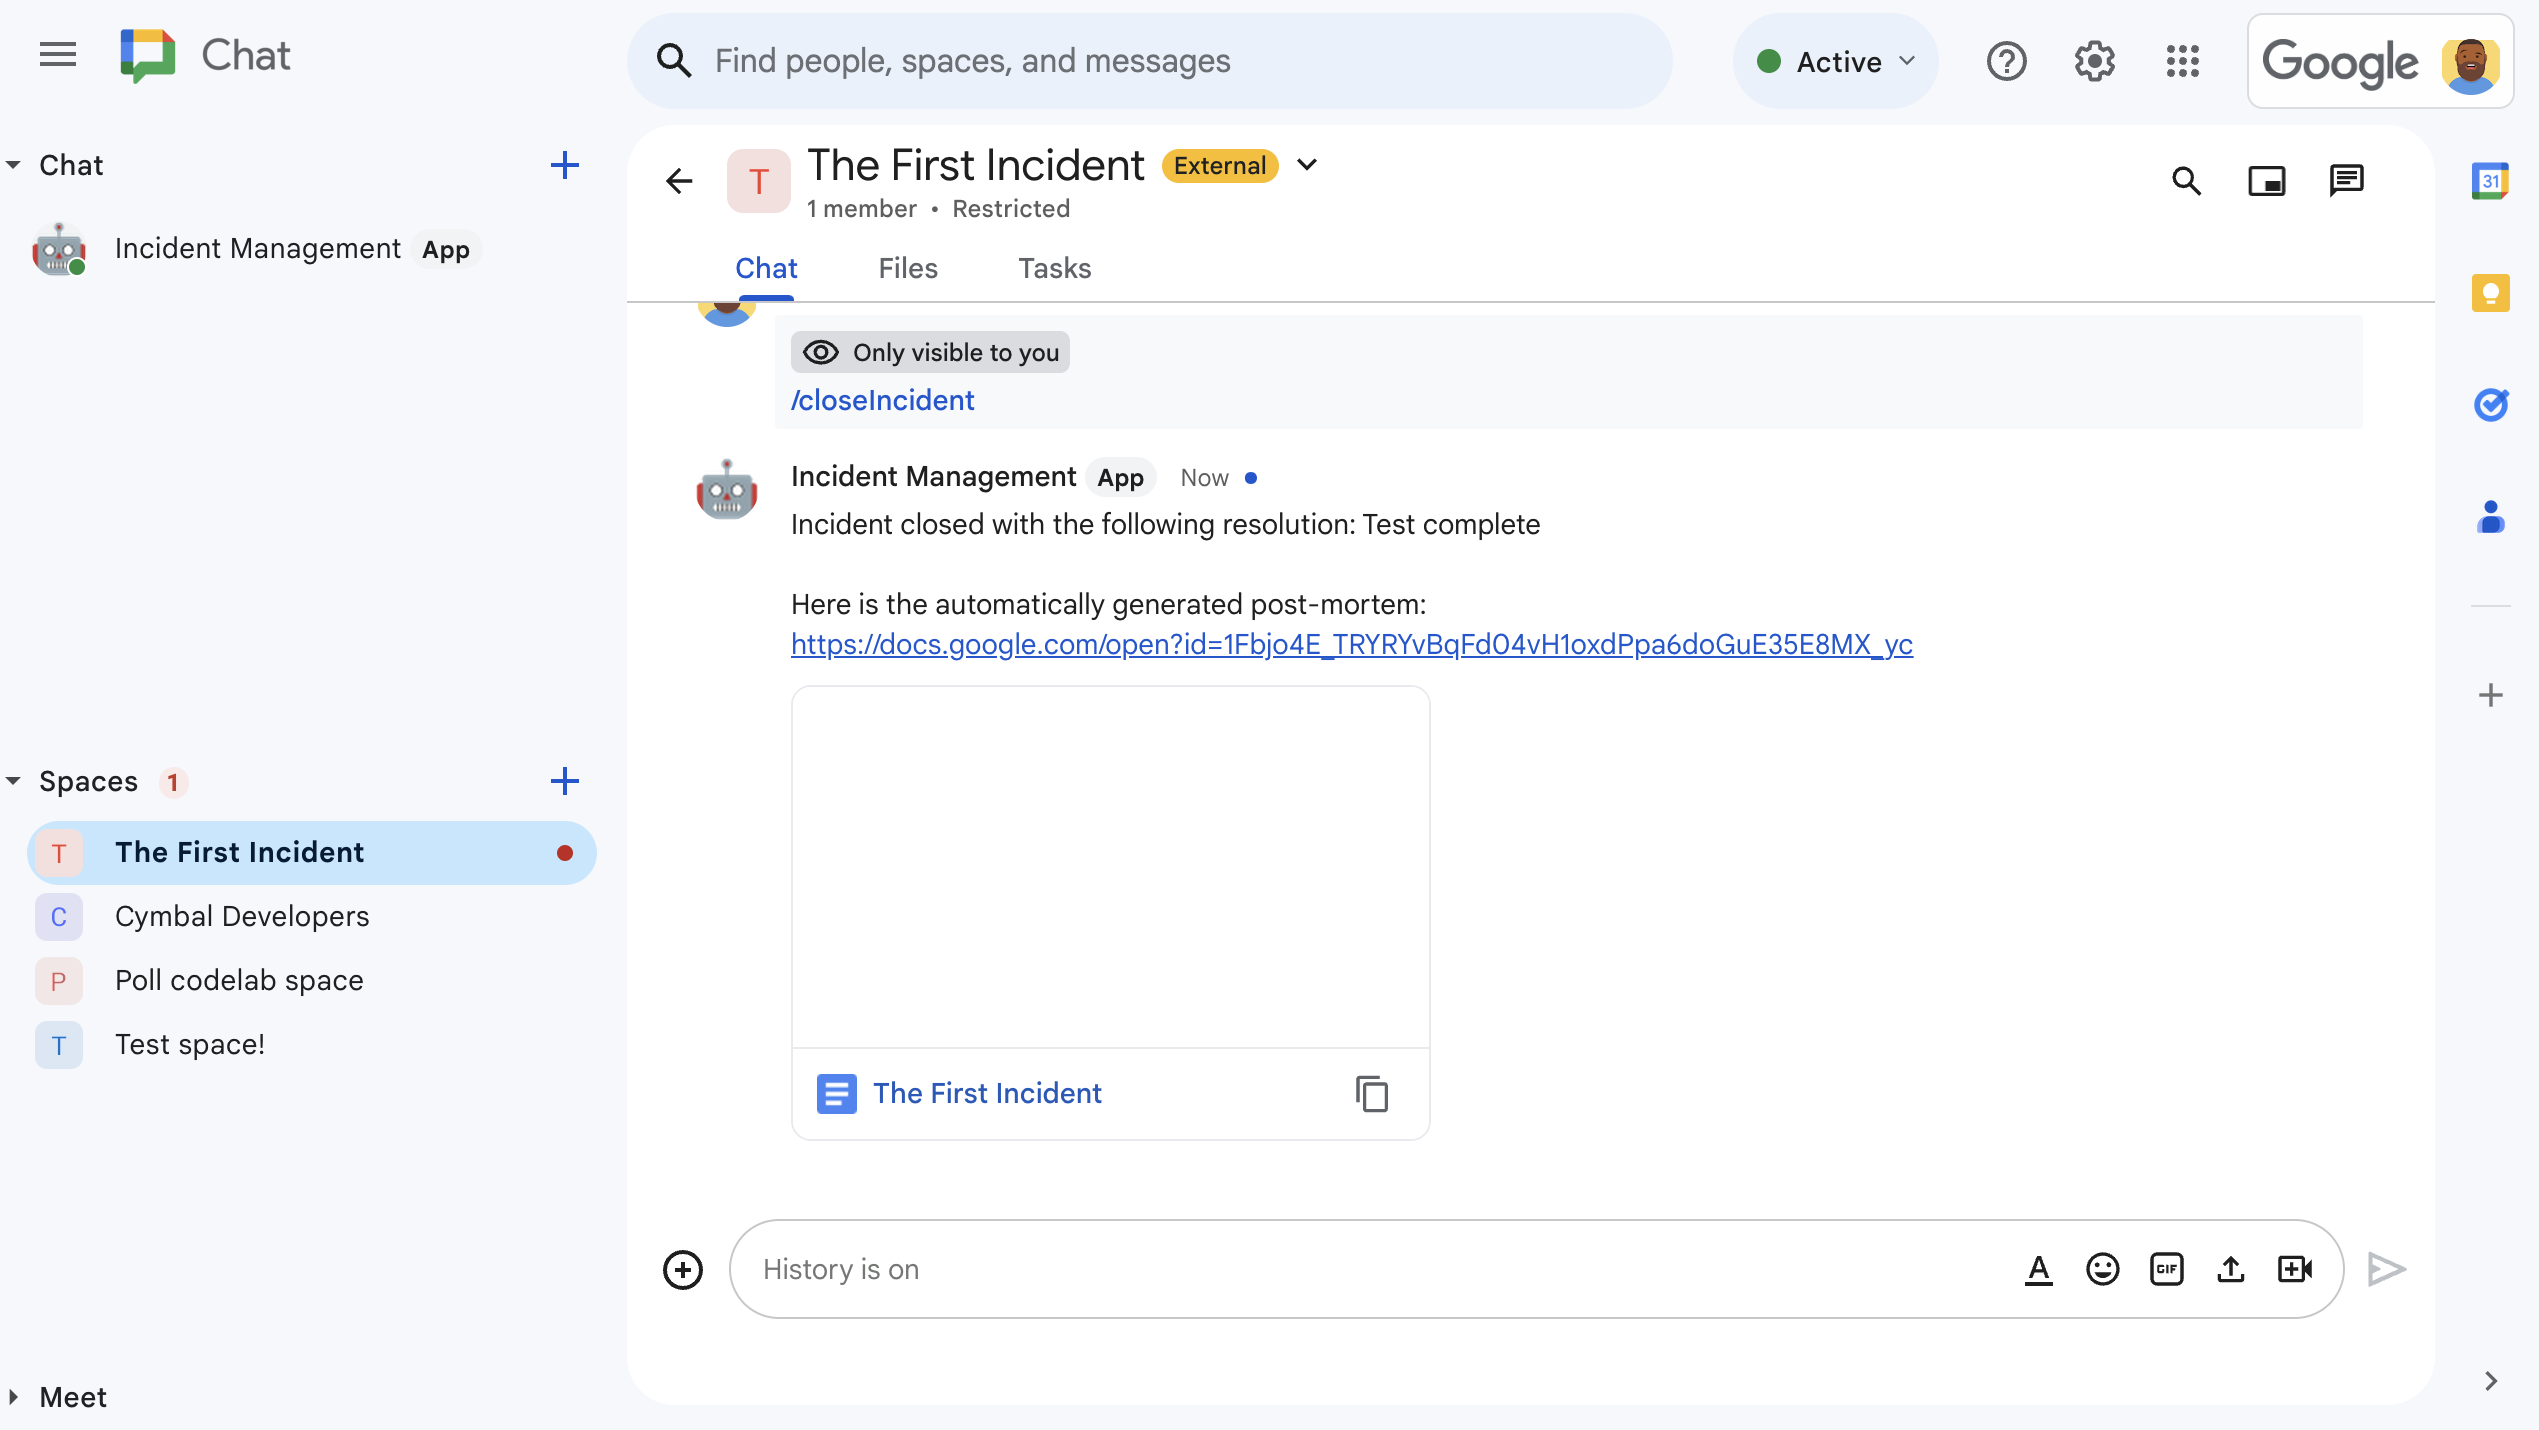
図 6. インシデント解決に関する Google ドキュメントがスペースで共有されました。 -

図 7. AI 要約インシデント解決の Google ドキュメント。
前提条件
組織でこれらの前提条件を有効にする必要がある場合は、Google Workspace 管理者に依頼して有効にしてください。
- Google Chat へのアクセス権を持つ Business または Enterprise の Google Workspace アカウント。
- Google Workspace でディレクトリ(連絡先の共有)が有効になっていること。インシデント アプリは、ディレクトリを使用して、インシデント対応者の名前やメールアドレスなどの連絡先情報を検索します。インシデント対応者は、Google Workspace 組織の Google Chat アカウントを持つユーザーである必要があります。
目標
- インシデントに対応する Chat 用アプリを構築します。
- ユーザーがインシデントに対応できるよう、次の手順を行います。
- インシデント対応スペースの作成。
- インシデントと対応を要約したメッセージを投稿する。
- インタラクティブな Chat 用アプリ機能によるコラボレーションをサポートします。
- Vertex AI を使用して会話と解決策を要約します。
アーキテクチャ
次の図は、インシデント対応の Google Chat アプリで使用される Google Workspace と Google Cloud リソースのアーキテクチャを示しています。
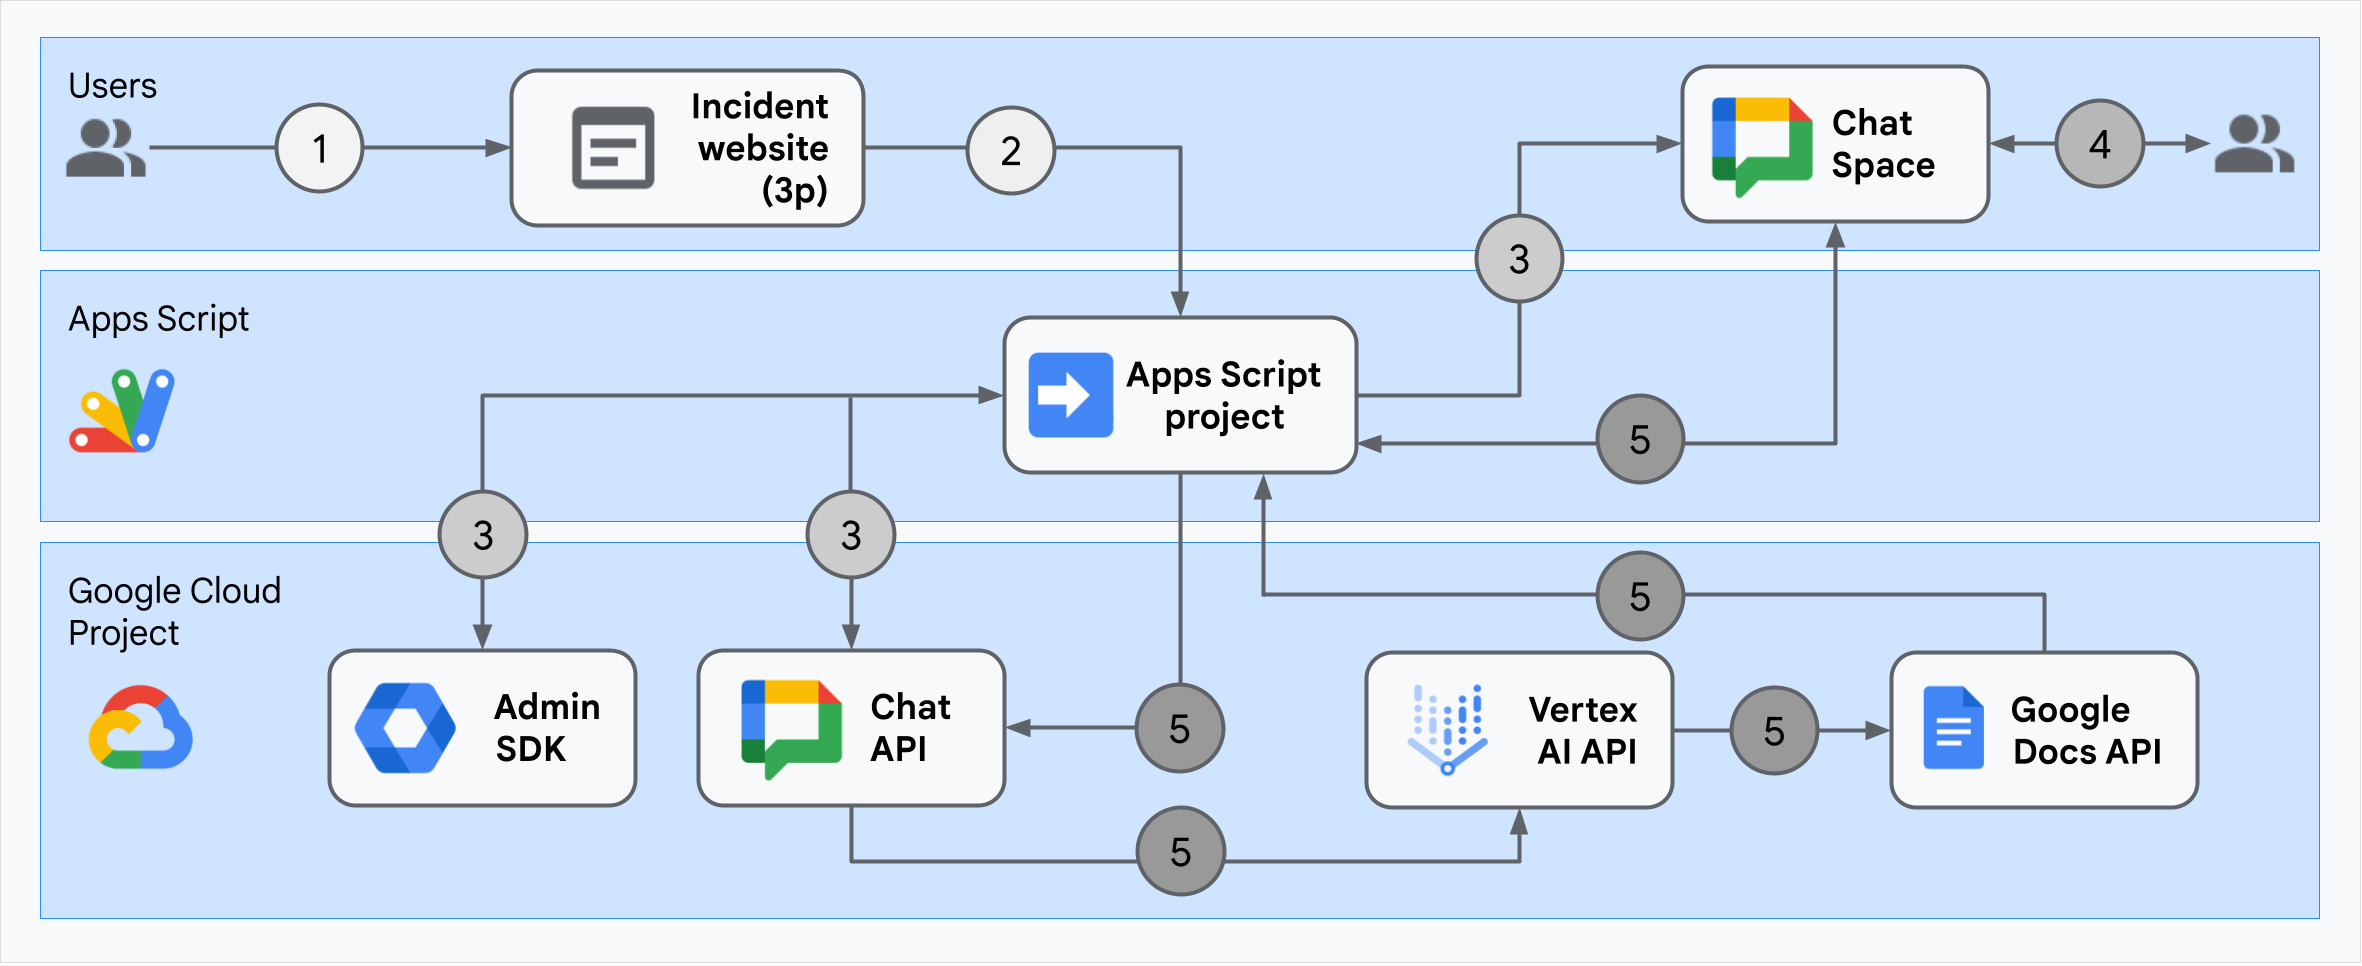
このアーキテクチャは、インシデント対応の Google Chat 用アプリがインシデントと解決策を処理する方法を示しています。
ユーザーが Apps Script でホストされている外部ウェブサイトからインシデントを開始します。
ウェブサイトは、Apps Script でホストされている Google Chat 用アプリに非同期 HTTP リクエストを送信します。
インシデント対応の Google Chat アプリがリクエストを処理します。
Apps Script Admin SDK サービスは、ユーザー ID やメールアドレスなどのチームメンバー情報を取得します。
Apps Script の高度な Chat サービスを使用して Chat API に一連の HTTP リクエストを送信すると、インシデント対応の Google Chat 用アプリがインシデントの Chat スペースを作成し、チームメンバーを追加して、スペースにメッセージを送信します。
チームメンバーが Chat スペースでインシデントについて話し合います。
チームメンバーがスラッシュ コマンドを呼び出して、インシデントの解決を通知します。
Apps Script の高度な Chat サービスを使用して Chat API に HTTP 呼び出しを行うと、Chat スペースのすべてのメッセージが一覧表示されます。
Vertex AI は、リストに記載されたメッセージを受信し、要約を生成します。
Apps Script の
DocumentAppサービスは、ドキュメントを作成し、Vertex AI の要約をドキュメントに追加します。インシデント対応の Google Chat アプリは、Chat API を呼び出して、概要のドキュメントへのリンクを共有するメッセージを送信します。
環境を準備する
このセクションでは、Chat 用アプリの Google Cloud プロジェクトを作成して構成する方法について説明します。
Google Cloud プロジェクトを作成する
Google Cloud コンソール
- Google Cloud コンソールで、メニュー > [IAM と管理] > [プロジェクトを作成] に移動します。
-
[プロジェクト名] フィールドに、プロジェクトのわかりやすい名前を入力します。
省略可: プロジェクト ID を編集するには、[編集] をクリックします。プロジェクトの作成後にプロジェクト ID を変更することはできないため、プロジェクトのライフタイムを考慮してニーズに合った ID を指定してください。
- [ロケーション] フィールドで、[参照] をクリックして、プロジェクトの候補となるロケーションを表示します。[選択] をクリックします。
- [作成] をクリックします。Google Cloud コンソールが [ダッシュボード] ページに移動し、数分以内にプロジェクトが作成されます。
gcloud CLI
次のいずれかの開発環境で、Google Cloud CLI(gcloud)にアクセスします。
-
Cloud Shell: gcloud CLI がすでに設定されているオンライン ターミナルを使用するには、Cloud Shell をアクティブにします。
Cloud Shell をアクティブにする -
ローカルシェル: ローカル開発環境を使用するには、gcloud CLI をインストールして初期化します。
Cloud プロジェクトを作成するには、gcloud projects createコマンドを使用します。gcloud projects create PROJECT_ID
Cloud プロジェクトに対する課金を有効にする
Google Cloud コンソール
- Google Cloud コンソールで、[お支払い] に移動します。[メニュー] > [お支払い] > [マイ プロジェクト] をクリックします。
- [組織を選択] で、Google Cloud プロジェクトに関連付けられている組織を選択します。
- プロジェクトの行で、[アクション] メニュー()を開き、[お支払い情報を変更] をクリックして、Cloud 請求先アカウントを選択します。
- [アカウントを設定] をクリックします。
gcloud CLI
- 使用可能な請求先アカウントを一覧表示するには、次のコマンドを実行します。
gcloud billing accounts list - 請求先アカウントを Google Cloud プロジェクトにリンクします。
gcloud billing projects link PROJECT_ID --billing-account=BILLING_ACCOUNT_ID次のように置き換えます。
PROJECT_IDは、課金を有効にする Cloud プロジェクトのプロジェクト ID です。BILLING_ACCOUNT_IDは、Google Cloud プロジェクトにリンクする請求先アカウント ID です。
API を有効にする
Google Cloud コンソール
Google Cloud コンソールで、Google Chat API、Google ドキュメント API、Admin SDK API、Vertex AI API を有効にします。
正しい Cloud プロジェクトで API を有効にしていることを確認し、[次へ] をクリックします。
正しい API を有効にしていることを確認し、[有効にする] をクリックします。
gcloud CLI
必要に応じて、現在の Cloud プロジェクトを
gcloud config set projectコマンドで作成したプロジェクトに設定します。gcloud config set project PROJECT_IDPROJECT_ID は、作成した Cloud プロジェクトのプロジェクト ID に置き換えます。
gcloud services enableコマンドを使用して、Google Chat API、Google ドキュメント API、Admin SDK API、Vertex AI API を有効にします。gcloud services enable chat.googleapis.com docs.googleapis.com admin.googleapis.com aiplatform.googleapis.com
認証と権限付与の設定
認証と認可により、Chat 用アプリは Google Workspace と Google Cloud のリソースにアクセスして、インシデント対応を処理できます。
このチュートリアルでは、アプリを内部で公開するため、プレースホルダ情報を使用しても問題ありません。アプリを外部に公開する前に、同意画面のプレースホルダ情報を実際の情報に置き換えます。
Google Cloud コンソールで、メニュー > Google Auth platform > [ブランディング] に移動します。
Google Auth platformをすでに構成している場合は、[ブランディング]、[対象ユーザー]、[データアクセス] で次の OAuth 同意画面の設定を構成できます。[Google Auth platform まだ設定されていません] というメッセージが表示された場合は、[使ってみる] をクリックします。
- [アプリ情報] の [アプリ名] に「
Incident Management」と入力します。 - [ユーザー サポートメール] で、メールアドレスまたは適切な Google グループを選択します。
- [次へ] をクリックします。
- [対象] で [内部] を選択します。[内部] を選択できない場合は、[外部] を選択します。
- [次へ] をクリックします。
- [連絡先情報] で、プロジェクトに対する変更の通知を受け取るメールアドレスを入力します。
- [次へ] をクリックします。
- [完了] で、Google API サービスのユーザーデータに関するポリシーを確認し、同意する場合は [Google API サービス: ユーザーデータに関するポリシーに同意します] を選択します。
- [続行] をクリックします。
- [作成] をクリックします。
- ユーザータイプとして [外部] を選択した場合は、テストユーザーを追加します。
- [オーディエンス] をクリックします。
- [テストユーザー] で [ユーザーを追加] をクリックします。
- メールアドレスと他の承認済みテストユーザーを入力し、[保存] をクリックします。
- [アプリ情報] の [アプリ名] に「
[データアクセス] > [スコープの追加または削除] をクリックします。パネルが表示され、Google Cloud プロジェクトで有効にした各 API のスコープのリストが表示されます。
[Manually add scopes] に、次のスコープを貼り付けます。
https://www.googleapis.com/auth/chat.spaces.createhttps://www.googleapis.com/auth/chat.membershipshttps://www.googleapis.com/auth/chat.memberships.apphttps://www.googleapis.com/auth/chat.messageshttps://www.googleapis.com/auth/documentshttps://www.googleapis.com/auth/admin.directory.user.readonlyhttps://www.googleapis.com/auth/script.external_requesthttps://www.googleapis.com/auth/userinfo.emailhttps://www.googleapis.com/auth/cloud-platform
[Add to Table] をクリックします。
[更新] をクリックします。
アプリに必要なスコープを選択したら、[データアクセス] ページで [保存] をクリックします。
Chat 用アプリを作成してデプロイする
次のセクションでは、Chat 用アプリに必要なすべてのアプリケーション コードを含む Apps Script プロジェクト全体をコピーして更新するため、各ファイルをコピーして貼り付ける必要はありません。
一部の関数では、ChatApp.gs の processSlashCommand_() のように、名前の末尾にアンダースコアが含まれています。アンダースコアは、ブラウザで開いたときにインシデントの初期化ウェブページから関数を非表示にします。詳細については、プライベート関数をご覧ください。
Apps Script は、.gs スクリプトと .html ファイルの 2 種類のファイル形式をサポートしています。このサポートに準拠するため、アプリのクライアントサイド JavaScript は <script /> タグ内に、CSS は HTML ファイル内の <style /> タグ内に含まれています。
必要に応じて、GitHub でプロジェクト全体を確認できます。
各ファイルの概要は次のとおりです。
Consts.gsCloud プロジェクト ID、Vertex AI ロケーション ID、インシデントをクローズするためのスラッシュ コマンド ID など、他のコードファイルで参照される定数を定義します。
Consts.gsコードを表示するChatApp.gsメッセージ、カードのクリック数、スラッシュ コマンド、ダイアログなどの Chat 操作イベントを処理します。
/closeIncidentスラッシュ コマンドに応答して、インシデント解決の詳細情報を収集するダイアログを開きます。Chat API のspaces.messages.listメソッドを呼び出して、スペース内のメッセージを読み取ります。Apps Script の Admin SDK Directory サービスを使用してユーザー ID を取得します。ChatApp.gsコードを表示するChatSpaceCreator.gsインシデントの初期化ウェブページでユーザーが入力したフォームデータを受け取り、それを使用して Chat スペースを設定します。具体的には、Chat スペースを作成してデータを入力し、インシデントに関するメッセージを投稿します。
ChatSpaceCreator.gsコードを表示するDocsApi.gsGoogle ドキュメント API を呼び出して、ユーザーの Google ドライブに Google ドキュメントを作成し、
VertexAiApi.gsで作成されたインシデント情報の概要をドキュメントに書き込みます。DocsApi.gsコードを表示するVertexAiApi.gsVertex AI を使用して、Chat スペースでの会話を要約します。この要約は、
DocsAPI.gsで特別に作成されたドキュメントに投稿されます。VertexAiApi.gsコードを表示するWebController.gsインシデントの初期化ウェブサイトを提供します。
WebController.gsコードを表示するIndex.htmlインシデントの初期化ウェブサイトを構成する HTML。
Index.htmlコードを表示するJavaScript.htmlインシデントの初期化ウェブサイトの送信、エラー、クリアなどのフォームの動作を処理します。これは、
WebController.gsのカスタムinclude関数によってIndex.htmlに含まれます。JavaScript.htmlコードを表示するStylesheet.htmlインシデントの初期化ウェブサイトの CSS。これは、
WebController.gsのカスタムinclude関数によってIndex.htmlに含まれます。Stylesheet.htmlコードを表示する
Cloud プロジェクトの番号と ID を確認する
Google Cloud コンソールで、Cloud プロジェクトに移動します。
設定とユーティリティ > [プロジェクトの設定] をクリックします。
[プロジェクト番号] フィールドと [プロジェクト ID] フィールドの値を書き留めます。これらは、以降のセクションで使用します。
Apps Script プロジェクトを作成する
Apps Script プロジェクトを作成して Cloud プロジェクトに接続するには:
- 次のボタンをクリックして、Google Chat でインシデントに対応する Apps Script プロジェクトを開きます。
プロジェクトを開く - [概要] をクリックします。
- 概要ページで、
 [コピーを作成] をクリックします。
 Apps Script プロジェクトのコピーに名前を付けます。
[Copy of Respond to incidents with Google Chat] をクリックします。
[プロジェクトのタイトル] に「
Incident Management Chat app」と入力します。[名前を変更] をクリックします。
Apps Script プロジェクトのコピーで、
Consts.gsファイルに移動し、YOUR_PROJECT_IDを Cloud プロジェクトの ID に置き換えます。
Apps Script プロジェクトの Cloud プロジェクトを設定する
- Apps Script プロジェクトで、
 [プロジェクトの設定] をクリックします。
 - [Google Cloud Platform(GCP)プロジェクト] で、[プロジェクトを変更] をクリックします。
- [GCP プロジェクト番号] に、Cloud プロジェクトのプロジェクト番号を貼り付けます。
- [プロジェクトを設定] をクリックします。これで、Cloud プロジェクトと Apps Script プロジェクトが接続されました。
Apps Script のデプロイを作成する
すべてのコードが配置されたので、Apps Script プロジェクトをデプロイします。デプロイ ID は、Google Cloud で Chat 用アプリを構成するときに使用します。
Apps Script で、インシデント対応アプリのプロジェクトを開きます。
[Deploy] > [New deployment] をクリックします。
[アドオン] と [ウェブアプリ] がまだ選択されていない場合は、[種類の選択] の横にあるデプロイタイプ
をクリックし、[アドオン] と [ウェブアプリ] を選択します。[説明] に、このバージョンの説明(例:
Complete version of incident management app)を入力します。[実行ユーザー] で、[ウェブアプリにアクセスするユーザー] を選択します。
[アクセスできるユーザー] で、[Workspace 組織内の全員] を選択します。ここで、「Workspace 組織」は Google Workspace 組織の名前です。
[デプロイ] をクリックします。Apps Script はデプロイの成功を報告し、デプロイ ID とインシデントの初期化ウェブページの URL を提供します。
インシデントを開始するときに後でアクセスできるように、ウェブアプリの URL をメモしておきます。[デプロイ ID] をコピーします。この ID は、Google Cloud コンソールで Chat 用アプリを構成するときに使用します。
[完了] をクリックします。
Google Cloud コンソールで Chat 用アプリを構成する
このセクションでは、Google Cloud コンソールで Google Chat API を構成する方法について説明します。この構成には、Apps Script プロジェクトから作成したデプロイの ID など、Chat 用アプリに関する情報が含まれます。
Google Cloud コンソールで、メニュー > [その他のプロダクト] > [Google Workspace] > [プロダクト ライブラリ] > [Google Chat API] > [管理] > [構成] をクリックします。
[この Chat 用アプリを Google Workspace アドオンとしてビルドする] をオフにします。確認を求めるダイアログが開きます。ダイアログで [無効にする] をクリックします。
[アプリ名] に「
Incident Management」と入力します。[アバターの URL] に「
https://developers.google.com/chat/images/quickstart-app-avatar.png」と入力します。[説明] に「
Responds to incidents.」と入力します。[インタラクティブ機能を有効にする] 切り替えボタンをクリックしてオンにします。
[機能] で、[スペースとグループの会話に参加する] を選択します。
[接続設定] で [Apps Script] を選択します。
[デプロイ ID] に、先ほど Apps Script プロジェクトのデプロイからコピーした Apps Script デプロイ ID を貼り付けます。
完全に実装された Chat 用アプリが使用するスラッシュ コマンドを登録します。
[スラッシュ コマンド] で、[スラッシュ コマンドを追加] をクリックします。
[名前] に「
Close incident」と入力します。[コマンド ID] に「
1」と入力します。[説明] に「
Closes the incident being discussed in the space.」と入力します。[コマンドの種類] で [スラッシュ コマンド] を選択します。
[スラッシュ コマンド名] に「
/closeIncident」と入力します。[ダイアログを開く] を選択します。
[完了] をクリックします。スラッシュ コマンドが登録され、一覧に表示されます。
[公開設定] で、[Your Workspace Domain 内の特定のユーザーとグループにこの Chat 用アプリの利用を許可する] を選択し、メールアドレスを入力します。
[ログ] で、[エラーを Logging にロギング] を選択します。
[保存] をクリックします。[設定が保存されました] というメッセージが表示され、アプリのテストの準備が整ったことを示します。
Chat アプリをテストする
インシデント管理 Chat 用アプリをテストするには、ウェブページからインシデントを開始し、Chat 用アプリが想定どおりに動作することを確認します。
Apps Script のデプロイ ウェブアプリの URL に移動します。
Apps Script からデータへのアクセス権限を求められたら、[権限を確認] をクリックし、Google Workspace ドメインの適切な Google アカウントでログインして、[許可] をクリックします。
インシデントの初期化ウェブページが開きます。テスト情報を入力します。
- [インシデントのタイトル] に「
The First Incident」と入力します。 - 必要に応じて、[インシデント対応担当者] に、インシデント対応担当者のメールアドレスを入力します。Google Workspace 組織に Google Chat アカウントを持つユーザーである必要があります。そうでない場合、スペースの作成は失敗します。自分のメールアドレスは自動的に含まれるため、入力しないでください。
- [初期メッセージ] に「
Testing the incident management Chat app.」と入力します。
- [インシデントのタイトル] に「
[Create Chat Space] をクリックします。
creating spaceメッセージが表示されます。スペースが作成されると、
Space created!メッセージが表示されます。[スペースを開く] をクリックします。Chat のスペースが新しいタブで開きます。必要に応じて、あなたと他のインシデント対応者はスペースでメッセージを送信できます。アプリは Vertex AI を使用してこれらのメッセージを要約し、振り返りドキュメントを共有します。
インシデント対応を終了して解決プロセスを開始するには、Chat スペースで「
/closeIncident」と入力します。インシデント管理ダイアログが開きます。[インシデントをクローズ] に、インシデントの解決策の説明(
Test completeなど)を入力します。[Close Incident](インシデントをクローズ)をクリックします。
インシデント管理アプリは、スペース内のメッセージを一覧表示し、Vertex AI で要約して、Google ドキュメントに要約を貼り付け、スペースでドキュメントを共有します。
クリーンアップ
このチュートリアルで使用したリソースについて、Google Cloud アカウントに課金されないようにするには、Cloud プロジェクトを削除することをおすすめします。
- Google Cloud コンソールで、[リソースの管理] ページに移動します。メニュー アイコン > [IAM と管理] > [リソースの管理] をクリックします。
- プロジェクト リストで、削除するプロジェクトを選択し、[削除] をクリックします。
- ダイアログでプロジェクト ID を入力し、[シャットダウン] をクリックしてプロジェクトを削除します。
関連トピック
- Gemini AI Chat アプリで Chat の会話に基づいて質問に回答する
- Google Chat、Vertex AI、Firestore でプロジェクトを管理する
- インシデント対応アプリは、ユーザー認証情報で認証を行い、API を呼び出して Chat API や Vertex AI API などの Google Cloud サービスを呼び出します。つまり、インシデントを初期化するユーザーは、これらのサービスにアクセスできる必要があります。アプリをより堅牢にするには、
/closeIncidentスラッシュ コマンドを呼び出すユーザーのユーザー認証情報ではなく、サービス アカウントを使用して Vertex AI API を呼びえることを検討してください。Vertex AI API のサービス アカウントの構成については、カスタム サービス アカウントを使用するをご覧ください。