依賴方 (RP) 需要完成下列步驟,才能在網站上啟用 FedCM:
- 確認 FedCM 端點已在 RP 網站上開放。
- 使用 FedCM JavaScript API 啟動使用者驗證程序。
- 將中繼資料 (例如隱私權政策和服務條款網址) 提供給 IdP。
- [選用] 選擇使用者介面模式、提供登入或網域提示、傳遞自訂參數、要求特定使用者資訊、提供自訂錯誤訊息,或選擇重新驗證使用者。
取得 IdP 設定和端點後,RP 就能呼叫 navigator.credentials.get(),要求允許使用者透過 IdP 登入 RP。
在呼叫 API 之前,您需要確認 FedCM 可在使用者的瀏覽器上使用。如要檢查 FedCM 是否可用,請在 FedCM 實作項目中包裝以下程式碼:
  if ('IdentityCredential' in window) {
    // If the feature is available, take action
  } else {
    // FedCM is not supported, use a different identity solution
  }
如要讓使用者透過 FedCM 在 RP 上登入 IdP,RP 可以呼叫 navigator.credentials.get(),例如:
  const credential = await navigator.credentials.get({
    identity: {
      context: 'signin',
      providers: [{
        configURL: 'https://accounts.idp.example/config.json',
        clientId: '********',
        mode: 'active',
        params: {
          nonce: '******'
        }
      }]
    }
  });
  const { token } = credential;
背景資訊屬性
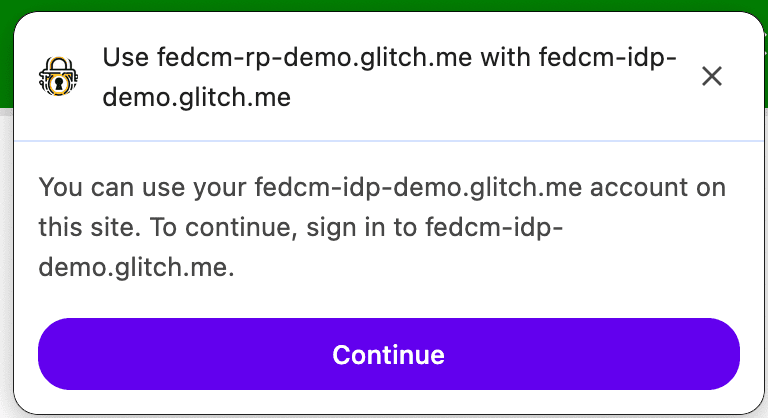
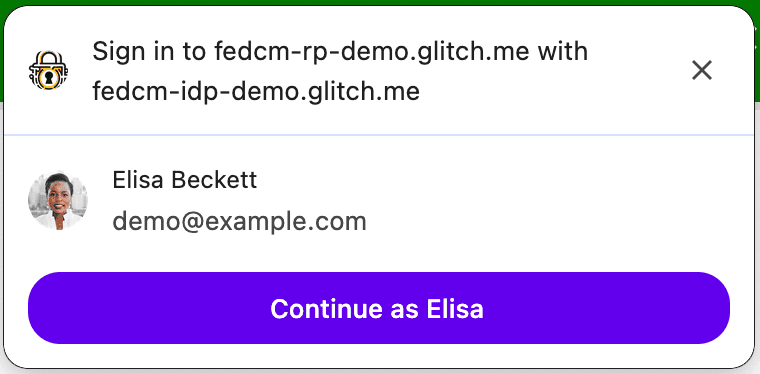
透過選用的 context 屬性,RP 可以修改 FedCM 對話方塊 UI 中的字串 (例如「Sign in to rp.example…」和「Use idp.example…」),以便配合預先定義的驗證內容。context 屬性可包含下列值:
signin(預設)signupuse
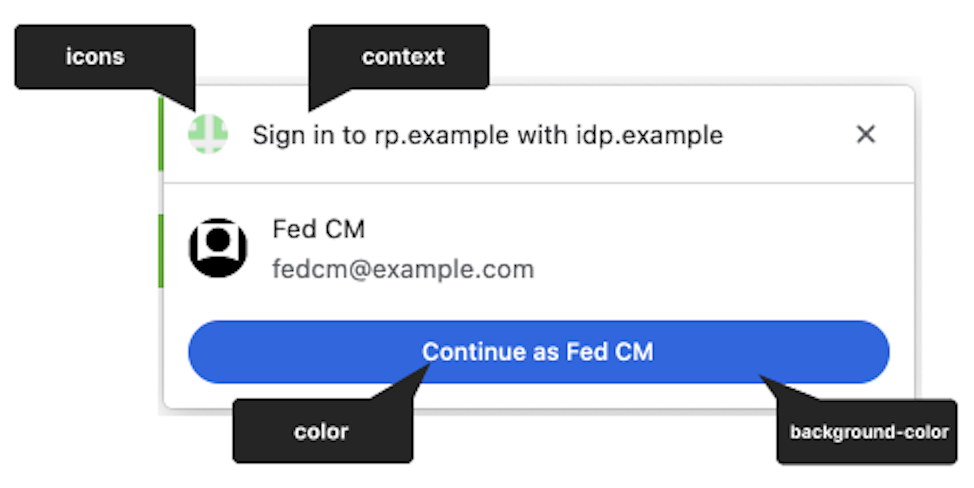
舉例來說,將 context 設為 use 會產生以下訊息:
瀏覽器會根據帳戶清單端點回應中是否存在 approved_clients,以不同方式處理註冊和登入用途。如果使用者已註冊 RP,瀏覽器就不會顯示「To continue with ....」的揭露資訊文字。
providers 屬性會採用 IdentityProvider 物件的陣列,其中包含下列屬性:
Providers 屬性
providers 屬性會採用 IdentityProvider 物件的陣列,其中包含下列屬性:
| 屬性 | 說明 |
|---|---|
configURL (必填) |
IdP 設定檔的完整路徑。 |
clientId (必填) |
由 IdP 核發的 RP 用戶端 ID。 |
loginHint (非必要) |
指定 帳戶端點提供的 login_hints 值之一,FedCM 對話方塊就會依指定帳戶顯示。 |
domainHint (非必要) |
指定 帳戶端點提供的 domain_hints 值之一,FedCM 對話方塊就會依指定帳戶顯示。 |
mode (非必要) |
指定 FedCM 使用者介面模式的字串。可為下列其中一個值:
注意:Chrome 132 以上版本支援 mode 參數。
|
fields (非必要) |
字串陣列,用於指定 RP 需要 ID 提供者提供的使用者資訊 (「name」、「email」、「picture」)。 注意:Chrome 132 以上版本支援 Field API。 |
params (非必要) |
可指定其他鍵/值參數的自訂物件:
注意:Chrome 132 以上版本支援 params。
|
正常模式
FedCM 支援不同的使用者體驗模式設定。無主動模式是預設模式,開發人員不需要設定。
如何在啟用模式下使用 FedCM:
- 檢查使用者瀏覽器中是否支援這項功能。
- 使用暫時性的使用者手勢 (例如按一下按鈕) 叫用 API。
- 將
mode參數傳遞至 API 呼叫:
  let supportsFedCmMode = false;
  try {
    navigator.credentials.get({
      identity: Object.defineProperty(
        // Check if this Chrome version supports the Mode API.
        {}, 'mode', {
          get: function () { supportsFedCmMode = true; }
        }
      )
    });
  } catch(e) {}

  if (supportsFedCmMode) {
    // The button mode is supported. Call the API with mode property:
    return await navigator.credentials.get({
      identity: {
        providers: [{
          configURL: 'https://idp.example/config.json',
          clientId: '123',
        }],
        // The 'mode' value defines the UX mode of FedCM.
        // - 'active': Must be initiated by user interaction (e.g., clicking a button).
        // - 'passive': Can be initiated without direct user interaction.
        mode: 'active'
      }
    });
  }
使用中模式的自訂圖示
在啟用模式下,IdP 可直接在用戶端中繼資料端點回應中加入 RP 的官方標誌圖示。RP 必須事先提供品牌資料。
從跨來源 iframe 中呼叫 FedCM
如果父項框架允許,您可以使用 identity-credentials-get 權限政策,從跨來源 iframe 內叫用 FedCM。如要這麼做,請在 iframe 代碼中附加 allow="identity-credentials-get" 屬性,如下所示:
<iframe src="https://fedcm-cross-origin-iframe.glitch.me" allow="identity-credentials-get"></iframe>
您可以在示例中查看實際運作情形。
或者,如果父項框架想要限制呼叫 FedCM 的來源,請傳送 Permissions-Policy 標頭,並附上允許的來源清單。
Permissions-Policy: identity-credentials-get=(self "https://fedcm-cross-origin-iframe.glitch.me")
如要進一步瞭解權限政策的運作方式,請參閱「透過權限政策控管瀏覽器功能」。
Login Hint API
使用者可以透過登入提示,讓 RP 建議使用者應登入哪個帳戶。對於不確定自己先前使用哪個帳戶的使用者,這項功能可協助他們重新驗證。
RP 可以使用 loginHint 屬性搭配 帳戶清單端點擷取的 login_hints 值之一,呼叫 navigator.credentials.get(),藉此選擇顯示特定帳戶,如以下程式碼範例所示:
  return await navigator.credentials.get({
    identity: {
      providers: [{
        configURL: 'https://idp.example/manifest.json',
        clientId: '123',
        // Accounts endpoint can specify a 'login_hints' array for an account.
        // When RP specifies a 'exampleHint' value, only those accounts will be
        // shown to the user whose 'login_hints' array contains the 'exampleHint'
        // value
        loginHint : 'exampleHint'
      }]
    }
  });
如果沒有任何帳戶與 loginHint 相符,FedCM 對話方塊會顯示登入提示,讓使用者登入與 RP 要求提示相符的 IdP 帳戶。使用者輕觸提示時,系統會開啟彈出式視窗,其中包含設定檔中指定的登入網址。接著,連結會附加登入提示和網域提示查詢參數。
Domain Hint API
供應商可以選擇只顯示與特定網域相關聯的帳戶。這對受限於公司網域的 RP 來說相當實用。
如要只顯示特定網域帳戶,RP 應使用 domainHint 屬性搭配 帳戶清單端點擷取的 domain_hints 值之一,呼叫 navigator.credentials.get(),如以下程式碼範例所示:
  return await navigator.credentials.get({
    identity: {
      providers: [{
        configURL: 'https://idp.example/manifest.json',
        clientId: 'abc',
        // Accounts endpoint can specify a 'domain_hints' array for an account.
        // When RP specifies a '@domain.example' value, only those accounts will be
        // shown to the user whose 'domain_hints' array contains the
        // '@domain.example' value
        domainHint : '@domain.example'
      }]
    }
  });
如果沒有任何帳戶與 domainHint 相符,FedCM 對話方塊會顯示登入提示,讓使用者登入與 RP 要求提示相符的 IdP 帳戶。使用者輕觸提示時,系統會開啟彈出式視窗,其中包含設定檔中指定的登入網址。接著,連結會附加登入提示和網域提示查詢參數。
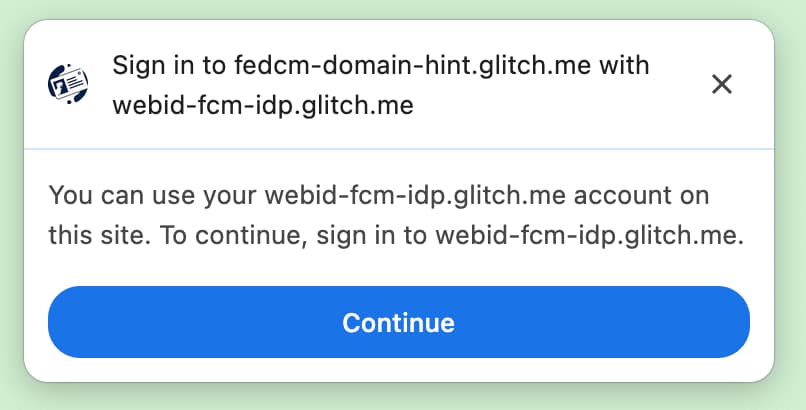
domainHint 相符時的登入提示範例。自訂參數
自訂參數功能可讓 RP 向ID 斷言端點提供額外的鍵/值參數。透過 Parameters API,RP 可以將額外參數傳遞至 IdP,要求基本登入以外的資源權限。在以下情況下,傳遞額外參數可能會很有幫助:
- 接受方需要動態要求 ID 提供者具備的其他權限,例如帳單地址或日曆存取權。使用者可以透過使用「繼續使用」功能啟動的 IdP 控管使用者體驗流程授予這些權限,IdP 就會分享這項資訊。
如要使用 API,RP 會將參數新增至 params 屬性,做為 navigator.credentials.get() 呼叫中的物件:
  let {token} = await navigator.credentials.get({
    identity: {
      providers: [{
        clientId: '1234',
        configURL: 'https://idp.example/fedcm.json',
        // Key/value pairs that need to be passed from the
        // RP to the IdP but that don't really play any role with
        // the browser.
        params: {
          IDP_SPECIFIC_PARAM: '1',
          foo: 'BAR'
        }
      },
    }
  });
瀏覽器會自動將這項資訊轉譯為 POST 要求,並將參數設為單一網址編碼 JSON 序列化物件,傳送至 IdP:
// The assertion endpoint is drawn from the config file
POST /fedcm_assertion_endpoint HTTP/1.1
Host: idp.example
Origin: https://rp.example/
Content-Type: application/x-www-form-urlencoded
Cookie: 0x23223
Sec-Fetch-Dest: webidentity
// params are translated into urlencoded version of `{"IDP_SPECIFIC_PARAM":"1","foo":"bar"}`
account_id=123&client_id=client1234¶ms=%22%7B%5C%22IDP_SPECIFIC_PARAM%5C%22%3A1%2C%5C%22foo%5C%22%3A%5C%22BAR%5C%22%7D%22.
如果 RP 需要任何額外權限,IdP 可以提供重新導向連結。例如在 node.js 中:
  if (rpRequestsPermissions) {
    // Response with a URL if the RP requests additional permissions
    return res.json({
      continue_on: '/example-redirect',
    });
  }
欄位
RP 可以指定 ID 方需要提供的使用者資訊 (姓名、電子郵件地址和個人資料相片的任意組合)。要求的資訊會納入 FedCM 對話方塊的揭露 UI。如果使用者選擇登入,系統會顯示訊息,通知使用者 idp.example 會將要求的資訊分享給 rp.example。
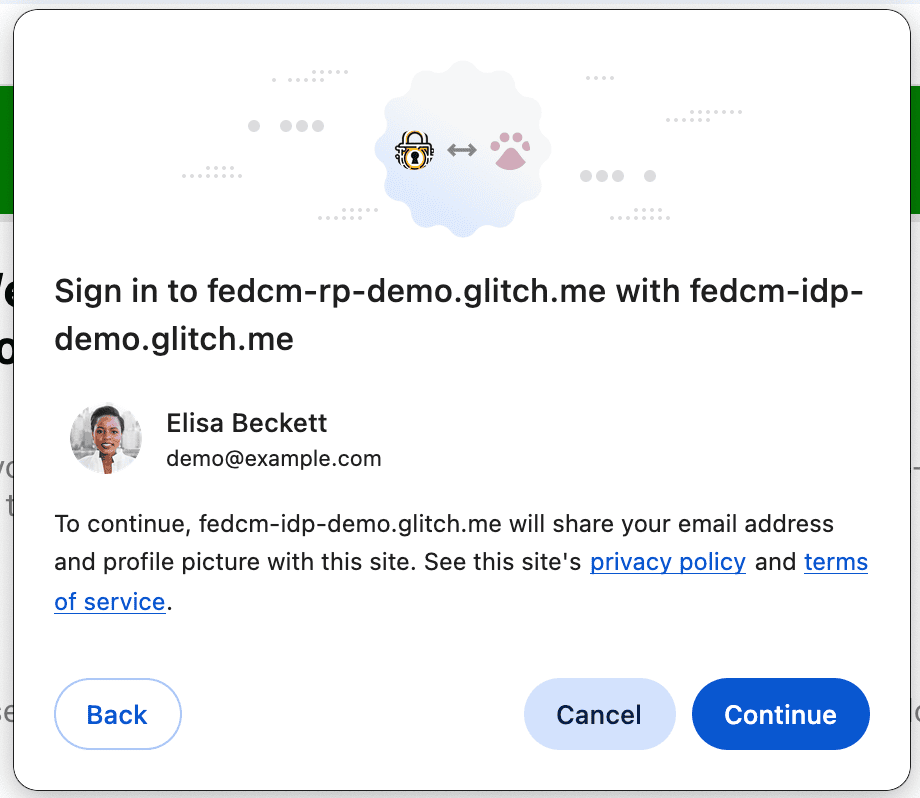
如要使用「欄位」功能,RP 應在 navigator.credentials.get() 呼叫中新增 fields 陣列。這些欄位可包含 name、email 和 picture 的任何排列組合。日後可能會擴充至包含更多值。含有 fields 的請求如下所示:
  let { token } = await navigator.credentials.get({
    identity: {
      providers: [{
        // RP requests the IdP to share only user email and profile picture
        fields: [ 'email', 'picture'],
        clientId: '1234',
        configURL: 'https://idp.example/fedcm.json',

      },
    }
  });
瀏覽器會自動將其轉譯為對ID 斷言端點提出的 HTTP 要求,其中包含 RP 指定的 fields 參數,以及瀏覽器在 disclosure_shown_for 參數中向使用者揭露的欄位。為了確保向後相容性,如果瀏覽器顯示揭露文字,且要求的欄位包含 所有三個欄位:'name'、'email' 和 'picture',瀏覽器也會傳送 disclosure_text_shown=true。
  POST /id_assertion_endpoint HTTP/1.1
  Host: idp.example
  Origin: https://rp.example/
  Content-Type: application/x-www-form-urlencoded
  Cookie: 0x23223
  Sec-Fetch-Dest: webidentity

  // The RP only requested to share email and picture. The browser will send `disclosure_text_shown=false`, as the 'name' field value is missing
  account_id=123&client_id=client1234&disclosure_text_shown=false&fields=email,picture&disclosure_shown_for=email,picture
如果 fields 是空陣列,使用者代理程式會略過揭露 UI。
即使帳戶端點的回應不含與 approved_clients 中的 RP 相符的用戶端 ID,也會發生這種情況。
在這種情況下,傳送至 ID 斷言端點的 disclosure_text_shown 在 HTTP 主體中為 false:
  POST /id_assertion_endpoint HTTP/1.1
  Host: idp.example
  Origin: https://rp.example/
  Content-Type: application/x-www-form-urlencoded
  Cookie: 0x23223
  Sec-Fetch-Dest: webidentity

  account_id=123&client_id=client1234&nonce=234234&disclosure_text_shown=false
顯示錯誤訊息
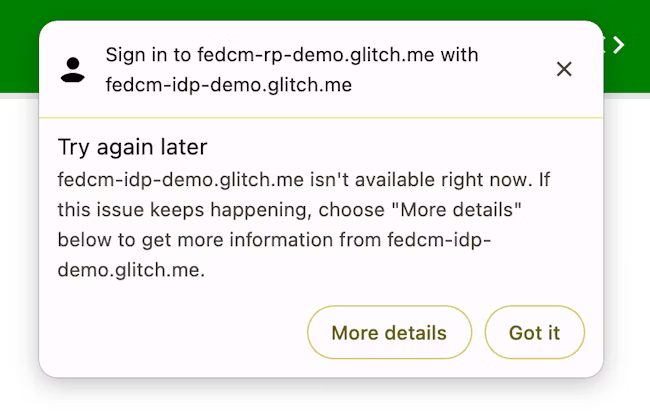
有時,IdP 可能會基於合法理由而無法核發權杖,例如用戶端未經授權,或伺服器暫時無法使用。如果 IdP 傳回「錯誤」回應,RP 可以擷取該回應,而 Chrome 可以顯示瀏覽器 UI,並顯示 IdP 提供的錯誤資訊,以便通知使用者。
  try {
    const cred = await navigator.credentials.get({
      identity: {
        providers: [
          {
            configURL: 'https://idp.example/manifest.json',
            clientId: '1234',
          },
        ],
      }
    });
  } catch (e) {
    const code = e.code;
    const url = e.url;
  }
在初始驗證後自動重新驗證使用者
FedCM 自動重新驗證 (簡稱「auto-reauthn」) 可讓使用者在使用 FedCM 進行初次驗證後,自動重新驗證。此處的「初始驗證」是指使用者在同一個瀏覽器執行個體上首次輕觸 FedCM 登入對話方塊中的「以...身分繼續」按鈕,建立帳戶或登入 RP 網站。
雖然在使用者建立聯合帳戶以防追蹤 (這是 FedCM 的主要目標之一) 之前,明確的使用者體驗是合理的,但在使用者完成這項操作後,再要求他們明確確認這項操作,就顯得過於繁瑣:在使用者授權允許 RP 和 IdP 之間進行通訊後,如果再要求他們明確確認這項操作,就沒有任何隱私權或安全性好處。
使用自動重新驗證功能時,瀏覽器會根據您在呼叫 navigator.credentials.get() 時為 mediation 指定的選項,變更其行為。
  const cred = await navigator.credentials.get({
    identity: {
      providers: [{
        configURL: 'https://idp.example/fedcm.json',
        clientId: '1234',
      }],
    },
    mediation: 'optional', // this is the default
  });

  // `isAutoSelected` is `true` if auto-reauthn was performed.
  const isAutoSelected = cred.isAutoSelected;
mediation 是 Credential Management API 中的屬性,其行為與 PasswordCredential 和 FederatedCredential 相同,也部分支援 PublicKeyCredential。這個屬性可接受下列四個值:
'optional'(預設):盡可能自動重新授權,否則需要中介服務。建議您在登入頁面中選擇這個選項。'required':一律需要仲介才能繼續,例如按一下 UI 上的「繼續」按鈕。如果您希望使用者每次需要驗證時都必須明確授予權限,請選擇這個選項。'silent':盡可能自動重新授權,如果無法自動重新授權,則在未要求中介服務的情況下,以靜默方式失敗。建議您在專屬登入頁面以外,但希望使用者保持登入狀態的網頁上選取這個選項,例如運送網站的商品頁面,或新聞網站的文章頁面。'conditional':用於 WebAuthn,目前無法用於 FedCM。
在這個呼叫中,系統會在下列情況下自動重新授權:
- FedCM 可供使用。例如,使用者並未在設定中為 FedCM 全域或 RP 停用。
- 使用者只使用一個具備 FedCM API 的帳戶,透過這個瀏覽器登入網站。
- 使用者已使用該帳戶登入 IdP。
- 自動重新授權未在過去 10 分鐘內發生。
- 在先前登入後,RP 並未呼叫
navigator.credentials.preventSilentAccess()。
在符合這些條件時,只要叫用 FedCM navigator.credentials.get(),系統就會嘗試自動重新驗證使用者。
當 mediation: optional 時,自動重新驗證可能會因只有瀏覽器知道的原因而無法使用;RP 可以檢查 isAutoSelected 屬性,確認是否已執行自動重新驗證。
這有助於評估 API 效能,並據此改善使用者體驗。此外,如果無法使用,系統可能會提示使用者透過明確的使用者中介服務登入,也就是使用 mediation: required 的流程。
使用 preventSilentAccess() 強制執行中介服務
在使用者登出後立即自動重新驗證,並不會帶來良好的使用者體驗。因此,FedCM 會在自動重新授權後設有 10 分鐘的靜默期,以避免發生這種行為。也就是說,除非使用者在 10 分鐘內重新登入,否則自動重新授權的情況最多會發生 10 分鐘一次。當使用者明確登出 RP (例如點選登出按鈕),RP 應呼叫 navigator.credentials.preventSilentAccess(),明確要求瀏覽器停用自動重新授權功能。
  function signout() {
    navigator.credentials.preventSilentAccess();
    location.href = '/signout';
  }
使用者可以在設定中選擇停用自動重新授權功能
使用者可透過設定選單選擇停用自動重新授權功能:
- 在 Chrome 電腦版上,依序前往
chrome://password-manager/settings> 自動登入。 - 在 Android 版 Chrome 中,依序開啟「設定」 >「密碼管理工具」 > 輕觸右上角的齒輪圖示 >「自動登入」。
只要停用切換鈕,使用者就能完全停用自動重新驗證行為。如果使用者在 Chrome 例項中登入 Google 帳戶並啟用同步處理功能,系統就會儲存這項設定並在裝置間同步處理。
將 IdP 與 RP 中斷連線
如果使用者先前曾透過 FedCM 使用 IdP 登入 RP,瀏覽器會在本機將這項關係儲存為已連結帳戶的清單。RP 可能會透過呼叫 IdentityCredential.disconnect() 函式來啟動中斷連線。這個函式可從頂層 RP 影格呼叫。RP 需要傳遞 configURL、IdP 下所用的 clientId,以及用於斷開 IdP 的 accountHint。只要斷開連結端點可識別帳戶,帳戶提示可以是任意字串,例如電子郵件地址或使用者 ID,不一定需要與帳戶清單端點提供的帳戶 ID 相符:
  // Disconnect an IdP account 'account456' from the RP 'https://idp.com/'. This is invoked on the RP domain.
  IdentityCredential.disconnect({
    configURL: 'https://idp.com/config.json',
    clientId: 'rp123',
    accountHint: 'account456'
  });
IdentityCredential.disconnect() 會傳回 Promise。此應許會因下列原因而擲回例外狀況:
- 使用者尚未透過 FedCM 使用 IdP 登入 RP。
- 在沒有 FedCM 權限政策的 iframe 中叫用 API。
- configURL 無效或缺少斷開端點。
- 內容安全政策 (CSP) 檢查失敗。
- 有個待處理的斷線要求。
- 使用者已在瀏覽器設定中停用 FedCM。
當 IdP 的斷開連線端點傳回回應時,瀏覽器上的 RP 和 IdP 會中斷連線,且承諾會解析。取消連結端點的回應中會指定已取消連結的帳戶 ID。