Overview
The Reverse Binding flow allows users to initiate and link their eWallet account to Google Pay directly from within the partner's Android mobile app or website, establishing a long-lived Google Payment Token (GPT).
For the complete client-side JavaScript SDK API specifications, parameter definitions, error codes, and implementation examples, refer to the Reverse Binding SDK documentation.
User Journey
The following screens illustrate the end-to-end user experience when initiating reverse binding from a partner application:
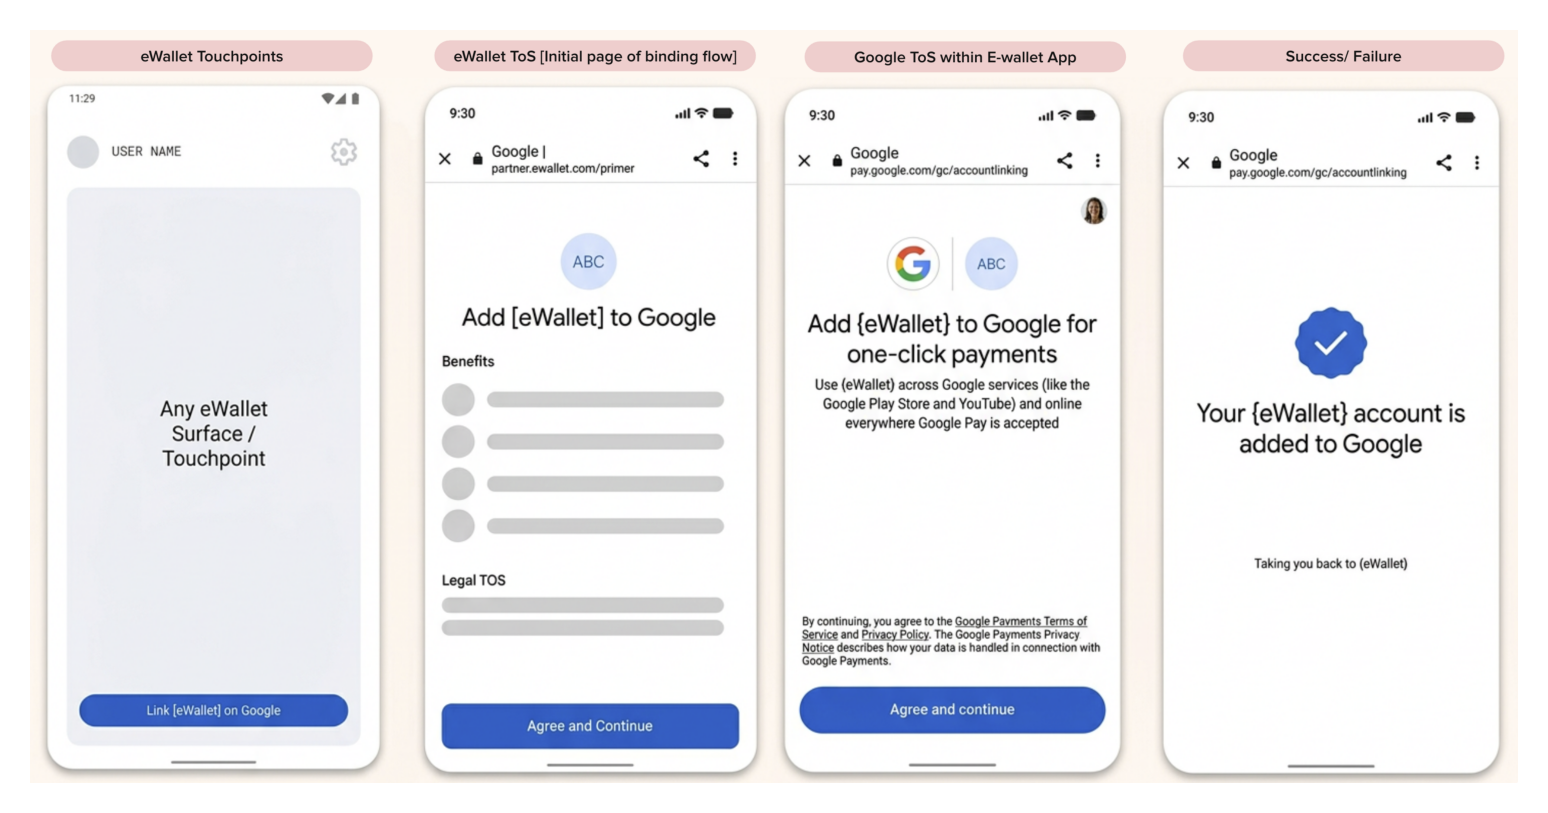
- eWallet Touchpoints: The user initiates account linking from any touchpoint within the partner app (such as account settings, promotions, or payment method management) by tapping "Link [eWallet] on Google".
- eWallet ToS: The partner web primer page opens in a Chrome Custom Tab (CCT) at
partner.ewallet.com/primer, presenting the benefits of linking and partner legal terms. The user taps "Agree and Continue". - Google ToS within E-wallet App: Google's WebApp UI loads inside the CCT at
pay.google.com/gc/accountlinking, presenting localized Google Payments Terms of Service and Account selection. The user taps "Agree and continue". - Success / Failure: Google confirms the linkage status with a success confirmation screen at
pay.google.com/gc/accountlinkingand returns the user seamlessly back to the partner application.
Sequence Diagram
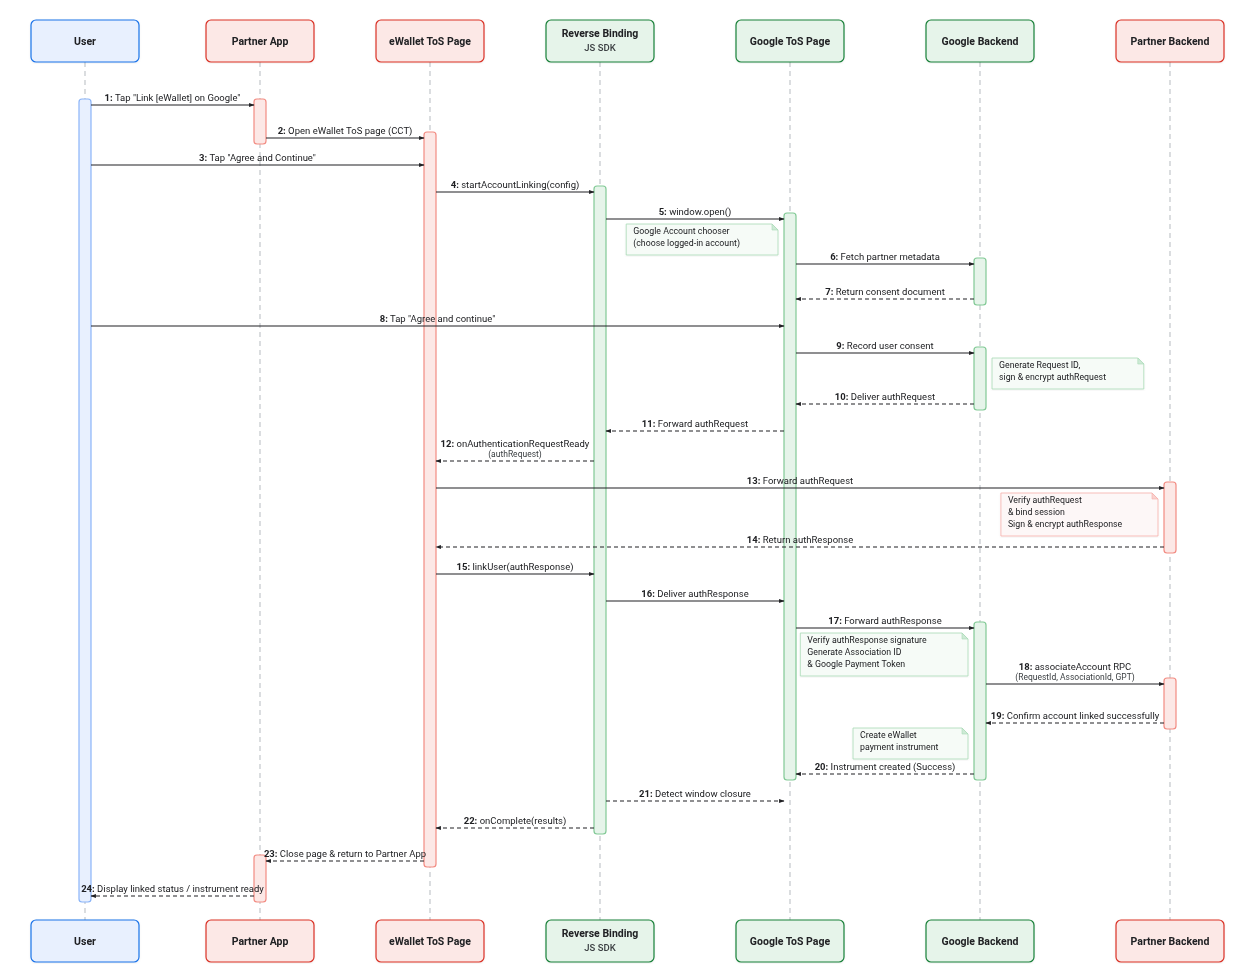
The following sequence diagram depicts every message, cryptographic token exchange, and callback interaction during a successful reverse binding session:
Sequence Step-by-Step Details
- User initiates linking: The user taps "Link [eWallet] on Google" from an eWallet surface/touchpoint in the partner app.
- Partner App opens eWallet ToS page: The partner Android app opens the eWallet ToS page (
partner.ewallet.com/primer) in a Chrome Custom Tab (CCT). - User reviews partner terms: The eWallet ToS page displays benefits and partner Legal ToS. The user taps "Agree and Continue".
startAccountLinking()invoked: The eWallet ToS page synchronously callswindow.googlepay.startAccountLinking()with configuration parameters.- Google ToS Page opened: The Reverse Binding JS SDK calls
window.open()to display the Google ToS Page (pay.google.com/gc/accountlinking). - Fetch partner metadata: Google ToS Page requests partner integration metadata from Google Backend.
- Consent document returned: Google Backend returns the localized Google consent document, and Google ToS Page displays the consent screen and Google Account chooser (if needed).
- User agrees to Google ToS: The user reviews the terms and taps "Agree and continue".
- Google records consent: Google ToS Page notifies Google Backend to record user consent. Google Backend generates a unique Request ID, then signs and encrypts it into an
authRequestJWS/JWE token. authRequestdelivered: Google Backend deliversauthRequestto Google ToS Page.authRequestforwarded: Google ToS Page forwardsauthRequestto the Reverse Binding JS SDK.onAuthenticationRequestReady()callback: The SDK invokes the partner's registeredonAuthenticationRequestReady()callback withauthRequest.- Forward to Partner Backend: The eWallet ToS page sends
authRequestto the partner backend. The partner backend verifies the request, binds the user session, then signs and encrypts theauthResponseJWS/JWE token. - Return
authResponse: Partner backend returns the signedauthResponsetoken to the eWallet ToS page. linkUser()called: The eWallet ToS page passesauthResponsetowindow.googlepay.linkUser(authResponse).- Deliver
authResponse: The SDK deliversauthResponseto Google ToS Page. - Forward
authResponseto backend: Google ToS Page forwardsauthResponseto Google Backend. Google Backend verifies the token signature, generates an Association ID, and creates a Google Payment Token (GPT). associateAccountRPC: Google Backend sends a server-to-serverassociateAccountRPC (with RequestId, AssociationId, and GPT) to the partner backend.- Confirm account linked: Partner backend activates the account link and confirms success to Google Backend. Google Backend creates the eWallet payment instrument.
- Instrument created: Google Backend confirms instrument creation to Google ToS Page. Google ToS Page displays the Success screen ("Your {eWallet} account is added to Google") and triggers
window.close(). - Detect window closure: The Reverse Binding JS SDK detects window closure.
onComplete()callback: The SDK invokes the partner'sonComplete()callback with linking status and optional chained push provisioning parameters.- Close page & return: The eWallet ToS page closes and returns success to the partner Android app.
- Instrument ready: The partner Android app displays the linked status to the user.
Backend Operations Context
For a complete and secure integration, your backend server must support the cryptographic verify/signing loop referenced in the integration flow:
- Decrypting the Request: Your backend must decrypt the base64url-encoded JWS/JWE token passed from the client (
authRequest) to extract therequestId. Refer to the Request Schema Reference page. - Signing the Response: Your backend must verify Google's signature, bind the
requestIdto the user account session, sign/encrypt it again, and return theauthResponsebase64url JWS/JWE string. Refer to the Response Reference page. - Handling Google Link Callback: Once the front-end calls
linkUser(authResponse, {}), Google's server will callback your backend server using theassociateAccountRPC. Your server must look up the matchingrequestIdand activate the link.
Android Client Requirement: Chrome Custom Tabs (CCT)
The reverse binding flow must be launched using Chrome Custom Tabs (CCT) rather than an in-app WebView.
Key Architectural Rationale
- Zero-Login SSO (Shared Cookies): CCT shares the user's active Chrome browser session and Google Account authentication cookies, enabling 1-tap zero-login account linking. Embedded in-app WebViews isolate cookie storage from system Chrome, forcing manual password/2FA entry on every linking attempt and triggering Google Identity OAuth policy violations (
disallowed_useragent). - Popup Blocker Prevention (User Gesture Timing): Google's
startAccountLinking()triggerswindow.open(). Mobile browsers strictly enforce Transient User Activation for pop-up windows:- Incorrect: User taps 'Continue' -> Partner app initiates an asynchronous network call to its backend ->
startAccountLinking()is invoked upon API response. The browser detects the user gesture expired during the network round-trip and blocks the pop-up window. - Best Practice: Pre-fetch all necessary parameters (such as
integratorId,serviceCountry, and attribution tags) before the primer page loads. When the user taps 'Continue', invokestartAccountLinking()immediately and synchronously.
- Incorrect: User taps 'Continue' -> Partner app initiates an asynchronous network call to its backend ->
- Alternative Fallback Flow (Native Consent Policies): For partners whose compliance or risk policies mandate that user consent must run inside a native Android screen rather than a web primer:
- User completes eWallet Terms of Service / consent on the native Android screen.
- Native app launches CCT loading a lightweight transition page containing an action button (e.g., "Continue to Google Pay").
- User taps the button on the transition page to immediately and synchronously call
startAccountLinking().
- Explicit Launcher: Having the
androidx.browser:browserdependency inbuild.gradledoes not automatically route links through CCT. The linking entry point must explicitly launchCustomTabsIntent. - Fallback Strategy (Devices Without Chrome / CCT): Open the system default browser via standard
Intent.ACTION_VIEW. Never fall back to an in-app WebView. - Prohibited In-App WebView Bypass: Do NOT attempt to handle popups in an in-app WebView using
WebChromeClient.onCreateWindow()withsetSupportMultipleWindows(true). This breaks Google SSO authentication and violates security policies.
Verification: CCT vs In-App WebView
| Check Method | Chrome Custom Tabs (CCT) | In-App WebView |
|---|---|---|
| Visual UI | Shows Chrome top bar with URL, lock icon, and 3-dot menu (⋮). | Renders full-screen or with custom app header; no Chrome top bar or 3-dot menu. |
| Codebase & Architecture | Calls CustomTabsIntent.launchUrl(...). Popups and windows are managed natively by Chrome. |
Uses android.webkit.WebView, loadUrl(), or handles popups via WebChromeClient.onCreateWindow() and setSupportMultipleWindows(true). |
| Device / ADB Check |
adb shell dumpsys activity top | grep ACTIVITYShows Chrome's CustomTabActivity:ACTIVITY com.android.chrome/org.chromium.chrome.browser.customtabs.CustomTabActivity
|
Shows your own app's internal Activity:ACTIVITY com.partner.app/.WebViewActivity
|
Next Steps
To begin implementation, review the Reverse Binding SDK Reference to download the JavaScript SDK, inspect method parameter definitions, error codes, and integration code samples.