مقدمة
Google Mashup Editor (GME) هي إحدى الأدوات الأكثر انتظارًا والأكثر فائدة للمطوّرين الذين يستخدمون أسلوب المزج. تساعد GME المطوّرين في إنشاء وتعديل المكوّنات الديناميكية في صفحات الويب، مثل الخرائط والجداول والقوائم والعناصر الأخرى، استنادًا إلى عمليات الربط بالبيانات الخارجية. ويمكن بعد ذلك تضمين هذه العناصر في صفحات الويب والمدوّنات باستخدام إطار iframe.سيوضّح لك هذا البرنامج التعليمي كيفية دمج ملف KML في خريطة تم إنشاؤها باستخدام GME.
انطباعاتي الأولى عن Google Mashup Editor
- يتميّز هذا التطبيق ببساطته الشديدة، إذ يتضمّن واجهة واضحة ومميّزة، مثل معظم منتجات Google.
- يتضمّن فهرسًا مناسبًا للمشاريع مع مجموعة متزايدة باستمرار من أمثلة الرموز، بالإضافة إلى رمز المؤلّف.
- ويتيح تخزين موارد إضافية للمشروع بسهولة (مثل ملفات الصور).
- تتضمّن هذه الأداة برنامج تصحيح أخطاء XML سهل الاستخدام.
- ويتضمّن العديد من التطبيقات النموذجية سهلة الاستخدام.
GME for KML Developers
قبل ظهور الإنترنت، كان من الصعب عادةً مشاركة البيانات المكانية. ومع ذلك، ومع تطوّر الإنترنت، أصبحت تطبيقات الخرائط طريقة معيارية لمشاركة بيانات نظم المعلومات الجغرافية (GIS) بسهولة مع العالم. أصبح تنسيق KML معيارًا لعرض بيانات نظم المعلومات الجغرافية وتبادلها، وذلك لأنّه مضغوط وسهل التطوير ومتوافق مع تطبيقات رائجة مثل Google Earth و"خرائط Google".
حتى وقت قريب، كانت عملية إنشاء صفحات وتعديلها استنادًا إلى JavaScript تشكّل مشكلة كبيرة لمطوّري ملفات KML. وكان يتطلّب عددًا كبيرًا من الخطوات الإضافية لإنشاء مقطع ريمكس وتصحيح الأخطاء فيه. تتيح GME إنشاء تركيبة مستندة إلى KML بسرعة كبيرة من خلال بضعة مكوّنات أساسية. لا تتطلّب عملية الإنشاء معرفة خاصة بلغتَي HTML أو JavaScript. توفّر المشاريع النموذجية في "محرك ألعاب Google" ما يكفي للبدء.
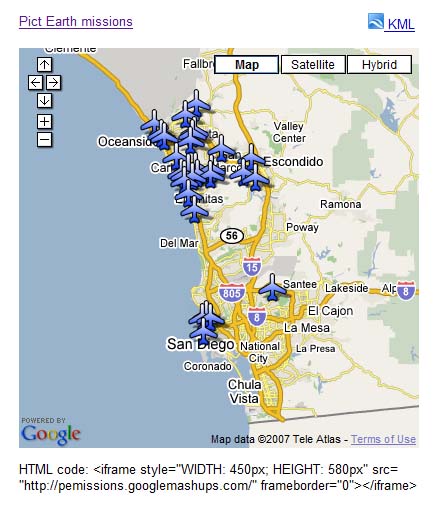
في المثال التالي، سأستخدم ملف KML يشير إلى مجموعة الصور التي تم التقاطها خلال رحلات Pict Earth في الولايات المتحدة.
هذه لقطة من تطبيق الويب المركّب لخرائط Pict Earth:
في ما يلي الخطوات اللازمة لدمج ملف KML في مشروع GME باستخدام Google Maps API:
الخطوة 1: اختيار ملف KML
الخطوة 2: إنشاء مشروع جديد في "خرائط Google"
الخطوة 3: إنشاء دالة لإضافة ملف KML
الخطوة 4: إضافة خريطة
الخطوة 5: اختبار الخريطة المركّبة
الخطوة 6: نشر الخريطة المركّبة
الخطوة 7: إضافة الخريطة المركّبة إلى صفحة ويب
الخطوة 8: وضعها في معرض "خرائط Google"
الخطوة 1: اختيار ملف KML
اختَر ملف KML الذي تريد إضافته إلى خريطتك. يمكن أن يكون ذلك أي شيء يتضمّن ميزات متوافقة مع "خرائط Google". يجب أن تتم استضافته على خادم متاح للجميع.
الخطوة 2: إنشاء مشروع GME جديد
أنشئ مشروعًا جديدًا فارغًا في GME.
إليك الشكل الذي يبدو عليه مشروع GME فارغ:
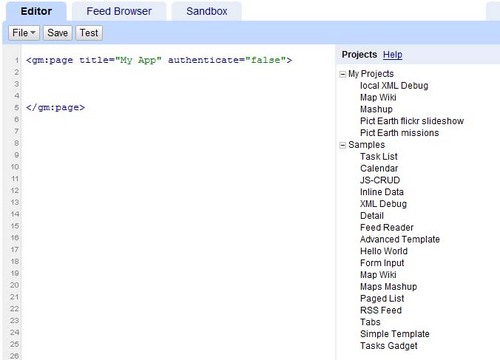
أضِف عنوانًا واسمًا للدالة.
<gm:page title="Pict Earth missions" authenticate="false" onload="kmlPE()"></gm:page>
الخطوة 3: إنشاء دالة لإضافة ملف KML
أنشئ دالة JavaScript تتضمّن مسار ملف KML الذي ستتم إضافته إلى الخريطة.
<script>
  function kmlPE()
  {
    <!-- Get map -->
    var myMap = google.mashups.getObjectById('map').getMap();
    <!-- Get KML -->
    var geoXml = new GGeoXml("http://pictearthusa.com/kml/missions.kml");
    <!--Place KML on Map -->
    myMap.addOverlay(geoXml);
    <!--Set zoom on double click -->
    myMap.enableDoubleClickZoom();
  }
</script>
الخطوة 4: إضافة خريطة
أضِف الخريطة والمَعلمات.
<gm:map id="map" height="400px" width="400px" lat="32.9393" lng="-117.206" zoom="9" maptypes="true"/>
الخطوة 5: اختبار الأغنية المركّبة
اضغط على الزر "اختبار" (F4).
هذه صورة لدمج Pict Earth الذي تم اختباره في Sandbox.
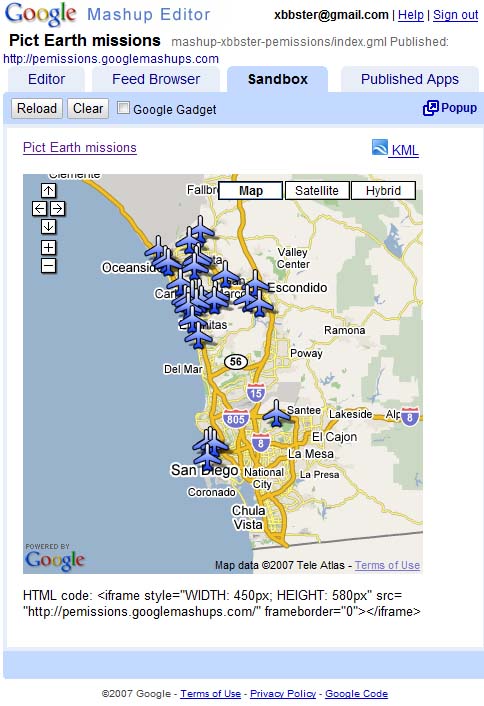
يمكننا الآن التحقّق من نص التطبيق والاطّلاع على النتيجة الأولى. يمكننا إضافة عنوان وروابط ثم إعادة الاختبار.
الخطوة 6: نشر الأغنية المركّبة
اضبط اسم المشروع، ثم انشره. سيمنحك ذلك رابطًا دائمًا إلى الأغنية المعدَّلة، ويمكنك استخدامه لدمجها في صفحات الويب. باستخدام المثال الذي ذكرته، هذا هو الرابط إلى الصفحة الرئيسية لمشروع GME. يمكنك أيضًا الاطّلاع على رمز المصدر الخاص بالمشروع.
الخطوة 7: إضافة الخريطة المركّبة إلى صفحة ويب
أضِف المزيج إلى صفحة ويب باستخدام إطار iframe. على سبيل المثال، لإدراج مشروع المثال، أضِف ما يلي:
<iframe style="WIDTH: 439px; HEIGHT: 491px" src="http://pemissions.googlemashups.com/" frameborder="0"></iframe>
في ما يلي أمثلة على المحتوى المركّب في صفحة على الويب ومدوّنة.
يمكنك أيضًا إضافة رمز إحصاءات Google إلى المشروع، ما يتيح لك تتبُّع إحصاءات حول المستخدمين الذين يشاهدون صفحتك. إليك النص البرمجي البسيط لإضافته:
<script src="http://www.google-analytics.com/urchin.js" type="text/javascript"></script>
<script type="text/javascript">uacct = "youraccountnumber";urchinTracker();</script>
الخطوة 8: وضعها في معرض GME
انشر المزيج في معرض GME للمزج. سيسمح هذا الإجراء للمستخدمين الآخرين بمشاهدة المَشاهد التي أنشأتها.
لمزيد من المعلومات:
يمكنك الاطّلاع على دليل البدء في استخدام "محرّر الخرائط المركّبة" من Google الذي يوضّح بالتفصيل عملية إنشاء الخرائط المركّبة. يمكنك أيضًا الاطّلاع على قائمة العلامات للحصول على وصف موجز لجميع علامات gm مع أمثلة.
الرمز:
في ما يلي الرمز الكامل لاستخدام ملف KML الخاص بـ Pict Earth في GME:
<gm:page title="Pict Earth missions" authenticate="false" onload="kmlPE()>

<!-- Map definition -->
<gm:mapid="map" height="400px" width="400px" lat="32.9393" lng="-117.206" zoom="9" maptypes="true"/>

<script>
  function kmlPE(){

    <!-- Get map -->
    var myMap = google.mashups.getObjectById('map').getMap();

    <!-- Get KML -->
    var geoXml = new GGeoXml("http://pictearthusa.com/kml/missions.kml");

    <!-- Place KML on Map -->
    myMap.addOverlay(geoXml);

    <!-- Set zoom on double click -->
    myMap.enableDoubleClickZoom();
  }
</script>
</gm:page>
ما هي الخطوات التالية؟
بعد نشر الخريطة المركّبة، يمكنك استخدام ملف KML المضمّن فيها كمعلَمة لتضمينها في تطبيق آخر، أو تحميلها مباشرةً كخريطة. على سبيل المثال، هذه الصفحة:
http://param.googlemashups.com هي عبارة عن مزيج من GME. يمكنك الرجوع مباشرةً إلى ملف KML في الخريطة المركّبة من خلال إضافة kml= كمَعلمة في عنوان URL، على النحو التالي: http://param.googlemashups.com/?kml=http://mapgadgets.googlepages.com/cta.kmlيمكنك أيضًا إنشاء أداة من مشروعك. بعد إرسالها، انتقِل إلى قائمة الملفات وانقر على "إرسال الأداة" واتّبِع التعليمات. سيتيح لك ذلك إضافة تطبيقك بسهولة إلى صفحة Google الرئيسية المخصّصة وعلى صفحات ويب أخرى، كما سيتيح لك مشاركته مع الآخرين.