تعرض هذه الصفحة كيفية تنفيذ المهام الشائعة باستخدام "قوائم الفيديوهات الرائجة" في أداة تتبُّع المشاكل من Google.
إنشاء "قائمة فيديوهات رائجة"
عند إنشاء "قائمة فيديوهات رائجة"، يتم منحك إذن المشرف وتكون القائمة خاصة بك تلقائيًا. يجب تغيير الأذونات على "قائمة الفيديوهات الرائجة" لتكون مرئية للمستخدمين الآخرين أو قابلة للتعديل من قِبلهم.
لإنشاء "قائمة فيديوهات رائجة"، اتّبِع الخطوات التالية:
افتح أداة تتبُّع المشاكل في متصفّح الويب.
انقر على إنشاء "قائمة فيديوهات رائجة"، وهو زر يظهر بالقرب من أسفل شريط التنقّل على يمين الصفحة.
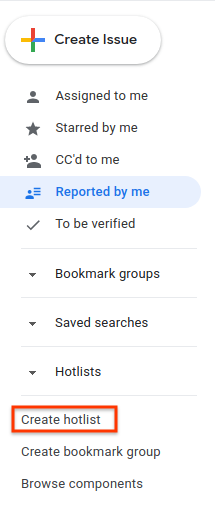
ستظهر النافذة إنشاء "قائمة فيديوهات رائجة" جديدة.
أدخِل اسمًا لـ "قائمة الفيديوهات الرائجة".
(اختياري) أدخِل وصفًا لـ "قائمة الفيديوهات الرائجة".
انقر على حفظ.
ستظهر "قائمة الفيديوهات الرائجة" في شريط التنقّل على يمين الصفحة في قسم قوائم الفيديوهات الرائجة.
يمكنك أيضًا إنشاء "قائمة فيديوهات رائجة" باستخدام أداة اختيار قائمة الفيديوهات الرائجة التي تظهر في صفحة مشكلة أو في تعديل مجمّع أو من صفحة إدارة قوائم الفيديوهات الرائجة.
تعديل "قائمة فيديوهات رائجة"
يجب أن يكون لديك إذن المشرف لـ "قائمة الفيديوهات الرائجة" لتتمكّن من تعديل خصائصها. لديك إذن المشرف لقوائم الفيديوهات الرائجة التي تنشئها.
لتعديل "قائمة فيديوهات رائجة"، اتّبِع الخطوات التالية:
افتح أداة تتبُّع المشاكل في متصفّح الويب.
في شريط التنقّل على يمين الصفحة، ابحث عن "قائمة الفيديوهات الرائجة" التي تريد تعديلها.
مرِّر مؤشر الماوس فوق "قائمة الفيديوهات الرائجة" وانقر على الزر "المزيد".
اختَر الإعدادات.
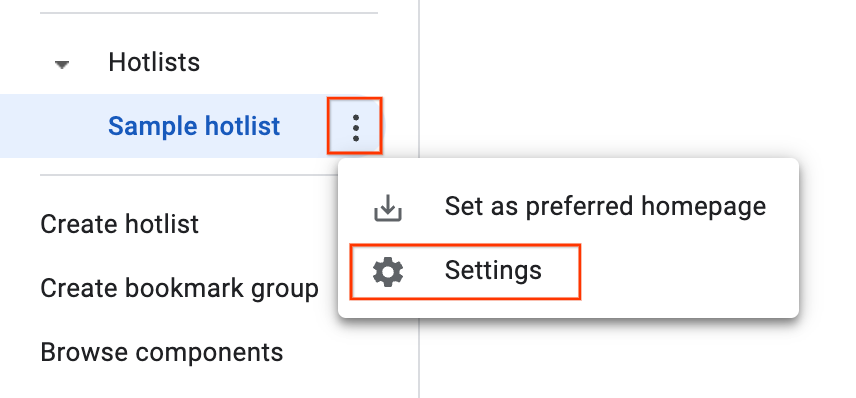
ستظهر نافذة تفاصيل "قائمة الفيديوهات الرائجة".
انقر على حفظ.
يمكنك أيضًا تعديل "قائمة فيديوهات رائجة" من صفحة المشاكل الخاصة بها من خلال النقر على رمز التعديل (قلم الرصاص) بجانب اسم "قائمة الفيديوهات الرائجة".
تمييز "قائمة فيديوهات رائجة" بنجمة
يمكنك تحديد "قوائم الفيديوهات الرائجة" المهمة من خلال تمييزها بنجمة. ستظهر "قوائم الفيديوهات الرائجة" المميّزة بنجمة أيضًا في أداة اختيار "قائمة الفيديوهات الرائجة" عند إضافة "قوائم فيديوهات رائجة" إلى مشكلة أو إزالتها منها.
لتمييز "قائمة فيديوهات رائجة" بنجمة، اتّبِع الخطوات التالية:
افتح أداة تتبُّع المشاكل في متصفّح الويب.
في شريط التنقّل على يمين الصفحة، اختَر "قائمة الفيديوهات الرائجة" التي تريد تمييزها بنجمة.
في أعلى الصفحة، انقر على رمز النجمة بجانب اسم "قائمة الفيديوهات الرائجة".
إضافة المشاكل وإزالتها
يجب أن يكون لديك إذن المشرف أو إذن عرض البيانات والإضافة في "قائمة فيديوهات رائجة" لإضافة المشاكل أو إزالتها.
لإضافة المشاكل أو إزالتها في "قائمة فيديوهات رائجة"، اتّبِع الخطوات التالية:
افتح أداة تتبُّع المشاكل في متصفّح الويب.
ضَع علامة في مربّع الاختيار بجانب المشكلة التي تريد إضافتها أو إزالتها، أو افتح المشكلة.
انقر على الزر قوائم الفيديوهات الرائجة في الشريط العلوي لفتح أداة اختيار "قائمة الفيديوهات الرائجة".
لإضافة المشكلة إلى "قائمة فيديوهات رائجة"، ضَع علامة في مربّع الاختيار بجانب "قائمة الفيديوهات الرائجة" هذه وانقر على حفظ. لإزالة المشكلة من "قائمة فيديوهات رائجة"، أزِل العلامة من مربّع الاختيار وانقر على إزالة. يمكن إضافة "قوائم فيديوهات رائجة" متعددة أو إزالتها في الإجراء نفسه.
ضبط أذونات "قائمة فيديوهات رائجة"
يجب أن يكون لديك إذن المشرف لـ "قائمة الفيديوهات الرائجة" لتتمكّن من ضبط الأذونات للمستخدمين والمجموعات الأخرى.
لضبط الأذونات لـ "قائمة فيديوهات رائجة"، اتّبِع الخطوات التالية:
افتح أداة تتبُّع المشاكل في متصفّح الويب.
في شريط التنقّل على يمين الصفحة، ابحث عن "قائمة الفيديوهات الرائجة" التي تريد تغيير أذوناتها.
مرِّر مؤشر الماوس فوق "قائمة الفيديوهات الرائجة" وانقر على الزر المنسدل.
اختَر الإعدادات.
ستظهر نافذة تفاصيل "قائمة الفيديوهات الرائجة".
انقر على علامة التبويب التحكّم في الوصول وامنح الأذونات لـ "قائمة الفيديوهات الرائجة" حسب الحاجة.
انقر على تعديل.
يجب أن يكون لدى أي مستخدم أو مجموعة تم منحها أذونات الوصول إلى "قائمة الفيديوهات الرائجة" حساب على Google. وإلا، سيظهر المستخدم بحد أحمر وستظهر رسالة الخطأ مستخدمون غير صالحين.
إضافة "قائمة فيديوهات رائجة" إلى شريط التنقّل
يجب أن يكون لديك إذن المشرف أو إذن عرض البيانات والإضافة أو إذن عرض البيانات فقط في "قائمة فيديوهات رائجة" لتتمكّن من إضافتها إلى شريط التنقّل على يمين الصفحة.
لإضافة "قائمة فيديوهات رائجة"، اتّبِع الخطوات التالية:
افتح أداة تتبُّع المشاكل في متصفّح الويب.
انقر على رمز العدسة المكبّرة بجانب قوائم الفيديوهات الرائجة في شريط التنقّل على يمين الصفحة.
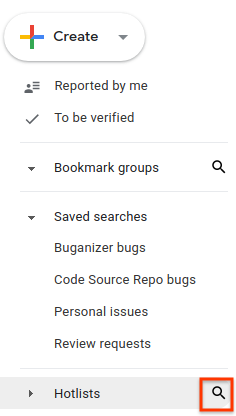
عندما يُطلب منك ذلك، ابحث عن "قائمة الفيديوهات الرائجة" باستخدام الكلمات الرئيسية في اسمها أو وصفها. لا يمكنك البحث إلا عن "قوائم الفيديوهات الرائجة" التي لديك فيها إذن المشرف أو إذن عرض البيانات والإضافة أو إذن عرض البيانات فقط.
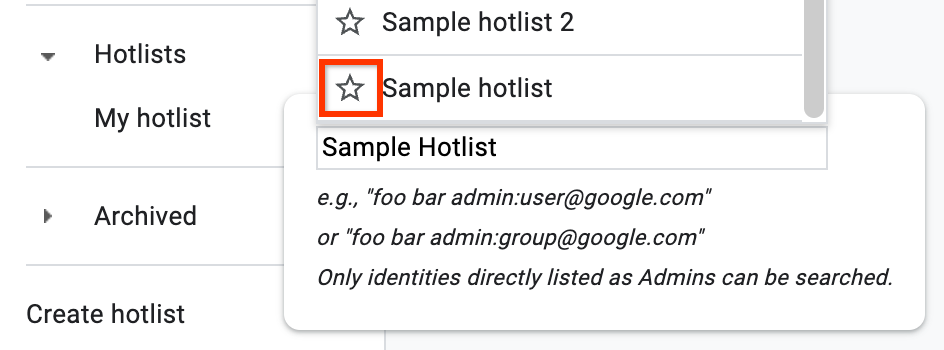
يمكنك أيضًا استخدام
owner:[NAME]للبحث حسب اسم مستخدم لديه إذن المشرف في "قائمة الفيديوهات الرائجة".لإضافة "قائمة فيديوهات رائجة" إلى قسم قوائم الفيديوهات الرائجة في شريط التنقّل على يمين الصفحة، انقر على النجمة بجانب نتيجة البحث.
لعرض قائمة المشاكل في "قائمة فيديوهات رائجة"، انقر على نتيجة البحث.
يمكنك أيضًا إضافة "قائمة الفيديوهات الرائجة" من صفحة المشاكل من خلال النقر على رمز النجمة الذي يظهر على يمين اسم "قائمة الفيديوهات الرائجة".
إزالة "قائمة فيديوهات رائجة" من شريط التنقّل
إذا لم تكن مالك "قائمة فيديوهات رائجة"، يمكنك إزالتها من شريط التنقّل من خلال إزالة النجمة منها. إذا كنت المالك، يمكنك إزالتها من خلال أرشفتها.
لإزالة "قائمة فيديوهات رائجة" من شريط التنقّل، اتّبِع الخطوات التالية:
افتح أداة تتبُّع المشاكل في متصفّح الويب.
ابحث عن "قائمة الفيديوهات الرائجة" التي تريد إزالتها في شريط التنقّل على يمين الصفحة وافتحها.
على يمين اسم "قائمة الفيديوهات الرائجة"، انقر على إزالة النجمة من "قائمة الفيديوهات الرائجة" هذه.
إذا كنت مالك "قائمة الفيديوهات الرائجة" أو إذا كان لديك إذن المشرف في "قائمة الفيديوهات الرائجة"، اتّبِع الخطوات التالية:
مرِّر مؤشر الماوس فوق "قائمة الفيديوهات الرائجة" وانقر على رمز "المزيد".
اختَر الإعدادات.
ستظهر نافذة تفاصيل "قائمة الفيديوهات الرائجة".
انقر على الزر أرشفة في الشريط العلوي.
انقر على تأكيد. يؤدي هذا الإجراء إلى أرشفة "قائمة الفيديوهات الرائجة" لجميع المستخدمين الذين كان بإمكانهم الوصول إليها.
لن تظهر "قوائم الفيديوهات الرائجة" المؤرشفة بعد ذلك في شريط التنقّل على يمين الصفحة ولن تظهر بعد ذلك كعلامات في صفحات المشاكل.