Set Date and Time Formats
Stay organized with collections
Save and categorize content based on your preferences.
This page shows how to set date and time formats in Google Issue Tracker.
To set date and time formats:
Open Issue Tracker in your web browser.
Click the gear icon in the upper right corner of Issue Tracker.

Select Settings.
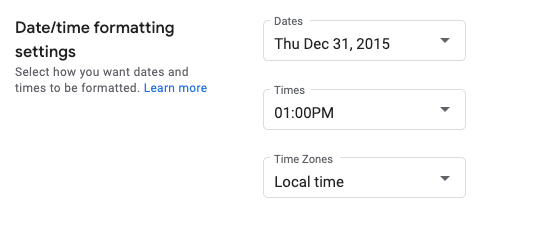
In the Date/time formatting settings section of the Settings overlay,
use the drop-downs to select your preferences.
Use the Dates drop-down to set how dates appear.
Use the Times drop-down to set how times appear.
Use the Time Zones drop-down to set the time zone used.
What's next
All rights reserved. Java is a registered trademark of Oracle and/or its affiliates.
Last updated 2025-02-21 UTC.
[[["Easy to understand","easyToUnderstand","thumb-up"],["Solved my problem","solvedMyProblem","thumb-up"],["Other","otherUp","thumb-up"]],[["Missing the information I need","missingTheInformationINeed","thumb-down"],["Too complicated / too many steps","tooComplicatedTooManySteps","thumb-down"],["Out of date","outOfDate","thumb-down"],["Samples / code issue","samplesCodeIssue","thumb-down"],["Other","otherDown","thumb-down"]],["Last updated 2025-02-21 UTC."],[],[]]