概览
下面简要介绍了通行密钥身份验证所涉及的关键步骤:
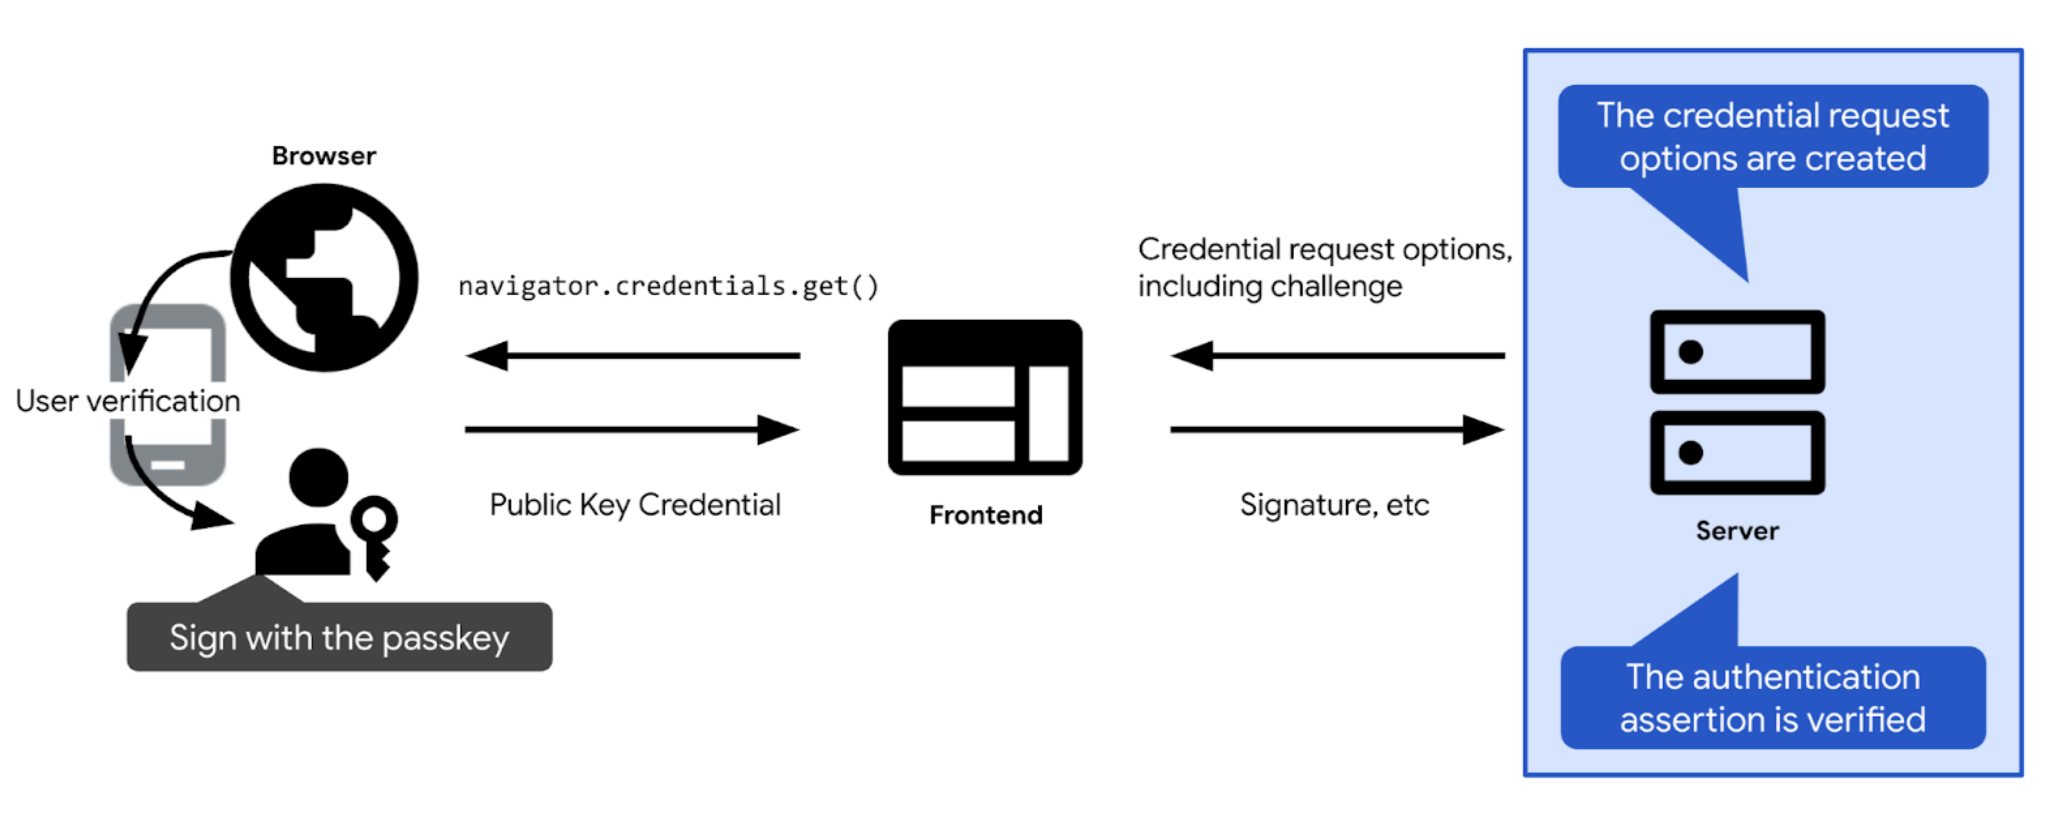
- 指定使用通行密钥进行身份验证所需的质询和其他选项。将它们发送给客户端,以便您将其传递给通行密钥身份验证调用(网站上为
navigator.credentials.get)。用户确认通行密钥身份验证后,系统会解析通行密钥身份验证调用,并返回凭据 (PublicKeyCredential)。凭据包含身份验证断言。
- 验证身份验证断言。
- 如果身份验证断言有效,请对用户进行身份验证。
以下部分详细介绍了每个步骤。
<ph type="x-smartling-placeholder">创建挑战
在实践中,挑战是随机字节数组,表示为 ArrayBuffer 对象。
// Example challenge, base64URL-encoded
weMLPOSx1VfSnMV6uPwDKbjGdKRMaUDGxeDEUTT5VN8
为确保挑战实现其目标,您必须:
- 确保相同的验证绝不重复使用。每次尝试登录时都生成新的质询。每次尝试登录后都舍弃该质询,无论登录成功与否。达到一定时长后也舍弃该质询。切勿在响应中多次接受相同的质询。
- 确保验证具有加密安全性。真正的挑战应该是几乎无法猜测出来的。如需在服务器端创建加密安全的验证服务,最好依赖您信任的 FIDO 服务器端库。如果您自行创建验证,请使用您的技术栈中提供的内置加密功能,或查找专为加密用例设计的库。示例包括 Node.js 中的 iso-crypto 或 Python 中的 secrets。根据规范,质询的长度必须至少为 16 个字节,才会被视为安全。
创建验证后,请将其保存到用户的会话中,供日后验证。
创建凭据请求选项
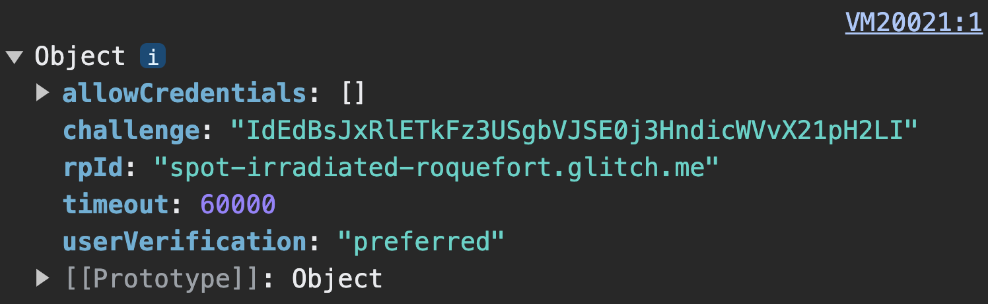
以 publicKeyCredentialRequestOptions 对象的形式创建凭据请求选项。
为此,依赖于 FIDO 服务器端库。它通常会提供一个实用函数,可为您创建这些选项。例如,SimpleWebAuthn 会提供 generateAuthenticationOptions。
publicKeyCredentialRequestOptions 应包含通行密钥身份验证所需的所有信息。将这些信息传递给 FIDO 服务器端库中负责创建 publicKeyCredentialRequestOptions 对象的函数。
部分publicKeyCredentialRequestOptions'字段可以是常量。其他的 ID 应在服务器上动态定义:
rpId:您希望凭据与哪个 RP ID 相关联,例如example.com。仅当您在此处提供的 RP ID 与凭据关联的 RP ID 匹配时,身份验证才会成功。如需填充 RP ID,请使用与您在凭据注册期间在publicKeyCredentialCreationOptions中设置的 RP ID 相同的值。challenge:在收到身份验证请求时,通行密钥提供程序将签署以证明用户持有通行密钥的一段数据。在创建挑战中查看详细信息。allowCredentials:此身份验证可接受的一组凭据。传递一个空数组,即可让用户从浏览器显示的列表中选择可用的通行密钥。如需了解详情,请参阅从 RP 服务器提取质询和深入探究可发现凭据。userVerification:用于指明使用设备屏幕锁定功能进行用户验证是“必需”还是“首选”或“不建议”。查看从 RP 服务器提取质询。timeout:用户完成身份验证需要多长时间(以毫秒为单位)。它应该相当宽松,并且比challenge的生命周期短。建议的默认值为 5 分钟,但您可以增加此值(最多 10 分钟),该值仍在建议的范围内。如果您希望用户使用混合工作流程(通常需要更长的时间),则可以设置较长的超时。如果操作超时,系统会抛出NotAllowedError。
创建 publicKeyCredentialRequestOptions 后,将其发送给客户端。
challenge 解码在客户端进行。示例代码:创建凭据请求选项
我们在示例中使用了 SimpleWebAuthn 库。在这里,我们将凭据请求选项的创建移交给其 generateAuthenticationOptions 函数。
import {
  generateRegistrationOptions,
  verifyRegistrationResponse,
  generateAuthenticationOptions,
  verifyAuthenticationResponse
} from '@simplewebauthn/server';

router.post('/signinRequest', csrfCheck, async (req, res) => {

  // Ensure you nest calls in try/catch blocks.
  // If something fails, throw an error with a descriptive error message.
  // Return that message with an appropriate error code to the client.
  try {
    // Use the generateAuthenticationOptions function from SimpleWebAuthn
    const options = await generateAuthenticationOptions({
      rpID: process.env.HOSTNAME,
      allowCredentials: [],
    });
    // Save the challenge in the user session
    req.session.challenge = options.challenge;

    return res.json(options);
  } catch (e) {
    console.error(e);
    return res.status(400).json({ error: e.message });
  }
});
验证用户并登录
当 navigator.credentials.get 在客户端上成功解析后,它会返回 PublicKeyCredential 对象。
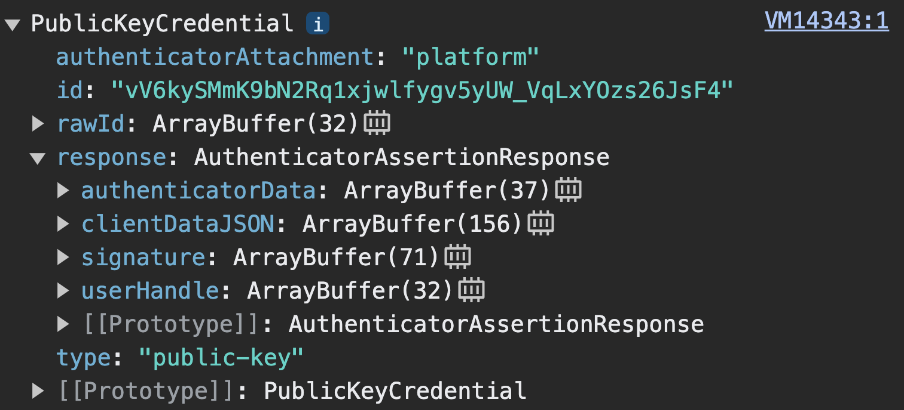
navigator.credentials.get 会返回 PublicKeyCredential。response 是一个 AuthenticatorAssertionResponse。它表示通行密钥提供程序对客户端指令的响应,即创建尝试使用 RP 中的通行密钥进行身份验证所需的内容。其中包含:
response.authenticatorData和response.clientDataJSON,例如在通行密钥注册步骤中。response.signature,其中包含针对这些值的签名。
将 PublicKeyCredential 对象发送到服务器。
在服务器上,执行以下操作:
<ph type="x-smartling-placeholder">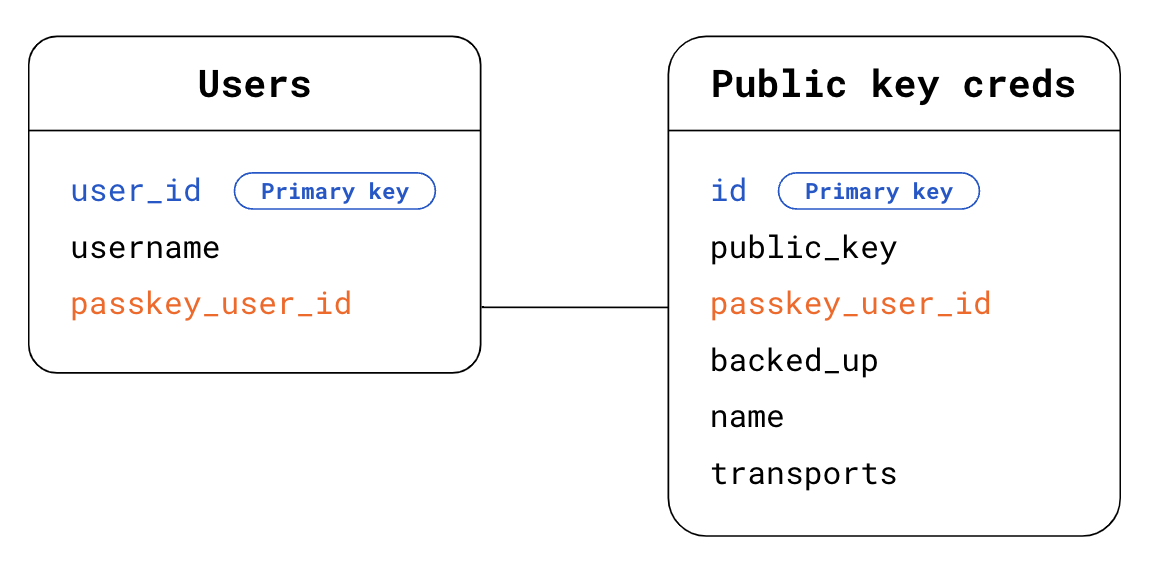
- 收集验证断言和对用户进行身份验证所需的信息:
<ph type="x-smartling-placeholder">
- </ph>
- 获取您在生成身份验证选项时存储在会话中的预期验证码。
- 获取预期的 origin 和 RP ID。
- 在数据库中查找用户。对于可检测到的凭据,您不知道发出身份验证请求的用户是谁。为此,您有两种选择:
<ph type="x-smartling-placeholder">
- </ph>
- 选项 1:在
PublicKeyCredential对象中使用response.userHandle。在 Users 表中,查找与userHandle匹配的passkey_user_id。 - 选项 2:使用
PublicKeyCredential对象中存在的凭据id。在 Public key credentials 表中,查找与PublicKeyCredential对象中的凭据id匹配的凭据id。然后使用 Users 表的外键passkey_user_id查找相应的用户。
- 选项 1:在
- 在您的数据库中查找与您收到的身份验证断言匹配的公钥凭据信息。为此,请在 Public key credentials 表中查找与
PublicKeyCredential对象中存在的凭据id匹配的凭据id。
验证身份验证断言。将此验证步骤移交给您的 FIDO 服务器端库,该库通常会提供用于此目的的实用函数。例如,SimpleWebAuthn 会提供
verifyAuthenticationResponse。请参阅附录:身份验证响应验证,了解后台发生的情况。无论验证成功与否,删除质询,以防止重放攻击。
登录用户。如果验证成功,请更新会话信息以将用户标记为已登录。您可能还需要向客户端返回
user对象,以便前端可以使用与新登录用户相关的信息。
示例代码:验证并登录用户
我们在示例中使用了 SimpleWebAuthn 库。在这里,我们将身份验证响应的验证工作移交给其 verifyAuthenticationResponse 函数。
import {
  generateRegistrationOptions,
  verifyRegistrationResponse,
  generateAuthenticationOptions,
  verifyAuthenticationResponse
} from '@simplewebauthn/server';
import { isoBase64URL } from '@simplewebauthn/server/helpers';

router.post('/signinResponse', csrfCheck, async (req, res) => {
  const response = req.body;
  const expectedChallenge = req.session.challenge;
  const expectedOrigin = getOrigin(req.get('User-Agent'));
  const expectedRPID = process.env.HOSTNAME;

  // Ensure you nest verification function calls in try/catch blocks.
  // If something fails, throw an error with a descriptive error message.
  // Return that message with an appropriate error code to the client.
  try {
    // Find the credential stored to the database by the credential ID
    const cred = Credentials.findById(response.id);
    if (!cred) {
      throw new Error('Credential not found.');
    }
    // Find the user - Here alternatively we could look up the user directly
    // in the Users table via userHandle
    const user = Users.findByPasskeyUserId(cred.passkey_user_id);
    if (!user) {
      throw new Error('User not found.');
    }
    // Base64URL decode some values
    const authenticator = {
      credentialPublicKey: isoBase64URL.toBuffer(cred.publicKey),
      credentialID: isoBase64URL.toBuffer(cred.id),
      transports: cred.transports,
    };

    // Verify the credential
    const { verified, authenticationInfo } = await verifyAuthenticationResponse({
      response,
      expectedChallenge,
      expectedOrigin,
      expectedRPID,
      authenticator,
      requireUserVerification: false,
    });

    if (!verified) {
      throw new Error('User verification failed.');
    }

    // Kill the challenge for this session.
    delete req.session.challenge;

    req.session.username = user.username;
    req.session['signed-in'] = 'yes';

    return res.json(user);
  } catch (e) {
    delete req.session.challenge;

    console.error(e);
    return res.status(400).json({ error: e.message });
  }
});
附录:验证身份验证响应
验证身份验证响应包括以下检查:
- 确保 RP ID 与您的网站一致。
- 确保请求的来源与您网站的登录来源一致。对于 Android 应用,请查看验证来源。
- 检查设备是否能够提供您设定的挑战。
- 验证在身份验证期间,用户是否遵守了您作为 RP 的要求。如果您要求进行用户验证,请确保
authenticatorData中的uv(用户已验证)标志为true。检查authenticatorData中的up(用户存在)标志是否为true,因为通行密钥始终需要用户存在。 - 验证签名。如需验证签名,您需要:
<ph type="x-smartling-placeholder">
- </ph>
- 签名(即已签名的验证):
response.signature - 公钥,用于验证签名。
- 原始签名数据。这是需要验证其签名的数据。
- 用于创建签名的加密算法。
- 签名(即已签名的验证):
如需详细了解这些步骤,请查看 SimpleWebAuthn 的 verifyAuthenticationResponse 源代码,或深入了解规范中的完整验证列表。