.NET İstemci Kitaplığı'nı kullanmaya başlama
Koleksiyonlar ile düzeninizi koruyun
İçeriği tercihlerinize göre kaydedin ve kategorilere ayırın.
Jeff Fisher, Google Data API'leri Ekibi
Ağustos 2007
Giriş
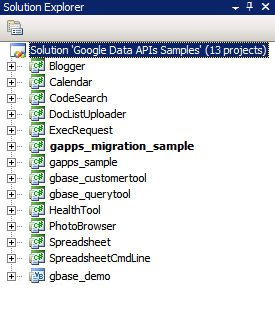
Şekil 1: Google Data API çözümü
Birçok geliştirici için yeni bir projenin en zor kısmı işe başlamaktır: yeni yazılım paketlerini yüklemek, geliştirme ortamını yapılandırmak ve yeni kitaplıkları öğrenmek. Bu makalede, Windows için Visual Studio 2005 veya Linux ve diğer Unix işletim sistemleri için Mono'yu kullanarak .NET istemci kitaplığıyla çalışmaya başlamayla ilgili adım adım talimatları bir araya getirdim. Bu sayede, başlangıç aşamasında zaman kazanacağınızı ve hızlı bir şekilde kodlarla çalışmaya başlayacağınızı umuyoruz.
Visual Studio 2008
Visual Studio 2008'i henüz yüklemediyseniz .NET istemci kitaplığıyla çalışmanıza olanak tanıyan ücretsiz bir Visual Studio sürümü olan Visual C# 2008 Express Edition'ı kullanmayı düşünebilirsiniz.
Ortamınızı kurma
- İstemci kitaplığının en son MSI sürümünü http://code.google.com/p/google-gdata/downloads/list adresinden indirin.
- Paketi yüklemek için indirilen MSI dosyasını çalıştırın. Varsayılan olarak "C:\Program Files\Google\Google Data API SDK\" konumuna yüklenir. Bu makaledeki diğer örneklerde, istemci kitaplığını bu konuma yüklediğiniz varsayılacaktır.
- Başlat menüsündeki "Google Data API SDK" klasöründe "Google Data API SDK" adlı çözüm dosyasını açın.
Örnekleri derleme ve çalıştırma
- "Build > Build Solution" (Derleme > Çözümü Derle) işleminin hatasız olarak tamamlandığını doğrulayın.
- Hata ayıklama derlemesi oluşturmak için "Build > Configuration Manager"a (Derleme > Yapılandırma Yöneticisi) gidin ve etkin çözüm yapılandırması olarak "Debug"ı (Hata ayıklama) seçin. Ardından "Derle > Çözüm Derle"yi seçin.
- Yeni derlediğiniz ikili dosyaları ve DLL dosyalarını "C:\Program Files\Google\Google Data API SDK\Sources\Samples\" konumunda bulabilirsiniz.
Örneğin, "C:\Program Files\Google\Google Data API SDK\Sources\Samples\calendar\bin\Debug\Calendar.exe" dosyasını çalıştırarak Takvim için örnek uygulamayı çalıştırabilirsiniz. Bu örneklere yönelik bazı Başlat menüsü kısayolları da vardır.
Kendi uygulamanızı geliştirme
MSI dosyası tarafından sağlanan çözüm dosyasının dışındaki bir projede geliştirme yapmak istiyorsanız istemci kitaplığı DLL dosyalarını referans yolu olarak eklemeniz gerekir.
- Google API SDK çözümü dışında bir proje oluşturun veya açın.
- Proje menüsünden "Referans Ekle"yi seçin.
- Göz at sekmesini tıklayın.
- SDK'daki Redist dizinine gidin: "C:\Program Files\Google\Google Data API SDK\Redist".
- Kodunuz tarafından kullanılacak DLL dosyalarını seçin. Google.GData.Extensions.dll ve Google.GData.Client.dll, çoğu proje için uygulamanızda kullandığınız Google hizmetlerine özel DLL dosyasıyla birlikte gereklidir.
Not: Mobil cihazlardaki istemci kitaplıkları için de bir çözüm dosyası vardır. Varsayılan olarak "C:\Program Files\Google\Google Data API SDK\Sources\Library\VS2005.mobile" konumunda bulunur. Bu çözüm yalnızca istemci kitaplıklarının DLL dosyalarını derler.
NUnit testlerini çalıştırma
İstemci kitaplıklarında değişiklik yaparsanız veya bu kitaplıklara katkıda bulunmayı planlıyorsanız uygun NUnit testlerinin başarılı olduğundan emin olmanız önemli bir adımdır. İstemci kitaplıklarını değişiklik yapmadan kullanmayı planlıyorsanız genellikle çalıştırmanız gerekmez.
- NUnit'in .NET 2.0 MSI dosyası sürümünü http://www.nunit.org/index.php?p=download adresinden indirin.
- MSI dosyasını çalıştırarak NUnit'i yükleyin. Varsayılan yükleme konumu "C:\Program Files\NUnit 2.4.8"e benzer. Gelecekte NUnit'i yükseltmek için Visual Studio projenizdeki yolu değiştirmeniz gerekmemesi adına bunu "C:\Program Files\NUnit" gibi bir yolla değiştirebilirsiniz.
- "C:\Program Files\Google\Google Data API SDK\Sources\Library\VS2005" dizinine gidin ve "Google Data APIs" adlı çözüm dosyasını açın.
Bu bir Visual Studio 2005 proje dosyası olduğundan Dönüşüm Sihirbazı'nı görürsünüz. İstemleri tıklayarak ilerleyin veya "Bitir" düğmesini tıklayın. Dönüşüm günlüğü gösterilir. Bu günlük yoksayılabilir.
- Şimdi NUnit, referans yolu olarak eklenmelidir. Sağdaki Çözüm Gezgini'nde "unittests" projesini sağ tıklayın ve "Özellikler"i seçin. Şimdi açılan penceredeki "Referans Yolları" sekmesini tıklayın. NUnit yüklemesinin "bin" alt dizininin konumunu referans yolu olarak girin ve "Add Folder" (Klasör Ekle) seçeneğini tıklayın. Örneğin, NUnit "C:\Program Files\NUnit\" konumuna yüklendiyse "C:\Program Files\NUnit\bin" girilir. Devam etmeden önce bu değişikliği kaydettiğinizden emin olun.
- İstemci kitaplığını ve birim testlerini yeniden oluşturmak için Örnekleri derleme ve çalıştırma bölümünde listelenen adımları uygulayın.
- "C:\Program Files\Google\Google Data API SDK\Sources\Library\unittests\" dizinindeki "unittests.dll.config" dosyasını hata ayıklama derleme dizininiz olan "C:\Program Files\Google\Google Data API SDK\Source\Library\VS2005\unittests\bin\Debug\" dizinine kopyalayın. Dosyayı, yürüttüğünüz testlerle ilgili uygun bilgileri içerecek şekilde düzenlemeyi unutmayın. Örneğin, Base için API anahtarı, Calendar için ise kullanıcı adı ve şifre gerekir. Birim testleri tarafından bilgilerin silinmesini önlemek için canlı verilerin olmadığı bir test hesabı kullanmanız önerilir.
- Başlat menüsünden NUnit'i açın.
- "Dosya > Proje Aç"a gidin ve "C:\Program Files\Google\Google Data API SDK\Source\Library\VS2005\unittests\bin\Debug\" konumundaki "unittests.dll" dosyasını seçin.
- İlgilendiğiniz birim testlerini çalıştırın. Bazı testlerin çalışması için unittests.dll.config dosyasında parametrelerin ayarlanması gerektiğini unutmayın. Belirli hizmetler için yük testi yaparsanız test hesabınız spam oluşturuyor olarak işaretlenebilir ve CAPTCHA zorluklarıyla karşılaşmadan Google sunucularına programatik olarak içerik gönderemeyebilirsiniz.
Mono
Mono, .NET istemci ve sunucu uygulamalarını Linux, Solaris, Mac OS X, Windows ve Unix'te çalıştırmanıza olanak tanıyan açık kaynaklı bir projedir. Bu platformlardan birinde çalışmak isteyen geliştiriciler için istemci kitaplığımızın ayrı bir ZIP dosyasını sunuyoruz.
Ortamınızı kurma
- İstemci kitaplığının en son ZIP dosyası sürümünü http://code.google.com/p/google-gdata/downloads/list adresinden indirin.
- Yerel bir dizine (ör. "/scratch/gdata.NET") ayıklayın.
- Mono'yu yüklemek için dağıtımınızın paket yönetimini kullanın.
Alternatif olarak, http://www.mono-project.com adresinden de indirebilirsiniz.
- Bazı dağıtımlarda nunit.framework.dll dosyasının mono kitaplığına düzgün şekilde bağlandığından emin olmanız gerekir. Mono "/usr/lib/mono"ya yüklendiyse "/usr/lib/mono/1.0" ve "/usr/lib/mono/2.0"da nunit.framework.dll için sembolik bağlantılar olduğundan emin olun (nunit.framework.dll, "/usr/lib/mono/gac/nunit.framework/<someversionstring>/nunit.framework.dll" konumuna yüklenmelidir).
Örnekleri derleme ve çalıştırma
- İstemci kitaplığını "/scratch/gdata.NET" dizinine yüklediğinizi varsayarsak "/scratch/gdata.NET/clients/cs" dizinine geçin.
- Kullanmak istediğiniz .NET sürümüne bağlı olarak Makefile'ı düzenleyin. .NET 1.x için
CSC=mcs
, .NET 2.x için CSC=gmcs
kullanın.
- Kitaplıkları ve örnek uygulamaları derlemek için
make
komutunu çalıştırın.
- İstemci kitaplığı DLL'lerini Mono kitaplığına yüklemek istiyorsanız
make install
komutunu çalıştırın.
Kendi uygulamanızı geliştirme
İstemci kitaplığını derledikten sonra make install
komutunu çalıştırdıysanız kullanmak istediğiniz belirli hizmet uzantılarının DLL dosyalarına yapılan referanslarla birlikte -r:Google.GData.Extensions.dll -r:Google.GData.Client.dll
komutunu Mono C# derleyicisine ileterek kitaplıkları kendi kodunuza ekleyebilirsiniz.
NUnit testlerini çalıştırma
- unittests.dll.config dosyasını "/scratch/gdata.NET/clients/cs/src/unittests" konumundan "/scratch/gdata.NET/clients/cs/" konumuna kopyalayın.
- Çalıştırdığınız testlerle ilgili uygun bilgileri eklemek için "/scratch/gdata.NET/clients/cs/unittests.dll.config" dosyasını düzenleyin. Örneğin, Base için API anahtarı, Calendar için ise kullanıcı adı ve şifre gerekir. Birim testleri tarafından bilgilerin silinmesini önlemek için canlı verilerin olmadığı bir test hesabı kullanmanızı öneririz.
- Kitaplık derlendikten sonra "/scratch/gdata.NET/clients/cs" dizininde unittests.dll dosyası bulunur. Bu DLL'yi, tercih ettiğiniz NUnit test yöneticisiyle (nunit-console, gnunit vb.) kullanın.
Sonuç
Artık kitaplıkları derleyip örnek kodu çalıştırabilirsiniz. Ancak bu sadece başlangıç. İstemci kitaplığının ".../clients/cs/docs" dizinindeki dokümanları okumanızı öneririz.
Ayrıca .NET İstemci Kitaplığı Geliştirici Kılavuzu, proje sayfası ve referans kılavuzu ile Google Data .NET istemci kitaplığı forumuna da göz atabilirsiniz.
Bu makalede referans verilen araçlar:
Bir sonraki .NET uygulamanızda başarılar dileriz.
Aksi belirtilmediği sürece bu sayfanın içeriği Creative Commons Atıf 4.0 Lisansı altında ve kod örnekleri Apache 2.0 Lisansı altında lisanslanmıştır. Ayrıntılı bilgi için Google Developers Site Politikaları'na göz atın. Java, Oracle ve/veya satış ortaklarının tescilli ticari markasıdır.
Son güncelleme tarihi: 2025-07-27 UTC.
[[["Anlaması kolay","easyToUnderstand","thumb-up"],["Sorunumu çözdü","solvedMyProblem","thumb-up"],["Diğer","otherUp","thumb-up"]],[["İhtiyacım olan bilgiler yok","missingTheInformationINeed","thumb-down"],["Çok karmaşık / çok fazla adım var","tooComplicatedTooManySteps","thumb-down"],["Güncel değil","outOfDate","thumb-down"],["Çeviri sorunu","translationIssue","thumb-down"],["Örnek veya kod sorunu","samplesCodeIssue","thumb-down"],["Diğer","otherDown","thumb-down"]],["Son güncelleme tarihi: 2025-07-27 UTC."],[[["\u003cp\u003eThis guide provides step-by-step instructions for setting up and using the Google Data .NET client library with either Visual Studio 2008 or Mono.\u003c/p\u003e\n"],["\u003cp\u003eDevelopers can use this library to interact with various Google services like Calendar by compiling and running provided sample applications or by developing their own applications.\u003c/p\u003e\n"],["\u003cp\u003eThe guide includes details on compiling the library, running provided unit tests for verifying functionality, and configuring the development environment for both Windows and Unix-based systems.\u003c/p\u003e\n"],["\u003cp\u003eAdditional resources such as the .NET Client Library Developer's Guide and project forums are available for further assistance.\u003c/p\u003e\n"]]],[],null,["# Getting Started with the .NET Client Library\n\n*Jeff Fisher, Google Data APIs team\nAugust 2007*\n\n- [Introduction](#introduction)\n- [Visual Studio 2008](#vs2005)\n - [Setting up your environment](#vssetup)\n - [Compiling and running samples](#vscompile)\n - [Developing your own application](#vsdevelop)\n - [Running the NUnit tests](#vsnunit)\n- [Mono](#mono)\n - [Setting up your environment](#monosetup)\n - [Compiling and running samples](#monocompile)\n - [Developing your own application](#monodevelop)\n - [Running the NUnit tests](#mononunit)\n- [Conclusion](#conclusion)\n\n### Introduction\n\n\u003cbr /\u003e\n\n**Figure 1: The Google Data API solution**\n\nFor many developers, the most difficult part of a new project is getting the ball rolling-installing new software packages, configuring a development environment, and learning new libraries. In this article, I have pulled together some step-by-step instructions for how to begin with the .NET client library using either Visual Studio 2005 for Windows or Mono for Linux and other Unix operating systems. It is my hope that this will save you some time in getting started and let you quickly start working with some code.\n\nVisual Studio 2008\n------------------\n\nIf you do not already have Visual Studio 2008 installed, you may want to consider using [Visual C# 2008 Express Edition](http://msdn.microsoft.com/en-us/library/orm-9780596521066-01-02.aspx), a free version of Visual Studio that will allow you to work with the .NET client library.\n\n### Setting up your environment\n\n1. Download the latest MSI release of the client library from [http://code.google.com/p/google-gdata/downloads/list](//code.google.com/p/google-gdata/downloads/list).\n2. Run the downloaded MSI file to install the package. It will install to \"C:\\\\Program Files\\\\Google\\\\Google Data API SDK\\\\\" by default. Further examples in this article will assume you installed the client library to this location.\n3. Open the solution file called \"Google Data API SDK\" in the \"Google Data API SDK\" folder in the Start Menu.\n\n### Compiling and running samples\n\n1. Verify that running \"Build \\\u003e Build Solution\" completes without any errors.\n2. To create a Debug build go to \"Build \\\u003e Configuration Manager\" and select \"Debug\" as the active solution configuration. Then select \"Build \\\u003e Build Solution\".\n3. The binaries and DLL files you have just compiled can be found in \"C:\\\\Program Files\\\\Google\\\\Google Data API SDK\\\\Sources\\\\Samples\\\\\" For example, you can run the sample application for Calendar by executing \"C:\\\\Program Files\\\\Google\\\\Google Data API SDK\\\\Sources\\\\Samples\\\\calendar\\\\bin\\\\Debug\\\\Calendar.exe\". There are also some Start Menu shortcuts to these samples.\n\n### Developing your own application\n\nIf you want to develop in a project outside of the solution file provided by the MSI file, you need to add the client library DLL files as a reference path.\n\n1. Create or open a project outside of the Google API SDK solution.\n2. Select \"Add Reference\" from the Project menu.\n3. Click on the Browse tab.\n4. Navigate to the Redist directory in the SDK: \"C:\\\\Program Files\\\\Google\\\\Google Data API SDK\\\\Redist\".\n5. Select the DLL files that will be used by your code. Google.GData.Extensions.dll and Google.GData.Client.dll will be needed for most projects, along with the DLL file specific to the Google service(s) you are using in your application.\n\n**Note:** There is also a solution file for client libraries on Mobile devices. It is found in \"C:\\\\Program Files\\\\Google\\\\Google Data API SDK\\\\Sources\\\\Library\\\\VS2005.mobile\" by default. This solution will only compile the DLL files for the client libraries.\n\n### Running the NUnit tests\n\nMaking sure the appropriate NUnit tests pass is an important step if you make any changes to the client libraries or plan to contribute to them. If you plan to use the client libraries without modifications then there is normally no need to run them.\n\n1. Download the .NET 2.0 MSI file release of NUnit from \u003chttp://www.nunit.org/index.php?p=download\u003e.\n2. Install NUnit by running the MSI file. The default install location is similar to \"C:\\\\Program Files\\\\NUnit 2.4.8\". You may wish to change this to something like \"C:\\\\Program Files\\\\NUnit\" so you can upgrade NUnit in the future without having to change the path in your Visual Studio project.\n3. Go to the \"C:\\\\Program Files\\\\Google\\\\Google Data API SDK\\\\Sources\\\\Library\\\\VS2005\" directory and open the solution file named \"Google Data APIs\". You will see the Conversion Wizard since this is a Visual Studio 2005 project file. Either click through the prompts or simply click on the \"Finish\" button. It should display the conversion log, which can be ignored.\n4. Now NUnit must be added as a reference path. Right click on the \"unittests\" project in the Solution Explorer on the right and select \"Properties\". Now click on the \"Reference Paths\" tab within the window that opens. Enter in the location of the \"bin\" subdirectory of the NUnit installation as a reference path and click \"Add Folder\". For example, if NUnit is installed to \"C:\\\\Program Files\\\\NUnit\\\\\", one would enter \"C:\\\\Program Files\\\\NUnit\\\\bin\". Be sure to save this change before continuing.\n5. Follow the steps listed in [Compiling and running samples](#vscompile) to rebuild the client library and the unit tests.\n6. Copy the \"unittests.dll.config\" file in \"C:\\\\Program Files\\\\Google\\\\Google Data API SDK\\\\Sources\\\\Library\\\\unittests\\\\\" to your debug build directory \"C:\\\\Program Files\\\\Google\\\\Google Data API SDK\\\\Source\\\\Library\\\\VS2005\\\\unittests\\\\bin\\\\Debug\\\\\". Remember to edit the file to include the appropriate information for the tests you are running. For example, Base requires an API key and Calendar requires a username and password. It is recommended to use a test account without any live data to avoid having information deleted by the unit tests.\n7. Open NUnit from the Start Menu.\n8. Go to \"File \\\u003e Open Project\" and select the \"unittests.dll\" file from \"C:\\\\Program Files\\\\Google\\\\Google Data API SDK\\\\Source\\\\Library\\\\VS2005\\\\unittests\\\\bin\\\\Debug\\\\\".\n9. Run the unit tests you are interested in. Remember that certain tests require parameters be set in unittests.dll.config to work. If you run the stress tests for certain services you may have your test account flagged as generating spam and be unable to programmatically submit content to Google servers without encountering CAPTCHA challenges.\n\nMono\n----\n\nMono is an open source project that allows you to run .NET client and server applications on Linux, Solaris, Mac OS X, Windows, and Unix. We offer a separate ZIP file of our client library for developers who want to work on one of these platforms.\n\n### Setting up your environment\n\n1. Download the latest ZIP file release of the client library from [http://code.google.com/p/google-gdata/downloads/list](//code.google.com/p/google-gdata/downloads/list)\n2. Extract to a local directory (e.g. \"/scratch/gdata.NET\")\n3. Use your distribution's package management to install Mono. Alternatively, you can download it from \u003chttp://www.mono-project.com\u003e.\n4. In some distributions you have to make sure that the nunit.framework.dll file is properly linked into the mono library. If mono was installed to \"/usr/lib/mono\", then ensure that there are symbolic links in \"/usr/lib/mono/1.0\" and \"/usr/lib/mono/2.0\" for nunit.framework.dll (which should be installed in \"/usr/lib/mono/gac/nunit.framework/\\\u003csomeversionstring\\\u003e/nunit.framework.dll\").\n\n### Compiling and running samples\n\n1. Assuming you installed the client library to \"/scratch/gdata.NET\", change to the \"/scratch/gdata.NET/clients/cs\" directory.\n2. Edit the Makefile depending on what version of .NET you wish to use. For .NET 1.x, use `CSC=mcs` and for .NET 2.x, use `CSC=gmcs`.\n3. Run `make` to compile the libraries and sample applications.\n4. Execute `make install` if you want to install the client library DLLs into the Mono library.\n\n### Developing your own application\n\nIf you executed a `make install` after compiling the client library, you should be able to include the libraries in your own code by passing `-r:Google.GData.Extensions.dll -r:Google.GData.Client.dll` to the Mono C# compiler along with references to the DLL files of any specific service extensions you wish to use.\n\n### Running the NUnit tests\n\n1. Copy the unittests.dll.config file from \"/scratch/gdata.NET/clients/cs/src/unittests\" to \"/scratch/gdata.NET/clients/cs/\".\n2. Edit \"/scratch/gdata.NET/clients/cs/unittests.dll.config\" to include the appropriate information for the tests you are running. For example, Base requires an API key and Calendar requires a username and password. I recommend using a test account without any live data to avoid having information deleted by the unit tests.\n3. After compiling the library there will be a unittests.dll file in \"/scratch/gdata.NET/clients/cs\". Use this DLL with your NUnit test manager of choice (nunit-console, gnunit, etc.).\n\n### Conclusion\n\nNow you should be able to compile the libraries and run the sample code. This is only the beginning, however. I encourage you to read through the documentation found in the \".../clients/cs/docs\" directory of the client library.\nYou might also want to check out the [.NET Client Library Developer's Guide](/gdata/client-cs), the [project page](http://code.google.com/p/google-gdata/) and [reference guide](http://google-gdata.googlecode.com/svn/docs/Index.html), and the [Google Data .NET client library forum](http://groups.google.com/group/gdata-dotnet-client-library).\n\nTools referenced in this article:\n\n- [Mono Project](http://www.mono-project.com/Main_Page)\n- [Visual Studio](http://msdn2.microsoft.com/en-us/vstudio/default.aspx)\n- [Visual C# 2008 Express Edition](http://msdn.microsoft.com/en-us/library/orm-9780596521066-01-02.aspx)\n- [NUnit](http://www.nunit.org/)\n\nGood luck on your next .NET application!"]]