جمع جهات الاتصال وإدارتها في Google Chat

يوضّح هذا البرنامج التعليمي كيفية إنشاء تطبيق Google Chat يساعد مستخدمي Google Chat في إدارة جهات الاتصال الشخصية وجهات الاتصال الخاصة بالعمل. لجمع المعلومات، يطلب تطبيق Chat من المستخدمين ملء نموذج اتصال في رسائل البطاقات ومربّعات الحوار.

إليك طريقة عمل تطبيق Chat:

  • نموذج تواصل من أمر يبدأ بشرطة مائلة
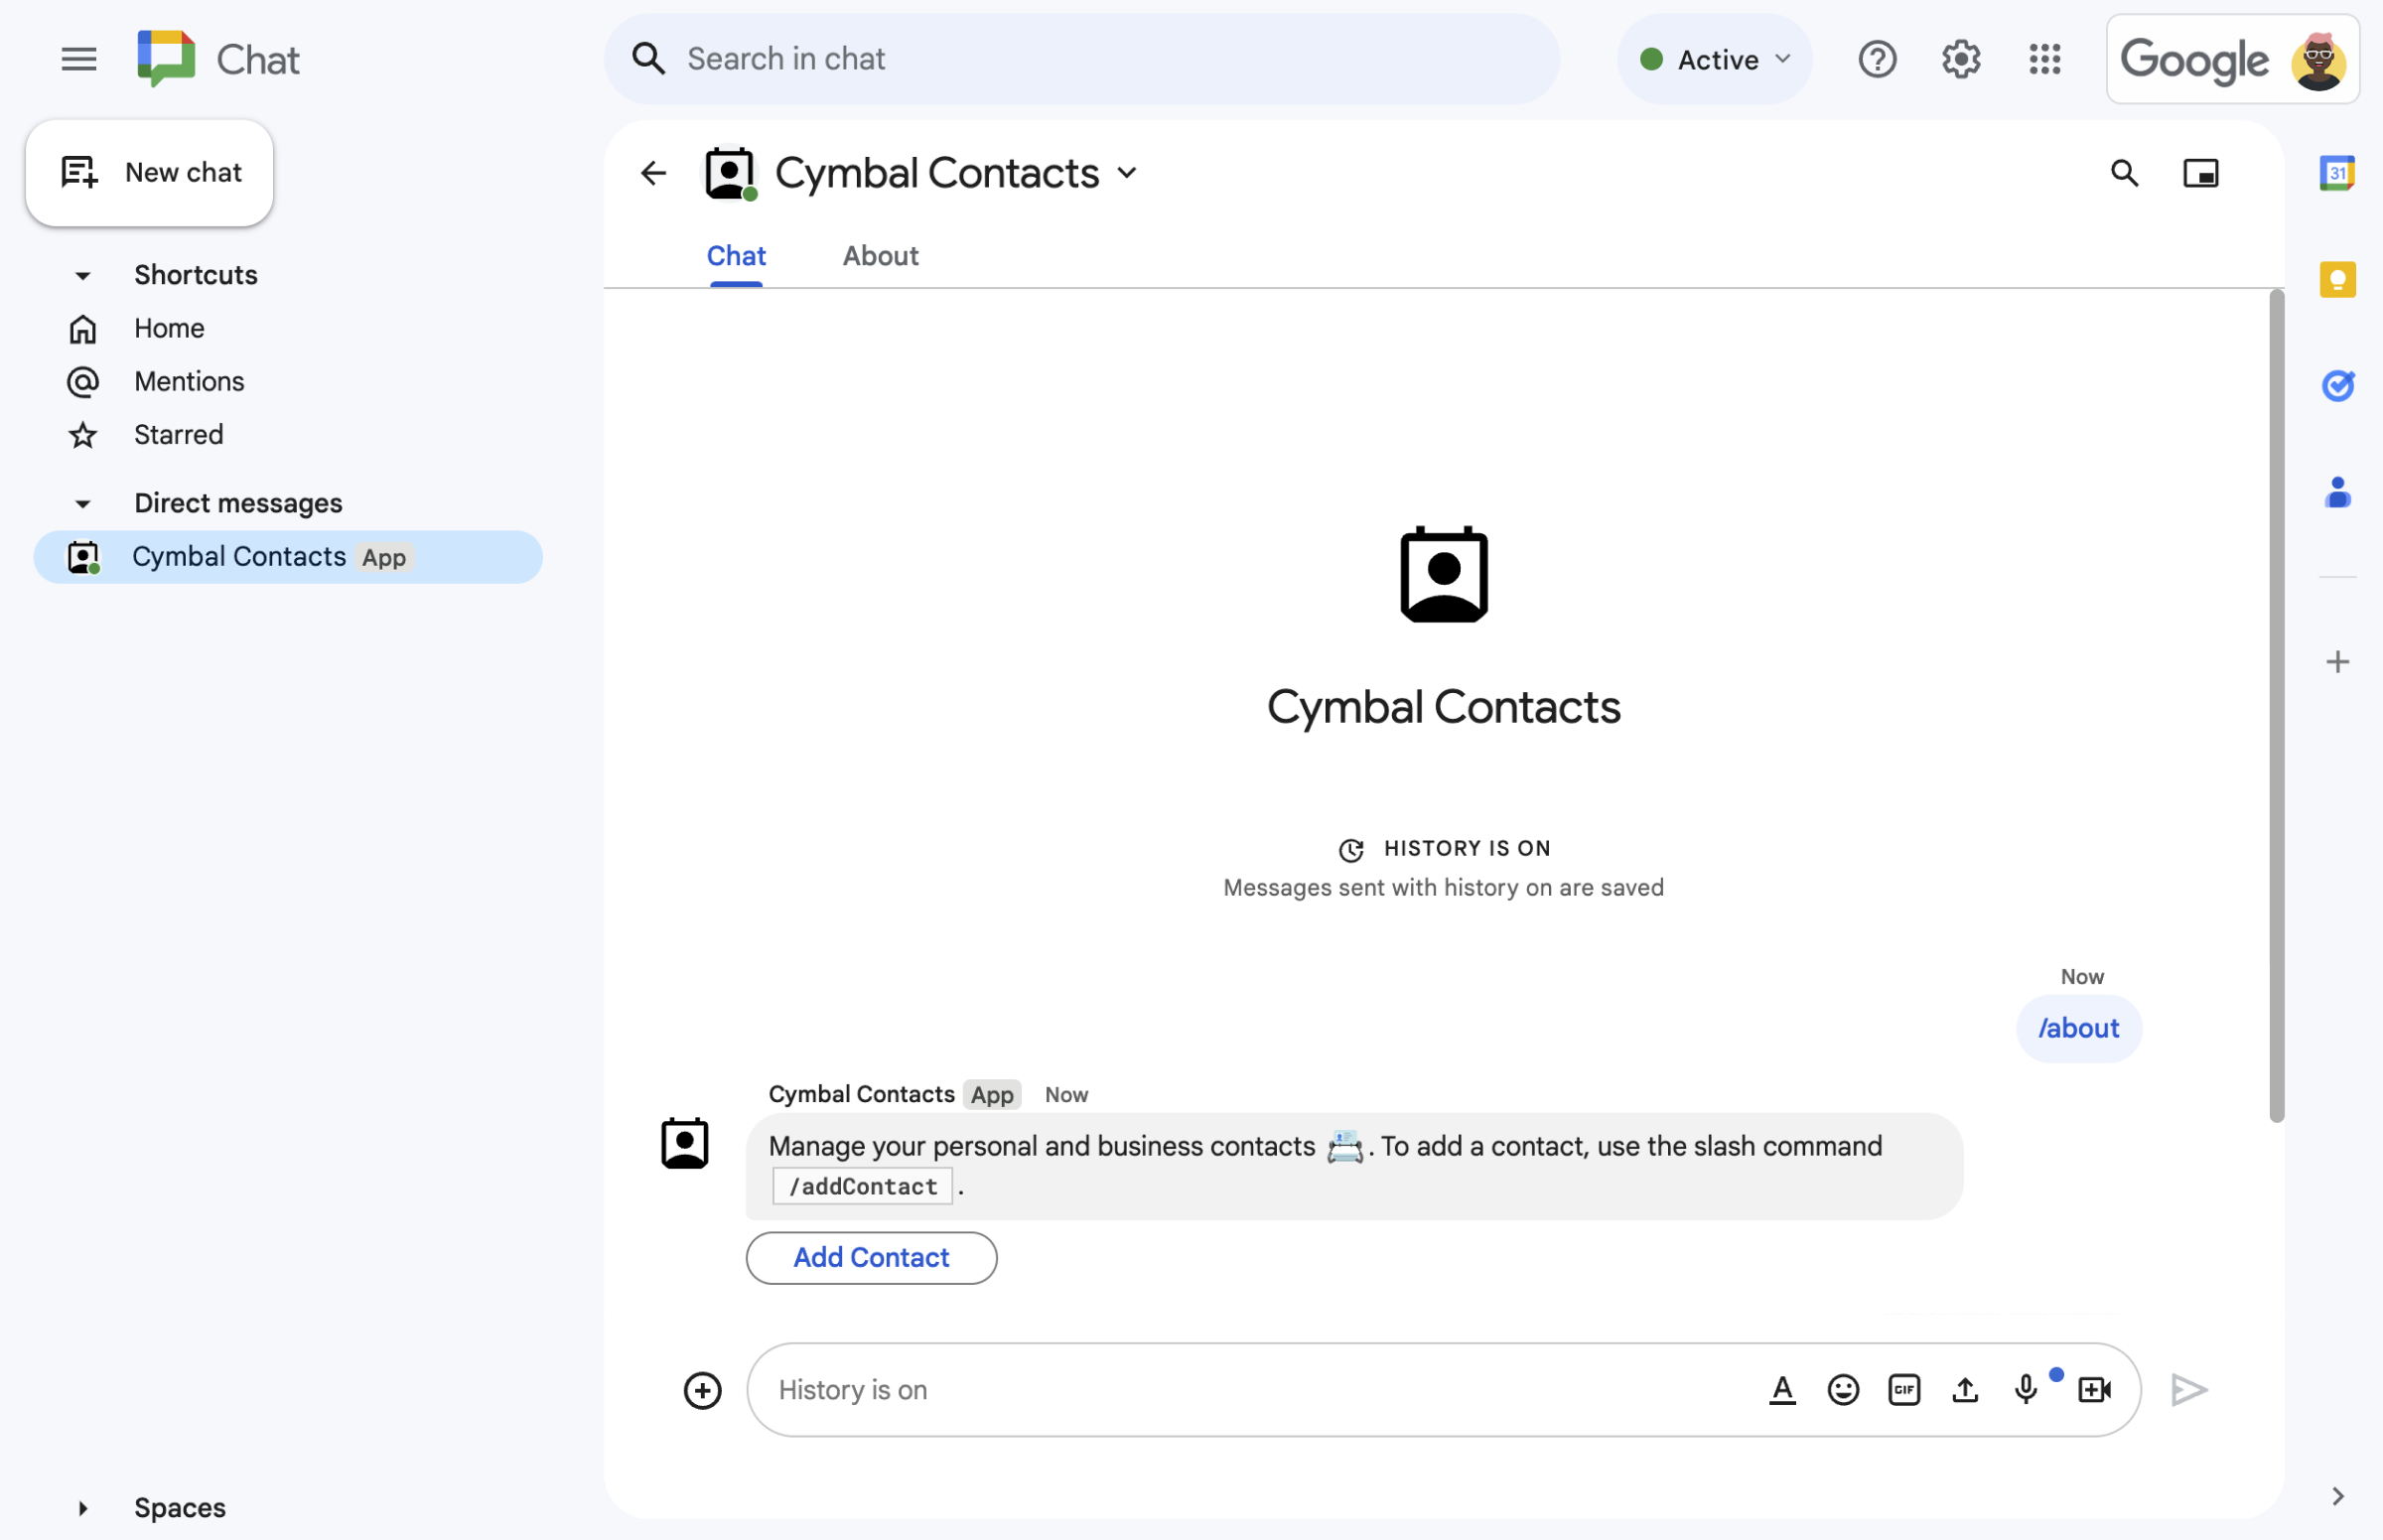
    الشكل 1. يستجيب تطبيق Chat للأمر الذي يبدأ بشرطة مائلة /about برسالة نصية وزر يفتح نموذج جهة الاتصال.
  • نموذج التواصل في مربّع حوار
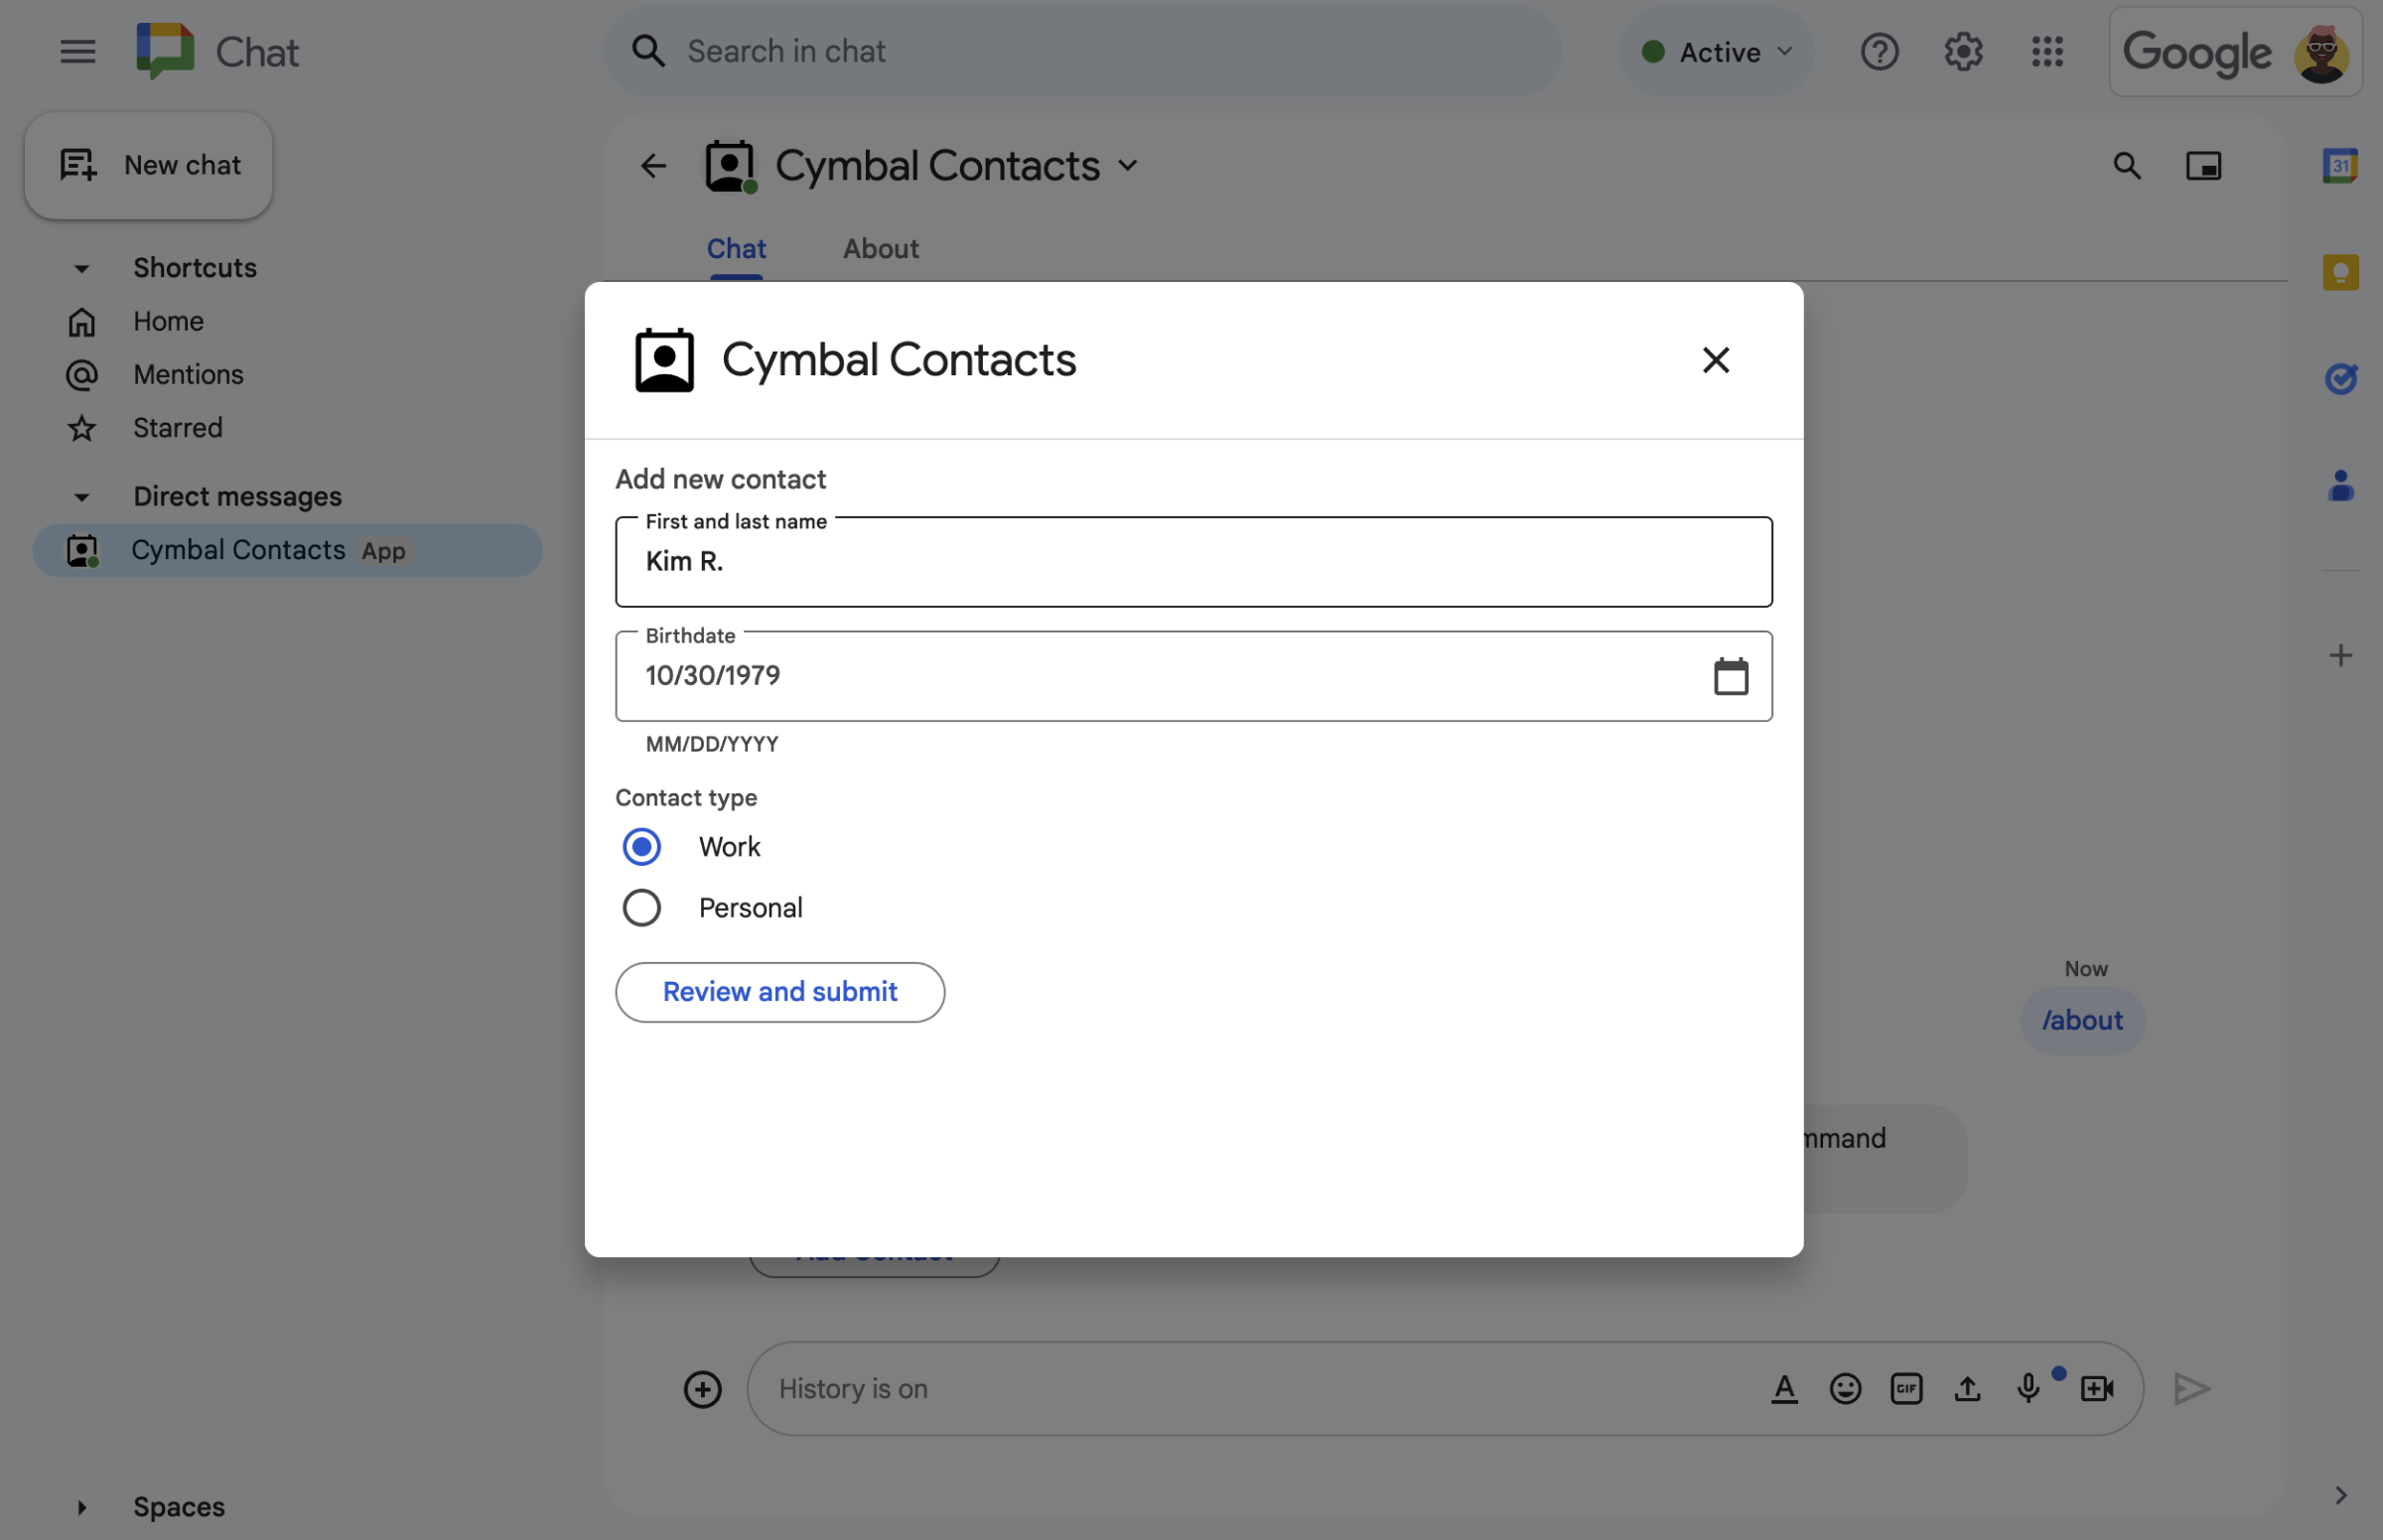
    الشكل 2. يفتح تطبيق Chat مربّع حوار يمكن للمستخدمين إدخال معلومات حول جهة اتصال فيه.
  • مربّع حوار التأكيد والمراجعة
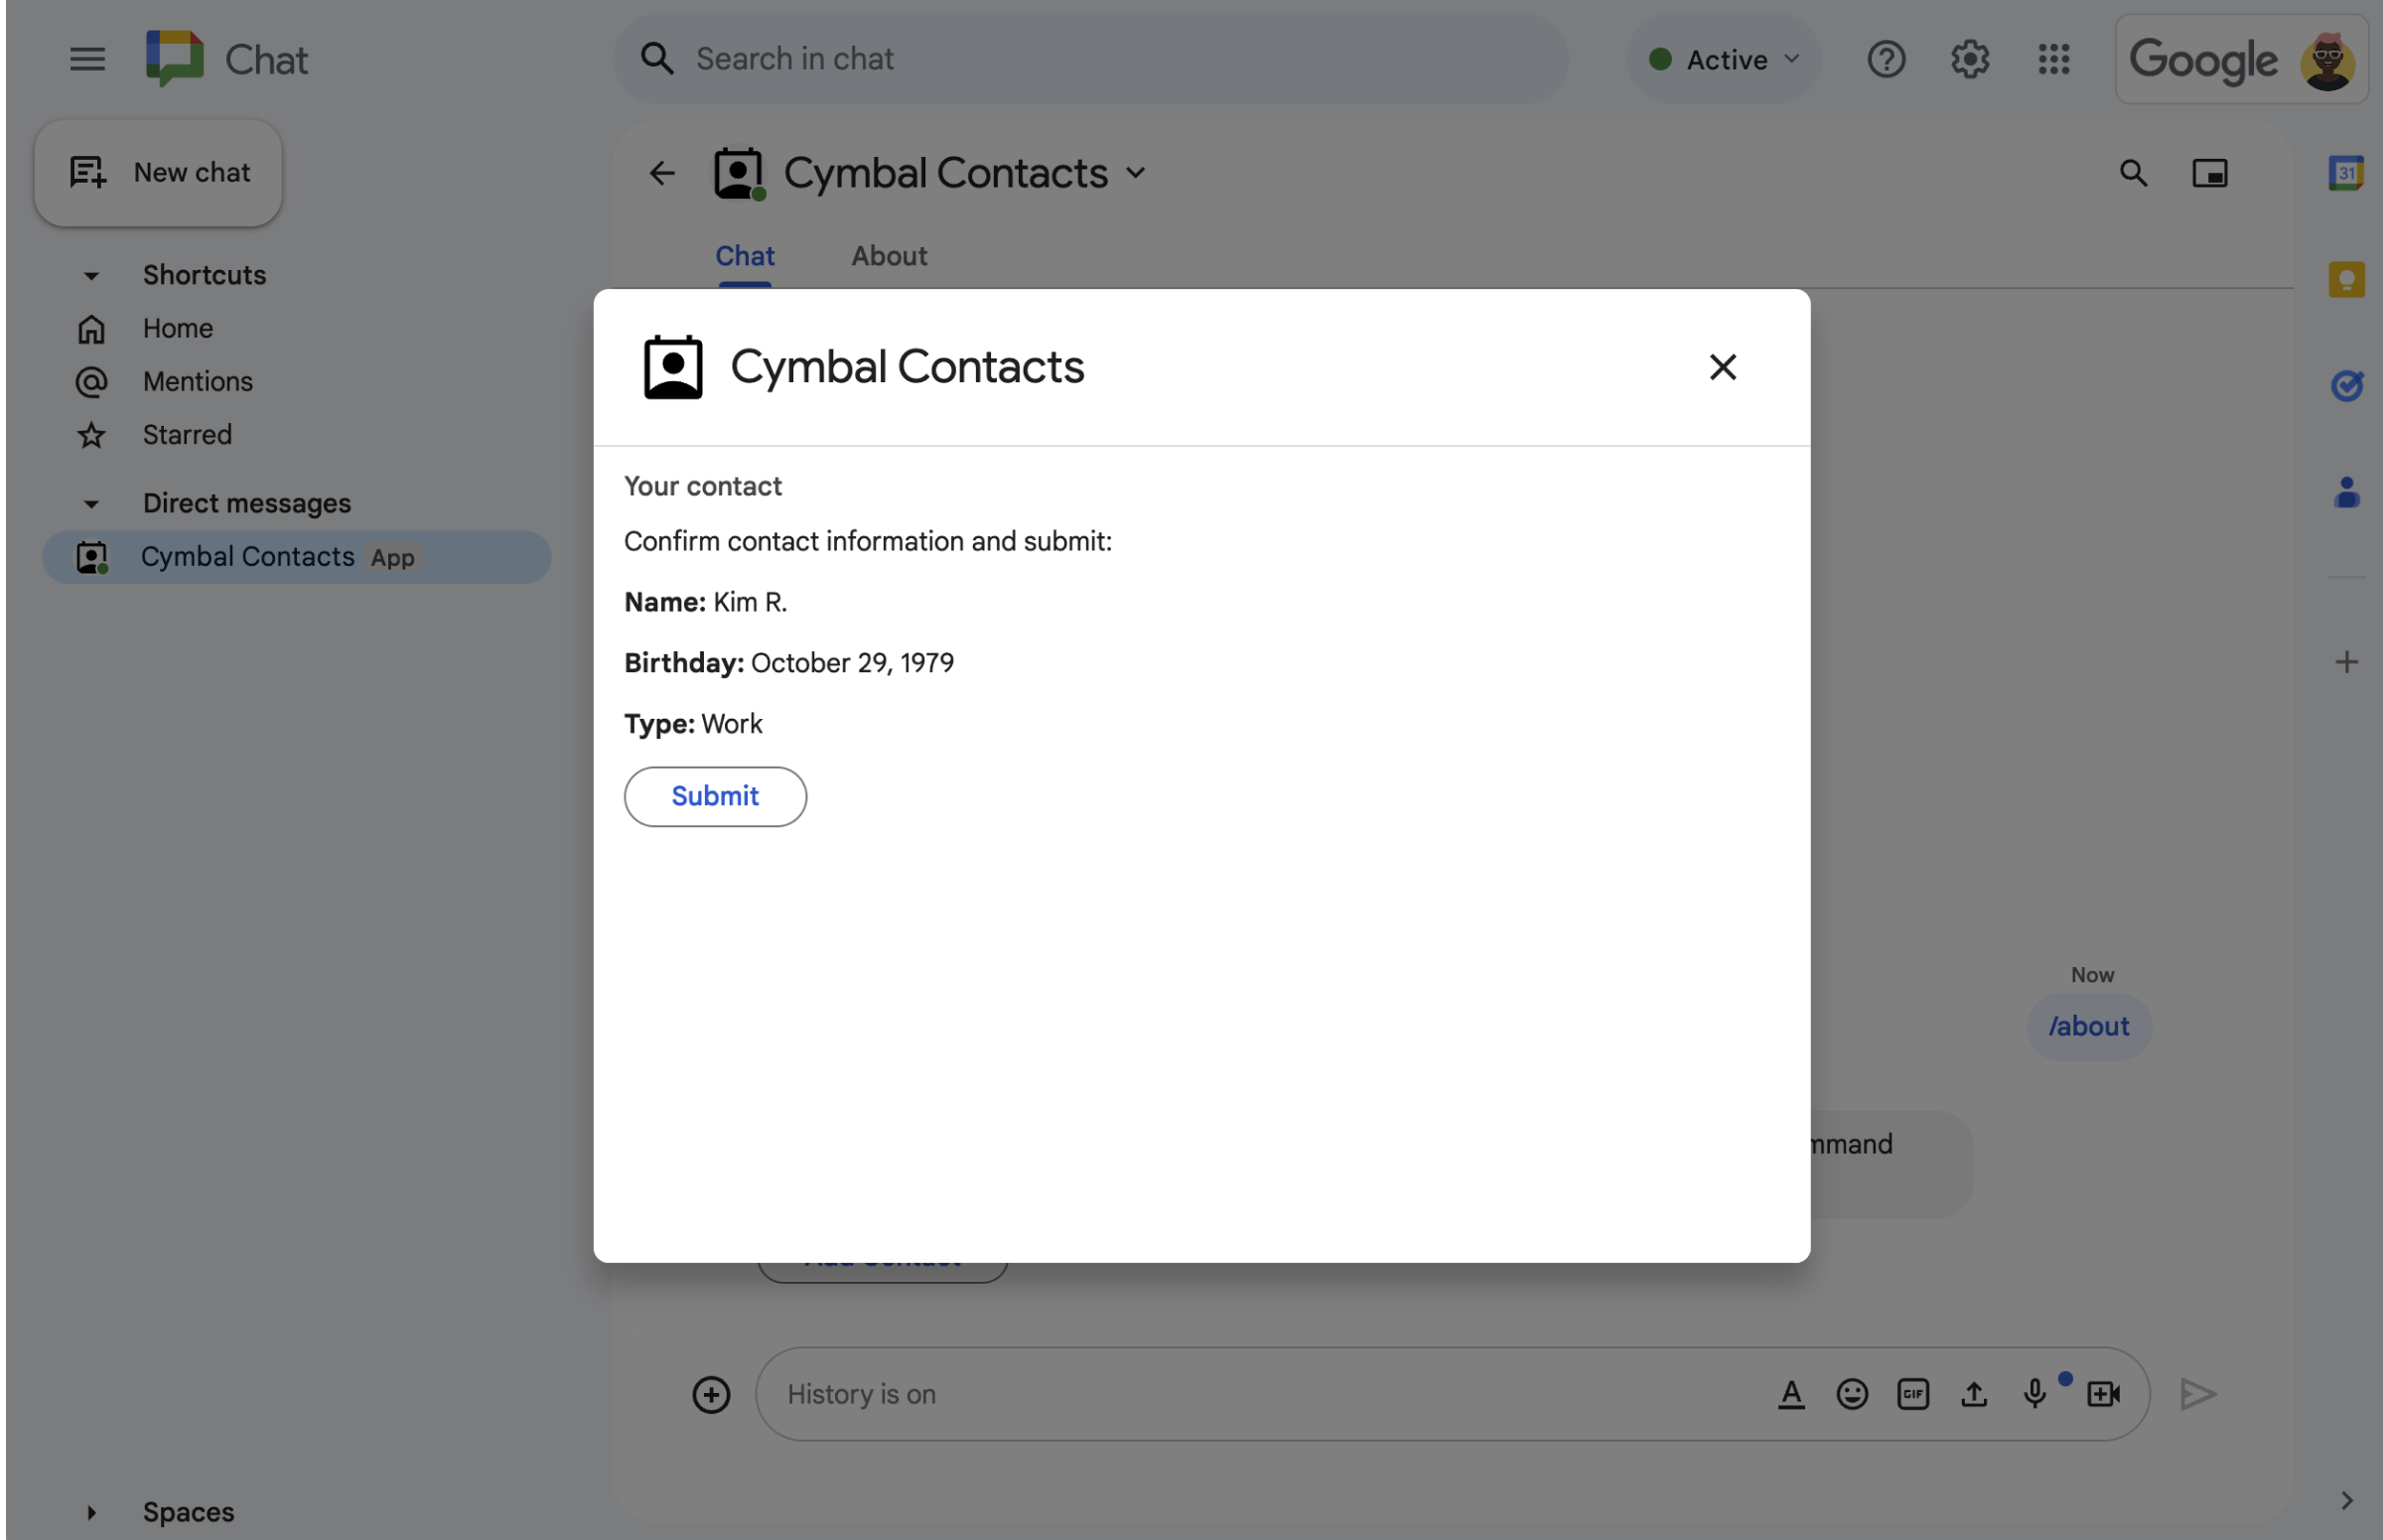
    الشكل 3. يعرض تطبيق Chat مربّع حوار تأكيد ليتمكّن المستخدمون من مراجعة المعلومات وتأكيدها قبل إرسالها.
  • رسالة نصية تؤكّد جهة الاتصال الجديدة
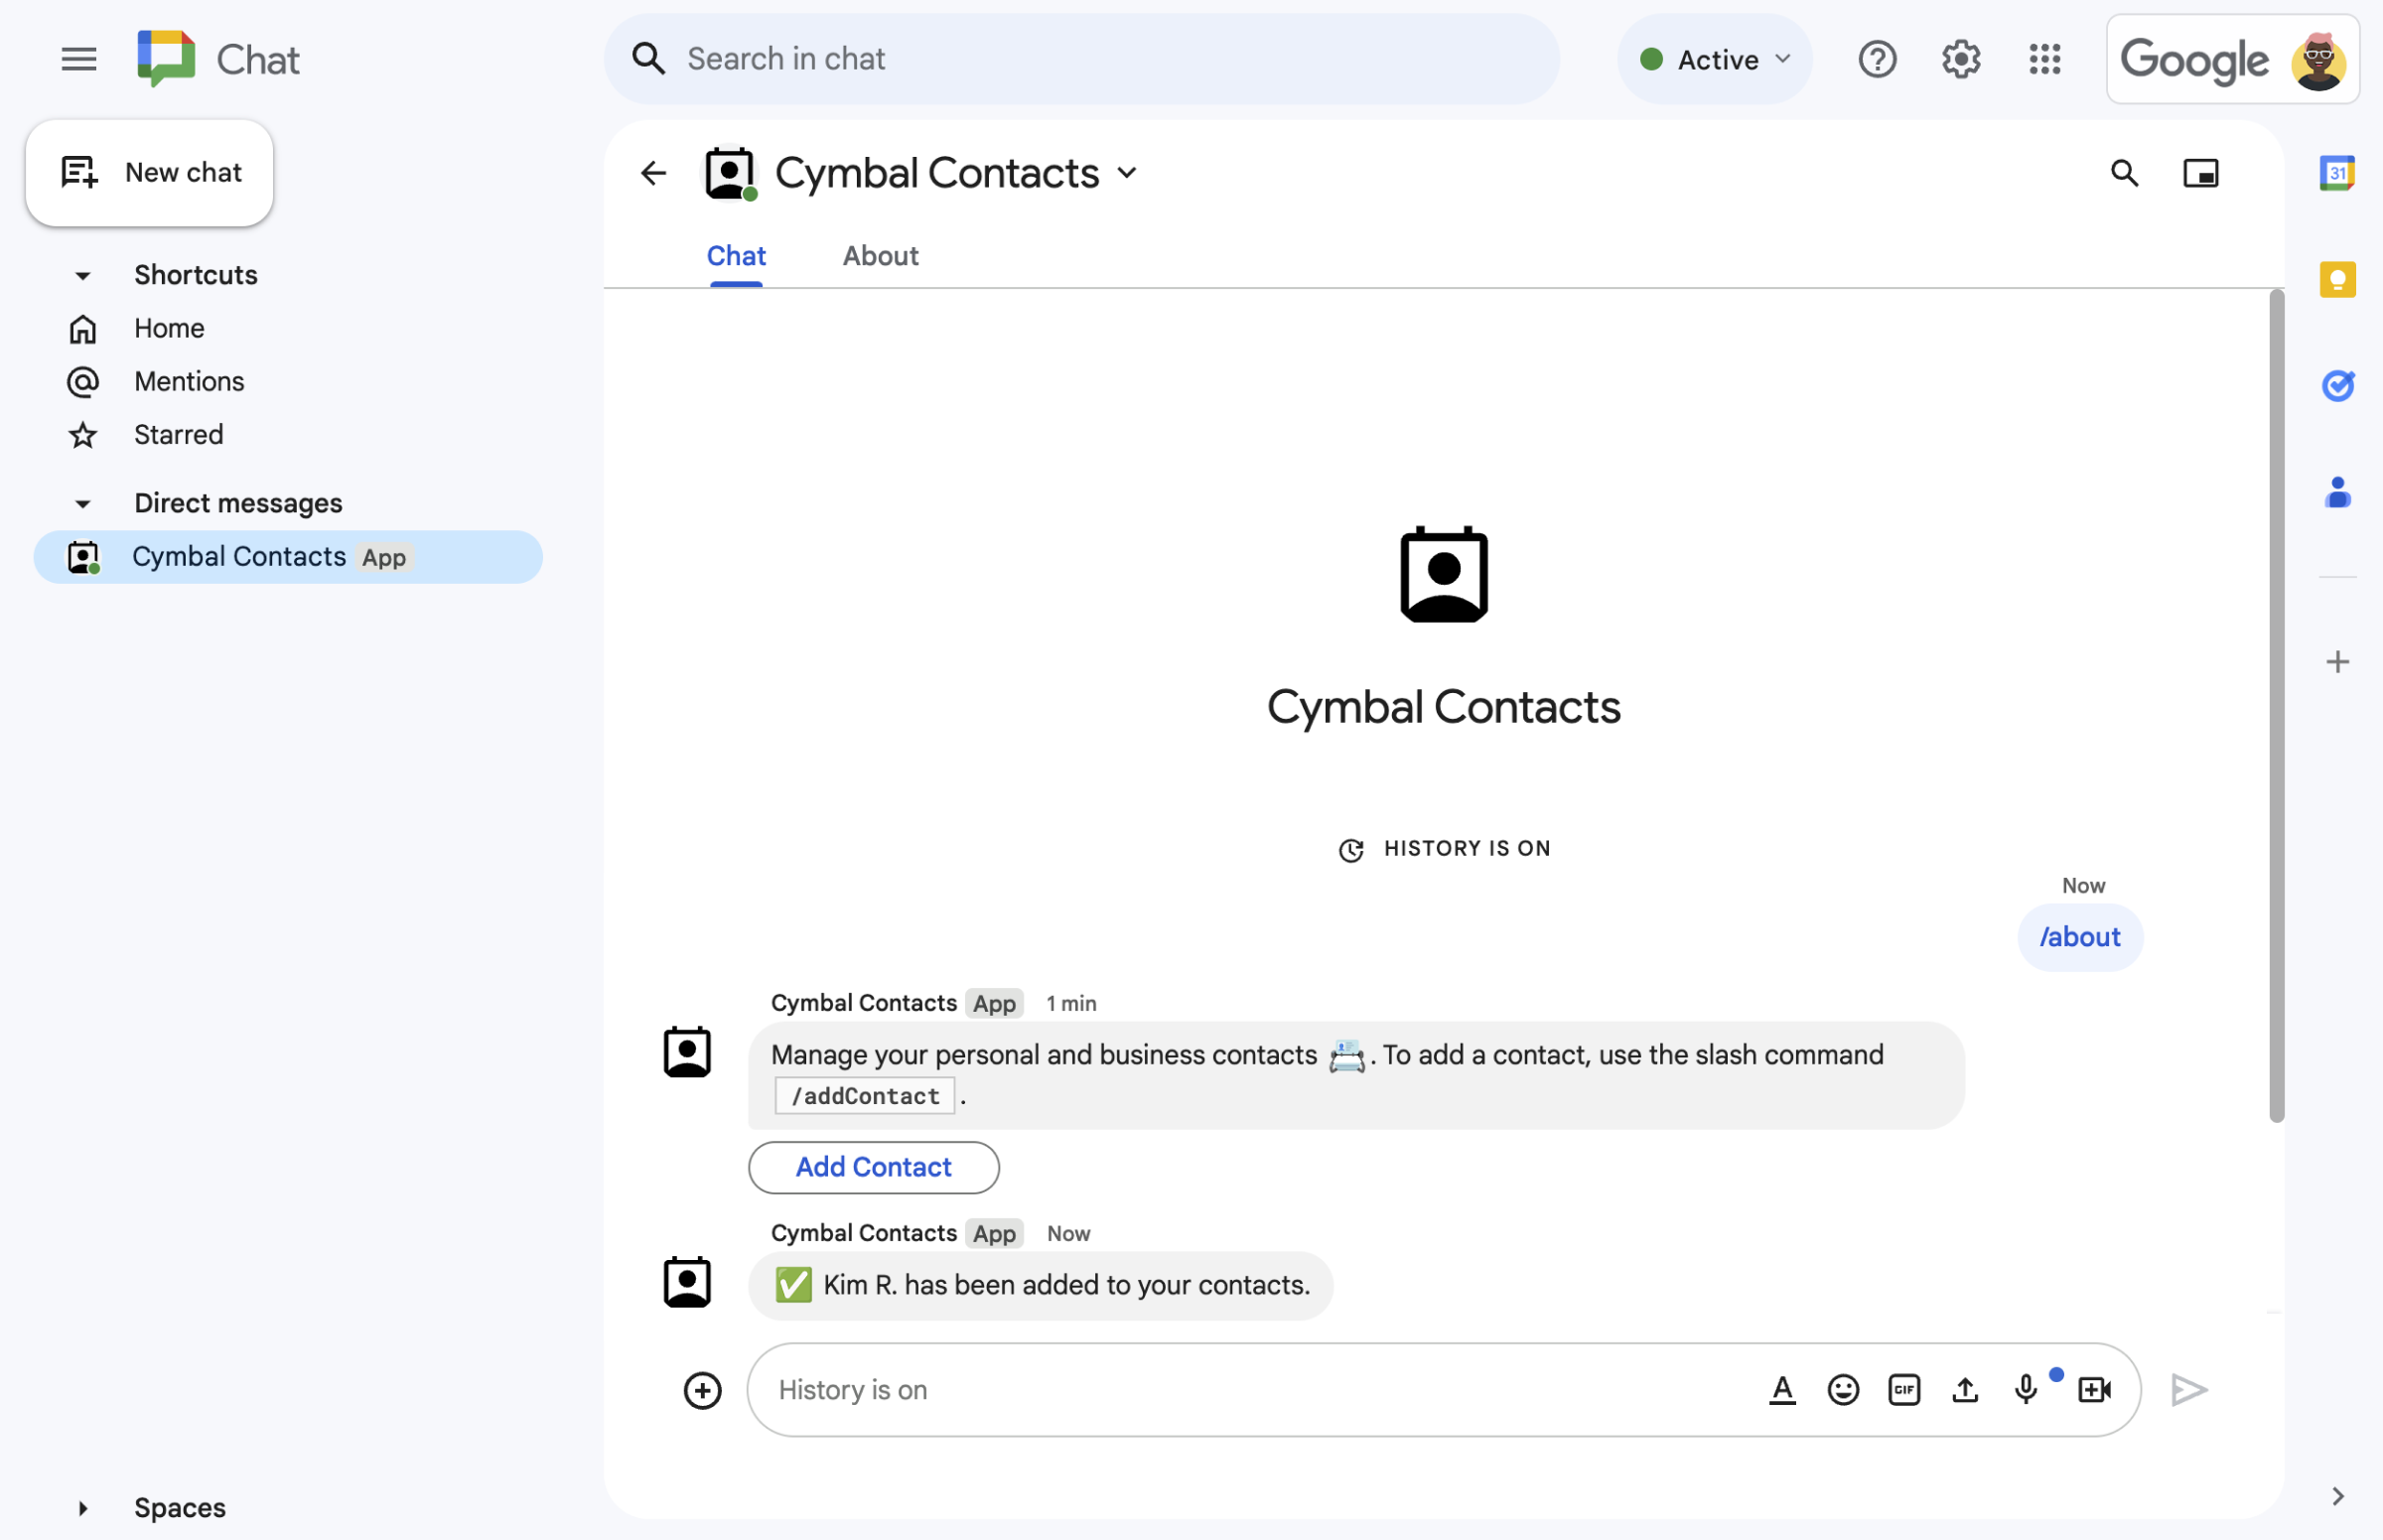
    الشكل 4. بعد أن يرسل المستخدم النموذج، يرسل تطبيق Chat رسالة نصية خاصة لتأكيد عملية الإرسال.
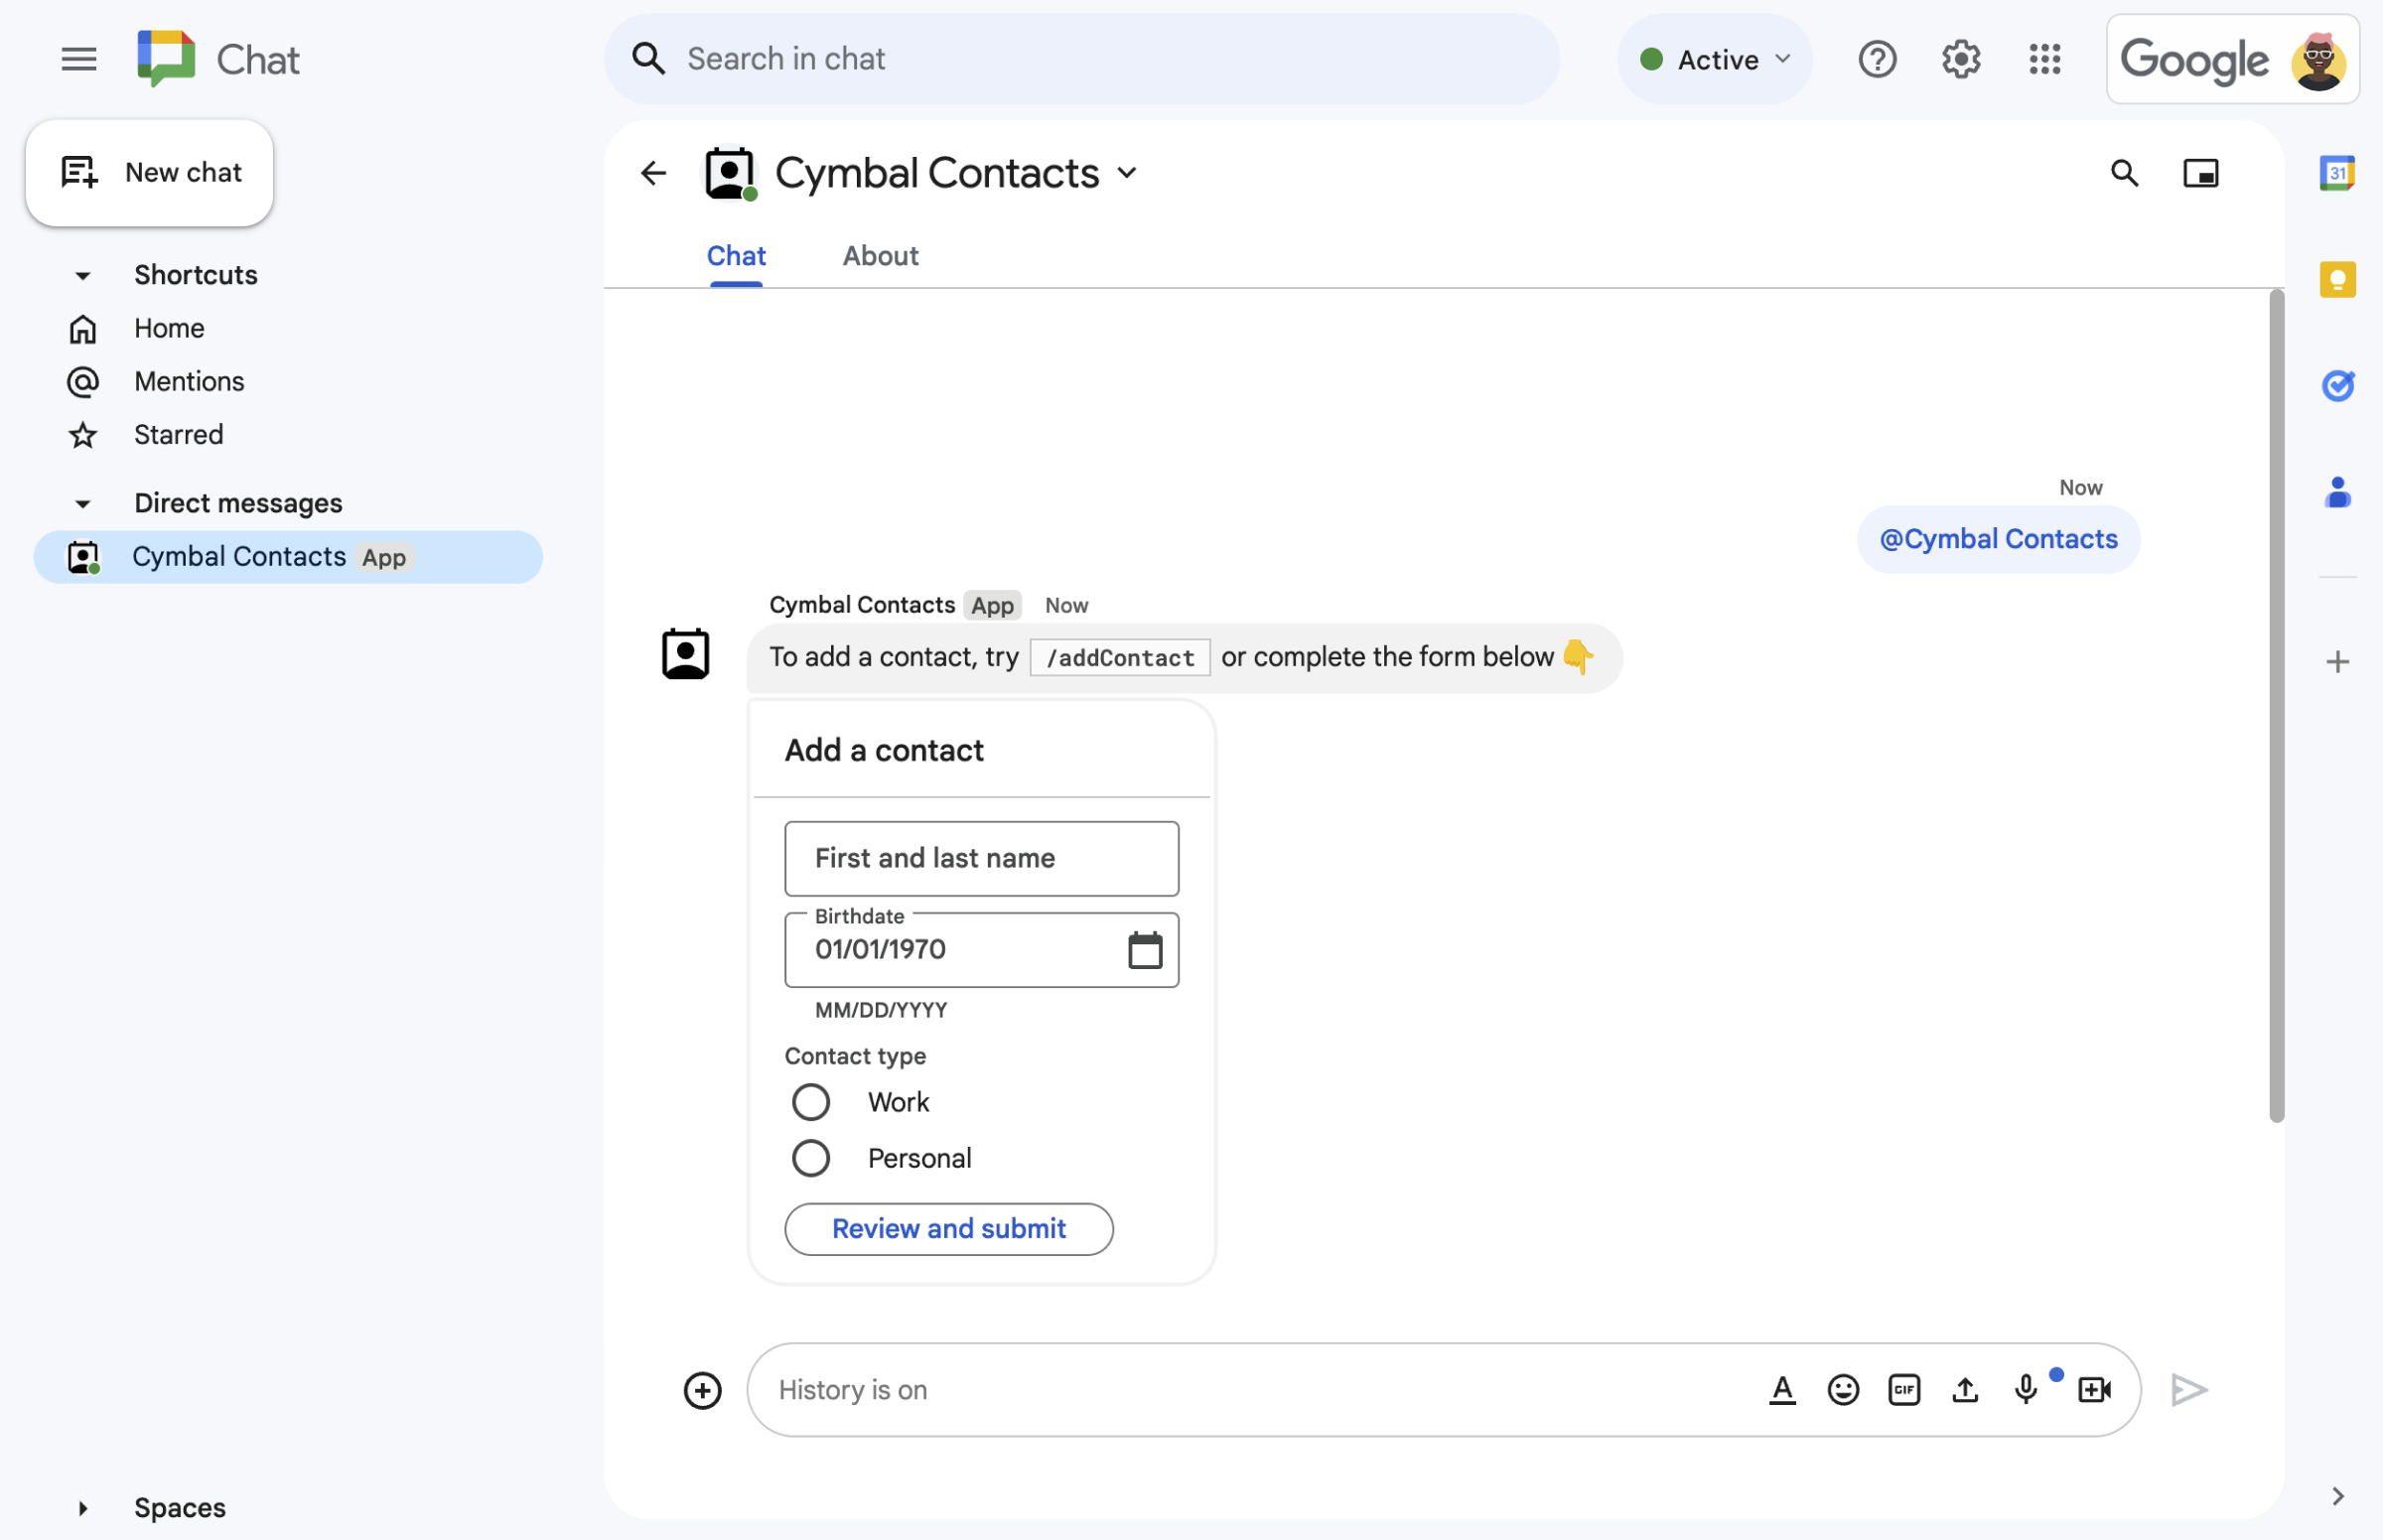
  • نموذج التواصل من رسالة بطاقة
    الشكل 5. يطلب تطبيق Chat أيضًا من المستخدمين إضافة جهة اتصال من بطاقة في رسالة.

المتطلبات الأساسية

الأهداف

الهندسة المعمارية

تم إنشاء تطبيق Chat باستخدام برمجة تطبيقات Google (كإضافة في Google Workspace توسّع نطاق Google Chat)، ويتفاعل مع تفاعلات المستخدمين (onMessage وonAppCommand والنقر على الأزرار التي تستدعي openInitialDialog وopenConfirmationDialog وsubmitForm) لمعالجة طلبات مستخدمي Chat والرد عليها.

يوضّح ما يلي كيف يمكن للمستخدم التفاعل عادةً مع تطبيق Chat:

  1. يفتح مستخدم رسالة مباشرة باستخدام تطبيق Chat، أو يضيف تطبيق Chat إلى مساحة حالية.

  2. يطلب تطبيق Chat من المستخدم إضافة جهة اتصال من خلال إنشاء نموذج تواصل وعرضه ككائن card. لعرض نموذج التواصل، يستجيب تطبيق Chat للمستخدمين بالطرق التالية:

    • يردّ على الإشارات التي تستخدم الرمز "@" والرسائل المباشرة (onMessage) برسالة بطاقة تتضمّن نموذج التواصل.
    • يستجيب للأمر الذي يبدأ بشرطة مائلة /addContact (onAppCommand) من خلال فتح مربّع حوار يتضمّن نموذج معلومات الاتصال.
    • يستجيب للأمر المائل /about (onAppCommand) برسالة نصية تتضمّن زر إضافة جهة اتصال يمكن للمستخدمين النقر عليه لتفعيل openInitialDialog وفتح مربّع حوار يتضمّن نموذج جهة الاتصال.
  3. عندما يظهر نموذج التواصل، يُدخل المستخدم معلومات الاتصال في الحقول وعناصر واجهة المستخدم التالية:

    • الاسم الأول واسم العائلة: أداة textInput تقبل السلاسل.
    • تاريخ الميلاد: هو dateTimePicker تطبيق مصغّر يقبل التواريخ فقط.
    • نوع جهة الاتصال: عنصر واجهة مستخدم selectionInput يتضمّن أزرار اختيار تتيح للمستخدمين اختيار قيمة سلسلة واحدة وإرسالها (إما Personal أو Work).
    • زر المراجعة والإرسال: هو عبارة عن buttonList مصفوفة تتضمّن أداة button ينقر عليها المستخدم لإرسال القيم التي أدخلها.
  4. يستدعي تطبيق Google Chat الدالة openConfirmationDialog لمعالجة القيم التي يدخلها المستخدم، ويعرض القيم في بطاقة تأكيد.

  5. يراجع المستخدم بطاقة التأكيد وينقر على الزر إرسال لتفعيل submitForm وإكمال معلومات الاتصال.

  6. سيرسل تطبيق Google Chat رسالة نصية خاصة تؤكّد عملية الإرسال.

تجهيز البيئة

يوضّح هذا القسم كيفية إعداد مشروع على Google Cloud لتطبيق Chat.

فتح مشروعك على السحابة الإلكترونية في "وحدة تحكّم Google API"

افتح مشروع على السحابة الإلكترونية الذي تريد استخدامه لهذا النموذج إذا لم يكن مفتوحًا من قبل:

  1. في Google API Console، انتقِل إلى صفحة اختيار مشروع.

    اختيار مشروع على السحابة الإلكترونية

  2. اختَر مشروع Google Cloud الذي تريد استخدامه. يمكنك أيضًا النقر على إنشاء مشروع واتّباع التعليمات الظاهرة على الشاشة. في حال إنشاء مشروع على Google Cloud، قد تحتاج إلى تفعيل الفوترة للمشروع.

إعداد المصادقة والتفويض

تتطلّب تطبيقات Google Chat إعداد شاشة طلب الموافقة المتعلّقة ببروتوكول OAuth ليتمكّن المستخدمون من منح الإذن لتطبيقك في تطبيقات Google Workspace، بما في ذلك Google Chat.

في هذا البرنامج التعليمي، ستنشئ تطبيق Chat مخصّصًا للاختبار والاستخدام الداخلي فقط، لذا لا بأس من استخدام معلومات العنصر النائب لشاشة طلب الموافقة. قبل نشر تطبيق Chat، عليك استبدال أي معلومات نائبة بمعلومات حقيقية.

  1. في Google API Console، انتقِل إلى "القائمة" > منصة Google Auth > العلامة التجارية.

    الانتقال إلى "هوية العلامة التجارية"

  2. إذا سبق لك ضبط منصة Google Auth، يمكنك ضبط إعدادات شاشة طلب الموافقة المتعلّقة ببروتوكول OAuth التالية في العلامة التجارية والجمهور والوصول إلى البيانات. إذا ظهرت لك الرسالة لم يتم إعداد منصة Google Auth بعد، انقر على البدء:

    1. ضمن معلومات التطبيق، في اسم التطبيق، اكتب Contact Manager.
    2. في حقل البريد الإلكتروني لدعم المستخدمين، اختَر عنوان بريدك الإلكتروني أو مجموعة Google مناسبة.
    3. انقر على التالي.
    4. ضمن الجمهور، اختَر داخلي. إذا لم تتمكّن من اختيار داخلي، اختَر خارجي.
    5. انقر على التالي.
    6. ضمن معلومات الاتصال، أدخِل عنوان بريد إلكتروني يمكنك تلقّي إشعارات عليه بشأن أي تغييرات تطرأ على مشروعك.
    7. انقر على التالي.
    8. ضمن إنهاء، راجِع سياسة بيانات المستخدمين في خدمات Google API، ثم ضَع علامة في المربّع أوافق على "سياسة بيانات المستخدمين في خدمات Google API" إذا كنت موافقًا.
    9. انقر على متابعة.
    10. انقر على إنشاء.
    11. إذا اخترت خارجي لنوع المستخدم، أضِف مستخدمين اختباريين:
      1. انقر على الجمهور.
      2. ضمن المستخدمون التجريبيون، انقر على إضافة مستخدمين.
      3. أدخِل عنوان بريدك الإلكتروني وأي مستخدمين آخرين معتمَدين للاختبار، ثم انقر على حفظ.

إنشاء تطبيق Chat ونشره

في القسم التالي، يمكنك إنشاء مشروع في برمجة تطبيقات وتعديله باستخدام الرمز البرمجي للتطبيق (Code.gs وappsscript.json) لتطبيق Chat.

يمكنك اختياريًا الاطّلاع على المشروع بأكمله على GitHub.

عرض على GitHub

في ما يلي نظرة عامة على كل ملف:

Code.gs

تتعامل هذه الحزمة مع جميع منطق التطبيق، بما في ذلك تفاعلات المستخدم (onMessage وonAppCommand وopenInitialDialog وopenConfirmationDialog وsubmitForm) وعناصر واجهة المستخدم الخاصة بإدخال النماذج المعروضة في البطاقات ضمن الرسائل ومربّعات الحوار.

عرض رمز واحد (Code.gs)

apps-script/chat/contact-form-app/Code.gs
/**
 * Copyright 2025 Google LLC
 *
 * Licensed under the Apache License, Version 2.0 (the "License");
 * you may not use this file except in compliance with the License.
 * You may obtain a copy of the License at
 *
 * http://www.apache.org/licenses/LICENSE-2.0
 *
 * Unless required by applicable law or agreed to in writing, software
 * distributed under the License is distributed on an "AS IS" BASIS,
 * WITHOUT WARRANTIES OR CONDITIONS OF ANY KIND, either express or implied.
 * See the License for the specific language governing permissions and
 * limitations under the License.
 */

/**
 * Responds to a message in Google Chat.
 *
 * @param {Object} event The event object from the Google Workspace add-on.
 * @return {Object} response that handles dialogs.
 */
function onMessage(event) {
  // Reply with a message that contains a button to open the initial dialog
  return { hostAppDataAction: { chatDataAction: { createMessageAction: { message: {
    text: "To add a contact, use the `ADD CONTACT` button below.",
    accessoryWidgets: [
      { buttonList: { buttons: [{
        text: "ADD CONTACT",
        onClick: { action: {
          function: "openInitialDialog",
          interaction: "OPEN_DIALOG"
        }}
      }]}}
    ]
  }}}}};
}

/**
 * Opens the initial step of the dialog that lets users add contact details.
 *
 * @param {Object} event The event object from the Google Workspace add-on.
 * @return {Object} open the dialog.
 */
function openInitialDialog(event) {
  return { action: { navigations: [{ pushCard: { sections: [{ widgets: [
    { textInput: {
      name: "contactName",
      label: "First and last name",
      type: "SINGLE_LINE"
    }},
    { dateTimePicker: {
      name: "contactBirthdate",
      label: "Birthdate",
      type: "DATE_ONLY"
    }},
    { selectionInput: {
      name: "contactType",
      label: "Contact type",
      type: "RADIO_BUTTON",
      items: [
        { text: "Work", value: "Work", selected: false },
        { text: "Personal", value: "Personal", selected: false }
      ]
    }},
    { buttonList: { buttons: [{
      text: "NEXT",
      onClick: { action: { function : "openConfirmationDialog" }}
    }]}}
  ]}]}}]}};
}

/**
 * Opens the second step of the dialog that lets users confirm details.
 *
 * @param {Object} event The event object from the Google Workspace add-on.
 * @return {Object} update the dialog.
 */
function openConfirmationDialog(event) {
  // Retrieve the form input values
  const name = event.commonEventObject.formInputs["contactName"].stringInputs.value[0];
  const birthdate = event.commonEventObject.formInputs["contactBirthdate"].dateInput.msSinceEpoch;
  const type = event.commonEventObject.formInputs["contactType"].stringInputs.value[0];
  // Display the input values for confirmation
  return { action: { navigations: [{ pushCard: { sections: [{ widgets: [
    { textParagraph: { text: "Confirm contact information and submit:" }},
    { textParagraph: { text: "<b>Name:</b> " + name }},
    { textParagraph: { text: "<b>Birthday:</b> " + new Date(birthdate) }},
    { textParagraph: { text: "<b>Type:</b> " + type }},
    { buttonList: { buttons: [{
      text: "SUBMIT",
      onClick: { action: {
        function: "submitDialog",
        // Pass input values as parameters for last dialog step (submission)
        parameters: [
          { key: "contactName", value: name },
          { key: "contactBirthdate", value: birthdate },
          { key: "contactType", value: type }
        ]
      }}
    }]}}
  ]}]}}]}};
}

/**
 * Handles submission and closes the dialog.
 *
 * @param {Object} event The event object from the Google Workspace add-on.
 * @return {Object} close the dialog with a status in text notification or message.
 */
function submitDialog(event) {
  // Validate the parameters.
  if (!event.commonEventObject.parameters["contactName"]) {
    return { action: {
      navigations: [{ endNavigation: { action: "CLOSE_DIALOG"}}],
      notification: { text: "Failure, the contact name was missing!" }
    }};
  }

  return { hostAppDataAction: { chatDataAction: { createMessageAction: { message: {
    text: "✅ " + event.commonEventObject.parameters["contactName"] + " has been added to your contacts."
  }}}}};
}
appsscript.json

بيان &quot;برمجة تطبيقات Google&quot; الذي يحدّد مشروع &quot;برمجة تطبيقات Google&quot; ويضبطه لتطبيق Chat

عرض رمز واحد (appsscript.json)

apps-script/chat/contact-form-app/appsscript.json
{
  "timeZone": "America/Los_Angeles",
  "dependencies": {},
  "exceptionLogging": "STACKDRIVER",
  "runtimeVersion": "V8",
  "addOns": {
    "common": {
      "name": "Contact Form app",
      "logoUrl": "https://developers.google.com/workspace/add-ons/images/contact-icon.png"
    },
    "chat": {}
  }
}

إنشاء مشروع "برمجة تطبيقات Google"

لإنشاء مشروع في "برمجة تطبيقات Google" من الملفين Code.gs وappsscript.json، اتّبِع الخطوات التالية:

  1. انتقِل إلى برمجة تطبيقات Google وانقر على مشروع جديد.
  2. أدخِل اسمًا لمشروعك في "برمجة تطبيقات Google":

    1. انقر على مشروع بلا عنوان.

    2. في عنوان المشروع، اكتب Contact Manager - Google Chat app.

    3. انقر على إعادة تسمية.

  3. استبدِل محتوى Code.gs بنموذج الرمز Code.gs أعلاه.

  4. انقر على إعدادات المشروع رمز إعدادات المشروع واختَر عرض ملف البيان "appsscript.json" في المحرّر.

  5. ارجع إلى المحرّر واستبدِل محتوى appsscript.json برمز بيان appsscript.json أعلاه، ثم احفظ مشروعك.

في المستقبل، إذا أردت استخدام Google APIs معيّنة أو نشر تطبيقك، عليك ربط مشروعك على السحابة الإلكترونية بمشروعك على "برمجة التطبيقات". ليس عليك إجراء ذلك في هذا الدليل. لمزيد من المعلومات، راجِع دليل مشاريع Google Cloud.

إنشاء عملية تفعيل في "برمجة تطبيقات Google"

بعد الانتهاء من إعداد الرمز البرمجي، يمكنك نشر مشروع &quot;برمجة تطبيقات Google&quot;. يتم استخدام معرّف النشر عند ضبط تطبيق Chat في Google Cloud.

  1. في برمجة تطبيقات، افتح مشروع تطبيق Chat.

    الانتقال إلى برمجة تطبيقات

  2. انقر على نشر > عملية نشر جديدة.

  3. إذا لم يكن خيار إضافة محدّدًا، انقر على أنواع النشر رمز إعدادات المشروع بجانب اختيار النوع، ثم اختَر إضافة.

  4. في الوصف، أدخِل وصفًا لهذا الإصدار، مثل Test of Contact Manager.

  5. انقر على نشر. تسجّل "برمجة التطبيقات" عملية النشر الناجحة وتوفّر رقم تعريف عملية النشر.

  6. انقر على نسخ لنسخ رقم تعريف عملية النشر، ثم انقر على تم.

ضبط تطبيق Chat في "وحدة تحكّم Google API"

يوضّح هذا القسم كيفية ضبط Google Chat API في &quot;وحدة تحكّم Google API&quot; باستخدام معلومات عن تطبيق Chat، بما في ذلك معرّف عملية النشر التي أنشأتها للتو من مشروع برمجة تطبيقات.

  1. في Google API Console، انقر على القائمة > واجهات برمجة التطبيقات والخدمات > واجهات برمجة التطبيقات والخدمات المفعَّلة > Google Chat API > الإعدادات.

    الانتقال إلى إعدادات Chat API

  2. في حقل اسم التطبيق، اكتب Contact Manager.

  3. في عنوان URL الخاص بالأفاتار، اكتب https://developers.google.com/chat/images/contact-icon.png.

  4. في حقل الوصف، اكتب Manage your personal and business contacts.

  5. انقر على مفتاح التبديل تفعيل الميزات التفاعلية لتفعيل هذا الإعداد.

  6. ضمن الوظائف، اختَر الانضمام إلى المساحات والمحادثات الجماعية.

  7. ضِمن إعدادات الربط، اختَر Apps Script.

  8. في حقل معرّف النشر، الصِق معرّف نشر &quot;برمجة تطبيقات Google&quot; الذي نسخته في القسم السابق عند إنشاء عملية نشر &quot;برمجة تطبيقات Google&quot;.

  9. ضمن المشغّلات، اضبط الدوال التي تستجيب لتفاعلات المستخدمين:

    • بالنسبة إلى مشغّل الرسالة، أدخِل onMessage.
    • بالنسبة إلى مشغّل أمر التطبيق، أدخِل onAppCommand.
  10. ضمن الأوامر، اضبط الأوامر التي تبدأ بشرطة مائلة /about و/addContact:

    1. انقر على إضافة أمر لإعداد الأمر الأول الذي يبدأ بشرطة مائلة.
    2. في معرّف الأمر، اكتب 1.
    3. في حقل الوصف، اكتب Learn how to use this Chat app to manage your contacts.
    4. ضمن نوع الأمر، اختَر Slash command.
    5. في اسم الأمر الذي يبدأ بشرطة مائلة، اكتب /about.
    6. انقر على تم.
    7. انقر على إضافة أمر يبدأ بشرطة مائلة لإعداد أمر آخر يبدأ بشرطة مائلة.
    8. في معرّف الأمر، اكتب 2.
    9. في حقل الوصف، اكتب Submit information about a contact.
    10. ضمن نوع الأمر، اختَر Slash command.
    11. في اسم الأمر الذي يبدأ بشرطة مائلة، اكتب /addContact.
    12. اختَر يفتح مربّع حوار.
    13. انقر على تم.
  11. ضمن إذن الوصول، ضَع علامة في مربّع الاختيار إتاحة تطبيق Chat هذا لمستخدمين ومجموعات محدّدين في YOUR DOMAIN وأدخِل عنوان بريدك الإلكتروني.

  12. ضمن السجلات، اختَر تسجيل الأخطاء في خدمة "التسجيل".

  13. انقر على حفظ. ستظهر رسالة "تم حفظ الإعدادات".

تطبيق Chat جاهز للتثبيت والاختبار في Chat.

اختبار تطبيق Chat

لاختبار تطبيق Chat، افتح مساحة رسالة مباشرة باستخدام تطبيق Chat وأرسِل رسالة:

  1. افتح Google Chat باستخدام حساب Google Workspace الذي قدّمته عند إضافة نفسك كمختبِر موثوق به.

    الانتقال إلى Google Chat

  2. انقر على محادثة جديدة.
  3. في حقل إضافة مستخدم واحد أو أكثر، اكتب اسم تطبيق Chat.
  4. اختَر تطبيق Chat من النتائج. سيتم فتح رسالة مباشرة.

  1. في الرسالة المباشرة الجديدة مع تطبيق Chat، اكتب /addContact واضغط على Enter.

  2. في مربّع الحوار الذي يفتح، أدخِل معلومات الاتصال:

    1. في حقل النص الاسم الأول واسم العائلة، أدخِل اسمًا.
    2. في أداة اختيار التاريخ تاريخ الميلاد، اختَر تاريخًا.
    3. ضمن نوع جهة الاتصال، انقر على زر الاختيار العمل أو شخصي.
  3. انقر على المراجعة والإرسال.

  4. في مربّع حوار التأكيد، راجِع المعلومات التي أرسلتها وانقر على إرسال. يرد تطبيق Chat برسالة نصية تقول ✅ CONTACT NAME has been added to your contacts..

  5. يمكنك أيضًا اختياريًا اختبار نموذج التواصل وإرساله بالطرق التالية:

    • استخدِم الأمر /about الذي يبدأ بشرطة مائلة. يرد تطبيق المحادثة برسالة نصية وزر أداة ملحقة مكتوب عليه Add a contact. يمكنك النقر على الزرّ لفتح مربّع حوار يتضمّن نموذج تواصل.
    • أرسِل رسالة مباشرة إلى تطبيق Chat بدون استخدام أمر يبدأ بشرطة مائلة، مثل Hello. يردّ تطبيق Chat بنص وبطاقة تحتوي على نموذج تواصل.

تَنظيم

لتجنُّب تحمّل رسوم في حسابك على Google Cloud مقابل الموارد المستخدَمة في هذا البرنامج التعليمي، ننصحك بحذف مشروع على السحابة الإلكترونية.

  1. في Google API Console، انتقِل إلى صفحة إدارة الموارد. انقر على القائمة > إدارة الهوية وإمكانية الوصول والمشرف > إدارة الموارد.

    الانتقال إلى "إدارة الموارد"

  2. في قائمة المشاريع، اختَر المشروع الذي تريد حذفه، ثم انقر على حذف .
  3. في مربّع الحوار، اكتب رقم تعريف المشروع، ثم انقر على إيقاف لحذف المشروع.

تطبيقات Chat التي ليست إضافات: إدارة جهات الاتصال من Google Chat

تنطبق التعليمات وعيّنات التعليمات البرمجية التالية على تطبيق Chat ليس إضافة Google Workspace (عرض على GitHub).

ملفات Apps Script

main.gs

يتعامل مع جميع منطق التطبيق، بما في ذلك أحداث التفاعل المتعلقة بموعد إرسال المستخدمين رسائل إلى تطبيق Chat أو النقر على أزرار من رسالة تطبيق Chat أو فتح مربعات الحوار وإغلاقها.

apps-script/contact-form-app/main.gs
/**
 * Copyright 2024 Google Inc.
 *
 * Licensed under the Apache License, Version 2.0 (the "License");
 * you may not use this file except in compliance with the License.
 * You may obtain a copy of the License at
 *
 * http://www.apache.org/licenses/LICENSE-2.0
 *
 * Unless required by applicable law or agreed to in writing, software
 * distributed under the License is distributed on an "AS IS" BASIS,
 * WITHOUT WARRANTIES OR CONDITIONS OF ANY KIND, either express or implied.
 * See the License for the specific language governing permissions and
 * limitations under the License.
 */

/**
 * Responds to a MESSAGE interaction event in Google Chat.
 *
 * @param {Object} event the MESSAGE interaction event from Chat API.
 * @return {Object} message response that opens a dialog or sends private
 *                          message with text and card.
 */
function onMessage(event) {
  if (event.message.slashCommand) {
    switch (event.message.slashCommand.commandId) {
      case 1:
        // If the slash command is "/about", responds with a text message and button
        // that opens a dialog.
        return {
          text: "Manage your personal and business contacts 📇. To add a " +
                  "contact, use the slash command `/addContact`.",
          accessoryWidgets: [{
            buttonList: { buttons: [{
              text: "Add Contact",
              onClick: { action: {
                function: "openInitialDialog",
                interaction: "OPEN_DIALOG"
              }}
            }]}
          }]
        }
      case 2:
        // If the slash command is "/addContact", opens a dialog.
        return openInitialDialog();
    }
  }

  // If user sends the Chat app a message without a slash command, the app responds
  // privately with a text and card to add a contact.
  return {
    privateMessageViewer: event.user,
    text: "To add a contact, try `/addContact` or complete the form below:",
    cardsV2: [{
      cardId: "addContactForm",
      card: {
        header: { title: "Add a contact" },
        sections:[{ widgets: CONTACT_FORM_WIDGETS.concat([{
          buttonList: { buttons: [{
            text: "Review and submit",
            onClick: { action: { function : "openConfirmation" }}
          }]}
        }])}]
      }
    }]
  };
}

/**
 * Responds to CARD_CLICKED interaction events in Google Chat.
 *
 * @param {Object} event the CARD_CLICKED interaction event from Google Chat.
 * @return {Object} message responses specific to the dialog handling.
 */
function onCardClick(event) {
  // Initial dialog form page
  if (event.common.invokedFunction === "openInitialDialog") {
    return openInitialDialog();
  // Confirmation dialog form page
  } else if (event.common.invokedFunction === "openConfirmation") {
    return openConfirmation(event);
  // Submission dialog form page
  } else if (event.common.invokedFunction === "submitForm") {
    return submitForm(event);
  }
}

/**
 * Opens the initial step of the dialog that lets users add contact details.
 *
 * @return {Object} a message with an action response to open a dialog.
 */
function openInitialDialog() {
  return { actionResponse: {
    type: "DIALOG",
    dialogAction: { dialog: { body: { sections: [{
      header: "Add new contact",
      widgets: CONTACT_FORM_WIDGETS.concat([{
        buttonList: { buttons: [{
          text: "Review and submit",
          onClick: { action: { function: "openConfirmation" }}
        }]}
      }])
    }]}}}
  }};
}

/**
 * Returns the second step as a dialog or card message that lets users confirm details.
 *
 * @param {Object} event the interactive event with form inputs.
 * @return {Object} returns a dialog or private card message.
 */
function openConfirmation(event) {
  const name = fetchFormValue(event, "contactName") ?? "";
  const birthdate = fetchFormValue(event, "contactBirthdate") ?? "";
  const type = fetchFormValue(event, "contactType") ?? "";
  const cardConfirmation = {
    header: "Your contact",
    widgets: [{
      textParagraph: { text: "Confirm contact information and submit:" }}, {
      textParagraph: { text: "<b>Name:</b> " + name }}, {
      textParagraph: {
        text: "<b>Birthday:</b> " + convertMillisToDateString(birthdate)
      }}, {
      textParagraph: { text: "<b>Type:</b> " + type }}, {
      buttonList: { buttons: [{
        text: "Submit",
        onClick: { action: {
          function: "submitForm",
          parameters: [{
            key: "contactName", value: name }, {
            key: "contactBirthdate", value: birthdate }, {
            key: "contactType", value: type
          }]
        }}
      }]}
    }]
  };

  // Returns a dialog with contact information that the user input.
  if (event.isDialogEvent) {
    return { action_response: {
      type: "DIALOG",
      dialogAction: { dialog: { body: { sections: [ cardConfirmation ]}}}
    }};
  }

  // Updates existing card message with contact information that the user input.
  return {
    actionResponse: { type: "UPDATE_MESSAGE" },
    privateMessageViewer: event.user,
    cardsV2: [{
      card: { sections: [cardConfirmation]}
    }]
  }
}

/**
  * Validates and submits information from a dialog or card message
  * and notifies status.
  *
  * @param {Object} event the interactive event with parameters.
  * @return {Object} a message response that opens a dialog or posts a private
  *                  message.
  */
function submitForm(event) {
  const contactName = event.common.parameters["contactName"];
  // Checks to make sure the user entered a contact name.
  // If no name value detected, returns an error message.
  const errorMessage = "Don't forget to name your new contact!";
  if (!contactName && event.dialogEventType === "SUBMIT_DIALOG") {
    return { actionResponse: {
      type: "DIALOG",
      dialogAction: { actionStatus: {
        statusCode: "INVALID_ARGUMENT",
        userFacingMessage: errorMessage
      }}
    }};
  }
  if (!contactName) {
    return {
      privateMessageViewer: event.user,
      text: errorMessage
    };
  }

  // The Chat app indicates that it received form data from the dialog or card.
  // Sends private text message that confirms submission.
  const confirmationMessage = "✅ " + contactName + " has been added to your contacts.";
  if (event.dialogEventType === "SUBMIT_DIALOG") {
    return {
      actionResponse: {
        type: "DIALOG",
        dialogAction: { actionStatus: {
          statusCode: "OK",
          userFacingMessage: "Success " + contactName
        }}
      }
    };
  }
  return {
    actionResponse: { type: "NEW_MESSAGE" },
    privateMessageViewer: event.user,
    text: confirmationMessage
  };
}

/**
 * Extracts form input value for a given widget.
 *
 * @param {Object} event the CARD_CLICKED interaction event from Google Chat.
 * @param {String} widgetName a unique ID for the widget, specified in the widget's name field.
 * @returns the value inputted by the user, null if no value can be found.
 */
function fetchFormValue(event, widgetName) {
  const formItem = event.common.formInputs[widgetName][""];
  // For widgets that receive StringInputs data, the value input by the user.
  if (formItem.hasOwnProperty("stringInputs")) {
    const stringInput = event.common.formInputs[widgetName][""].stringInputs.value[0];
    if (stringInput != null) {
      return stringInput;
    }
  // For widgets that receive dateInput data, the value input by the user.
  } else if (formItem.hasOwnProperty("dateInput")) {
    const dateInput = event.common.formInputs[widgetName][""].dateInput.msSinceEpoch;
     if (dateInput != null) {
       return dateInput;
     }
  }

  return null;
}

/**
 * Converts date in milliseconds since epoch to user-friendly string.
 *
 * @param {Object} millis the milliseconds since epoch time.
 * @return {string} Display-friend date (English US).
 */
function convertMillisToDateString(millis) {
  const date = new Date(millis);
  const options = { year: 'numeric', month: 'long', day: 'numeric' };
  return date.toLocaleDateString('en-US', options);
}
contactForm.gs

يحتوي على التطبيقات المصغّرة التي تتلقّى بيانات النماذج من المستخدمين. يتم عرض عناصر واجهة المستخدم الخاصة بإدخال النماذج هذه في بطاقات تظهر في الرسائل ومربّعات الحوار.

apps-script/contact-form-app/contactForm.gs
/**
 * Copyright 2024 Google Inc.
 *
 * Licensed under the Apache License, Version 2.0 (the "License");
 * you may not use this file except in compliance with the License.
 * You may obtain a copy of the License at
 *
 * http://www.apache.org/licenses/LICENSE-2.0
 *
 * Unless required by applicable law or agreed to in writing, software
 * distributed under the License is distributed on an "AS IS" BASIS,
 * WITHOUT WARRANTIES OR CONDITIONS OF ANY KIND, either express or implied.
 * See the License for the specific language governing permissions and
 * limitations under the License.
 */

/**
 * The section of the contact card that contains the form input widgets. Used in a dialog and card message.
 * To add and preview widgets, use the Card Builder: https://addons.gsuite.google.com/uikit/builder
 */
const CONTACT_FORM_WIDGETS = [
  {
    "textInput": {
      "name": "contactName",
      "label": "First and last name",
      "type": "SINGLE_LINE"
    }
  },
  {
    "dateTimePicker": {
      "name": "contactBirthdate",
      "label": "Birthdate",
      "type": "DATE_ONLY"
    }
  },
  {
    "selectionInput": {
      "name": "contactType",
      "label": "Contact type",
      "type": "RADIO_BUTTON",
      "items": [
        {
          "text": "Work",
          "value": "Work",
          "selected": false
        },
        {
          "text": "Personal",
          "value": "Personal",
          "selected": false
        }
      ]
    }
  }
];
appsscript.json

ملف بيان "برمجة التطبيقات" الذي يحدّد مشروع "برمجة التطبيقات" ويضبطه لتطبيق Chat الذي ليس إضافة

apps-script/contact-form-app/appsscript.json
{
  "timeZone": "America/Los_Angeles",
  "dependencies": {},
  "exceptionLogging": "STACKDRIVER",
  "runtimeVersion": "V8",
  "chat": {}
}

إنشاء مشروع برمجة تطبيقات وإعداده

  1. افتح مشروع إدارة جهات الاتصال في Google Chat على Apps Script لتطبيق Chat ليس إضافة، وأنشئ نسخة منه.
  2. عند ضبط إعدادات Chat API في Google API Console، ألغِ تحديد إنشاء تطبيق Chat هذا كإضافة في Google Workspace. سيظهر مربّع حوار يطلب منك التأكيد. في مربّع الحوار، انقر على إيقاف.