Mantenha tudo organizado com as coleções
Salve e categorize o conteúdo com base nas suas preferências.
Para começar a usar as APIs do Google Fotos, configure seu projeto ativando as APIs
do Google Fotos necessárias usando o console de APIs do Google e configurando um ID de cliente OAuth 2.0.
Seu app interage com o Google Fotos em nome de um
usuário do Google Fotos. Por exemplo, quando você cria álbuns na biblioteca do Google Fotos de um usuário
ou faz upload de itens de mídia para a conta do Google Fotos de um usuário, ele autoriza essas solicitações de API usando o
protocolo OAuth 2.0.
O ID do cliente OAuth 2.0 permite que os usuários do aplicativo façam login, se autentiquem
e usem as APIs do Google Fotos. As APIs do Google Fotos não oferecem suporte a
contas de serviço. Para usar essas APIs, os usuários precisam fazer login em uma conta
Google válida.
Configurar o app
Primeiro, ative a API e, em seguida, solicite um ID do cliente OAuth 2.0.
Ativar a API
Antes de usar as APIs do Google Fotos, é necessário ativá-las no seu projeto.
Na barra de menus, selecione um projeto ou crie um novo.
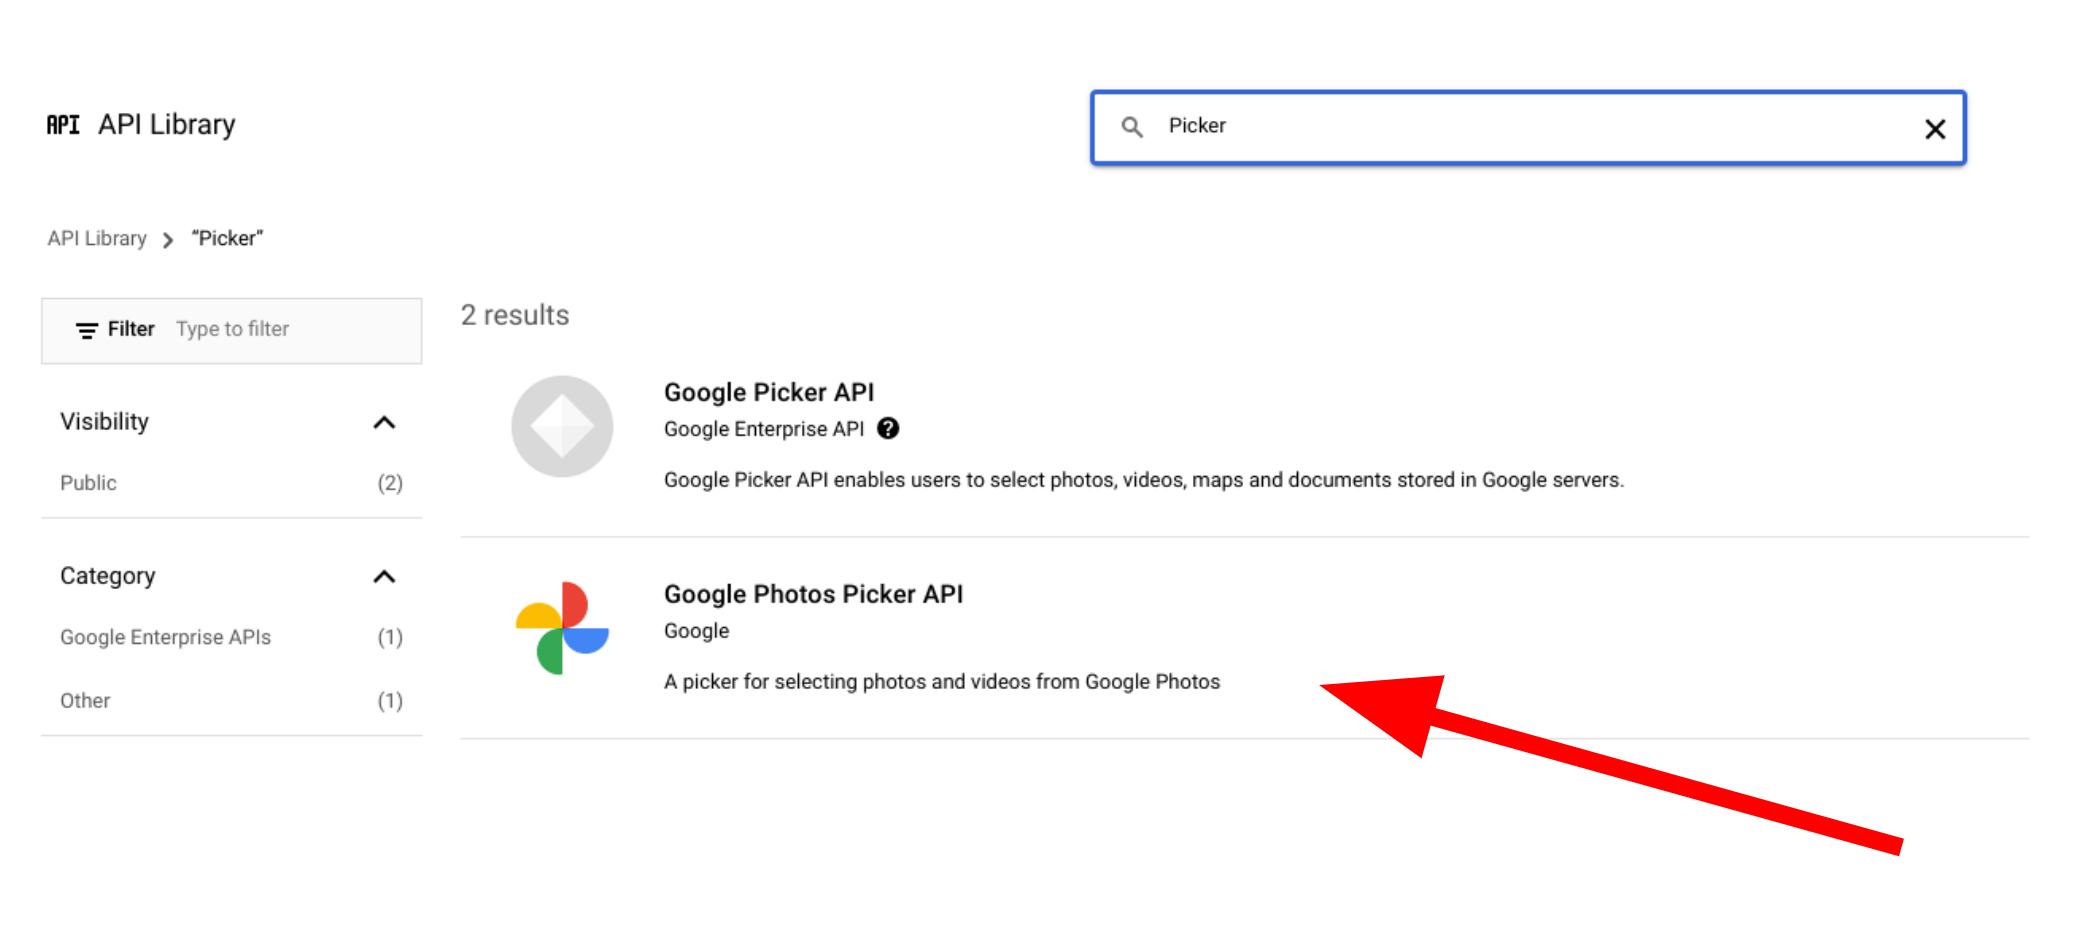
Para abrir uma das APIs do Google Fotos, no menu de navegação, selecione
APIs e serviços > Biblioteca.
Pesquise "Fotos". Selecione uma ou mais APIs do Google Fotos e clique em
Ativar.
Solicitar um ID do cliente OAuth 2.0
Siga estas etapas para solicitar um ID de cliente OAuth e configurá-lo para seu
app. Este exemplo usa um aplicativo em que todo o fluxo do OAuth é
gerenciado do lado do servidor, como o dos nossos exemplos. O processo de configuração pode variar
para outros cenários de implementação.
Na página Credenciais, clique em Criar credenciais > ID do cliente OAuth.
Selecione o Tipo de aplicativo. Neste exemplo, o tipo de aplicativo é
Aplicativo da Web.
Registre as origens em que o app pode acessar as APIs
do Google da seguinte maneira:
Para identificar o ID do cliente, insira um nome.
No campo Origens JavaScript autorizadas, insira a origem do
app. Esse campo não aceita caracteres curinga.
É possível inserir várias origens para permitir que o app seja executado em diferentes
protocolos, domínios ou subdomínios. Os URLs inseridos podem
iniciar uma solicitação OAuth.
O exemplo a seguir mostra um URL de desenvolvimento local (nossos exemplos usam
localhost:8080) e um URL de produção.
O campo URI de redirecionamento autorizado é o endpoint que recebe
respostas do servidor OAuth 2.0. Normalmente, isso inclui o
ambiente de desenvolvimento e aponta para um caminho no aplicativo.
Na caixa de diálogo do cliente OAuth resultante, copie o seguinte:
ID do cliente
Chave secreta do cliente
O app pode acessar as APIs do Google ativadas usando esses valores.
Antes de lançar um aplicativo público que acesse as APIs do Google Fotos,
ele precisa ser analisado pelo Google. Uma mensagem "App não verificado" aparece na
tela quando você testa o aplicativo, até que ele seja
verificado.
Os recursos criados com qualquer uma das APIs do Google Fotos só podem ser acessados ou
modificados usando o ID de cliente original usado para criá-los. Por exemplo, se você
criar um session na API Picker com um ID do cliente específico e depois mudar
esse ID no app, o app vai perder o acesso a todos os recursos de API
criados com o ID do cliente anterior.
Planeje com cuidado e escolha o tipo de ID de cliente correto para a API do Google Fotos que você está
usando. Só mude o ID do cliente se for absolutamente necessário para evitar problemas de
acesso.
[[["Fácil de entender","easyToUnderstand","thumb-up"],["Meu problema foi resolvido","solvedMyProblem","thumb-up"],["Outro","otherUp","thumb-up"]],[["Não contém as informações de que eu preciso","missingTheInformationINeed","thumb-down"],["Muito complicado / etapas demais","tooComplicatedTooManySteps","thumb-down"],["Desatualizado","outOfDate","thumb-down"],["Problema na tradução","translationIssue","thumb-down"],["Problema com as amostras / o código","samplesCodeIssue","thumb-down"],["Outro","otherDown","thumb-down"]],["Última atualização 2025-08-29 UTC."],[[["\u003cp\u003eTo use Google Photos APIs, enable them in your Google API Console project and set up an OAuth 2.0 client ID for user authentication.\u003c/p\u003e\n"],["\u003cp\u003eGoogle Photos APIs require user sign-in with a Google Account and do not support service accounts.\u003c/p\u003e\n"],["\u003cp\u003eBefore launching publicly, your application needs to be verified by Google to remove the "Unverified app" message.\u003c/p\u003e\n"],["\u003cp\u003eResources created with a specific client ID can only be accessed or modified using the same ID; changing it may lead to access issues.\u003c/p\u003e\n"],["\u003cp\u003eYou can get started with either the Picker API or the Library API after configuring your application.\u003c/p\u003e\n"]]],["To utilize Google Photos APIs, enable them in your project via the Google API Console. Then, request an OAuth 2.0 client ID, selecting your application type and registering authorized JavaScript origins and redirect URIs. Copy the client ID and secret for your app's use. Note that user sign-in via a valid Google Account is necessary. Applications must be verified by Google before public launch, and client ID changes can cause access issues to previously created resources.\n"],null,["# Configure your app\n\nTo start using the Google Photos APIs, configure your project by enabling the Photos\nAPIs you need using the Google API Console and setting up an OAuth 2.0 client ID.\n\nYour application interacts with Google Photos on behalf of a\nGoogle Photos user. For example, when you create albums in a user's\nGoogle Photos library or upload media items to a user's\nGoogle Photos account, the user authorizes these API requests using the\n[OAuth 2.0](/identity/protocols/OAuth2) protocol.\n\nThe OAuth 2.0 client ID allows your application users to sign in, authenticate,\nand thereby use the Photos APIs. The Photos APIs don't support\nservice accounts; to use these APIs, users must be signed in to a valid Google\nAccount.\n\nConfigure your app\n------------------\n\nFirst enable the API, then request an OAuth 2.0 client ID.\n\n### Enable the API\n\nBefore you can use the Photos APIs, you must enable them in your project.\n\n1. Go to the [Google API Console](https://console.developers.google.com/apis/library).\n2. From the menu bar, select a project or create a new project.\n3. To open one of the Google Photos APIs, from the Navigation menu, select **APIs \\& Services \\\u003e Library**.\n4. Search for \"Photos\". Select one or more of the Photos APIs and click **Enable**.\n\n| **Note:** When searching Google APIs, you may also see the \"Google Picker API\", which is different from the Google Photos Picker API.\n\n### Request an OAuth 2.0 client ID\n\nFollow these steps to request an OAuth client ID and configure it for your\napplication. This example uses an application where the entire OAuth flow is\nhandled server-side, such as the one in our samples. The setup process may vary\nfor other [implementation scenarios](/identity/protocols/OAuth2).\n\n1. Go to the [Google API Console](https://console.developers.google.com/apis/library) and select your project.\n2. From the menu, select **APIs \\& Services \\\u003e Credentials**.\n3. On the **Credentials** page, click **Create Credentials \\\u003e OAuth client ID**.\n\n | **Note:** If you're setting up a new project, you may be prompted to configure your project's consent screen.\n4. Select your **Application type** . In this example, the application type is\n **Web application**.\n\n5. Register the origins from which your app is allowed to access the Google\n APIs as follows:\n\n 1. To identify the client ID, enter a name.\n 2. In the **Authorized JavaScript origins** field, enter the origin for\n your app. This field doesn't allow wildcards.\n\n You can enter multiple origins to allow your app to run on different\n protocols, domains, or subdomains. The URLs you enter are allowed to\n start an OAuth request.\n\n The following example shows a local development URL (our samples use\n `localhost:8080`) and a production URL. \n\n http://localhost:8080\n https://myproductionurl.example.com\n\n 3. The **Authorized redirect URI** field is the endpoint that receives\n responses from the OAuth 2.0 server. Typically, this includes your\n development environment and points to a path in your application.\n\n http://localhost:8080/auth/google/callback\n https://myproductionurl.example.com/auth/google/callback\n\n 4. Click **Create**.\n\n\u003c!-- --\u003e\n\n6. From the resulting OAuth client dialog, copy the following:\n\n - Client ID\n - Client secret\n\n Your app can access the enabled Google APIs using these values.\n\nBefore you can launch a public application that accesses the Photos APIs,\nyour app must be reviewed by Google. An \"Unverified app\" message appears on the\nscreen when you test your application, until it is\n[verified](https://support.google.com/cloud/answer/7454865).\n\nAfter you've configured your app you're ready to get started:\n\n- [Get started with the Picker API](/photos/picker/guides/get-started-picker)\n- [Get started with the Library API](/photos/library/guides/get-started-library)\n\nChanging your client ID\n-----------------------\n\nResources created through any of the Google Photos APIs can only be accessed or\nmodified using the original client ID used to create them. For example, if you\ncreate a `session` in the Picker API with a specific client ID and later change\nthat client ID in your app, your app will lose access to any API resources\ncreated with the previous client ID.\n\nPlan carefully and choose the correct client ID type for the Photos API you are\nusing. Only change your client ID if absolutely necessary to avoid access\nissues."]]