Tetap teratur dengan koleksi
Simpan dan kategorikan konten berdasarkan preferensi Anda.
Untuk mulai menggunakan Google Photos API, konfigurasikan project Anda dengan mengaktifkan Photos API yang Anda perlukan menggunakan Konsol API Google dan menyiapkan client ID OAuth 2.0.
Aplikasi Anda berinteraksi dengan Google Foto atas nama
pengguna Google Foto. Misalnya, saat Anda membuat album di galeri Google Foto
pengguna atau mengupload item media ke akun Google Foto
pengguna, pengguna akan mengizinkan permintaan API ini menggunakan
protokol OAuth 2.0.
Client ID OAuth 2.0 memungkinkan pengguna aplikasi Anda login, mengautentikasi,
dan menggunakan Photos API. Photos API tidak mendukung akun layanan; untuk menggunakan API ini, pengguna harus login ke Akun Google yang valid.
Mengonfigurasi aplikasi Anda
Aktifkan API terlebih dahulu, lalu minta client ID OAuth 2.0.
Mengaktifkan API
Sebelum dapat menggunakan Photos API, Anda harus mengaktifkannya di project Anda.
Dari menu bar, pilih project atau buat project baru.
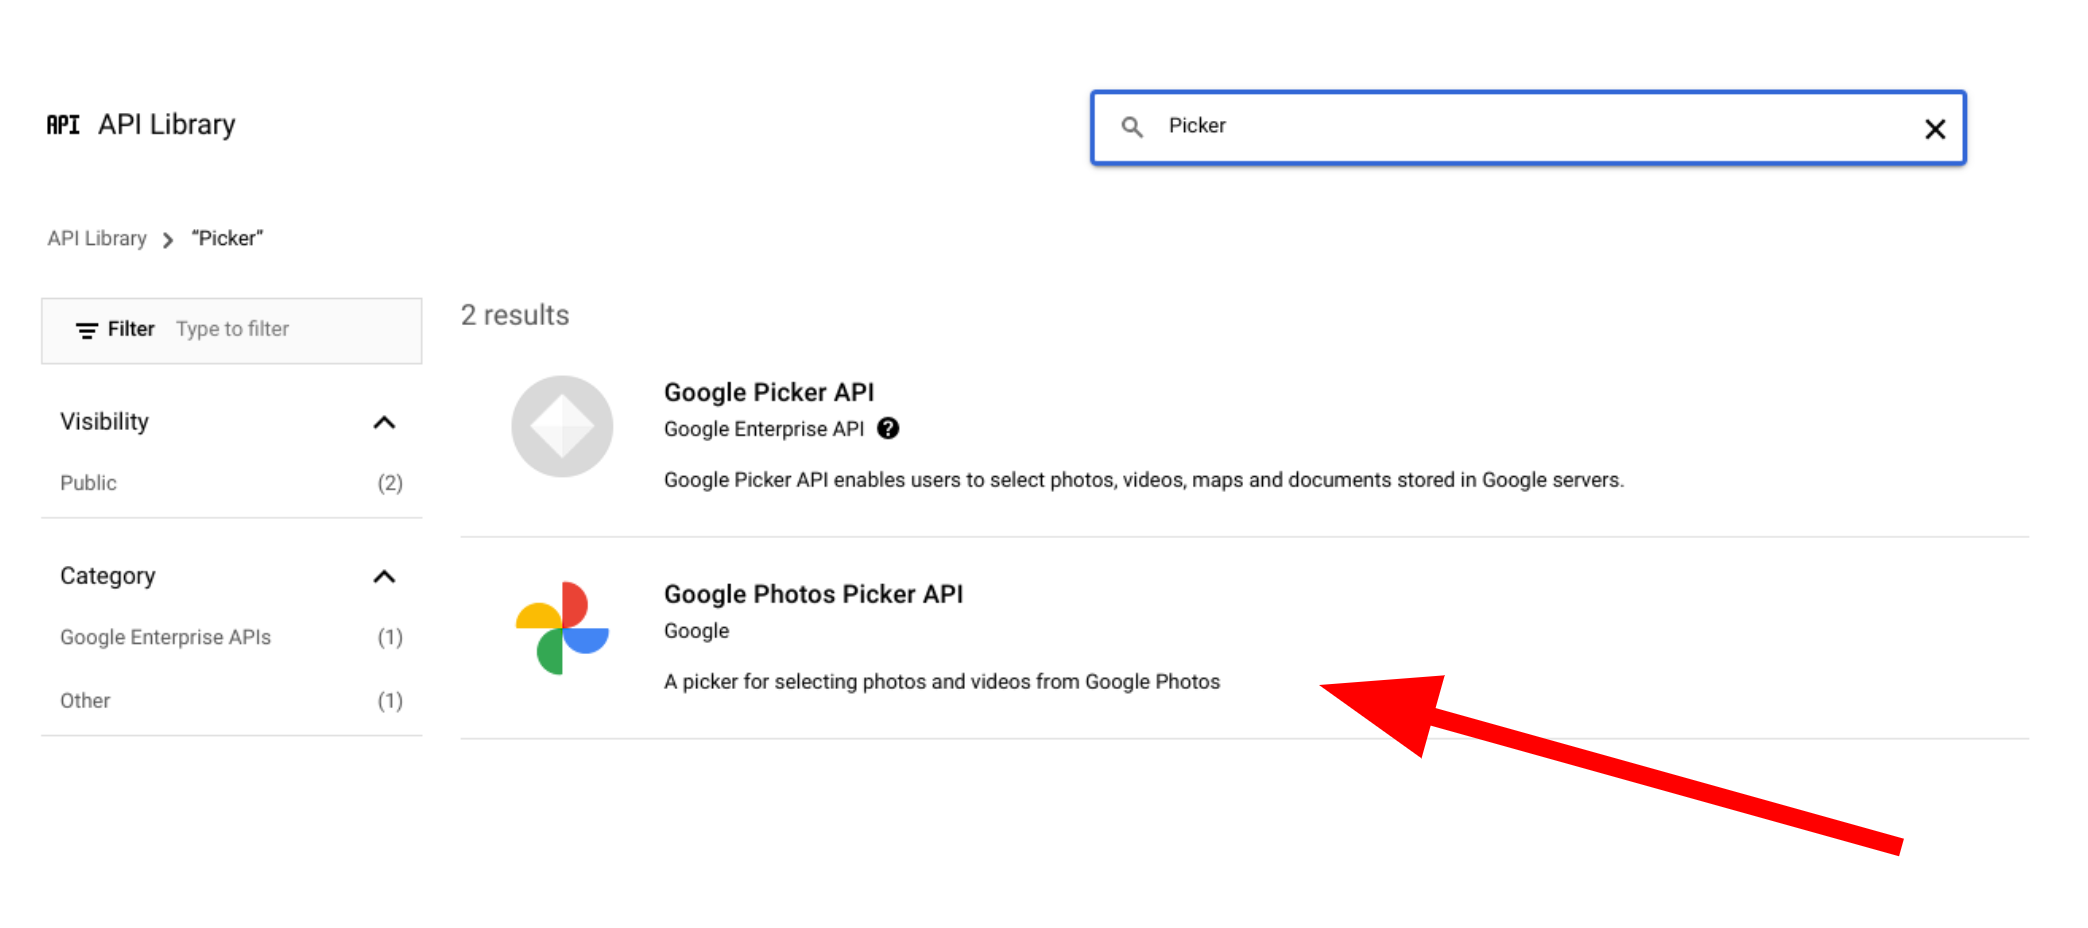
Untuk membuka salah satu Google Photos API, dari menu Navigation, pilih
APIs & Services > Library.
Telusuri "Foto". Pilih satu atau beberapa Photos API, lalu klik
Enable.
Meminta client ID OAuth 2.0
Ikuti langkah-langkah berikut untuk meminta client ID OAuth dan mengonfigurasinya untuk aplikasi Anda. Contoh ini menggunakan aplikasi tempat seluruh alur OAuth
ditangani sisi server, seperti yang ada dalam contoh kami. Proses penyiapan dapat bervariasi
untuk skenario penerapan lainnya.
Di halaman Credentials, klik Create Credentials > OAuth client ID.
Pilih Jenis aplikasi Anda. Dalam contoh ini, jenis aplikasinya adalah
Aplikasi web.
Daftarkan origin tempat aplikasi Anda diizinkan untuk mengakses Google API sebagai berikut:
Untuk mengidentifikasi client ID, masukkan nama.
Di kolom Asal JavaScript yang sah, masukkan asal untuk
aplikasi Anda. Kolom ini tidak mengizinkan karakter pengganti.
Anda dapat memasukkan beberapa origin untuk mengizinkan aplikasi berjalan di protokol, domain, atau subdomain yang berbeda. URL yang Anda masukkan diizinkan untuk
memulai permintaan OAuth.
Contoh berikut menunjukkan URL pengembangan lokal (contoh kami menggunakan
localhost:8080) dan URL produksi.
Kolom URI alihan yang diberi otorisasi adalah endpoint yang menerima
respons dari server OAuth 2.0. Biasanya, ini mencakup
lingkungan pengembangan dan mengarah ke jalur di aplikasi Anda.
Dari dialog klien OAuth yang dihasilkan, salin hal berikut:
ID Klien
Rahasia klien
Aplikasi Anda dapat mengakses Google API yang diaktifkan menggunakan nilai ini.
Sebelum Anda dapat meluncurkan aplikasi publik yang mengakses Photos API,
aplikasi Anda harus ditinjau oleh Google. Pesan "Aplikasi tidak terverifikasi" akan muncul di
layar saat Anda menguji aplikasi, hingga
diverifikasi.
Setelah mengonfigurasi aplikasi, Anda siap untuk memulai:
Resource yang dibuat melalui Google Photos API hanya dapat diakses atau
diubah menggunakan client ID asli yang digunakan untuk membuatnya. Misalnya, jika Anda
membuat session di Picker API dengan client ID tertentu, lalu mengubah
client ID tersebut di aplikasi, aplikasi Anda akan kehilangan akses ke resource API apa pun
yang dibuat dengan client ID sebelumnya.
Rencanakan dengan cermat dan pilih jenis client ID yang benar untuk Photos API yang Anda
gunakan. Hanya ubah client ID Anda jika benar-benar diperlukan untuk menghindari masalah
akses.
[[["Mudah dipahami","easyToUnderstand","thumb-up"],["Memecahkan masalah saya","solvedMyProblem","thumb-up"],["Lainnya","otherUp","thumb-up"]],[["Informasi yang saya butuhkan tidak ada","missingTheInformationINeed","thumb-down"],["Terlalu rumit/langkahnya terlalu banyak","tooComplicatedTooManySteps","thumb-down"],["Sudah usang","outOfDate","thumb-down"],["Masalah terjemahan","translationIssue","thumb-down"],["Masalah kode / contoh","samplesCodeIssue","thumb-down"],["Lainnya","otherDown","thumb-down"]],["Terakhir diperbarui pada 2025-08-29 UTC."],[[["\u003cp\u003eTo use Google Photos APIs, enable them in your Google API Console project and set up an OAuth 2.0 client ID for user authentication.\u003c/p\u003e\n"],["\u003cp\u003eGoogle Photos APIs require user sign-in with a Google Account and do not support service accounts.\u003c/p\u003e\n"],["\u003cp\u003eBefore launching publicly, your application needs to be verified by Google to remove the "Unverified app" message.\u003c/p\u003e\n"],["\u003cp\u003eResources created with a specific client ID can only be accessed or modified using the same ID; changing it may lead to access issues.\u003c/p\u003e\n"],["\u003cp\u003eYou can get started with either the Picker API or the Library API after configuring your application.\u003c/p\u003e\n"]]],["To utilize Google Photos APIs, enable them in your project via the Google API Console. Then, request an OAuth 2.0 client ID, selecting your application type and registering authorized JavaScript origins and redirect URIs. Copy the client ID and secret for your app's use. Note that user sign-in via a valid Google Account is necessary. Applications must be verified by Google before public launch, and client ID changes can cause access issues to previously created resources.\n"],null,["# Configure your app\n\nTo start using the Google Photos APIs, configure your project by enabling the Photos\nAPIs you need using the Google API Console and setting up an OAuth 2.0 client ID.\n\nYour application interacts with Google Photos on behalf of a\nGoogle Photos user. For example, when you create albums in a user's\nGoogle Photos library or upload media items to a user's\nGoogle Photos account, the user authorizes these API requests using the\n[OAuth 2.0](/identity/protocols/OAuth2) protocol.\n\nThe OAuth 2.0 client ID allows your application users to sign in, authenticate,\nand thereby use the Photos APIs. The Photos APIs don't support\nservice accounts; to use these APIs, users must be signed in to a valid Google\nAccount.\n\nConfigure your app\n------------------\n\nFirst enable the API, then request an OAuth 2.0 client ID.\n\n### Enable the API\n\nBefore you can use the Photos APIs, you must enable them in your project.\n\n1. Go to the [Google API Console](https://console.developers.google.com/apis/library).\n2. From the menu bar, select a project or create a new project.\n3. To open one of the Google Photos APIs, from the Navigation menu, select **APIs \\& Services \\\u003e Library**.\n4. Search for \"Photos\". Select one or more of the Photos APIs and click **Enable**.\n\n| **Note:** When searching Google APIs, you may also see the \"Google Picker API\", which is different from the Google Photos Picker API.\n\n### Request an OAuth 2.0 client ID\n\nFollow these steps to request an OAuth client ID and configure it for your\napplication. This example uses an application where the entire OAuth flow is\nhandled server-side, such as the one in our samples. The setup process may vary\nfor other [implementation scenarios](/identity/protocols/OAuth2).\n\n1. Go to the [Google API Console](https://console.developers.google.com/apis/library) and select your project.\n2. From the menu, select **APIs \\& Services \\\u003e Credentials**.\n3. On the **Credentials** page, click **Create Credentials \\\u003e OAuth client ID**.\n\n | **Note:** If you're setting up a new project, you may be prompted to configure your project's consent screen.\n4. Select your **Application type** . In this example, the application type is\n **Web application**.\n\n5. Register the origins from which your app is allowed to access the Google\n APIs as follows:\n\n 1. To identify the client ID, enter a name.\n 2. In the **Authorized JavaScript origins** field, enter the origin for\n your app. This field doesn't allow wildcards.\n\n You can enter multiple origins to allow your app to run on different\n protocols, domains, or subdomains. The URLs you enter are allowed to\n start an OAuth request.\n\n The following example shows a local development URL (our samples use\n `localhost:8080`) and a production URL. \n\n http://localhost:8080\n https://myproductionurl.example.com\n\n 3. The **Authorized redirect URI** field is the endpoint that receives\n responses from the OAuth 2.0 server. Typically, this includes your\n development environment and points to a path in your application.\n\n http://localhost:8080/auth/google/callback\n https://myproductionurl.example.com/auth/google/callback\n\n 4. Click **Create**.\n\n\u003c!-- --\u003e\n\n6. From the resulting OAuth client dialog, copy the following:\n\n - Client ID\n - Client secret\n\n Your app can access the enabled Google APIs using these values.\n\nBefore you can launch a public application that accesses the Photos APIs,\nyour app must be reviewed by Google. An \"Unverified app\" message appears on the\nscreen when you test your application, until it is\n[verified](https://support.google.com/cloud/answer/7454865).\n\nAfter you've configured your app you're ready to get started:\n\n- [Get started with the Picker API](/photos/picker/guides/get-started-picker)\n- [Get started with the Library API](/photos/library/guides/get-started-library)\n\nChanging your client ID\n-----------------------\n\nResources created through any of the Google Photos APIs can only be accessed or\nmodified using the original client ID used to create them. For example, if you\ncreate a `session` in the Picker API with a specific client ID and later change\nthat client ID in your app, your app will lose access to any API resources\ncreated with the previous client ID.\n\nPlan carefully and choose the correct client ID type for the Photos API you are\nusing. Only change your client ID if absolutely necessary to avoid access\nissues."]]