Koleksiyonlar ile düzeninizi koruyun
İçeriği tercihlerinize göre kaydedin ve kategorilere ayırın.
Google Fotoğraflar API'lerini kullanmaya başlamak için Google API Konsolu'nu kullanarak ihtiyacınız olan Fotoğraflar API'lerini etkinleştirip bir OAuth 2.0 istemci kimliği oluşturarak projenizi yapılandırın.
Uygulamanız, Google Fotoğraflar kullanıcısı adına Google Fotoğraflar ile etkileşim kurar. Örneğin, bir kullanıcının Google Fotoğraflar kitaplığında albüm oluşturduğunuzda veya kullanıcının Google Fotoğraflar hesabına medya öğeleri yüklediğinizde kullanıcı, OAuth 2.0 protokolünü kullanarak bu API isteklerine yetki verir.
OAuth 2.0 istemci kimliği, uygulama kullanıcılarınızın oturum açmasına, kimlik doğrulamasına ve böylece Fotoğraflar API'lerini kullanmasına olanak tanır. Fotoğraflar API'leri hizmet hesaplarını desteklemez. Bu API'leri kullanmak için kullanıcıların geçerli bir Google Hesabı'nda oturum açmış olması gerekir.
Uygulamanızı yapılandırma
Önce API'yi etkinleştirin, ardından OAuth 2.0 istemci kimliği isteyin.
API'yi etkinleştirme
Fotoğraflar API'lerini kullanabilmek için projenizde etkinleştirmeniz gerekir.
Menü çubuğundan bir proje seçin veya yeni bir proje oluşturun.
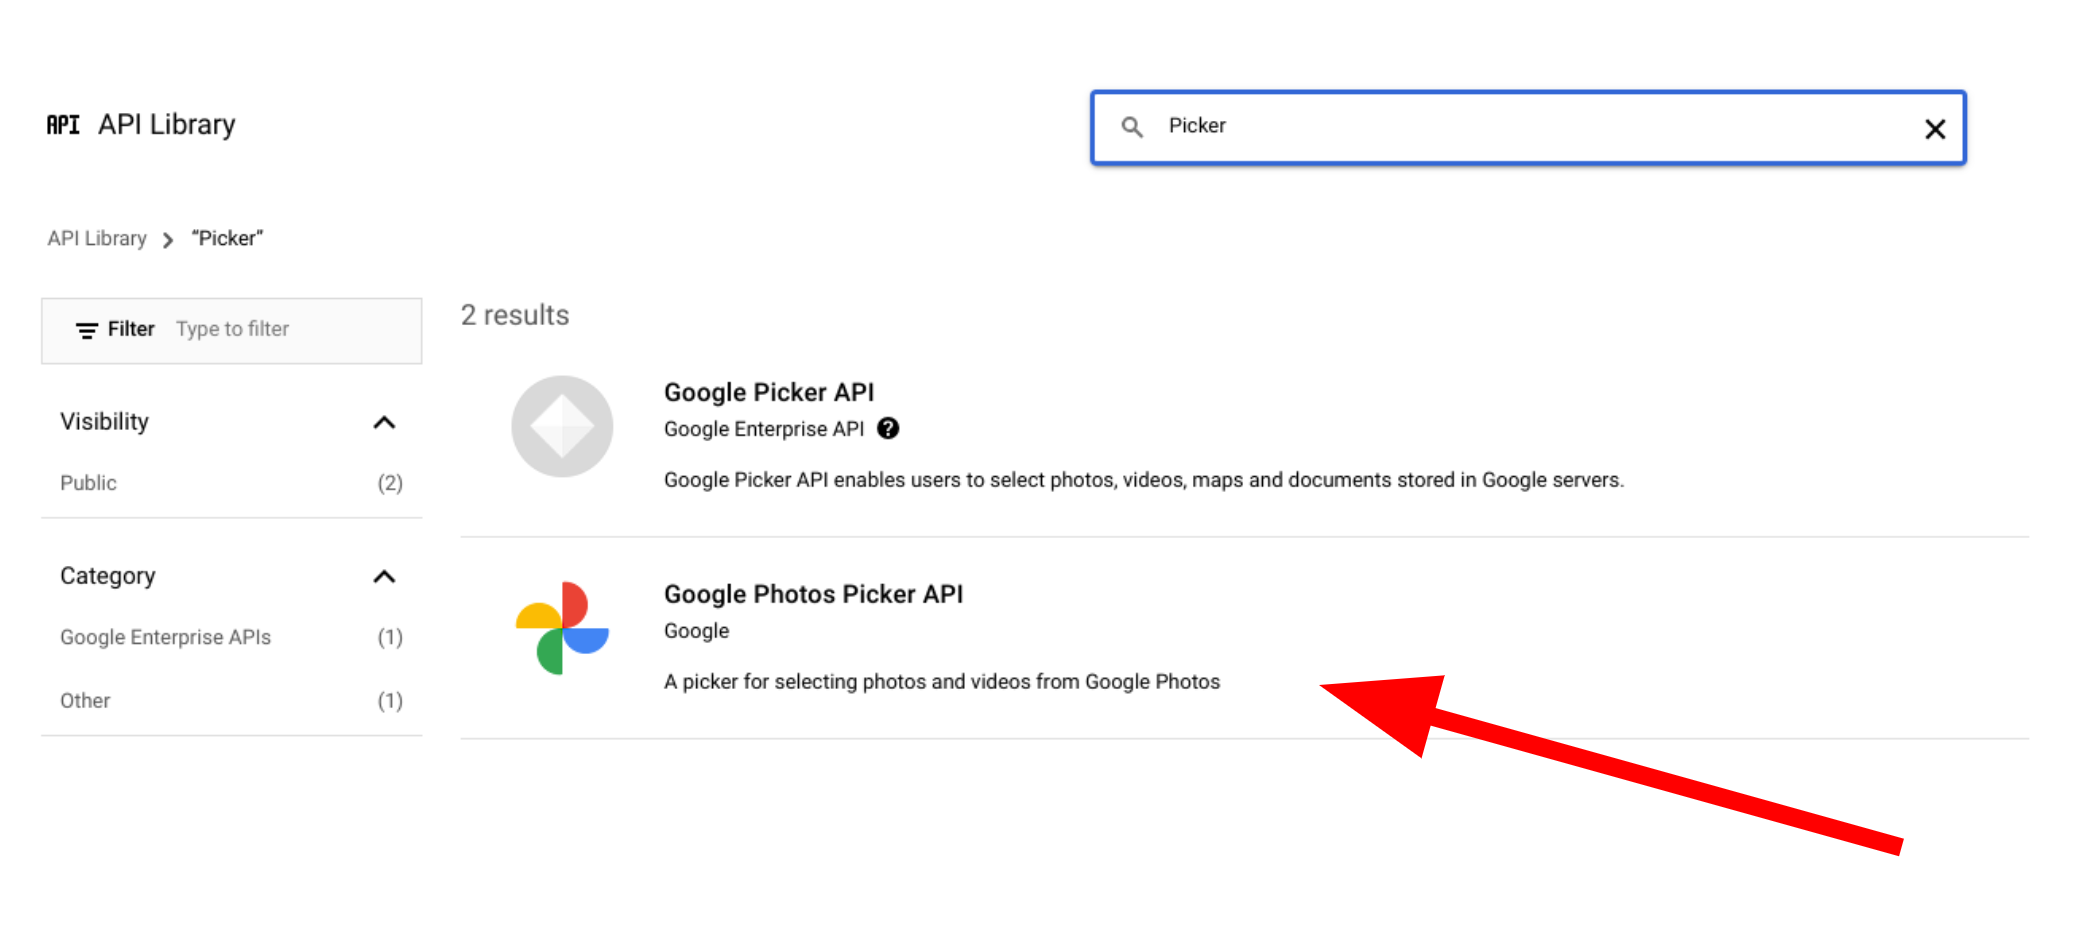
Google Fotoğraflar API'lerinden birini açmak için Gezinme menüsünden API'ler ve Hizmetler > Kitaplık'ı seçin.
"Fotoğraflar"ı arayın. Fotoğraf API'lerinden birini veya daha fazlasını seçip Etkinleştir'i tıklayın.
OAuth 2.0 istemci kimliği isteme
OAuth istemci kimliği istemek ve uygulamanız için yapılandırmak üzere aşağıdaki adımları uygulayın. Bu örnekte, OAuth akışının tamamının sunucu tarafında işlendiği bir uygulama (örneklerimizdeki gibi) kullanılmaktadır. Kurulum işlemi, diğer uygulama senaryoları için değişiklik gösterebilir.
Menüden API'ler ve Hizmetler > Kimlik Bilgileri'ni seçin.
Kimlik bilgileri sayfasında Kimlik bilgileri oluştur > OAuth istemci kimliği'ni tıklayın.
Uygulama türünüzü seçin. Bu örnekte uygulama türü Web uygulamasıdır.
Uygulamanızın Google API'lerine erişmesine izin verilen kaynaklarını aşağıdaki gibi kaydedin:
İstemci kimliğini tanımlamak için bir ad girin.
Yetkilendirilmiş JavaScript kaynakları alanına uygulamanızın kaynağını girin. Bu alanda joker karakterlere izin verilmez.
Uygulamanızın farklı protokollerde, alan adlarında veya alt alan adlarında çalışmasına izin vermek için birden fazla kaynak girebilirsiniz. Girdiğiniz URL'lerin OAuth isteği başlatmasına izin verilir.
Aşağıdaki örnekte yerel bir geliştirme URL'si (örneklerimizde localhost:8080 kullanılmaktadır) ve üretim URL'si gösterilmektedir.
Yetkilendirilmiş yönlendirme URI'si alanı, OAuth 2.0 sunucusundan yanıt alan uç noktadır. Bu genellikle geliştirme ortamınızı içerir ve uygulamanızdaki bir yola işaret eder.
Açılan OAuth istemcisi iletişim kutusunda şunları kopyalayın:
Müşteri Kimliği
İstemci gizli anahtarı
Uygulamanız, etkinleştirilen Google API'lerine bu değerleri kullanarak erişebilir.
Fotoğraflar API'lerine erişen herkese açık bir uygulama yayınlayabilmeniz için uygulamanızın Google tarafından incelenmesi gerekir. Uygulamanızı test ettiğinizde, doğrulanana kadar ekranda "Doğrulanmamış uygulama" mesajı gösterilir.
Uygulamanızı yapılandırdıktan sonra çalışmaya başlayabilirsiniz:
Google Fotoğraflar API'lerinden herhangi biri aracılığıyla oluşturulan kaynaklara yalnızca oluşturulurken kullanılan orijinal istemci kimliği kullanılarak erişilebilir veya bu kaynaklarda değişiklik yapılabilir. Örneğin, Picker API'de belirli bir istemci kimliğiyle bir session oluşturur ve daha sonra uygulamanızda bu istemci kimliğini değiştirirseniz uygulamanız önceki istemci kimliğiyle oluşturulan API kaynaklarına erişimi kaybeder.
Kullandığınız Fotoğraflar API'si için dikkatli bir şekilde planlama yapın ve doğru istemci kimliği türünü seçin. Erişim sorunlarını önlemek için yalnızca kesinlikle gerekli olduğunda istemci kimliğinizi değiştirin.
[[["Anlaması kolay","easyToUnderstand","thumb-up"],["Sorunumu çözdü","solvedMyProblem","thumb-up"],["Diğer","otherUp","thumb-up"]],[["İhtiyacım olan bilgiler yok","missingTheInformationINeed","thumb-down"],["Çok karmaşık / çok fazla adım var","tooComplicatedTooManySteps","thumb-down"],["Güncel değil","outOfDate","thumb-down"],["Çeviri sorunu","translationIssue","thumb-down"],["Örnek veya kod sorunu","samplesCodeIssue","thumb-down"],["Diğer","otherDown","thumb-down"]],["Son güncelleme tarihi: 2025-08-29 UTC."],[[["\u003cp\u003eTo use Google Photos APIs, enable them in your Google API Console project and set up an OAuth 2.0 client ID for user authentication.\u003c/p\u003e\n"],["\u003cp\u003eGoogle Photos APIs require user sign-in with a Google Account and do not support service accounts.\u003c/p\u003e\n"],["\u003cp\u003eBefore launching publicly, your application needs to be verified by Google to remove the "Unverified app" message.\u003c/p\u003e\n"],["\u003cp\u003eResources created with a specific client ID can only be accessed or modified using the same ID; changing it may lead to access issues.\u003c/p\u003e\n"],["\u003cp\u003eYou can get started with either the Picker API or the Library API after configuring your application.\u003c/p\u003e\n"]]],["To utilize Google Photos APIs, enable them in your project via the Google API Console. Then, request an OAuth 2.0 client ID, selecting your application type and registering authorized JavaScript origins and redirect URIs. Copy the client ID and secret for your app's use. Note that user sign-in via a valid Google Account is necessary. Applications must be verified by Google before public launch, and client ID changes can cause access issues to previously created resources.\n"],null,["# Configure your app\n\nTo start using the Google Photos APIs, configure your project by enabling the Photos\nAPIs you need using the Google API Console and setting up an OAuth 2.0 client ID.\n\nYour application interacts with Google Photos on behalf of a\nGoogle Photos user. For example, when you create albums in a user's\nGoogle Photos library or upload media items to a user's\nGoogle Photos account, the user authorizes these API requests using the\n[OAuth 2.0](/identity/protocols/OAuth2) protocol.\n\nThe OAuth 2.0 client ID allows your application users to sign in, authenticate,\nand thereby use the Photos APIs. The Photos APIs don't support\nservice accounts; to use these APIs, users must be signed in to a valid Google\nAccount.\n\nConfigure your app\n------------------\n\nFirst enable the API, then request an OAuth 2.0 client ID.\n\n### Enable the API\n\nBefore you can use the Photos APIs, you must enable them in your project.\n\n1. Go to the [Google API Console](https://console.developers.google.com/apis/library).\n2. From the menu bar, select a project or create a new project.\n3. To open one of the Google Photos APIs, from the Navigation menu, select **APIs \\& Services \\\u003e Library**.\n4. Search for \"Photos\". Select one or more of the Photos APIs and click **Enable**.\n\n| **Note:** When searching Google APIs, you may also see the \"Google Picker API\", which is different from the Google Photos Picker API.\n\n### Request an OAuth 2.0 client ID\n\nFollow these steps to request an OAuth client ID and configure it for your\napplication. This example uses an application where the entire OAuth flow is\nhandled server-side, such as the one in our samples. The setup process may vary\nfor other [implementation scenarios](/identity/protocols/OAuth2).\n\n1. Go to the [Google API Console](https://console.developers.google.com/apis/library) and select your project.\n2. From the menu, select **APIs \\& Services \\\u003e Credentials**.\n3. On the **Credentials** page, click **Create Credentials \\\u003e OAuth client ID**.\n\n | **Note:** If you're setting up a new project, you may be prompted to configure your project's consent screen.\n4. Select your **Application type** . In this example, the application type is\n **Web application**.\n\n5. Register the origins from which your app is allowed to access the Google\n APIs as follows:\n\n 1. To identify the client ID, enter a name.\n 2. In the **Authorized JavaScript origins** field, enter the origin for\n your app. This field doesn't allow wildcards.\n\n You can enter multiple origins to allow your app to run on different\n protocols, domains, or subdomains. The URLs you enter are allowed to\n start an OAuth request.\n\n The following example shows a local development URL (our samples use\n `localhost:8080`) and a production URL. \n\n http://localhost:8080\n https://myproductionurl.example.com\n\n 3. The **Authorized redirect URI** field is the endpoint that receives\n responses from the OAuth 2.0 server. Typically, this includes your\n development environment and points to a path in your application.\n\n http://localhost:8080/auth/google/callback\n https://myproductionurl.example.com/auth/google/callback\n\n 4. Click **Create**.\n\n\u003c!-- --\u003e\n\n6. From the resulting OAuth client dialog, copy the following:\n\n - Client ID\n - Client secret\n\n Your app can access the enabled Google APIs using these values.\n\nBefore you can launch a public application that accesses the Photos APIs,\nyour app must be reviewed by Google. An \"Unverified app\" message appears on the\nscreen when you test your application, until it is\n[verified](https://support.google.com/cloud/answer/7454865).\n\nAfter you've configured your app you're ready to get started:\n\n- [Get started with the Picker API](/photos/picker/guides/get-started-picker)\n- [Get started with the Library API](/photos/library/guides/get-started-library)\n\nChanging your client ID\n-----------------------\n\nResources created through any of the Google Photos APIs can only be accessed or\nmodified using the original client ID used to create them. For example, if you\ncreate a `session` in the Picker API with a specific client ID and later change\nthat client ID in your app, your app will lose access to any API resources\ncreated with the previous client ID.\n\nPlan carefully and choose the correct client ID type for the Photos API you are\nusing. Only change your client ID if absolutely necessary to avoid access\nissues."]]