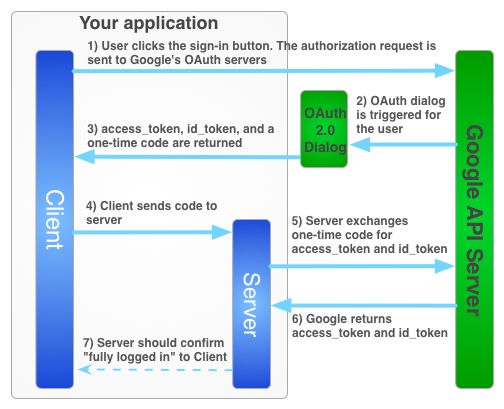
ユーザーがオフラインのときにユーザーに代わって Google サービスを使用するには、ハイブリッド サーバーサイド フローを使用する必要があります。このフローでは、ユーザーが JavaScript API クライアントを使用してクライアントサイドでアプリを承認し、特別な1 回限りの認可コードをサーバーに送信します。サーバーは、この 1 回限りのコードと交換して、Google から独自のアクセス トークンとリフレッシュ トークンを取得し、独自の API 呼び出しを行うことができます。これは、ユーザーがオフラインの場合でも実行できます。この 1 回限りのコードフローには、純粋なサーバーサイド フローやアクセス トークンをサーバーに送信するフローよりもセキュリティ上の利点があります。
サーバーサイド アプリケーションのアクセス トークンを取得するログインフローは次のとおりです。
1 回限りのコードには、セキュリティ上のいくつかのメリットがあります。Google はコードを使用して、トークンを仲介なしでサーバーに直接提供します。コードの漏洩はおすすめしませんが、クライアント シークレットなしでコードを使用することは非常に困難です。クライアント シークレットは控えておきましょう。
ワンタイム コードのフローを実装する
Google ログイン ボタンは、アクセス トークンと認証コードの両方を取得します。このコードは、サーバーが Google のサーバーと交換してアクセス トークンを取得できるワンタイム コードです。
次のサンプルコードは、ワンタイム コードフローを実行する方法を示しています。
ワンタイム コード フローで Google ログインを認証するには、次の要件を満たす必要があります。
ステップ 1: クライアント ID とクライアント シークレットを作成する
クライアント ID とクライアント シークレットを作成するには、Google API Console プロジェクトを作成し、OAuth クライアント ID を設定して、JavaScript 生成元を登録します。
Google API コンソールに移動します。
プロジェクトのプルダウンから既存のプロジェクトを選択するか、[新しいプロジェクトを作成] を選択して新しいプロジェクトを作成します。
[API とサービス] のサイドバーで [認証情報] を選択し、[同意画面を設定] をクリックします。
メールアドレスを選択し、プロダクト名を指定して、[Save] をクリックします。
[認証情報] タブで、[認証情報を作成] プルダウン リストを選択し、[OAuth クライアント ID] を選択します。
[アプリケーションの種類] で、[ウェブ アプリケーション] を選択します。
次のように、アプリに Google API へのアクセスを許可するオリジンを登録します。オリジンは、プロトコル、ホスト名、ポートの一意の組み合わせです。
[承認済み JavaScript 生成元] フィールドに、アプリの生成元を入力します。複数の生成元を入力して、異なるプロトコル、ドメイン、サブドメインでアプリを実行させることができます。ワイルドカードは使用できません。次の例では、2 番目の URL は本番環境の URL です。
http://localhost:8080 https://myproductionurl.example.com[承認済みのリダイレクト URI] フィールドに値を指定する必要はありません。リダイレクト URI は JavaScript API では使用されません。
[作成] ボタンを押します。
表示される [OAuth クライアント] ダイアログ ボックスで、クライアント ID をコピーします。クライアント ID を使用すると、有効な Google API にアプリからアクセスできるようになります。
ステップ 2: ページに Google プラットフォーム ライブラリを含める
この index.html ウェブページの DOM にスクリプトを挿入する匿名関数を示す次のスクリプトを追加します。
<!-- The top of file index.html -->
<html itemscope itemtype="http://schema.org/Article">
<head>
  <!-- BEGIN Pre-requisites -->
  <script src="//ajax.googleapis.com/ajax/libs/jquery/1.8.2/jquery.min.js">
  </script>
  <script src="https://apis.google.com/js/client:platform.js?onload=start" async defer>
  </script>
  <!-- END Pre-requisites -->
ステップ 3: GoogleAuth オブジェクトを初期化する
auth2 ライブラリを読み込み、gapi.auth2.init() を呼び出して GoogleAuth オブジェクトを初期化します。init() を呼び出すときに、クライアント ID とリクエストするスコープを指定します。
<!-- Continuing the <head> section -->
  <script>
    function start() {
      gapi.load('auth2', function() {
        auth2 = gapi.auth2.init({
          client_id: 'YOUR_CLIENT_ID.apps.googleusercontent.com',
          // Scopes to request in addition to 'profile' and 'email'
          //scope: 'additional_scope'
        });
      });
    }
  </script>
</head>
<body>
  <!-- ... -->
</body>
</html>
ステップ 4: ログイン ボタンをページに追加する
ウェブページにログインボタンを追加し、クリック ハンドラを接続して grantOfflineAccess() を呼び出して、ワンタイム コード フローを開始します。
<!-- Add where you want your sign-in button to render -->
<!-- Use an image that follows the branding guidelines in a real app -->
<button id="signinButton">Sign in with Google</button>
<script>
  $('#signinButton').click(function() {
    // signInCallback defined in step 6.
    auth2.grantOfflineAccess().then(signInCallback);
  });
</script>
ステップ 5: ユーザーをログインさせる
ユーザーがログインボタンをクリックし、リクエストした権限へのアクセスをアプリに許可します。次に、grantOfflineAccess().then() メソッドで指定したコールバック関数に、認証コードを含む JSON オブジェクトが渡されます。例:
{"code":"4/yU4cQZTMnnMtetyFcIWNItG32eKxxxgXXX-Z4yyJJJo.4qHskT-UtugceFc0ZRONyF4z7U4UmAI"}
ステップ 6: 認可コードをサーバーに送信する
code は、サーバーが独自のアクセス トークンと更新トークンと交換できるワンタイム コードです。更新トークンは、ユーザーにオフライン アクセスをリクエストする承認ダイアログが表示された後にのみ取得できます。ステップ 4 の OfflineAccessOptions で select-account prompt を指定した場合、以降のエクスチェンジで更新トークンの null が返されるため、取得した更新トークンを後で使用できるように保存する必要があります。このフローにより、標準の OAuth 2.0 フローよりもセキュリティが強化されます。
アクセス トークンは常に有効な認証コードと交換されると返されます。
次のスクリプトは、ログイン ボタンのコールバック関数を定義します。ログインが成功すると、この関数はクライアントサイドで使用するためのアクセス トークンを保存し、同じドメインのサーバーにワンタイム コードを送信します。
<!-- Last part of BODY element in file index.html -->
<script>
function signInCallback(authResult) {
  if (authResult['code']) {

    // Hide the sign-in button now that the user is authorized, for example:
    $('#signinButton').attr('style', 'display: none');

    // Send the code to the server
    $.ajax({
      type: 'POST',
      url: 'http://example.com/storeauthcode',
      // Always include an `X-Requested-With` header in every AJAX request,
      // to protect against CSRF attacks.
      headers: {
        'X-Requested-With': 'XMLHttpRequest'
      },
      contentType: 'application/octet-stream; charset=utf-8',
      success: function(result) {
        // Handle or verify the server response.
      },
      processData: false,
      data: authResult['code']
    });
  } else {
    // There was an error.
  }
}
</script>
ステップ 7: 認証コードをアクセス トークンと交換する
サーバーで、認証コードをアクセス トークンおよび更新トークンと交換します。アクセス トークンを使用して、ユーザーに代わって Google API を呼び出します。必要に応じて、更新トークンを保存し、アクセス トークンが期限切れになったときに新しいアクセス トークンを取得します。
プロフィールへのアクセスをリクエストした場合は、ユーザーの基本的なプロフィール情報を含む ID トークンも取得されます。
次に例を示します。
Java
// (Receive authCode via HTTPS POST)


if (request.getHeader("X-Requested-With") == null) {
  // Without the `X-Requested-With` header, this request could be forged. Aborts.
}

// Set path to the Web application client_secret_*.json file you downloaded from the
// Google API Console: https://console.cloud.google.com/apis/credentials
// You can also find your Web application client ID and client secret from the
// console and specify them directly when you create the GoogleAuthorizationCodeTokenRequest
// object.
String CLIENT_SECRET_FILE = "/path/to/client_secret.json";

// Exchange auth code for access token
GoogleClientSecrets clientSecrets =
    GoogleClientSecrets.load(
        JacksonFactory.getDefaultInstance(), new FileReader(CLIENT_SECRET_FILE));
GoogleTokenResponse tokenResponse =
          new GoogleAuthorizationCodeTokenRequest(
              new NetHttpTransport(),
              JacksonFactory.getDefaultInstance(),
              "https://oauth2.googleapis.com/token",
              clientSecrets.getDetails().getClientId(),
              clientSecrets.getDetails().getClientSecret(),
              authCode,
              REDIRECT_URI)  // Specify the same redirect URI that you use with your web
                             // app. If you don't have a web version of your app, you can
                             // specify an empty string.
              .execute();

String accessToken = tokenResponse.getAccessToken();

// Use access token to call API
GoogleCredential credential = new GoogleCredential().setAccessToken(accessToken);
Drive drive =
    new Drive.Builder(new NetHttpTransport(), JacksonFactory.getDefaultInstance(), credential)
        .setApplicationName("Auth Code Exchange Demo")
        .build();
File file = drive.files().get("appfolder").execute();

// Get profile info from ID token
GoogleIdToken idToken = tokenResponse.parseIdToken();
GoogleIdToken.Payload payload = idToken.getPayload();
String userId = payload.getSubject();  // Use this value as a key to identify a user.
String email = payload.getEmail();
boolean emailVerified = Boolean.valueOf(payload.getEmailVerified());
String name = (String) payload.get("name");
String pictureUrl = (String) payload.get("picture");
String locale = (String) payload.get("locale");
String familyName = (String) payload.get("family_name");
String givenName = (String) payload.get("given_name");
Python
from apiclient import discovery
import httplib2
from oauth2client import client

# (Receive auth_code by HTTPS POST)


# If this request does not have `X-Requested-With` header, this could be a CSRF
if not request.headers.get('X-Requested-With'):
    abort(403)

# Set path to the Web application client_secret_*.json file you downloaded from the
# Google API Console: https://console.cloud.google.com/apis/credentials
CLIENT_SECRET_FILE = '/path/to/client_secret.json'

# Exchange auth code for access token, refresh token, and ID token
credentials = client.credentials_from_clientsecrets_and_code(
    CLIENT_SECRET_FILE,
    ['https://www.googleapis.com/auth/drive.appdata', 'profile', 'email'],
    auth_code)

# Call Google API
http_auth = credentials.authorize(httplib2.Http())
drive_service = discovery.build('drive', 'v3', http=http_auth)
appfolder = drive_service.files().get(fileId='appfolder').execute()

# Get profile info from ID token
userid = credentials.id_token['sub']
email = credentials.id_token['email']
