如果支援使用 Google 帳戶登入,就可以使用 One Tap 登入功能 客戶也能享有順暢的帳戶建立體驗, 絕不會從應用程式內容中去掉這些元素。
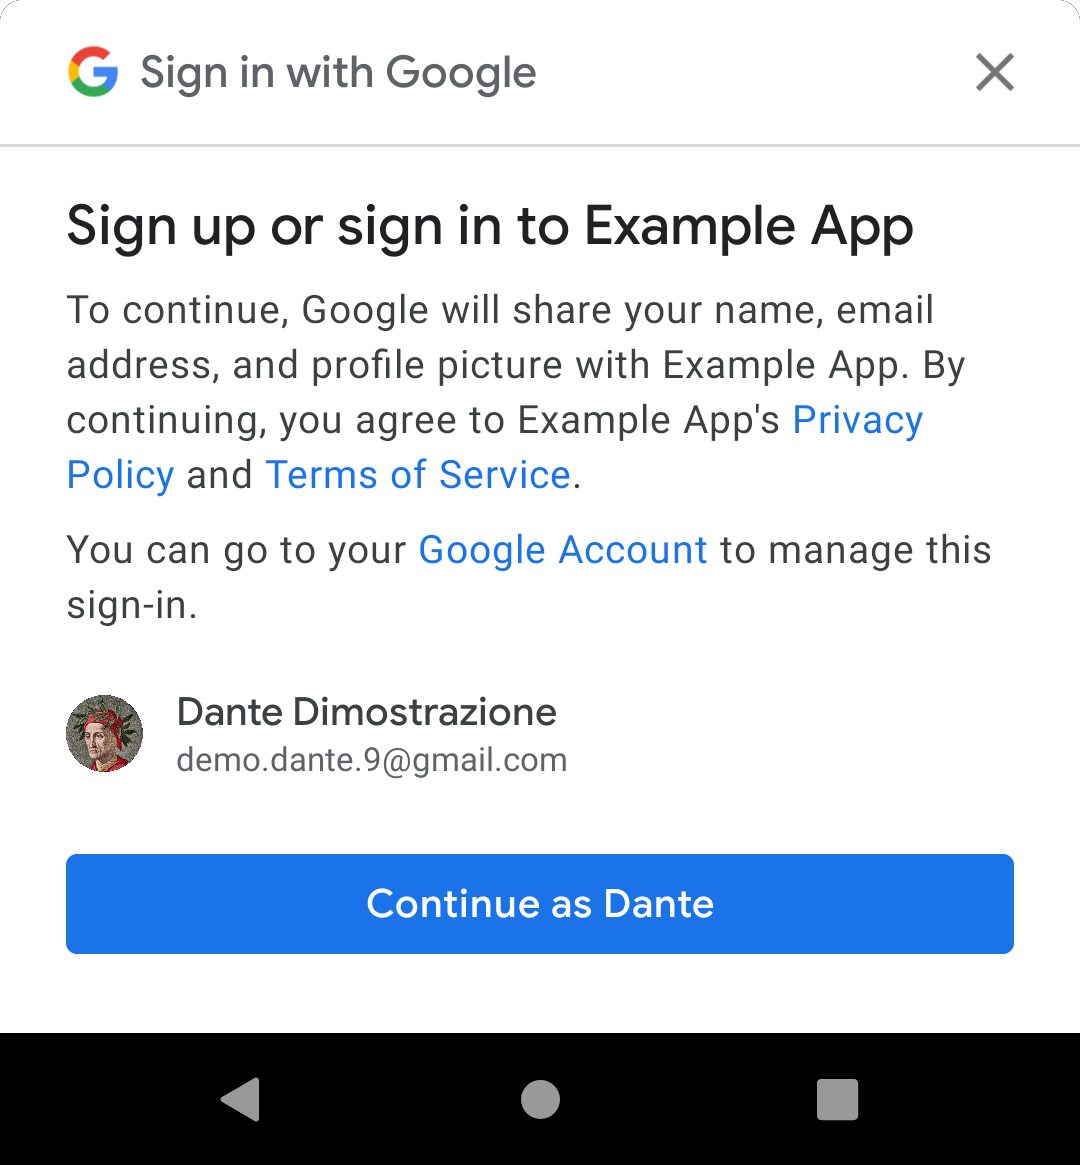
當您顯示 One Tap UI 時,系統會提示使用者建立新帳戶: 在裝置上透過其中一個 Google 帳戶存取應用程式。如果使用者選擇 繼續操作後,您會取得含有基本個人資料的 ID 權杖,也就是 姓名、個人資料相片及已驗證的電子郵件地址。您可以使用以下地址: 建立新帳戶。
One Tap 帳戶建立流程分為兩個部分:
- 按照本頁說明將 One Tap 用戶端整合至應用程式。 這與使用 One Tap 登入功能大致相同,只是以下差異: 此外還會從 0 自動調整資源配置 您完全不必調整資源調度設定
- 在後端中新增可透過 Google ID 建立使用者帳戶的功能 權杖,請參閱「在後端使用 ID 權杖」一文。
哪裡可以使用 One Tap 註冊功能?
在以下情境中,最適合為使用者提供 One Tap 註冊功能的位置 登入帳戶就會啟用新功能首先,嘗試透過 已儲存的憑證。如果找不到已儲存的憑證,表示需要建立新的憑證 帳戶。
事前準備
按照說明設定 Google API 控制台專案和 Android 專案 請參閱「開始使用 One Tap 登入」一文。
1. 設定 One Tap 用戶端
如要設定用於建立帳戶的 One Tap 用戶端,請按照下列步驟操作:
- 請勿啟用密碼憑證要求。(只有輕觸一下可以註冊 權杖式驗證)。
使用
setGoogleIdTokenRequestOptions()和 這些設定:- 將伺服器用戶端 ID 設為您在 Google API 中建立的 ID 控制台。請注意,這是伺服器的用戶端 ID,不是 您的 Android 用戶端 ID。
- 設定用戶端以顯示裝置上所有 Google 帳戶。 請不要根據授權帳戶進行篩選
- 你也可以視需要要求已驗證的手機號碼 數字 。
Java
public class YourActivity extends AppCompatActivity {

  // ...

  private SignInClient oneTapClient;
  private BeginSignInRequest signUpRequest;

  @Override
  public void onCreate(@Nullable Bundle savedInstanceState,
                       @Nullable PersistableBundle persistentState) {
      super.onCreate(savedInstanceState, persistentState);

      oneTapClient = Identity.getSignInClient(this);
      signUpRequest = BeginSignInRequest.builder()
              .setGoogleIdTokenRequestOptions(GoogleIdTokenRequestOptions.builder()
                      .setSupported(true)
                      // Your server's client ID, not your Android client ID.
                      .setServerClientId(getString(R.string.your_web_client_id))
                      // Show all accounts on the device.
                      .setFilterByAuthorizedAccounts(false)
                      .build())
              .build();

      // ...
  }
}
Kotlin
class YourActivity : AppCompatActivity() {
    // ...

    private lateinit var oneTapClient: SignInClient
    private lateinit var signUpRequest: BeginSignInRequest

    override fun onCreate(savedInstanceState: Bundle?) {
        super.onCreate(savedInstanceState)
        setContentView(R.layout.activity_main)

        oneTapClient = Identity.getSignInClient(this)
        signUpRequest = BeginSignInRequest.builder()
            .setGoogleIdTokenRequestOptions(
                BeginSignInRequest.GoogleIdTokenRequestOptions.builder()
                    .setSupported(true)
                    // Your server's client ID, not your Android client ID.
                    .setServerClientId(getString(R.string.your_web_client_id))
                    // Show all accounts on the device.
                    .setFilterByAuthorizedAccounts(false)
                    .build())
            .build()
        // ...
    }
    // ...
}
2. 追蹤 One Tap UI 取消作業
您必須追蹤使用者是否已拒絕使用 One Tap 關閉提示或輕觸提示以外的位置。這可以是 做為活動的布林值屬性(請參閱停止顯示 One Tap UI)。
3. 顯示 One Tap 註冊 UI
如果使用者未拒絕使用 One Tap 建立新帳戶,請呼叫
用戶端物件的 beginSignIn() 方法,並將事件監聽器附加到 Task
就會傳回值。如未找到 One Tap 登入要求,應用程式通常會執行這個步驟
任何已儲存的憑證,也就是在登入失敗事件監聽器中
請求。
One Tap 用戶端會在使用者
裝置上設定的 Google 帳戶。在成功事件監聽器中,取得
定義意圖,並將該意圖傳遞至 Task,並傳遞至 startIntentSenderForResult()
啟動 One Tap UI
如果使用者在裝置上沒有 Google 帳戶,One Tap 用戶端 會呼叫失敗監聽器。在這種情況下,您無需採取任何行動: 繼續呈現未登入狀態的應用程式 以一般帳戶建立流程註冊
Java
oneTapClient.beginSignIn(signUpRequest)
        .addOnSuccessListener(this, new OnSuccessListener<BeginSignInResult>() {
            @Override
            public void onSuccess(BeginSignInResult result) {
                try {
                    startIntentSenderForResult(
                            result.getPendingIntent().getIntentSender(), REQ_ONE_TAP,
                            null, 0, 0, 0);
                } catch (IntentSender.SendIntentException e) {
                    Log.e(TAG, "Couldn't start One Tap UI: " + e.getLocalizedMessage());
                }
            }
        })
        .addOnFailureListener(this, new OnFailureListener() {
            @Override
            public void onFailure(@NonNull Exception e) {
                // No Google Accounts found. Just continue presenting the signed-out UI.
                Log.d(TAG, e.getLocalizedMessage());
            }
        });
Kotlin
oneTapClient.beginSignIn(signUpRequest)
    .addOnSuccessListener(this) { result ->
        try {
            startIntentSenderForResult(
                result.pendingIntent.intentSender, REQ_ONE_TAP,
                null, 0, 0, 0)
        } catch (e: IntentSender.SendIntentException) {
            Log.e(TAG, "Couldn't start One Tap UI: ${e.localizedMessage}")
        }
    }
    .addOnFailureListener(this) { e ->
        // No Google Accounts found. Just continue presenting the signed-out UI.
        Log.d(TAG, e.localizedMessage)
    }
4. 處理使用者回應
使用者對 One Tap 註冊提示的回覆會回報給您的應用程式
使用活動的 onActivityResult() 方法。如果使用者選擇建立
帳戶,結果就會是 Google ID 權杖。如果使用者拒絕註冊
方法是關閉 One Tap UI 或輕觸其他位置
兌換代碼:RESULT_CANCELED。您的應用程式需要同時處理這兩種可能性。
使用 Google ID 權杖建立帳戶
如果使用者選擇以 Google 帳戶註冊,您可以取得
將意圖資料從 onActivityResult() 傳遞至 One Tap
用戶端的 getSignInCredentialFromIntent() 方法。憑證會包含
非空值的 googleIdToken 屬性。
使用 ID 憑證在後端建立帳戶 (請參閱使用 後端連結,) 並登入使用者。
憑證也包含您要求的任何其他詳細資料,例如 已驗證帳戶的電話號碼 (如果有的話)。
Java
public class YourActivity extends AppCompatActivity {

  // ...
  private static final int REQ_ONE_TAP = 2;  // Can be any integer unique to the Activity.
  private boolean showOneTapUI = true;
  // ...

  @Override
  protected void onActivityResult(int requestCode, int resultCode, @Nullable Intent data) {
      super.onActivityResult(requestCode, resultCode, data);

      switch (requestCode) {
          case REQ_ONE_TAP:
              try {
                  SignInCredential credential = oneTapClient.getSignInCredentialFromIntent(data);
                  String idToken = credential.getGoogleIdToken();
                  if (idToken !=  null) {
                      // Got an ID token from Google. Use it to authenticate
                      // with your backend.
                      Log.d(TAG, "Got ID token.");
                  }
              } catch (ApiException e) {
                  // ...
              }
              break;
      }
  }
}
Kotlin
class YourActivity : AppCompatActivity() {

    // ...
    private val REQ_ONE_TAP = 2  // Can be any integer unique to the Activity
    private var showOneTapUI = true
    // ...

    override fun onActivityResult(requestCode: Int, resultCode: Int, data: Intent?) {
        super.onActivityResult(requestCode, resultCode, data)

        when (requestCode) {
             REQ_ONE_TAP -> {
                try {
                    val credential = oneTapClient.getSignInCredentialFromIntent(data)
                    val idToken = credential.googleIdToken
                    when {
                        idToken != null -> {
                            // Got an ID token from Google. Use it to authenticate
                            // with your backend.
                            Log.d(TAG, "Got ID token.")
                        }
                        else -> {
                            // Shouldn't happen.
                            Log.d(TAG, "No ID token!")
                        }
                    }
                } catch (e: ApiException) {
                    // ...
            }
        }
    }
    // ...
}
停止顯示 One Tap UI
如果使用者拒絕登入,系統會呼叫 getSignInCredentialFromIntent()
將會擲回包含 CommonStatusCodes.CANCELED 狀態碼的 ApiException。
發生這種情況時,建議您暫時停止顯示 One Tap 登入 UI
讓系統重複提示,以免使用者感到不悅以下範例
方法是在「活動」上設定屬性,然後利用該屬性來
判斷是否要為使用者提供 One Tap 登入功能;但您也可以
請將值儲存至 SharedPreferences,或使用其他方法。
請務必自行實作 One Tap 登入提示的頻率限制。 如果不是,而使用者連續取消多次提示,One Tap 用戶端 不會在接下來的 24 小時內提示使用者
Java
public class YourActivity extends AppCompatActivity {

  // ...
  private static final int REQ_ONE_TAP = 2;  // Can be any integer unique to the Activity.
  private boolean showOneTapUI = true;
  // ...

  @Override
  protected void onActivityResult(int requestCode, int resultCode, @Nullable Intent data) {
      super.onActivityResult(requestCode, resultCode, data);

      switch (requestCode) {
          case REQ_ONE_TAP:
              try {
                  // ...
              } catch (ApiException e) {
                  switch (e.getStatusCode()) {
                      case CommonStatusCodes.CANCELED:
                          Log.d(TAG, "One-tap dialog was closed.");
                          // Don't re-prompt the user.
                          showOneTapUI = false;
                          break;
                      case CommonStatusCodes.NETWORK_ERROR:
                          Log.d(TAG, "One-tap encountered a network error.");
                          // Try again or just ignore.
                          break;
                      default:
                          Log.d(TAG, "Couldn't get credential from result."
                                  + e.getLocalizedMessage());
                          break;
                  }
              }
              break;
      }
  }
}
Kotlin
class YourActivity : AppCompatActivity() {

    // ...
    private val REQ_ONE_TAP = 2  // Can be any integer unique to the Activity
    private var showOneTapUI = true
    // ...

    override fun onActivityResult(requestCode: Int, resultCode: Int, data: Intent?) {
        super.onActivityResult(requestCode, resultCode, data)

        when (requestCode) {
            REQ_ONE_TAP -> {
                try {
                    // ...
                } catch (e: ApiException) {
                    when (e.statusCode) {
                        CommonStatusCodes.CANCELED -> {
                            Log.d(TAG, "One-tap dialog was closed.")
                            // Don't re-prompt the user.
                            showOneTapUI = false
                        }
                        CommonStatusCodes.NETWORK_ERROR -> {
                            Log.d(TAG, "One-tap encountered a network error.")
                            // Try again or just ignore.
                        }
                        else -> {
                            Log.d(TAG, "Couldn't get credential from result." +
                                " (${e.localizedMessage})")
                        }
                    }
                }
            }
        }
    }
    // ...
}
後續步驟
使用者完成 One Tap 註冊流程後,您會取得 Google ID 權杖。 其中包括一些基本個人資料資訊,包括使用者的電子郵件地址、全名 以及個人資料相片網址對於許多應用程式而言,這些資訊足以讓您 在後端驗證使用者並建立新帳戶。
如果您需要額外資訊才能完成帳戶建立程序,例如 使用者的出生日期:向使用者顯示註冊詳細資料流程, 要求您提供這項額外資訊然後把它傳送到後端,以完成帳戶建立程序。