نظرة عامة
تضيف ميزة الربط المُبسَّط لميزة "تسجيل الدخول باستخدام حساب Google" المستندة إلى OAuth ميزة "تسجيل الدخول باستخدام حساب Google" إلى ربط OAuth. يقدّم ذلك تجربة ربط سلسة لمستخدمي Google، كما يتيح إنشاء الحسابات، ما يسمح للمستخدم بإنشاء حساب جديد على خدمتك باستخدام حسابه على Google.
لإجراء عملية ربط الحساب باستخدام بروتوكول OAuth وميزة "تسجيل الدخول باستخدام حساب Google"، اتّبِع الخطوات العامة التالية:
- أولاً، اطلب من المستخدم الموافقة على الوصول إلى ملفه الشخصي على Google.
- استخدِم المعلومات الواردة في ملفه الشخصي للتحقّق مما إذا كان حساب المستخدم متوفّرًا.
- بالنسبة إلى المستخدمين الحاليين، عليك ربط الحسابات.
- إذا لم تتمكّن من العثور على مطابقة لمستخدم Google في نظام المصادقة، عليك التحقّق من صحة الرمز المميّز للهوية الذي تم تلقّيه من Google. يمكنك بعد ذلك إنشاء مستخدم استنادًا إلى معلومات الملف الشخصي الواردة في رمز التعريف.
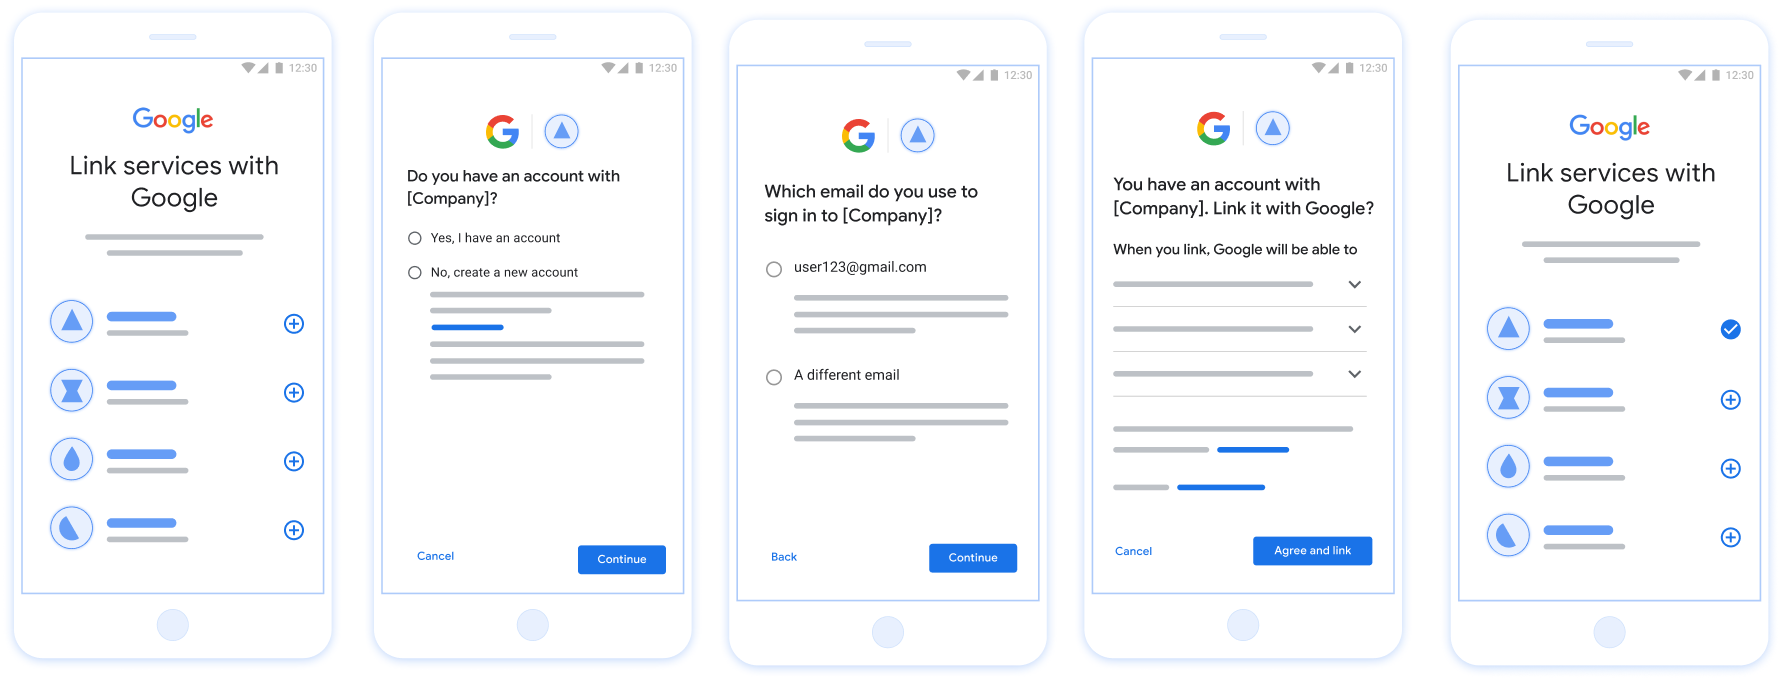
الشكل 1: ربط الحساب على هاتف المستخدم باستخدام ميزة "الربط الميسّر"
متطلبات ميزة "الربط الميسّر"
- نفِّذ خطوات الربط الأساسي عبر بروتوكول OAuth على الويب. يجب أن تتوافق خدمتك مع نقاط نهاية التفويض واستبدال الرموز المميَّزة المتوافقة مع OAuth 2.0.
- يجب أن تتيح نقطة نهاية تبادل الرموز المميّزة رموز JSON المميّزة للويب (JWT) وتنفيذ النية
check
وcreate
وget
.
تنفيذ خادم OAuth
يجب أن تتيح نقطة نهاية تبادل الرموز المميّزة نوايا check
وcreate
وget
. يوضّح الجدول أدناه الخطوات التي تم إكمالها خلال عملية ربط الحساب ويشير إلى وقت استدعاء النوايا المختلفة:
- هل لدى المستخدم حساب في نظام المصادقة؟ (يحدد المستخدم ذلك من خلال اختيار "نعم" أو "لا")
- نعم : هل يستخدم المستخدم عنوان البريد الإلكتروني المرتبط بحسابه على Google لتسجيل الدخول إلى منصتك؟ (يحدد المستخدم ذلك عن طريق اختيار "نعم" أو "لا")
- نعم : هل لدى المستخدم حساب مطابق في نظام المصادقة؟ (يتم الاتصال بالرقم
check intent
للتأكيد)- نعم : يتمّ استدعاء
get intent
ويتمّ ربط الحساب إذا تمّ عرض النيّة بنجاح. - لا، هل تريد إنشاء حساب جديد؟ (يحدد المستخدم ذلك عن طريق اختيار "نعم" أو "لا")
- نعم : يتمّ استدعاء
create intent
ويتمّ ربط الحساب إذا تمّ عرض نية الإنشاء بنجاح. - لا : يتم بدء عملية Web OAuth، ويتم توجيه المستخدم إلى المتصفّح، ويتم منح المستخدم خيار الربط ببريد إلكتروني مختلف.
- نعم : يتمّ استدعاء
- لا : يتم تفعيل مسار Web OAuth، ويتم توجيه المستخدم إلى المتصفّح، ويتم منح المستخدم خيار الربط ببريد إلكتروني مختلف.
- نعم : هل لدى المستخدم حساب مطابق في نظام المصادقة؟ (يتم الاتصال بالرقم
- لا : هل لدى المستخدم حساب مطابق في نظام المصادقة؟ (يتم الاتصال بالرقم
check intent
للتأكيد)- نعم : يتمّ استدعاء
get intent
ويتمّ ربط الحساب إذا تمّ عرض النيّة بنجاح. - لا : يتمّ استدعاء
create intent
ويتمّ ربط الحساب إذا تمّ عرض نية الإنشاء بنجاح.
- نعم : يتمّ استدعاء
- نعم : هل يستخدم المستخدم عنوان البريد الإلكتروني المرتبط بحسابه على Google لتسجيل الدخول إلى منصتك؟ (يحدد المستخدم ذلك عن طريق اختيار "نعم" أو "لا")
التحقّق من توفّر حساب مستخدم حالي (التحقّق من النية)
بعد أن يمنح المستخدِم موافقته على الوصول إلى ملفه الشخصي في Google، ترسل Google طلب يتضمن تأكيدًا موقَّعًا على هوية مستخدم Google. تشير رسالة الأشكال البيانية يحتوي تأكيد البيانات على معلومات تشتمل على رقم تعريف حساب المستخدم على Google، والاسم وعنوان البريد الإلكتروني. نقطة نهاية تبادل الرموز المميّزة التي تم ضبطها المشروع أن يتعامل مع هذا الطلب.
في حال توفُّر حساب Google المناسب في المصادقة
فإن نقطة نهاية تبادل الرمز المميز تستجيب باستخدام account_found=true
. إذا كانت
لا يتطابق حساب Google مع مستخدم حالي، نقطة نهاية تبادل الرموز المميّزة
تعرض الخطأ HTTP 404 لم يتم العثور على الصفحة مع account_found=false
.
يكون الطلب بالشكل التالي:
POST /token HTTP/1.1 Host: oauth2.example.com Content-Type: application/x-www-form-urlencoded grant_type=urn:ietf:params:oauth:grant-type:jwt-bearer&intent=check&assertion=JWT&scope=SCOPES&client_id=GOOGLE_CLIENT_ID&client_secret=GOOGLE_CLIENT_SECRET
يجب أن تتمكّن نقطة نهاية تبادل الرموز المميّزة من معالجة المَعلمات التالية:
مَعلمات نقطة نهاية الرمز المميّز | |
---|---|
intent |
بالنسبة إلى هذه الطلبات، تكون قيمة هذه المعلمة
check |
grant_type |
تمثّل هذه السمة نوع الرمز المميّز الذي يتم تبادله. بالنسبة لهذه الطلبات، سيتم
المعلَمة urn:ietf:params:oauth:grant-type:jwt-bearer . |
assertion |
يشير هذا المصطلح إلى رمز JSON المميّز للويب (JWT) ويقدِّم تأكيدًا موقَّعًا على بيانات وهوية المستخدم. يحتوي JWT على معلومات تتضمن عنوان URL الخاص رقم تعريف حساب Google والاسم وعنوان البريد الإلكتروني |
client_id |
معرِّف العميل الذي عيّنته لـ Google. |
client_secret |
سر العميل الذي خصّصته لـ Google. |
للردّ على طلبات intent لـ check
، يجب أن تنفِّذ نقطة نهاية تبادل الرموز المميّزة الخطوات التالية:
- التحقق من صحة تأكيد JWT وفك ترميزه
- تحقَّق مما إذا كان حساب Google متوفّرًا من قبل في نظام المصادقة.
Validate and decode the JWT assertion
You can validate and decode the JWT assertion by using a JWT-decoding library for your language. Use Google's public keys, available in JWK or PEM formats, to verify the token's signature.
When decoded, the JWT assertion looks like the following example:
{ "sub": "1234567890", // The unique ID of the user's Google Account "iss": "https://accounts.google.com", // The assertion's issuer "aud": "123-abc.apps.googleusercontent.com", // Your server's client ID "iat": 233366400, // Unix timestamp of the assertion's creation time "exp": 233370000, // Unix timestamp of the assertion's expiration time "name": "Jan Jansen", "given_name": "Jan", "family_name": "Jansen", "email": "jan@gmail.com", // If present, the user's email address "email_verified": true, // true, if Google has verified the email address "hd": "example.com", // If present, the host domain of the user's GSuite email address // If present, a URL to user's profile picture "picture": "https://lh3.googleusercontent.com/a-/AOh14GjlTnZKHAeb94A-FmEbwZv7uJD986VOF1mJGb2YYQ", "locale": "en_US" // User's locale, from browser or phone settings }
In addition to verifying the token's signature, verify that the assertion's
issuer (iss
field) is https://accounts.google.com
, that the audience
(aud
field) is your assigned client ID, and that the token has not expired
(exp
field).
Using the email
, email_verified
and hd
fields you can determine if
Google hosts and is authoritative for an email address. In cases where Google is
authoritative the user is currently known to be the legitimate account owner
and you may skip password or other challenges methods. Otherwise, these methods
can be used to verify the account prior to linking.
Cases where Google is authoritative:
email
has a@gmail.com
suffix, this is a Gmail account.email_verified
is true andhd
is set, this is a G Suite account.
Users may register for Google Accounts without using Gmail or G Suite. When
email
does not contain a @gmail.com
suffix and hd
is absent Google is not
authoritative and password or other challenge methods are recommended to verify
the user. email_verified
can also be true as Google initially verified the
user when the Google account was created, however ownership of the third party
email account may have since changed.
التأكّد من توفّر حساب Google في نظام المصادقة
تحقق مما إذا كان أي من الشروط التالية صحيحًا:
- رقم تعريف حساب Google، الوارد في حقل
sub
في التأكيد، موجود في حساب المستخدم. قاعدة البيانات. - يتطابق عنوان البريد الإلكتروني الوارد في التأكيد مع مستخدم في قاعدة بيانات المستخدم الخاصة بك.
في حال استيفاء أيٌّ من الشروط، يعني هذا أنّ المستخدم قد اشترك في الخدمة من قبل. في هذه الحالة، إرجاع رد مثل ما يلي:
HTTP/1.1 200 Success Content-Type: application/json;charset=UTF-8 { "account_found":"true", }
إذا لم يكن معرّف حساب Google أو عنوان البريد الإلكتروني المحددَين في
تطابق تأكيد مع مستخدم في قاعدة البيانات الخاصة بك، لم يشترك المستخدم بعد. ضِمن
في هذه الحالة، تحتاج نقطة نهاية تبادل الرمز المميّز إلى الردّ مع عرض خطأ HTTP 404
تحدّد هذه السمة "account_found": "false"
، كما في المثال التالي:
HTTP/1.1 404 Not found Content-Type: application/json;charset=UTF-8 { "account_found":"false", }
Handle automatic linking (get intent)
After the user gives consent to access their Google profile, Google sends a request that contains a signed assertion of the Google user's identity. The assertion contains information that includes the user's Google Account ID, name, and email address. The token exchange endpoint configured for your project handles that request.
If the corresponding Google Account is already present in your authentication
system, your token exchange endpoint returns a token for the user. If the
Google Account doesn't match an existing user, your token exchange endpoint
returns a linking_error
error and optional login_hint
.
The request has the following form:
POST /token HTTP/1.1 Host: oauth2.example.com Content-Type: application/x-www-form-urlencoded grant_type=urn:ietf:params:oauth:grant-type:jwt-bearer&intent=get&assertion=JWT&scope=SCOPES&client_id=GOOGLE_CLIENT_ID&client_secret=GOOGLE_CLIENT_SECRET
Your token exchange endpoint must be able to handle the following parameters:
Token endpoint parameters | |
---|---|
intent |
For these requests, the value of this parameter is get . |
grant_type |
The type of token being exchanged. For these requests, this
parameter has the value urn:ietf:params:oauth:grant-type:jwt-bearer . |
assertion |
A JSON Web Token (JWT) that provides a signed assertion of the Google user's identity. The JWT contains information that includes the user's Google Account ID, name, and email address. |
scope |
Optional: Any scopes that you've configured Google to request from users. |
client_id |
The client ID you assigned to Google. |
client_secret |
The client secret you assigned to Google. |
To respond to the get
intent requests, your token exchange endpoint must perform the following steps:
- Validate and decode the JWT assertion.
- Check if the Google account is already present in your authentication system.
Validate and decode the JWT assertion
You can validate and decode the JWT assertion by using a JWT-decoding library for your language. Use Google's public keys, available in JWK or PEM formats, to verify the token's signature.
When decoded, the JWT assertion looks like the following example:
{ "sub": "1234567890", // The unique ID of the user's Google Account "iss": "https://accounts.google.com", // The assertion's issuer "aud": "123-abc.apps.googleusercontent.com", // Your server's client ID "iat": 233366400, // Unix timestamp of the assertion's creation time "exp": 233370000, // Unix timestamp of the assertion's expiration time "name": "Jan Jansen", "given_name": "Jan", "family_name": "Jansen", "email": "jan@gmail.com", // If present, the user's email address "email_verified": true, // true, if Google has verified the email address "hd": "example.com", // If present, the host domain of the user's GSuite email address // If present, a URL to user's profile picture "picture": "https://lh3.googleusercontent.com/a-/AOh14GjlTnZKHAeb94A-FmEbwZv7uJD986VOF1mJGb2YYQ", "locale": "en_US" // User's locale, from browser or phone settings }
In addition to verifying the token's signature, verify that the assertion's
issuer (iss
field) is https://accounts.google.com
, that the audience
(aud
field) is your assigned client ID, and that the token has not expired
(exp
field).
Using the email
, email_verified
and hd
fields you can determine if
Google hosts and is authoritative for an email address. In cases where Google is
authoritative the user is currently known to be the legitimate account owner
and you may skip password or other challenges methods. Otherwise, these methods
can be used to verify the account prior to linking.
Cases where Google is authoritative:
email
has a@gmail.com
suffix, this is a Gmail account.email_verified
is true andhd
is set, this is a G Suite account.
Users may register for Google Accounts without using Gmail or G Suite. When
email
does not contain a @gmail.com
suffix and hd
is absent Google is not
authoritative and password or other challenge methods are recommended to verify
the user. email_verified
can also be true as Google initially verified the
user when the Google account was created, however ownership of the third party
email account may have since changed.
Check if the Google account is already present in your authentication system
Check whether either of the following conditions are true:
- The Google Account ID, found in the assertion's
sub
field, is in your user database. - The email address in the assertion matches a user in your user database.
If an account is found for the user, issue an access token and return the values in a JSON object in the body of your HTTPS response, like in the following example:
{ "token_type": "Bearer", "access_token": "ACCESS_TOKEN", "refresh_token": "REFRESH_TOKEN", "expires_in": SECONDS_TO_EXPIRATION }
In some cases, account linking based on ID token might fail for the user. If it
does so for any reason, your token exchange endpoint needs to reply with a HTTP
401 error that specifies error=linking_error
, as the following example shows:
HTTP/1.1 401 Unauthorized Content-Type: application/json;charset=UTF-8 { "error":"linking_error", "login_hint":"foo@bar.com" }
When Google receives a 401 error response with linking_error
, Google sends
the user to your authorization endpoint with login_hint
as a parameter. The
user completes account linking using the OAuth linking flow in their browser.
Handle account creation via Google Sign-In (create intent)
When a user needs to create an account on your service, Google makes a request
to your token exchange endpoint that specifies intent=create
.
The request has the following form:
POST /token HTTP/1.1 Host: oauth2.example.com Content-Type: application/x-www-form-urlencoded response_type=token&grant_type=urn:ietf:params:oauth:grant-type:jwt-bearer&scope=SCOPES&intent=create&assertion=JWT&client_id=GOOGLE_CLIENT_ID&client_secret=GOOGLE_CLIENT_SECRET
Your token exchange endpoint must able to handle the following parameters:
Token endpoint parameters | |
---|---|
intent |
For these requests, the value of this parameter is create . |
grant_type |
The type of token being exchanged. For these requests, this
parameter has the value urn:ietf:params:oauth:grant-type:jwt-bearer . |
assertion |
A JSON Web Token (JWT) that provides a signed assertion of the Google user's identity. The JWT contains information that includes the user's Google Account ID, name, and email address. |
client_id |
The client ID you assigned to Google. |
client_secret |
The client secret you assigned to Google. |
The JWT within the assertion
parameter contains the user's Google Account ID,
name, and email address, which you can use to create a new account on your
service.
To respond to the create
intent requests, your token exchange endpoint must perform the following steps:
- Validate and decode the JWT assertion.
- Validate user information and create new account.
Validate and decode the JWT assertion
You can validate and decode the JWT assertion by using a JWT-decoding library for your language. Use Google's public keys, available in JWK or PEM formats, to verify the token's signature.
When decoded, the JWT assertion looks like the following example:
{ "sub": "1234567890", // The unique ID of the user's Google Account "iss": "https://accounts.google.com", // The assertion's issuer "aud": "123-abc.apps.googleusercontent.com", // Your server's client ID "iat": 233366400, // Unix timestamp of the assertion's creation time "exp": 233370000, // Unix timestamp of the assertion's expiration time "name": "Jan Jansen", "given_name": "Jan", "family_name": "Jansen", "email": "jan@gmail.com", // If present, the user's email address "email_verified": true, // true, if Google has verified the email address "hd": "example.com", // If present, the host domain of the user's GSuite email address // If present, a URL to user's profile picture "picture": "https://lh3.googleusercontent.com/a-/AOh14GjlTnZKHAeb94A-FmEbwZv7uJD986VOF1mJGb2YYQ", "locale": "en_US" // User's locale, from browser or phone settings }
In addition to verifying the token's signature, verify that the assertion's
issuer (iss
field) is https://accounts.google.com
, that the audience
(aud
field) is your assigned client ID, and that the token has not expired
(exp
field).
Using the email
, email_verified
and hd
fields you can determine if
Google hosts and is authoritative for an email address. In cases where Google is
authoritative the user is currently known to be the legitimate account owner
and you may skip password or other challenges methods. Otherwise, these methods
can be used to verify the account prior to linking.
Cases where Google is authoritative:
email
has a@gmail.com
suffix, this is a Gmail account.email_verified
is true andhd
is set, this is a G Suite account.
Users may register for Google Accounts without using Gmail or G Suite. When
email
does not contain a @gmail.com
suffix and hd
is absent Google is not
authoritative and password or other challenge methods are recommended to verify
the user. email_verified
can also be true as Google initially verified the
user when the Google account was created, however ownership of the third party
email account may have since changed.
Validate user information and create new account
Check whether either of the following conditions are true:
- The Google Account ID, found in the assertion's
sub
field, is in your user database. - The email address in the assertion matches a user in your user database.
If either condition is true, prompt the user to link their existing account
with their Google Account. To do so, respond to the request with an HTTP 401 error
that specifies error=linking_error
and gives the user's email address as the
login_hint
. The following is a sample response:
HTTP/1.1 401 Unauthorized Content-Type: application/json;charset=UTF-8 { "error":"linking_error", "login_hint":"foo@bar.com" }
When Google receives a 401 error response with linking_error
, Google sends
the user to your authorization endpoint with login_hint
as a parameter. The
user completes account linking using the OAuth linking flow in their browser.
If neither condition is true, create a new user account with the information provided in the JWT. New accounts don't typically have a password set. It's recommended that you add Google Sign-In to other platforms to enable users to log in with Google across the surfaces of your application. Alternatively, you can email the user a link that starts your password recovery flow to allow the user to set a password to sign in on other platforms.
When the creation is completed, issue an access token and return the values in a JSON object in the body of your HTTPS response, like in the following example:
{ "token_type": "Bearer", "access_token": "ACCESS_TOKEN", "refresh_token": "REFRESH_TOKEN", "expires_in": SECONDS_TO_EXPIRATION }
الحصول على معرّف عميل Google API
سيُطلب منك تقديم معرّف عميل Google API أثناء عملية تسجيل ميزة "ربط الحساب".
للحصول على معرِّف عميل واجهة برمجة التطبيقات باستخدام المشروع الذي أنشأته أثناء إكمال خطوات ربط OAuth. لإجراء ذلك، يُرجى إكمال الخطوات التالية:
- Go to the Credentials page.
أنشئ مشروعًا على Google APIs أو اختَره.
إذا لم يكن مشروعك يتضمّن معرّف عميل لنوع تطبيق الويب، انقر على إنشاء عميل لإنشاء معرّف. احرص على تضمين نطاق موقعك الإلكتروني في مربّع مصادر JavaScript المسموح بها. عند إجراء اختبارات محلية أو تطوير، يجب إضافة كل من
http://localhost
وhttp://localhost:<port_number>
إلى حقل مصادر JavaScript المعتمَدة.
التحقّق من صحة عملية التنفيذ
يمكنك التحقّق من صحة التنفيذ باستخدام أداة ساحة اختبار OAuth 2.0.
في الأداة، اتّبِع الخطوات التالية:
- انقر على رمز الإعدادات لفتح نافذة ضبط OAuth 2.0.
- في حقل مسار OAuth، اختَر جانب العميل.
- في الحقل نقاط نهاية OAuth، اختَر مخصّص.
- حدِّد نقطة نهاية OAuth 2.0 ومعرّف العميل الذي عيّنته لخدمة Google في الحقول المقابلة.
- في قسم الخطوة 1، لا تختَر أيّ نطاقات Google. بدلاً من ذلك، اترك هذا الحقل فارغًا أو اكتب نطاقًا صالحًا لخادمك (أو سلسلة عشوائية إذا كنت لا تستخدم نطاقات OAuth). عند الانتهاء، انقر على تفويض واجهات برمجة التطبيقات.
- في القسمَين الخطوة 2 والخطوة 3، انتقِل إلى مسار OAuth 2.0 وتحقَّق من أنّ كل خطوة تعمل على النحو المطلوب.
يمكنك التحقّق من صحة عملية التنفيذ باستخدام أداة العرض التوضيحي لربط حساب Google.
في الأداة، اتّبِع الخطوات التالية:
- انقر على الزر تسجيل الدخول باستخدام حساب Google.
- اختَر الحساب الذي تريد ربطه.
- أدخِل رقم تعريف الخدمة.
- يمكنك اختياريًا إدخال نطاق واحد أو أكثر لطلب الوصول إليه.
- انقر على بدء العرض التجريبي.
- أكِّد أنّه يمكنك الموافقة على طلب ربط الحساب ورفضه عندما يُطلب منك ذلك.
- تأكَّد من إعادة توجيهك إلى منصّتك.