खास जानकारी
OAuth पर आधारित, 'Google से साइन इन करें' की सुविधा के साथ आसानी से खाता लिंक करने की सुविधा, OAuth की मदद से खाता लिंक करने की सुविधा के साथ-साथ 'Google से साइन इन करें' की सुविधा भी जोड़ती है. इससे Google उपयोगकर्ताओं को बिना किसी रुकावट के खाते लिंक करने का अनुभव मिलता है. साथ ही, इससे खाता बनाने की सुविधा भी मिलती है. इसकी मदद से उपयोगकर्ता, Google खाते का इस्तेमाल करके आपकी सेवा पर नया खाता बना सकता है.
OAuth और 'Google से साइन इन करें' सुविधा का इस्तेमाल करके, खाता लिंक करने के लिए यह सामान्य तरीका अपनाएं:
- सबसे पहले, उपयोगकर्ता से उसकी Google प्रोफ़ाइल को ऐक्सेस करने की सहमति लें.
- उनकी प्रोफ़ाइल में मौजूद जानकारी का इस्तेमाल करके, यह पता लगाएं कि उपयोगकर्ता का खाता मौजूद है या नहीं.
- मौजूदा उपयोगकर्ताओं के लिए, खातों को लिंक करें.
- अगर आपको अपने पुष्टि करने वाले सिस्टम में Google उपयोगकर्ता का कोई मैच नहीं मिलता है, तो Google से मिले आईडी टोकन की पुष्टि करें. इसके बाद, आईडी टोकन में मौजूद प्रोफ़ाइल की जानकारी के आधार पर उपयोगकर्ता बनाया जा सकता है.
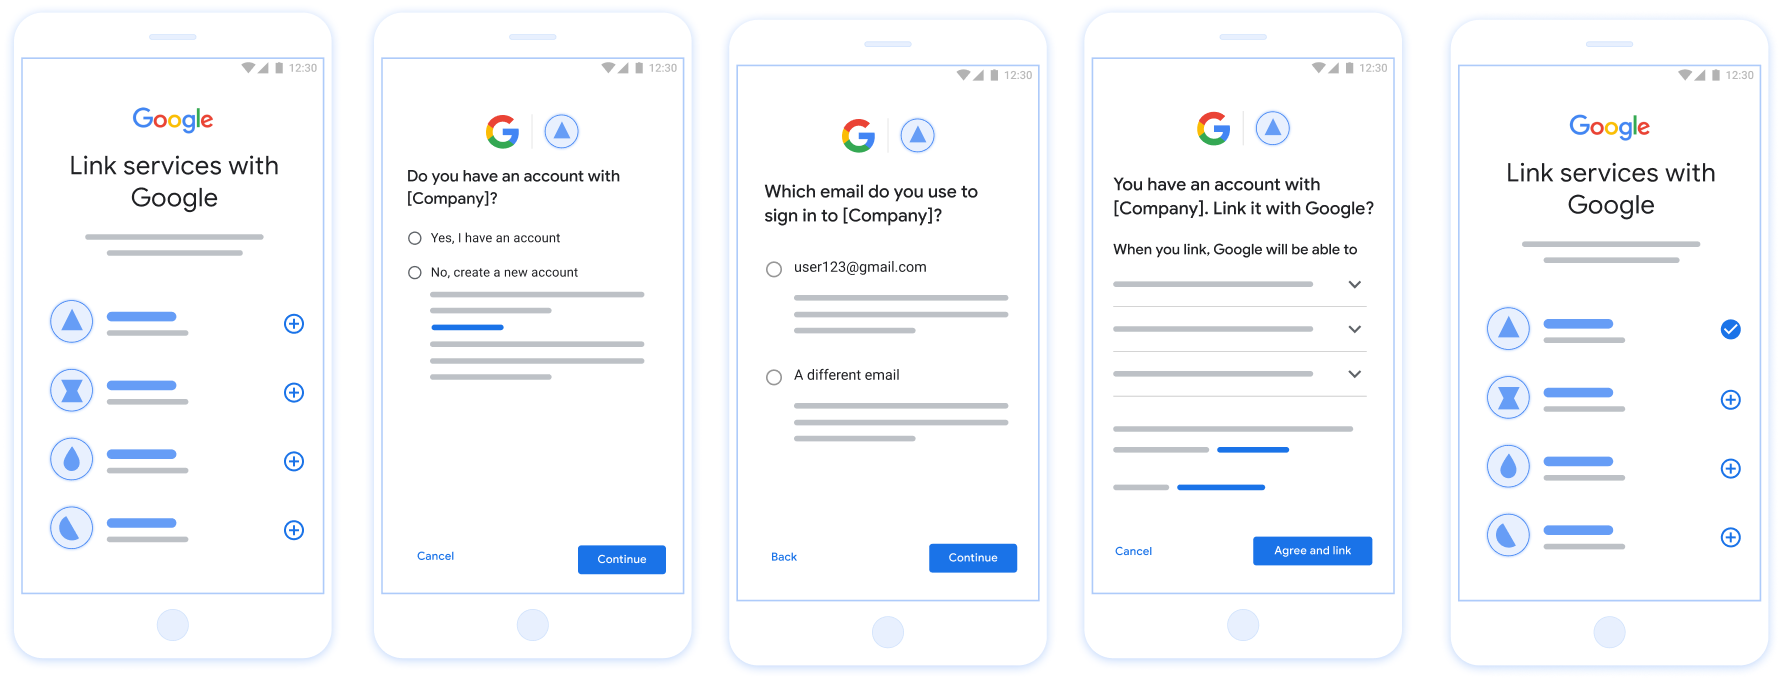
पहली इमेज. उपयोगकर्ता के फ़ोन पर, आसानी से खाता लिंक करने की सुविधा का इस्तेमाल करके खाता लिंक करना
लिंक करने की आसान प्रोसेस: OAuth + 'Google से साइन इन करें' फ़्लो
इस क्रम के डायग्राम में, स्ट्रीमलाइन लिंकिंग के लिए उपयोगकर्ता, Google, और टोकन एक्सचेंज एंडपॉइंट के बीच होने वाली बातचीत के बारे में बताया गया है.
भूमिकाएं और ज़िम्मेदारियां
यहां दी गई टेबल में, स्ट्रीमलाइन किए गए लिंकिंग फ़्लो में शामिल लोगों की भूमिकाओं और ज़िम्मेदारियों के बारे में बताया गया है.
| कार्रवाई करने वाला व्यक्ति / कॉम्पोनेंट | जीएएल की भूमिका | ज़िम्मेदारियां |
|---|---|---|
| Google ऐप्लिकेशन / सर्वर | OAuth क्लाइंट | यह कुकी, 'Google से साइन इन करें' सुविधा के लिए उपयोगकर्ता की सहमति लेती है. साथ ही, पहचान की पुष्टि करने वाले दावे (JWT) आपके सर्वर को भेजती है और नतीजे के तौर पर मिले टोकन को सुरक्षित तरीके से सेव करती है. |
| आपका टोकन एक्सचेंज एंडपॉइंट | आइडेंटिटी प्रोवाइडर / अनुमति देने वाला सर्वर | यह आइडेंटिटी असर्शन की पुष्टि करता है, मौजूदा खातों की जांच करता है, खाता लिंक करने के इंटेंट (check, get, create) को मैनेज करता है, और अनुरोध किए गए इंटेंट के आधार पर टोकन जारी करता है. |
| Your Service API | संसाधन सर्वर | यह मान्य ऐक्सेस टोकन मिलने पर, उपयोगकर्ता के डेटा का ऐक्सेस देता है. |
आसानी से लिंक करने की सुविधा के लिए ज़रूरी शर्तें
- OAuth के ज़रिए खाते लिंक करने की बुनियादी सुविधा लागू करें. आपकी सेवा में, OAuth 2.0 के साथ काम करने वाले अनुमति और टोकन एक्सचेंज एंडपॉइंट होने चाहिए.
- आपके टोकन एक्सचेंज एंडपॉइंट को JSON Web Token (JWT) असर्शन के साथ काम करना चाहिए. साथ ही, इसे
check,create, औरgetइंटेंट लागू करने चाहिए.
आसानी से खाता जोड़ने की सुविधा देने या न देने के फ़ैसले का आधार
यहां दिए गए लॉजिक से यह तय होता है कि स्ट्रीमलाइन किए गए लिंक करने की सुविधा के दौरान इंटेंट कैसे कॉल किए जाते हैं:
- क्या उपयोगकर्ता का खाता आपके पुष्टि करने वाले सिस्टम में है? (उपयोगकर्ता, हां या नहीं चुनकर फ़ैसला लेता है)
- हां : क्या उपयोगकर्ता, आपके प्लैटफ़ॉर्म में साइन इन करने के लिए, अपने Google खाते से जुड़े ईमेल पते का इस्तेमाल करता है? (उपयोगकर्ता, हां या नहीं चुनकर फ़ैसला लेता है)
- हां : क्या उपयोगकर्ता का खाता, आपके पुष्टि करने वाले सिस्टम में मौजूद है? (पुष्टि करने के लिए,
check intentको कॉल किया जाता है)- हां : अगर इंटेंट का जवाब सही मिलता है, तो
get intentको कॉल किया जाता है और खाते को लिंक कर दिया जाता है. - NO : Create New Account? (उपयोगकर्ता, हां या नहीं चुनकर फ़ैसला लेता है)
- हां :
create intentको कॉल किया जाता है. अगर क्रिएट इंटेंट का जवाब 'सफल' के तौर पर मिलता है, तो खाता लिंक हो जाता है. - नहीं : OAuth लिंकिंग फ़्लो ट्रिगर होता है. उपयोगकर्ता को उसके ब्राउज़र पर रीडायरेक्ट किया जाता है. साथ ही, उसे किसी दूसरे ईमेल से लिंक करने का विकल्प दिया जाता है.
- हां :
- हां : अगर इंटेंट का जवाब सही मिलता है, तो
- नहीं : OAuth लिंकिंग फ़्लो ट्रिगर होता है. उपयोगकर्ता को उसके ब्राउज़र पर रीडायरेक्ट किया जाता है. साथ ही, उसे किसी दूसरे ईमेल से लिंक करने का विकल्प दिया जाता है.
- हां : क्या उपयोगकर्ता का खाता, आपके पुष्टि करने वाले सिस्टम में मौजूद है? (पुष्टि करने के लिए,
- नहीं : क्या उपयोगकर्ता का खाता, पुष्टि करने वाले आपके सिस्टम में मौजूद है? (पुष्टि करने के लिए,
check intentको कॉल किया जाता है)- हां : अगर इंटेंट का जवाब सही मिलता है, तो
get intentको कॉल किया जाता है और खाते को लिंक कर दिया जाता है. - नहीं :
create intentको कॉल किया जाता है. अगर खाता बनाने का अनुरोध पूरा हो जाता है, तो खाता लिंक हो जाता है.
- हां : अगर इंटेंट का जवाब सही मिलता है, तो
- हां : क्या उपयोगकर्ता, आपके प्लैटफ़ॉर्म में साइन इन करने के लिए, अपने Google खाते से जुड़े ईमेल पते का इस्तेमाल करता है? (उपयोगकर्ता, हां या नहीं चुनकर फ़ैसला लेता है)
लागू करने की रेसिपी
स्ट्रीमलाइन लिंकिंग की सुविधा के लिए, आपके टोकन एक्सचेंज एंडपॉइंट में check, get, और create इंटेंट लागू होने चाहिए.
अलग-अलग इंटेंट को हैंडल करने के लिए, यह तरीका अपनाएं:
मौजूदा उपयोगकर्ता खाते की जांच करना (इरादे की जांच करना)
Google, आपके टोकन एक्सचेंज एंडपॉइंट को कॉल करता है. इससे यह पुष्टि की जाती है कि Google उपयोगकर्ता आपके सिस्टम में मौजूद है या नहीं. पैरामीटर के बारे में ज़्यादा जानने के लिए, लिंक करने के इंटेंट को आसान बनाना लेख पढ़ें.
लागू करने की रेसिपी
check इंटेंट को हैंडल करने के लिए, ये कार्रवाइयां करें:
अनुरोध की पुष्टि करें:
client_id,client_secret, औरgrant_typeकी पुष्टि करें. इनकी वैल्यूurn:ietf:params:oauth:grant-type:jwt-bearerहोनी चाहिए.- JWT की पुष्टि करना में दी गई शर्तों का इस्तेमाल करके,
assertion(JWT) की पुष्टि करें.
उपयोगकर्ता को ढूंढना:
- देखें कि JWT में मौजूद Google खाता आईडी (
sub) या ईमेल पता, आपके डेटाबेस में मौजूद किसी उपयोगकर्ता से मेल खाता हो.
- देखें कि JWT में मौजूद Google खाता आईडी (
जवाब:
- अगर मिल जाए, तो
{"account_found": "true"}के साथ एचटीटीपी200 OKदिखाएं. - अगर नहीं मिलता है, तो
{"account_found": "false"}के साथ एचटीटीपी404 Not Foundदिखाएं.
- अगर मिल जाए, तो
लिंक करने की सुविधा को अपने-आप चालू करने की सुविधा को मैनेज करना (इन्टेंट पाना)
अगर खाता मौजूद है, तो Google टोकन पाने के लिए, आपके एंडपॉइंट को intent=get के साथ कॉल करता है. पैरामीटर की ज़्यादा जानकारी के लिए, लिंक करने के इंटेंट को आसान बनाना लेख पढ़ें.
लागू करने की रेसिपी
get इंटेंट को मैनेज करने के लिए, यह तरीका अपनाएं:
अनुरोध की पुष्टि करें:
client_id,client_secret, औरgrant_typeकी पुष्टि करें.assertion(JWT) की पुष्टि करें.
उपयोगकर्ता को ढूंढें:
subयाemailदावे का इस्तेमाल करके, पुष्टि करें कि उपयोगकर्ता मौजूद है.
जवाब दें:
- अगर लिंक करने की सुविधा चालू हो जाती है, तो JSON के जवाब में
access_token,refresh_token, औरexpires_inजनरेट करें और उन्हें वापस भेजें. साथ ही, HTTP200 OKभेजें. - अगर लिंक करने की सुविधा चालू नहीं होती है, तो HTTP
401 Unauthorizedवापस भेजें. साथ ही,{"error": "linking_error"}और OAuth के स्टैंडर्ड तरीके से लिंक करने के लिए,login_hintभेजें.login_hintभेजना ज़रूरी नहीं है.
- अगर लिंक करने की सुविधा चालू हो जाती है, तो JSON के जवाब में
'Google से साइन इन करें' सुविधा का इस्तेमाल करके खाता बनाने की प्रोसेस को मैनेज करना (खाता बनाने का इंटेंट)
अगर कोई खाता मौजूद नहीं है, तो Google आपके एंडपॉइंट को intent=create के साथ कॉल करता है, ताकि नया उपयोगकर्ता बनाया जा सके. पैरामीटर की ज़्यादा जानकारी के लिए, लिंक करने के इंटेंट को आसान बनाना लेख पढ़ें.
इस्तेमाल करने का तरीका
create इंटेंट को मैनेज करने के लिए, यह तरीका अपनाएं:
अनुरोध की पुष्टि करें:
client_id,client_secret, औरgrant_typeकी पुष्टि करें.assertion(JWT) की पुष्टि करें.
इस बात की पुष्टि करें कि उपयोगकर्ता मौजूद नहीं है:
- देखें कि
subयाemailआपके डेटाबेस में पहले से मौजूद है या नहीं. - अगर उपयोगकर्ता मौजूद है, तो OAuth लिंकिंग पर वापस जाने के लिए, HTTP
401 Unauthorizedको{"error": "linking_error", "login_hint": "USER_EMAIL"}के साथ वापस भेजें.
- देखें कि
खाता बनाएं:
- नया उपयोगकर्ता रिकॉर्ड बनाने के लिए, JWT से
sub,email,name, औरpictureके दावे इस्तेमाल करें.
- नया उपयोगकर्ता रिकॉर्ड बनाने के लिए, JWT से
जवाब दें:
- JSON के तौर पर जवाब में टोकन जनरेट करें और उन्हें वापस भेजें (HTTP
200 OK).
- JSON के तौर पर जवाब में टोकन जनरेट करें और उन्हें वापस भेजें (HTTP
अपना Google API क्लाइंट आईडी पाना
खाता लिंक करने की रजिस्ट्रेशन प्रोसेस के दौरान, आपको अपना Google API क्लाइंट आईडी देना होगा. OAuth लिंकिंग के चरणों को पूरा करते समय बनाए गए प्रोजेक्ट का इस्तेमाल करके, अपना एपीआई क्लाइंट आईडी पाने के लिए. ऐसा करने के लिए, यह तरीका अपनाएं:
- क्लाइंट पेज पर जाएं.
Google APIs प्रोजेक्ट बनाएं या कोई मौजूदा प्रोजेक्ट चुनें.
अगर आपके प्रोजेक्ट में वेब ऐप्लिकेशन टाइप के लिए क्लाइंट आईडी नहीं है, तो इसे बनाने के लिए क्लाइंट बनाएं पर क्लिक करें. अनुमति वाले JavaScript ऑरिजिन बॉक्स में, अपनी साइट का डोमेन शामिल करना न भूलें. स्थानीय तौर पर टेस्ट या डेवलपमेंट करते समय, आपको अनुमति वाले JavaScript ऑरिजिन फ़ील्ड में
http://localhostऔरhttp://localhost:<port_number>, दोनों को जोड़ना होगा.
लागू करने की पुष्टि करें
OAuth 2.0 Playground टूल का इस्तेमाल करके, लागू करने की पुष्टि की जा सकती है.
टूल में, यह तरीका अपनाएं:
- OAuth 2.0 कॉन्फ़िगरेशन विंडो खोलने के लिए, कॉन्फ़िगरेशन पर क्लिक करें.
- OAuth फ़्लो फ़ील्ड में, क्लाइंट-साइड चुनें.
- OAuth एंडपॉइंट फ़ील्ड में, कस्टम चुनें.
- अपने OAuth 2.0 एंडपॉइंट और Google को असाइन किया गया क्लाइंट आईडी, उससे जुड़े फ़ील्ड में डालें.
- पहला चरण सेक्शन में, कोई भी Google स्कोप न चुनें. इसके बजाय, इस फ़ील्ड को खाली छोड़ दें या अपने सर्वर के लिए मान्य स्कोप टाइप करें. अगर OAuth स्कोप का इस्तेमाल नहीं किया जाता है, तो कोई भी स्ट्रिंग टाइप करें. जब आपका काम पूरा हो जाए, तो एपीआई को अनुमति दें पर क्लिक करें.
- दूसरे चरण और तीसरे चरण सेक्शन में, OAuth 2.0 फ़्लो देखें. साथ ही, यह पुष्टि करें कि हर चरण उम्मीद के मुताबिक काम कर रहा है.
Google खाता लिंक करने की सुविधा का डेमो टूल का इस्तेमाल करके, लागू की गई सुविधा की पुष्टि की जा सकती है.
टूल में, यह तरीका अपनाएं:
- Google से साइन इन करें बटन पर क्लिक करें.
- वह खाता चुनें जिसे आपको लिंक करना है.
- सेवा आईडी डालें.
- विकल्प के तौर पर, एक या उससे ज़्यादा ऐसे स्कोप डालें जिनके लिए आपको ऐक्सेस का अनुरोध करना है.
- डेमो शुरू करें पर क्लिक करें.
- जब कहा जाए, तब पुष्टि करें कि आपके पास खाते को लिंक करने के अनुरोध को स्वीकार या अस्वीकार करने का विकल्प है.
- पुष्टि करें कि आपको अपने प्लैटफ़ॉर्म पर रीडायरेक्ट किया गया हो.