Association simplifiée avec OAuth et Google Sign-In

Présentation

L'association simplifiée Google Sign-In à Google Sign-In vient compléter l'association OAuth. Les utilisateurs de Google bénéficient ainsi d'une expérience fluide. De plus, ils peuvent créer un compte, ce qui leur permet de créer un compte sur votre service à l'aide de leur compte Google.

Pour effectuer l'association de comptes avec OAuth et Google Sign-In, procédez comme suit:

  1. Tout d'abord, demandez à l'utilisateur d'autoriser l'accès à son profil Google.
  2. Utilisez les informations de leur profil pour vérifier si le compte utilisateur existe.
  3. Pour les utilisateurs existants, associez les comptes.
  4. Si vous ne trouvez pas de correspondance pour l'utilisateur Google dans votre système d'authentification, validez le jeton d'ID envoyé par Google. Vous pouvez ensuite créer un utilisateur à partir des informations de profil contenues dans le jeton d'ID.
Cette figure illustre les étapes à suivre pour associer un compte Google à l'aide du processus simplifié. La première capture d'écran montre comment un utilisateur peut sélectionner votre application pour l'associer. La deuxième capture d'écran permet à l'utilisateur de vérifier s'il possède déjà un compte sur votre service. La troisième capture d'écran permet à l'utilisateur de sélectionner le compte Google qu'il souhaite associer. La quatrième capture d'écran montre la confirmation d'association de son compte Google à votre appli. La cinquième capture d'écran montre un compte utilisateur associé dans l'appli Google.

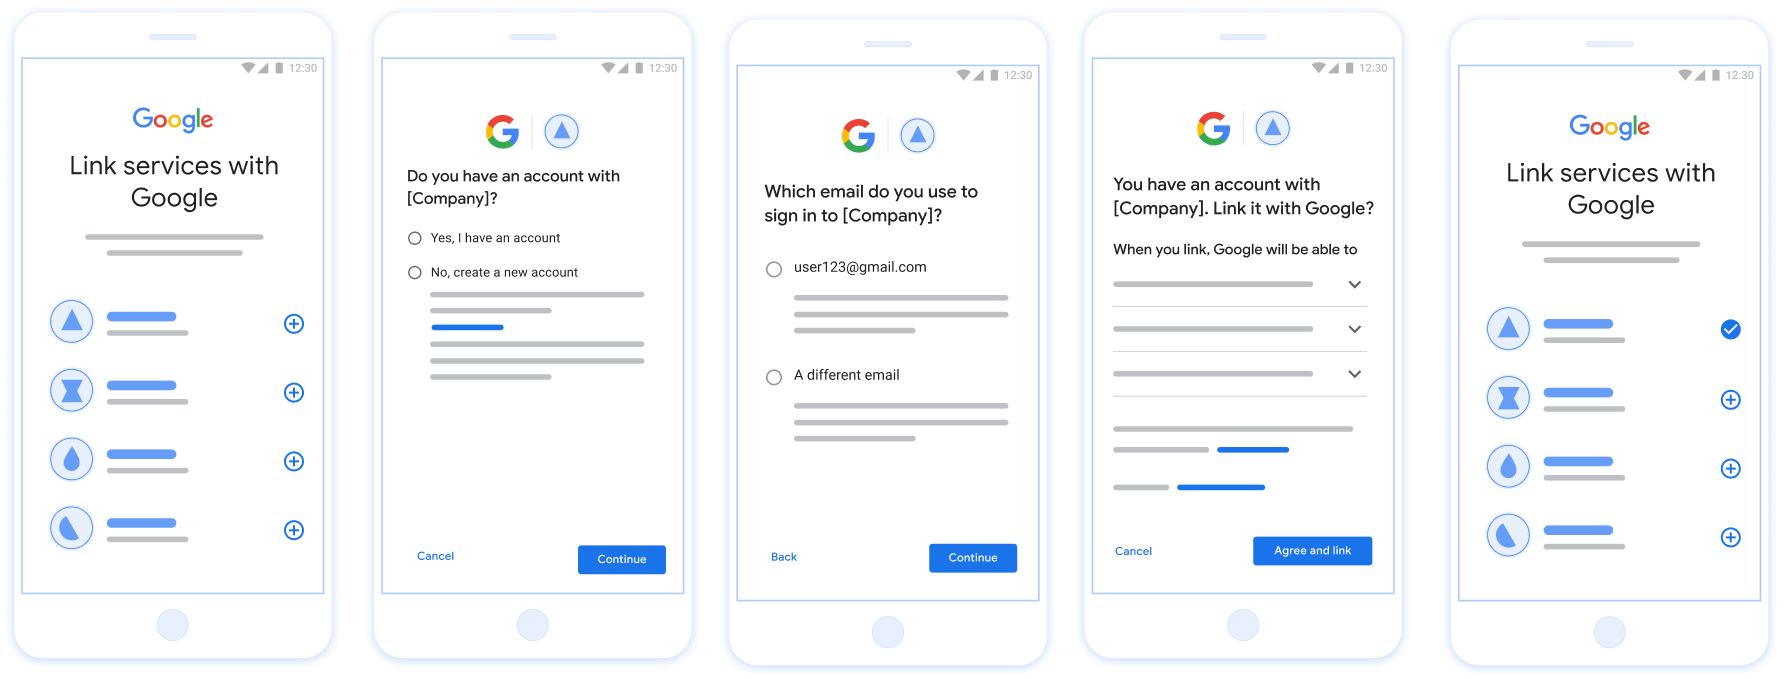
Figure 1 : Association de compte sur le téléphone d'un utilisateur avec l'association simplifiée

Conditions requises pour l'association simplifiée

  • Mettez en œuvre le flux Association de base Web OAuth. Votre service doit être compatible avec les points de terminaison d'autorisation et d'échange de jetons conformes à OAuth 2.0.
  • Votre point de terminaison Token Exchange doit accepter les assertions JSON Web Token (JWT) et implémenter les intents check, create et get.

Implémenter votre serveur OAuth

Votre point de terminaison d'échange de jetons doit accepter les intents check, create et get. Vous trouverez ci-dessous les étapes terminées lors du processus d'association de comptes, ainsi que le moment où les différents intents sont appelés:

  1. L'utilisateur possède-t-il un compte dans votre système d'authentification ? (L'utilisateur décide en sélectionnant "OUI" ou "NON")
    1. OUI : l'utilisateur se sert-il de l'adresse e-mail associée à son compte Google pour se connecter à votre plate-forme ? (L'utilisateur décide en sélectionnant "OUI" ou "NON")
      1. OUI : l'utilisateur a-t-il un compte correspondant dans votre système d'authentification ? (check intent est appelé pour confirmer).
        1. OUI : get intent est appelé et le compte est associé si l'intent get renvoie un résultat positif.
        2. NON : Créer un compte ? (L'utilisateur décide en sélectionnant "OUI" ou "NON")
          1. OUI : la méthode create intent est appelée. Si l'intent de création est bien renvoyé, le compte est associé.
          2. NON : le flux OAuth Web est déclenché, l'utilisateur est dirigé vers son navigateur et il a la possibilité de créer une association à une autre adresse e-mail.
      2. NON : le flux OAuth du Web est déclenché, et l'utilisateur est redirigé vers son navigateur et a la possibilité de créer une association à une autre adresse e-mail.
    2. NON : l'utilisateur dispose-t-il d'un compte correspondant dans votre système d'authentification ? (check intent est appelé pour confirmer).
      1. OUI : get intent est appelé et le compte est associé si l'intent get renvoie un résultat positif.
      2. NON : create intent est appelé et le compte est associé si l'intent de création aboutit.

Check for an existing user account (check intent)

After the user gives consent to access their Google profile, Google sends a request that contains a signed assertion of the Google user's identity. The assertion contains information that includes the user's Google Account ID, name, and email address. The token exchange endpoint configured for your project handles that request.

If the corresponding Google account is already present in your authentication system, your token exchange endpoint responds with account_found=true. If the Google account doesn't match an existing user, your token exchange endpoint returns an HTTP 404 Not Found error with account_found=false.

The request has the following form:

POST /token HTTP/1.1
Host: oauth2.example.com
Content-Type: application/x-www-form-urlencoded

grant_type=urn:ietf:params:oauth:grant-type:jwt-bearer&intent=check&assertion=JWT&scope=SCOPES&client_id=GOOGLE_CLIENT_ID&client_secret=GOOGLE_CLIENT_SECRET

Your token exchange endpoint must be able to handle the following parameters:

Token endpoint parameters
intent For these requests, the value of this parameter is check.
grant_type The type of token being exchanged. For these requests, this parameter has the value urn:ietf:params:oauth:grant-type:jwt-bearer.
assertion A JSON Web Token (JWT) that provides a signed assertion of the Google user's identity. The JWT contains information that includes the user's Google Account ID, name, and email address.
client_id The client ID you assigned to Google.
client_secret The client secret you assigned to Google.

To respond to the check intent requests, your token exchange endpoint must perform the following steps:

  • Validate and decode the JWT assertion.
  • Check if the Google account is already present in your authentication system.
Validate and decode the JWT assertion

You can validate and decode the JWT assertion by using a JWT-decoding library for your language. Use Google's public keys, available in JWK or PEM formats, to verify the token's signature.

When decoded, the JWT assertion looks like the following example:

{
  "sub": "1234567890",      // The unique ID of the user's Google Account
  "iss": "https://accounts.google.com",        // The assertion's issuer
  "aud": "123-abc.apps.googleusercontent.com", // Your server's client ID
  "iat": 233366400,         // Unix timestamp of the assertion's creation time
  "exp": 233370000,         // Unix timestamp of the assertion's expiration time
  "name": "Jan Jansen",
  "given_name": "Jan",
  "family_name": "Jansen",
  "email": "jan@gmail.com", // If present, the user's email address
  "email_verified": true,   // true, if Google has verified the email address
  "hd": "example.com",      // If present, the host domain of the user's GSuite email address
                            // If present, a URL to user's profile picture
  "picture": "https://lh3.googleusercontent.com/a-/AOh14GjlTnZKHAeb94A-FmEbwZv7uJD986VOF1mJGb2YYQ",
  "locale": "en_US"         // User's locale, from browser or phone settings
}

In addition to verifying the token's signature, verify that the assertion's issuer (iss field) is https://accounts.google.com, that the audience (aud field) is your assigned client ID, and that the token has not expired (exp field).

Using the email, email_verified and hd fields you can determine if Google hosts and is authoritative for an email address. In cases where Google is authoritative the user is currently known to be the legitimate account owner and you may skip password or other challenges methods. Otherwise, these methods can be used to verify the account prior to linking.

Cases where Google is authoritative:

  • email has a @gmail.com suffix, this is a Gmail account.
  • email_verified is true and hd is set, this is a G Suite account.

Users may register for Google Accounts without using Gmail or G Suite. When email does not contain a @gmail.com suffix and hd is absent Google is not authoritative and password or other challenge methods are recommended to verify the user. email_verfied can also be true as Google initially verified the user when the Google account was created, however ownership of the third party email account may have since changed.

Check if the Google account is already present in your authentication system

Check whether either of the following conditions are true:

  • The Google Account ID, found in the assertion's sub field, is in your user database.
  • The email address in the assertion matches a user in your user database.

If either condition is true, the user has already signed up. In that case, return a response like the following:

HTTP/1.1 200 Success
Content-Type: application/json;charset=UTF-8

{
  "account_found":"true",
}

If neither the Google Account ID nor the email address specified in the assertion matches a user in your database, the user hasn't signed up yet. In this case, your token exchange endpoint needs to reply with a HTTP 404 error that specifies "account_found": "false", as in the following example:

HTTP/1.1 404 Not found
Content-Type: application/json;charset=UTF-8

{
  "account_found":"false",
}

Handle automatic linking (get intent)

After the user gives consent to access their Google profile, Google sends a request that contains a signed assertion of the Google user's identity. The assertion contains information that includes the user's Google Account ID, name, and email address. The token exchange endpoint configured for your project handles that request.

If the corresponding Google Account is already present in your authentication system, your token exchange endpoint returns a token for the user. If the Google Account doesn't match an existing user, your token exchange endpoint returns a linking_error error and optional login_hint.

The request has the following form:

POST /token HTTP/1.1
Host: oauth2.example.com
Content-Type: application/x-www-form-urlencoded

grant_type=urn:ietf:params:oauth:grant-type:jwt-bearer&intent=get&assertion=JWT&scope=SCOPES&client_id=GOOGLE_CLIENT_ID&client_secret=GOOGLE_CLIENT_SECRET

Your token exchange endpoint must be able to handle the following parameters:

Token endpoint parameters
intent For these requests, the value of this parameter is get.
grant_type The type of token being exchanged. For these requests, this parameter has the value urn:ietf:params:oauth:grant-type:jwt-bearer.
assertion A JSON Web Token (JWT) that provides a signed assertion of the Google user's identity. The JWT contains information that includes the user's Google Account ID, name, and email address.
scope Optional: Any scopes that you've configured Google to request from users.
client_id The client ID you assigned to Google.
client_secret The client secret you assigned to Google.

To respond to the get intent requests, your token exchange endpoint must perform the following steps:

  • Validate and decode the JWT assertion.
  • Check if the Google account is already present in your authentication system.
Validate and decode the JWT assertion

You can validate and decode the JWT assertion by using a JWT-decoding library for your language. Use Google's public keys, available in JWK or PEM formats, to verify the token's signature.

When decoded, the JWT assertion looks like the following example:

{
  "sub": "1234567890",      // The unique ID of the user's Google Account
  "iss": "https://accounts.google.com",        // The assertion's issuer
  "aud": "123-abc.apps.googleusercontent.com", // Your server's client ID
  "iat": 233366400,         // Unix timestamp of the assertion's creation time
  "exp": 233370000,         // Unix timestamp of the assertion's expiration time
  "name": "Jan Jansen",
  "given_name": "Jan",
  "family_name": "Jansen",
  "email": "jan@gmail.com", // If present, the user's email address
  "email_verified": true,   // true, if Google has verified the email address
  "hd": "example.com",      // If present, the host domain of the user's GSuite email address
                            // If present, a URL to user's profile picture
  "picture": "https://lh3.googleusercontent.com/a-/AOh14GjlTnZKHAeb94A-FmEbwZv7uJD986VOF1mJGb2YYQ",
  "locale": "en_US"         // User's locale, from browser or phone settings
}

In addition to verifying the token's signature, verify that the assertion's issuer (iss field) is https://accounts.google.com, that the audience (aud field) is your assigned client ID, and that the token has not expired (exp field).

Using the email, email_verified and hd fields you can determine if Google hosts and is authoritative for an email address. In cases where Google is authoritative the user is currently known to be the legitimate account owner and you may skip password or other challenges methods. Otherwise, these methods can be used to verify the account prior to linking.

Cases where Google is authoritative:

  • email has a @gmail.com suffix, this is a Gmail account.
  • email_verified is true and hd is set, this is a G Suite account.

Users may register for Google Accounts without using Gmail or G Suite. When email does not contain a @gmail.com suffix and hd is absent Google is not authoritative and password or other challenge methods are recommended to verify the user. email_verfied can also be true as Google initially verified the user when the Google account was created, however ownership of the third party email account may have since changed.

Check if the Google account is already present in your authentication system

Check whether either of the following conditions are true:

  • The Google Account ID, found in the assertion's sub field, is in your user database.
  • The email address in the assertion matches a user in your user database.

If an account is found for the user, issue an access token and return the values in a JSON object in the body of your HTTPS response, like in the following example:

{
  "token_type": "Bearer",
  "access_token": "ACCESS_TOKEN",

  "refresh_token": "REFRESH_TOKEN",

  "expires_in": SECONDS_TO_EXPIRATION
}

In some cases, account linking based on ID token might fail for the user. If it does so for any reason, your token exchange endpoint needs to reply with a HTTP 401 error that specifies error=linking_error, as the following example shows:

HTTP/1.1 401 Unauthorized
Content-Type: application/json;charset=UTF-8

{
  "error":"linking_error",
  "login_hint":"foo@bar.com"
}

When Google receives a 401 error response with linking_error, Google sends the user to your authorization endpoint with login_hint as a parameter. The user completes account linking using the OAuth linking flow in their browser.

Gérer la création de compte via Google Sign-In (créer un intent)

Lorsqu'un utilisateur doit créer un compte sur votre service, Google envoie une requête à votre point de terminaison d'échange de jetons qui spécifie intent=create.

La requête se présente comme suit:

POST /token HTTP/1.1
Host: oauth2.example.com
Content-Type: application/x-www-form-urlencoded

response_type=token&grant_type=urn:ietf:params:oauth:grant-type:jwt-bearer&scope=SCOPES&intent=create&assertion=JWT&client_id=GOOGLE_CLIENT_ID&client_secret=GOOGLE_CLIENT_SECRET

Votre point de terminaison d'échange de jetons doit pouvoir gérer les paramètres suivants:

Paramètres du point de terminaison du jeton
intent Pour ces requêtes, la valeur de ce paramètre est create.
grant_type Type de jeton échangé. Pour ces requêtes, ce paramètre a la valeur urn:ietf:params:oauth:grant-type:jwt-bearer.
assertion Jeton Web JSON (JWT, JSON Web Token) qui fournit une assertion signée de l'identité de l'utilisateur Google. Le jeton JWT contient des informations qui incluent l'ID de compte, le nom et l'adresse e-mail du compte Google de l'utilisateur.
client_id ID client que vous avez attribué à Google.
client_secret Code secret du client que vous avez attribué à Google.

Le JWT dans le paramètre assertion contient l'ID de compte, le nom et l'adresse e-mail Google que vous pouvez utiliser pour créer un compte sur votre service.

Pour répondre aux requêtes d'intent create, le point de terminaison de votre échange de jetons doit procéder comme suit:

  • Validez et décodez l'assertion JWT.
  • Validez les informations utilisateur et créez un nouveau compte.
Validate and decode the JWT assertion

You can validate and decode the JWT assertion by using a JWT-decoding library for your language. Use Google's public keys, available in JWK or PEM formats, to verify the token's signature.

When decoded, the JWT assertion looks like the following example:

{
  "sub": "1234567890",      // The unique ID of the user's Google Account
  "iss": "https://accounts.google.com",        // The assertion's issuer
  "aud": "123-abc.apps.googleusercontent.com", // Your server's client ID
  "iat": 233366400,         // Unix timestamp of the assertion's creation time
  "exp": 233370000,         // Unix timestamp of the assertion's expiration time
  "name": "Jan Jansen",
  "given_name": "Jan",
  "family_name": "Jansen",
  "email": "jan@gmail.com", // If present, the user's email address
  "email_verified": true,   // true, if Google has verified the email address
  "hd": "example.com",      // If present, the host domain of the user's GSuite email address
                            // If present, a URL to user's profile picture
  "picture": "https://lh3.googleusercontent.com/a-/AOh14GjlTnZKHAeb94A-FmEbwZv7uJD986VOF1mJGb2YYQ",
  "locale": "en_US"         // User's locale, from browser or phone settings
}

In addition to verifying the token's signature, verify that the assertion's issuer (iss field) is https://accounts.google.com, that the audience (aud field) is your assigned client ID, and that the token has not expired (exp field).

Using the email, email_verified and hd fields you can determine if Google hosts and is authoritative for an email address. In cases where Google is authoritative the user is currently known to be the legitimate account owner and you may skip password or other challenges methods. Otherwise, these methods can be used to verify the account prior to linking.

Cases where Google is authoritative:

  • email has a @gmail.com suffix, this is a Gmail account.
  • email_verified is true and hd is set, this is a G Suite account.

Users may register for Google Accounts without using Gmail or G Suite. When email does not contain a @gmail.com suffix and hd is absent Google is not authoritative and password or other challenge methods are recommended to verify the user. email_verfied can also be true as Google initially verified the user when the Google account was created, however ownership of the third party email account may have since changed.

Valider les informations utilisateur et créer un compte

Vérifiez si l'une des conditions suivantes est remplie:

  • L'ID de compte Google, figurant dans le champ sub des assertions, se trouve dans votre base de données utilisateur.
  • L'adresse e-mail indiquée dans cette assertion correspond à un utilisateur de votre base de données.

Si l'une des deux conditions est remplie, demandez à l'utilisateur d'associer son compte existant à son compte Google. Pour ce faire, répondez à la requête avec une erreur HTTP 401 indiquant error=linking_error et indiquant l'adresse e-mail de l'utilisateur comme login_hint. Voici un exemple de réponse:

HTTP/1.1 401 Unauthorized
Content-Type: application/json;charset=UTF-8

{
  "error":"linking_error",
  "login_hint":"foo@bar.com"
}

Lorsque Google reçoit une réponse d'erreur 401 avec linking_error, il envoie l'utilisateur à votre point de terminaison d'autorisation avec le paramètre login_hint. L'utilisateur effectue l'association de compte à l'aide du flux d'association OAuth dans son navigateur.

Si aucune condition n'est remplie, créez un compte utilisateur avec les informations fournies dans le jeton JWT. Les nouveaux comptes n'ont généralement pas de mot de passe. Nous vous recommandons d'ajouter Google Sign-In à d'autres plates-formes pour permettre aux utilisateurs de se connecter avec Google sur les différentes plates-formes de votre application. Vous pouvez également envoyer à l'utilisateur un lien permettant de lancer la procédure de récupération de mot de passe pour lui permettre de définir un mot de passe pour se connecter sur d'autres plates-formes.

Une fois la création terminée, générez un jeton d'accès et un jeton d'actualisation , puis renvoyez les valeurs dans un objet JSON dans le corps de votre réponse HTTPS, comme dans l'exemple suivant :

{
  "token_type": "Bearer",
  "access_token": "ACCESS_TOKEN",

  "refresh_token": "REFRESH_TOKEN",

  "expires_in": SECONDS_TO_EXPIRATION
}

Obtenir votre ID client pour les API Google

Vous devrez fournir votre ID client pour l'API Google lors du processus d'enregistrement de l'association de comptes.

Pour obtenir votre ID client d'API à l'aide du projet que vous avez créé lors de la procédure d'association OAuth, procédez comme suit : Pour cela, procédez comme suit :

  1. Ouvrez la page Identifiants de la console Google APIs.
  2. Créez ou sélectionnez un projet d'API Google.

    Si votre projet ne dispose pas d'un ID client pour le type d'application Web, cliquez sur Créer des identifiants > ID client OAuth pour en créer un. Veillez à inclure le domaine de votre site dans le champ Origines JavaScript autorisées. Lorsque vous effectuez des tests ou un développement en local, vous devez ajouter http://localhost et http://localhost:<port_number> au champ Origines JavaScript autorisées.

Valider votre intégration

You can validate your implementation by using the OAuth 2.0 Playground tool.

In the tool, do the following steps:

  1. Click Configuration to open the OAuth 2.0 Configuration window.
  2. In the OAuth flow field, select Client-side.
  3. In the OAuth Endpoints field, select Custom.
  4. Specify your OAuth 2.0 endpoint and the client ID you assigned to Google in the corresponding fields.
  5. In the Step 1 section, don't select any Google scopes. Instead, leave this field blank or type a scope valid for your server (or an arbitrary string if you don't use OAuth scopes). When you're done, click Authorize APIs.
  6. In the Step 2 and Step 3 sections, go through the OAuth 2.0 flow and verify that each step works as intended.

You can validate your implementation by using the Google Account Linking Demo tool.

In the tool, do the following steps:

  1. Click the Sign-in with Google button.
  2. Choose the account you'd like to link.
  3. Enter the service ID.
  4. Optionally enter one or more scopes that you will request access for.
  5. Click Start Demo.
  6. When prompted, confirm that you may consent and deny the linking request.
  7. Confirm that you are redirected to your platform.