Panoramica
Il collegamento semplificato di Accedi con Google basato su OAuth aggiunge Accedi con Google al collegamento OAuth. In questo modo, gli utenti Google possono collegare facilmente il proprio Account Google al tuo servizio e creare un nuovo account.
Per eseguire il collegamento dell'account con OAuth e Accedi con Google, segui questi passaggi generali:
- Per prima cosa, chiedi all'utente di dare il consenso per accedere al suo profilo Google.
- Utilizza le informazioni nel profilo per verificare se l'account utente esiste.
- Per gli utenti esistenti, collega gli account.
- Se non riesci a trovare una corrispondenza per l'utente Google nel tuo sistema di autenticazione, convalida il token ID ricevuto da Google. Puoi quindi creare un utente in base alle informazioni del profilo contenute nel token ID.
![Questa figura mostra i passaggi che un utente deve seguire per collegare il proprio Account Google utilizzando il flusso di collegamento semplificato. Il primo screenshot mostra come un utente può selezionare la tua app per il collegamento. Il secondo screenshot consente all'utente di verificare se ha già un account sul tuo servizio. Il terzo screenshot consente all'utente di selezionare l'Account Google a cui vuole collegarsi. Il quarto screenshot mostra la conferma del collegamento dell'Account Google all'app. Il quinto screenshot mostra un account utente collegato correttamente nell'app Google.](https://developers-dot-devsite-v2-prod.appspot.com/static/identity/account-linking/images/streamlined-linking-flow.png?authuser=00&hl=it)
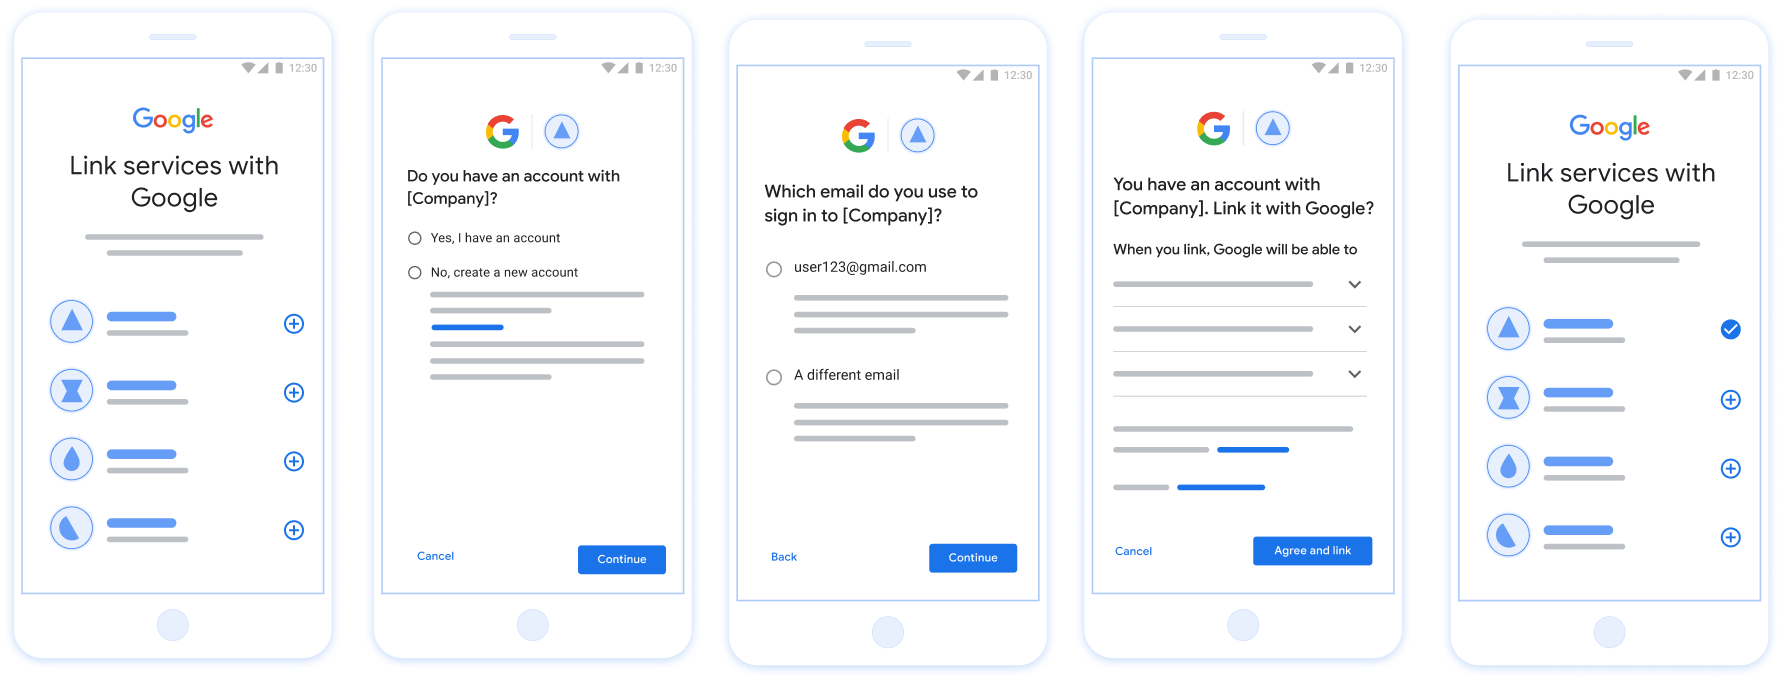
Figura 1. Collegamento dell'account sullo smartphone di un utente con il collegamento semplificato
Requisiti per il collegamento semplificato
- Implementa il flusso di collegamento OAuth web di base. Il servizio deve supportare gli endpoint di autorizzazione e di scambio di token conformi a OAuth 2.0.
- L'endpoint di scambio di token deve supportare le asserzioni JSON Web Token (JWT) e implementare gli intent
check
,create
eget
.
Implementa il server OAuth
L'endpoint di scambio di token deve supportare gli intent check
, create
e get
. Di seguito sono riportati i passaggi completati nel flusso di collegamento dell'account e viene indicato quando vengono chiamati i diversi intent:
- L'utente ha un account nel tuo sistema di autenticazione? (L'utente decide selezionando SÌ o NO)
- SÌ : l'utente utilizza l'indirizzo email associato al suo Account Google per accedere alla tua piattaforma? (L'utente decide selezionando SÌ o NO)
- SÌ : l'utente ha un account corrispondente nel tuo sistema di autenticazione? (viene chiamato
check intent
per conferma)- SÌ : viene chiamato
get intent
e l'account viene collegato se getIntent restituisce un risultato positivo. - NO : Crea nuovo account? (L'utente decide selezionando SÌ o NO)
- SÌ : viene chiamato
create intent
e l'account viene collegato se la chiamata create intent restituisce un risultato positivo. - NO : viene attivato il flusso OAuth web, l'utente viene indirizzato al browser e gli viene offerta la possibilità di eseguire il collegamento con un'email diversa.
- SÌ : viene chiamato
- NO : viene attivato il flusso OAuth web, l'utente viene reindirizzato al browser e gli viene offerta la possibilità di eseguire il collegamento con un'email diversa.
- SÌ : l'utente ha un account corrispondente nel tuo sistema di autenticazione? (viene chiamato
- NO : l'utente ha un account corrispondente nel tuo sistema di autenticazione? (viene chiamato
check intent
per conferma)- SÌ : viene chiamato
get intent
e l'account viene collegato se getIntent restituisce un risultato positivo. - NO :
create intent
viene chiamato e l'account viene collegato se la creazione dell'intent restituisce un risultato positivo.
- SÌ : viene chiamato
- SÌ : l'utente utilizza l'indirizzo email associato al suo Account Google per accedere alla tua piattaforma? (L'utente decide selezionando SÌ o NO)
Check for an existing user account (check intent)
After the user gives consent to access their Google profile, Google sends a request that contains a signed assertion of the Google user's identity. The assertion contains information that includes the user's Google Account ID, name, and email address. The token exchange endpoint configured for your project handles that request.
If the corresponding Google account is already present in your authentication
system, your token exchange endpoint responds with account_found=true
. If the
Google account doesn't match an existing user, your token exchange endpoint
returns an HTTP 404 Not Found error with account_found=false
.
The request has the following form:
POST /token HTTP/1.1 Host: oauth2.example.com Content-Type: application/x-www-form-urlencoded grant_type=urn:ietf:params:oauth:grant-type:jwt-bearer&intent=check&assertion=JWT&scope=SCOPES&client_id=GOOGLE_CLIENT_ID&client_secret=GOOGLE_CLIENT_SECRET
Your token exchange endpoint must be able to handle the following parameters:
Token endpoint parameters | |
---|---|
intent |
For these requests, the value of this parameter is
check . |
grant_type |
The type of token being exchanged. For these requests, this
parameter has the value urn:ietf:params:oauth:grant-type:jwt-bearer . |
assertion |
A JSON Web Token (JWT) that provides a signed assertion of the Google user's identity. The JWT contains information that includes the user's Google Account ID, name, and email address. |
client_id |
The client ID you assigned to Google. |
client_secret |
The client secret you assigned to Google. |
To respond to the check
intent requests, your token exchange endpoint must perform the following steps:
- Validate and decode the JWT assertion.
- Check if the Google account is already present in your authentication system.
Validate and decode the JWT assertion
You can validate and decode the JWT assertion by using a JWT-decoding library for your language. Use Google's public keys, available in JWK or PEM formats, to verify the token's signature.
When decoded, the JWT assertion looks like the following example:
{ "sub": "1234567890", // The unique ID of the user's Google Account "iss": "https://accounts.google.com", // The assertion's issuer "aud": "123-abc.apps.googleusercontent.com", // Your server's client ID "iat": 233366400, // Unix timestamp of the assertion's creation time "exp": 233370000, // Unix timestamp of the assertion's expiration time "name": "Jan Jansen", "given_name": "Jan", "family_name": "Jansen", "email": "jan@gmail.com", // If present, the user's email address "email_verified": true, // true, if Google has verified the email address "hd": "example.com", // If present, the host domain of the user's GSuite email address // If present, a URL to user's profile picture "picture": "https://lh3.googleusercontent.com/a-/AOh14GjlTnZKHAeb94A-FmEbwZv7uJD986VOF1mJGb2YYQ", "locale": "en_US" // User's locale, from browser or phone settings }
In addition to verifying the token's signature, verify that the assertion's
issuer (iss
field) is https://accounts.google.com
, that the audience
(aud
field) is your assigned client ID, and that the token has not expired
(exp
field).
Using the email
, email_verified
and hd
fields you can determine if
Google hosts and is authoritative for an email address. In cases where Google is
authoritative the user is currently known to be the legitimate account owner
and you may skip password or other challenges methods. Otherwise, these methods
can be used to verify the account prior to linking.
Cases where Google is authoritative:
email
has a@gmail.com
suffix, this is a Gmail account.email_verified
is true andhd
is set, this is a G Suite account.
Users may register for Google Accounts without using Gmail or G Suite. When
email
does not contain a @gmail.com
suffix and hd
is absent Google is not
authoritative and password or other challenge methods are recommended to verify
the user. email_verified
can also be true as Google initially verified the
user when the Google account was created, however ownership of the third party
email account may have since changed.
Check if the Google account is already present in your authentication system
Check whether either of the following conditions are true:
- The Google Account ID, found in the assertion's
sub
field, is in your user database. - The email address in the assertion matches a user in your user database.
If either condition is true, the user has already signed up. In that case, return a response like the following:
HTTP/1.1 200 Success Content-Type: application/json;charset=UTF-8 { "account_found":"true", }
If neither the Google Account ID nor the email address specified in the
assertion matches a user in your database, the user hasn't signed up yet. In
this case, your token exchange endpoint needs to reply with a HTTP 404 error
that specifies "account_found": "false"
, as in the following example:
HTTP/1.1 404 Not found Content-Type: application/json;charset=UTF-8 { "account_found":"false", }
Handle automatic linking (get intent)
After the user gives consent to access their Google profile, Google sends a request that contains a signed assertion of the Google user's identity. The assertion contains information that includes the user's Google Account ID, name, and email address. The token exchange endpoint configured for your project handles that request.
If the corresponding Google Account is already present in your authentication
system, your token exchange endpoint returns a token for the user. If the
Google Account doesn't match an existing user, your token exchange endpoint
returns a linking_error
error and optional login_hint
.
The request has the following form:
POST /token HTTP/1.1 Host: oauth2.example.com Content-Type: application/x-www-form-urlencoded grant_type=urn:ietf:params:oauth:grant-type:jwt-bearer&intent=get&assertion=JWT&scope=SCOPES&client_id=GOOGLE_CLIENT_ID&client_secret=GOOGLE_CLIENT_SECRET
Your token exchange endpoint must be able to handle the following parameters:
Token endpoint parameters | |
---|---|
intent |
For these requests, the value of this parameter is get . |
grant_type |
The type of token being exchanged. For these requests, this
parameter has the value urn:ietf:params:oauth:grant-type:jwt-bearer . |
assertion |
A JSON Web Token (JWT) that provides a signed assertion of the Google user's identity. The JWT contains information that includes the user's Google Account ID, name, and email address. |
scope |
Optional: Any scopes that you've configured Google to request from users. |
client_id |
The client ID you assigned to Google. |
client_secret |
The client secret you assigned to Google. |
To respond to the get
intent requests, your token exchange endpoint must perform the following steps:
- Validate and decode the JWT assertion.
- Check if the Google account is already present in your authentication system.
Validate and decode the JWT assertion
You can validate and decode the JWT assertion by using a JWT-decoding library for your language. Use Google's public keys, available in JWK or PEM formats, to verify the token's signature.
When decoded, the JWT assertion looks like the following example:
{ "sub": "1234567890", // The unique ID of the user's Google Account "iss": "https://accounts.google.com", // The assertion's issuer "aud": "123-abc.apps.googleusercontent.com", // Your server's client ID "iat": 233366400, // Unix timestamp of the assertion's creation time "exp": 233370000, // Unix timestamp of the assertion's expiration time "name": "Jan Jansen", "given_name": "Jan", "family_name": "Jansen", "email": "jan@gmail.com", // If present, the user's email address "email_verified": true, // true, if Google has verified the email address "hd": "example.com", // If present, the host domain of the user's GSuite email address // If present, a URL to user's profile picture "picture": "https://lh3.googleusercontent.com/a-/AOh14GjlTnZKHAeb94A-FmEbwZv7uJD986VOF1mJGb2YYQ", "locale": "en_US" // User's locale, from browser or phone settings }
In addition to verifying the token's signature, verify that the assertion's
issuer (iss
field) is https://accounts.google.com
, that the audience
(aud
field) is your assigned client ID, and that the token has not expired
(exp
field).
Using the email
, email_verified
and hd
fields you can determine if
Google hosts and is authoritative for an email address. In cases where Google is
authoritative the user is currently known to be the legitimate account owner
and you may skip password or other challenges methods. Otherwise, these methods
can be used to verify the account prior to linking.
Cases where Google is authoritative:
email
has a@gmail.com
suffix, this is a Gmail account.email_verified
is true andhd
is set, this is a G Suite account.
Users may register for Google Accounts without using Gmail or G Suite. When
email
does not contain a @gmail.com
suffix and hd
is absent Google is not
authoritative and password or other challenge methods are recommended to verify
the user. email_verified
can also be true as Google initially verified the
user when the Google account was created, however ownership of the third party
email account may have since changed.
Check if the Google account is already present in your authentication system
Check whether either of the following conditions are true:
- The Google Account ID, found in the assertion's
sub
field, is in your user database. - The email address in the assertion matches a user in your user database.
If an account is found for the user, issue an access token and return the values in a JSON object in the body of your HTTPS response, like in the following example:
{ "token_type": "Bearer", "access_token": "ACCESS_TOKEN", "refresh_token": "REFRESH_TOKEN", "expires_in": SECONDS_TO_EXPIRATION }
In some cases, account linking based on ID token might fail for the user. If it
does so for any reason, your token exchange endpoint needs to reply with a HTTP
401 error that specifies error=linking_error
, as the following example shows:
HTTP/1.1 401 Unauthorized Content-Type: application/json;charset=UTF-8 { "error":"linking_error", "login_hint":"foo@bar.com" }
When Google receives a 401 error response with linking_error
, Google sends
the user to your authorization endpoint with login_hint
as a parameter. The
user completes account linking using the OAuth linking flow in their browser.
Handle account creation via Google Sign-In (create intent)
When a user needs to create an account on your service, Google makes a request
to your token exchange endpoint that specifies intent=create
.
The request has the following form:
POST /token HTTP/1.1 Host: oauth2.example.com Content-Type: application/x-www-form-urlencoded response_type=token&grant_type=urn:ietf:params:oauth:grant-type:jwt-bearer&scope=SCOPES&intent=create&assertion=JWT&client_id=GOOGLE_CLIENT_ID&client_secret=GOOGLE_CLIENT_SECRET
Your token exchange endpoint must able to handle the following parameters:
Token endpoint parameters | |
---|---|
intent |
For these requests, the value of this parameter is create . |
grant_type |
The type of token being exchanged. For these requests, this
parameter has the value urn:ietf:params:oauth:grant-type:jwt-bearer . |
assertion |
A JSON Web Token (JWT) that provides a signed assertion of the Google user's identity. The JWT contains information that includes the user's Google Account ID, name, and email address. |
client_id |
The client ID you assigned to Google. |
client_secret |
The client secret you assigned to Google. |
The JWT within the assertion
parameter contains the user's Google Account ID,
name, and email address, which you can use to create a new account on your
service.
To respond to the create
intent requests, your token exchange endpoint must perform the following steps:
- Validate and decode the JWT assertion.
- Validate user information and create new account.
Validate and decode the JWT assertion
You can validate and decode the JWT assertion by using a JWT-decoding library for your language. Use Google's public keys, available in JWK or PEM formats, to verify the token's signature.
When decoded, the JWT assertion looks like the following example:
{ "sub": "1234567890", // The unique ID of the user's Google Account "iss": "https://accounts.google.com", // The assertion's issuer "aud": "123-abc.apps.googleusercontent.com", // Your server's client ID "iat": 233366400, // Unix timestamp of the assertion's creation time "exp": 233370000, // Unix timestamp of the assertion's expiration time "name": "Jan Jansen", "given_name": "Jan", "family_name": "Jansen", "email": "jan@gmail.com", // If present, the user's email address "email_verified": true, // true, if Google has verified the email address "hd": "example.com", // If present, the host domain of the user's GSuite email address // If present, a URL to user's profile picture "picture": "https://lh3.googleusercontent.com/a-/AOh14GjlTnZKHAeb94A-FmEbwZv7uJD986VOF1mJGb2YYQ", "locale": "en_US" // User's locale, from browser or phone settings }
In addition to verifying the token's signature, verify that the assertion's
issuer (iss
field) is https://accounts.google.com
, that the audience
(aud
field) is your assigned client ID, and that the token has not expired
(exp
field).
Using the email
, email_verified
and hd
fields you can determine if
Google hosts and is authoritative for an email address. In cases where Google is
authoritative the user is currently known to be the legitimate account owner
and you may skip password or other challenges methods. Otherwise, these methods
can be used to verify the account prior to linking.
Cases where Google is authoritative:
email
has a@gmail.com
suffix, this is a Gmail account.email_verified
is true andhd
is set, this is a G Suite account.
Users may register for Google Accounts without using Gmail or G Suite. When
email
does not contain a @gmail.com
suffix and hd
is absent Google is not
authoritative and password or other challenge methods are recommended to verify
the user. email_verified
can also be true as Google initially verified the
user when the Google account was created, however ownership of the third party
email account may have since changed.
Validate user information and create new account
Check whether either of the following conditions are true:
- The Google Account ID, found in the assertion's
sub
field, is in your user database. - The email address in the assertion matches a user in your user database.
If either condition is true, prompt the user to link their existing account
with their Google Account. To do so, respond to the request with an HTTP 401 error
that specifies error=linking_error
and gives the user's email address as the
login_hint
. The following is a sample response:
HTTP/1.1 401 Unauthorized Content-Type: application/json;charset=UTF-8 { "error":"linking_error", "login_hint":"foo@bar.com" }
When Google receives a 401 error response with linking_error
, Google sends
the user to your authorization endpoint with login_hint
as a parameter. The
user completes account linking using the OAuth linking flow in their browser.
If neither condition is true, create a new user account with the information provided in the JWT. New accounts don't typically have a password set. It's recommended that you add Google Sign-In to other platforms to enable users to log in with Google across the surfaces of your application. Alternatively, you can email the user a link that starts your password recovery flow to allow the user to set a password to sign in on other platforms.
When the creation is completed, issue an access token and return the values in a JSON object in the body of your HTTPS response, like in the following example:
{ "token_type": "Bearer", "access_token": "ACCESS_TOKEN", "refresh_token": "REFRESH_TOKEN", "expires_in": SECONDS_TO_EXPIRATION }
Ottenere l'ID client API di Google
Ti verrà chiesto di fornire il tuo ID client API Google durante la procedura di registrazione del collegamento dell'account.
Per ottenere l'ID client API utilizzando il progetto che hai creato durante la procedura di collegamento OAuth. Per farlo, segui questa procedura.
- Go to the Credentials page.
Crea o seleziona un progetto API di Google.
Se il progetto non ha un ID client per il tipo di applicazione web, fai clic su Crea client per crearne uno. Assicurati di includere il dominio del tuo sito nella casella Origini JavaScript autorizzate. Quando esegui sviluppi o test locali, devi aggiungere sia
http://localhost
chehttp://localhost:<port_number>
al campo Origini JavaScript autorizzate.
Convalidare l'implementazione
You can validate your implementation by using the OAuth 2.0 Playground tool.
In the tool, do the following steps:
- Click Configuration to open the OAuth 2.0 Configuration window.
- In the OAuth flow field, select Client-side.
- In the OAuth Endpoints field, select Custom.
- Specify your OAuth 2.0 endpoint and the client ID you assigned to Google in the corresponding fields.
- In the Step 1 section, don't select any Google scopes. Instead, leave this field blank or type a scope valid for your server (or an arbitrary string if you don't use OAuth scopes). When you're done, click Authorize APIs.
- In the Step 2 and Step 3 sections, go through the OAuth 2.0 flow and verify that each step works as intended.
You can validate your implementation by using the Google Account Linking Demo tool.
In the tool, do the following steps:
- Click the Sign-in with Google button.
- Choose the account you'd like to link.
- Enter the service ID.
- Optionally enter one or more scopes that you will request access for.
- Click Start Demo.
- When prompted, confirm that you may consent and deny the linking request.
- Confirm that you are redirected to your platform.